
Transferring your phone number and data to a new iPhone can seem like a daunting task, but with the right steps, it can be a smooth and seamless process. Whether you’ve upgraded to a shiny new device or simply need to switch to a different iPhone, transferring your phone number and data is essential to ensure uninterrupted communication and access to your important information. In this comprehensive guide, we will walk you through the step-by-step process of transferring your phone number and data to a new iPhone. From backing up your old device to activating your new one, we’ve got you covered. So, let’s dive in and make sure your transition to a new iPhone is as hassle-free as possible.
Inside This Article
- Overview
- Step 1: Backup your old iPhone
- Step 2: Set up your new iPhone
- Step 3: Transfer phone number
- Step 4: Transfer data to new iPhone
- Conclusion
- FAQs
Overview
Are you excited about getting a new iPhone but worried about the hassle of transferring your phone number and data? Worry no more! In this article, we will guide you through the process of seamlessly transferring your phone number and data to your new iPhone. Whether you’re switching carriers or upgrading to a newer iPhone model, we’ve got you covered.
Transferring your phone number is a crucial step as it ensures you can continue making and receiving calls without any interruption. We will show you different methods to transfer your phone number, whether you’re staying with the same carrier or moving to a new one.
But transferring your phone number is only half the battle. Your data, including contacts, photos, apps, and more, also needs to be transferred. We will walk you through the steps of using iCloud and iTunes to transfer all your valuable data to your new iPhone in a matter of minutes.
By following our step-by-step instructions, you can avoid the headache of manually inputting your phone number and painstakingly transferring your data. Instead, you can start enjoying your new iPhone right away, with all your important information readily accessible.
So, let’s get started on this journey to seamlessly transfer your phone number and data to your new iPhone. Get ready to experience the convenience of setting up your new device without losing any valuable information.
Step 1: Backup your old iPhone
Before transferring your phone number and data to your new iPhone, it is crucial to back up your old iPhone to ensure that none of your valuable information gets lost in the process. Follow these steps to create a backup:
1. Connect your old iPhone to a stable Wi-Fi network.
2. Open the Settings app and tap on your name at the top of the screen to access your Apple ID settings.
3. Tap on “iCloud” and then select “iCloud Backup.”
4. Toggle the iCloud Backup switch to “on”.
5. Tap on “Back Up Now” to initiate the backup process.
It is important to remain connected to a Wi-Fi network while the backup is in progress, as it may take some time depending on the amount of data on your device. Once the backup is complete, it’s time to move on to the next step.
Step 2: Set up your new iPhone
Once you have your new iPhone in hand, it’s time to start setting it up. Follow these simple steps to ensure a smooth transition from your old device to the new one.
1. Power on your new iPhone by pressing and holding the power button on the side or top of the device. You’ll see the Apple logo appear on the screen.
2. Select your language and region preferences. The iPhone will prompt you to choose your language and country or region. Make the appropriate selections and tap “Continue.”
3. Connect to Wi-Fi or cellular network. To proceed with the setup, you’ll need an internet connection. Choose your Wi-Fi network or use a cellular connection, if available.
4. Set up Face ID or Touch ID. Depending on the model of your new iPhone, you’ll have the option to set up Face ID or Touch ID for added security. Follow the on-screen instructions to complete the setup process.
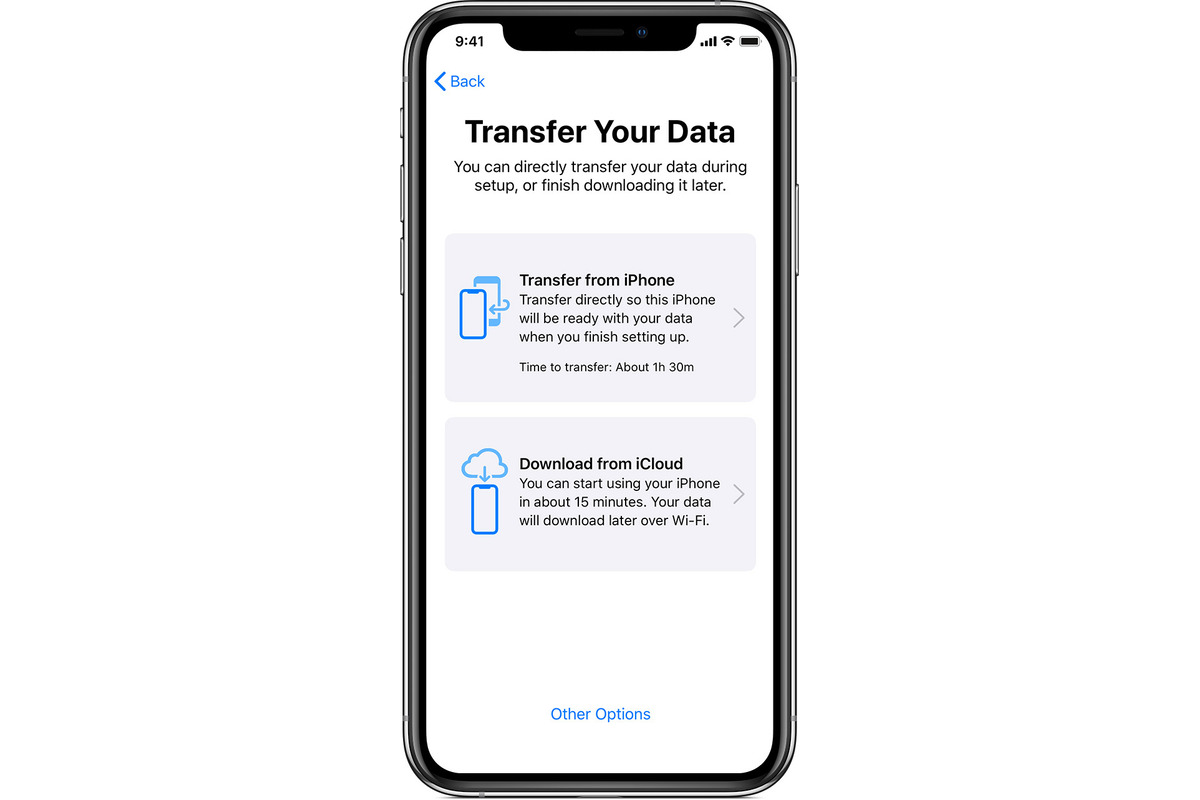
5. Restore from iCloud Backup or set up as new. If you have an iCloud backup of your previous device, you can choose to restore your data during the setup process. Alternatively, you can opt to set up the device as new and manually transfer your data later.
6. Sign in with your Apple ID. Enter your Apple ID and password to sign in to your iTunes and App Store account. This will enable you to download your previously purchased apps and content onto your new iPhone.
7. Agree to the terms and conditions. Read through the terms and conditions presented on the screen and tap “Agree” to proceed with the setup.
8. Choose to enable or disable Siri. Siri is Apple’s virtual assistant that can help you navigate your iPhone and perform tasks with voice commands. Decide whether you want to enable Siri or not.
9. Set up Apple Pay. If you want to use Apple Pay to make secure payments with your iPhone, follow the on-screen instructions to set it up. You’ll need to add your credit or debit card information to use this feature.
10. Customize your settings. At this stage, you can customize various settings on your new iPhone, such as display brightness, wallpaper, and more. Make the selections that suit your preferences.
11. Complete the setup. Once you’ve gone through all the necessary steps and made your desired settings, your new iPhone will be ready to use. You can now start exploring and enjoying your new device.
With these simple steps, you’ll be able to set up your new iPhone quickly and easily. It’s the next step towards enjoying all the features and capabilities of your shiny new device.
Step 3: Transfer phone number
One of the most important aspects of switching to a new iPhone is transferring your phone number. In this step, we will guide you through the process of transferring your phone number to your new device, ensuring that you can make and receive calls seamlessly.
Before you begin, make sure you have the following information handy:
- Your current phone number
- The account information associated with your current phone number
- The ICCID number, also known as the SIM card number, for the new iPhone
Once you have gathered the necessary information, you can proceed with the transfer process:
1. Contact your carrier: Reach out to your mobile network carrier’s customer service and inform them that you would like to transfer your phone number to your new iPhone. They will guide you through the process and provide you with any necessary instructions.
2. Provide required information: During the conversation with your carrier, you will be asked to provide the necessary information, such as your current phone number, account details, and the ICCID number of your new iPhone. Make sure to have all the information readily available to expedite the process.
3. Follow carrier’s instructions: Your carrier will provide specific instructions on how to complete the phone number transfer process. This might involve removing the SIM card from your old iPhone and inserting it into the new one, or activating a new SIM card that comes with the new iPhone. Follow the instructions carefully to ensure a smooth transition.
4. Confirm the transfer: Once all the steps have been completed as per your carrier’s instructions, test your new iPhone by making a test call to ensure that the phone number has been successfully transferred. Also, check if all the necessary services, such as voicemail and messaging, are working properly. If you face any issues, reach out to your carrier for assistance.
By following these steps, you will successfully transfer your phone number to your new iPhone, allowing you to continue using your existing phone number without any interruption. Now that you have taken care of the phone number transfer, it’s time to move on to the next step: transferring data to your new iPhone.
Step 4: Transfer data to new iPhone
Now that you have successfully transferred your phone number to your new iPhone, it’s time to transfer your data. Follow these steps to ensure a smooth transition:
1. Connect your new iPhone to a Wi-Fi network: Before you begin transferring the data, make sure your new iPhone is connected to a stable Wi-Fi network. This will ensure that the transfer process goes smoothly and efficiently.
2. Sign in to your iCloud account: On your new iPhone, go to Settings and tap on your name at the top of the screen. Then, select “iCloud” and sign in with your Apple ID and password. This will allow you to access your iCloud backup.
3. Restore from iCloud Backup: Once you have signed in to your iCloud account, tap on “iCloud Backup” and select “Restore from iCloud Backup.” You will be prompted to choose a backup to restore from. Select the most recent backup that contains your desired data and follow the on-screen instructions to complete the restoration process.
4. Transfer data via iTunes: If you prefer to transfer your data via iTunes, connect your new iPhone to your computer using a USB cable. Launch iTunes and select your device. Click on “Restore Backup” and choose the most recent backup. Click “Restore” and wait for the process to complete.
5. Set up your new iPhone: Once the data transfer is complete, follow the on-screen instructions to set up your new iPhone. This includes choosing your preferred settings, signing in to your Apple ID, and any additional steps required to personalize your device.
6. Verify your data: After setting up your new iPhone, double-check that all your data, such as contacts, photos, messages, and apps, has been successfully transferred. Open the respective apps and ensure that everything is in order.
By following these steps, you can easily transfer your data to your new iPhone and continue using your device without missing a beat. Enjoy your new phone and all the possibilities it has to offer!
Conclusion
Transferring your phone number and data to a new iPhone doesn’t have to be a daunting task. By following the steps and tips outlined in this article, you can seamlessly migrate all your important information and continue using your new device without any disruptions.
Remember to backup your data before initiating the transfer process, whether through iCloud or iTunes. This will ensure that your contacts, messages, apps, and other files are safely stored and can be easily restored on your new iPhone.
Whether you choose to use the Quick Start feature, iTunes, or iCloud, each method offers a convenient way to transfer your phone number and data with just a few simple steps. Just make sure that you have a stable internet connection and enough storage space on both devices to complete the process smoothly.
With these options at your disposal, you can enjoy a seamless transition to your new iPhone, keeping all your important information intact and ready for use.
FAQs
Q: Can I transfer my phone number to a new iPhone?
Yes, you can transfer your phone number to a new iPhone. The process will depend on your carrier, but generally, you can transfer your number by contacting your carrier and providing them with the necessary information. They will guide you through the steps to transfer your number to the new iPhone.
Q: What is the process for transferring data from my old iPhone to a new iPhone?
Transferring data from your old iPhone to a new one is a straightforward process. You can do it through iCloud or by using an iTunes backup. With iCloud, make sure you have an iCloud backup of your old iPhone, and then sign in to your iCloud account on your new iPhone and restore from the backup. For iTunes backup, connect your old iPhone to your computer, create a backup using iTunes, and then connect your new iPhone to the computer and restore from the backup.
Q: What should I do before transferring data to a new iPhone?
Before transferring data to a new iPhone, it is essential to back up your old iPhone to ensure you don’t lose any important information. Create a backup using iCloud or iTunes. It is also advisable to update your old iPhone to the latest iOS version to avoid any compatibility issues during the transfer process. Additionally, make sure both iPhones have enough battery power or are connected to a power source during the transfer.
Q: Can I transfer apps from my old iPhone to a new iPhone?
Yes, you can transfer apps from your old iPhone to a new one. When you restore your new iPhone from an iCloud or iTunes backup, your apps will be automatically downloaded onto your new device. However, please note that not all apps may be transferable, especially if they are no longer available on the App Store or are not compatible with the latest iOS version.
Q: Are there any alternative methods for transferring data to a new iPhone?
Yes, there are alternative methods for transferring data to a new iPhone. One option is to use third-party applications like iMazing or AnyTrans, which offer more flexibility in terms of what data you can transfer and how it is organized. These applications often provide additional features like selective data transfer and even the ability to transfer data between different operating systems, such as from an Android device to an iPhone.