
Screen sharing on an iPhone can be a useful feature when you want to share your screen with others during a video call or presentation. Whether you need to collaborate on a project, showcase a document, or give a live demonstration, knowing how to turn on screen sharing can greatly enhance your ability to communicate and share information. In this article, we will guide you through the process of turning on screen share on your iPhone. We will provide step-by-step instructions and explore different methods depending on your specific needs. With screen sharing capabilities at your fingertips, you can easily engage with others and present your ideas with just a few simple taps on your iPhone!
Inside This Article
- Enabling Screen Share on iPhone
- Update your iPhone
- Connect to a Stable Internet Connection
- Open the Settings app
- Turn on Screen Sharing in the Control Center settings
- Conclusion
- FAQs
Enabling Screen Share on iPhone
Screen sharing on your iPhone can be a useful feature for various purposes, whether it’s for business presentations, sharing content with friends and family, or troubleshooting technical issues. By turning on screen sharing, you can showcase your iPhone’s screen to others in real-time, allowing them to view exactly what you see on your device. In this article, we will guide you through the steps to enable screen sharing on your iPhone.
1. Update Your iPhone
To ensure a smooth and uninterrupted screen sharing experience, it is crucial to have the latest software on your iPhone. Updates often include bug fixes, security enhancements, and performance improvements, which can optimize the screen sharing functionality. You can check for updates by navigating to “Settings” on your iPhone, selecting “General,” and then tapping on “Software Update.” If an update is available, follow the on-screen prompts to download and install it.
2. Connect to a Stable Internet Connection
Screen sharing requires a stable and reliable internet connection to transmit the visuals in real-time. Make sure you are connected to a Wi-Fi network or have a strong cellular data signal before initiating screen sharing. Unstable or slow internet connections can result in lagging or interrupted screen sharing sessions.
3. Open the Settings App
To enable screen sharing on your iPhone, you need to access the settings. Locate the “Settings” app on your home screen, which is represented by a gear icon. Tap on it to open the settings menu.
4. Turn on Screen Sharing in the Control Center Settings
Once you have opened the settings app, scroll down and find the “Control Center” option. Tap on it to access the Control Center settings. In the Control Center settings, you will see a list of various toggle buttons.
Locate the “Screen Recording” option and tap on the green “+” icon beside it. This action will add the screen recording toggle button to your Control Center.
Now, go back to your home screen and swipe down from the top-right corner (on iPhone models with Face ID) or swipe up from the bottom (on iPhone models with Touch ID) to open the Control Center.
In the Control Center, you will see the newly added screen recording button, represented by a circle within a circle icon. Tap on it to initiate screen sharing. A countdown of 3 seconds will appear, indicating that the screen sharing has started.
To stop the screen sharing, simply tap on the red recording indicator at the top of your screen or open the Control Center again and tap on the screen recording button.
That’s it! You have successfully enabled screen sharing on your iPhone. You can now share your screen with others by using the Control Center screen recording button.
Screen sharing can be a valuable tool for collaboration, presentations, troubleshooting, and more. By following these steps, you can easily enable screen sharing on your iPhone and share your device’s screen with others in a seamless and efficient manner.
Update your iPhone
Updating your iPhone to the latest software version is crucial before you can enable the screen share feature. Not only does updating your iPhone provide you with the latest security patches and bug fixes, but it also ensures that you have access to the most up-to-date features and functionality.
To check if there are any available updates, follow these steps:
- Open the Settings app on your iPhone.
- Scroll down and tap on “General”.
- Select “Software Update”.
If an update is available, you will see a notification indicating the availability of the update. Tap on “Download and Install” to begin the update process. Ensure that your iPhone is connected to a stable Wi-Fi network and has sufficient battery life to complete the update smoothly.
Once the update is installed, your iPhone will restart, and you’ll be ready to proceed to the next step in enabling screen share.
Connect to a Stable Internet Connection
The next step in enabling screen share on your iPhone is to connect to a stable internet connection. Screen sharing involves transmitting data and streaming content from your device to another device in real-time. Therefore, having a reliable and fast internet connection is crucial for a smooth and uninterrupted screen sharing experience.
Here are a few tips to ensure a stable internet connection:
- Connect to Wi-Fi: Whenever possible, connect your iPhone to a Wi-Fi network. Wi-Fi offers greater speed and bandwidth compared to cellular data, which can help prevent lagging or buffering during screen sharing sessions.
- Choose a strong Wi-Fi signal: Make sure you are within the range of a strong Wi-Fi signal. Weak signals can result in slower internet speeds and interruptions in screen sharing.
- Avoid network congestion: If you are on a public Wi-Fi network or a network with multiple connected devices, there may be significant network congestion. Try to minimize the number of devices connected to the same network to ensure a smoother screen sharing experience.
- Disable background data usage: Background activities, such as automatic app updates and cloud syncing, can consume a significant portion of your internet bandwidth. It is advisable to disable these activities while engaging in screen sharing to allocate more bandwidth for the screen sharing process.
By following these simple steps, you can ensure a stable and reliable internet connection for screen sharing on your iPhone. Now that you are connected to a stable internet connection, let’s move on to the next step.
Open the Settings app
Once you’ve updated your iPhone and ensured a stable internet connection, it’s time to open the Settings app to enable screen sharing. The Settings app is where you can customize various aspects of your iPhone’s functionality and preferences.
To open the Settings app, locate the icon on your home screen. It resembles a gear or cogwheel. You can typically find it on the first page of your home screen, but if you have rearranged your apps, you may need to swipe left or right to find it.
Once you’ve located the Settings app, simply tap on it to open it. This will launch the Settings menu, where you can access and adjust a wide range of settings related to your iPhone’s software, hardware, and connectivity.
Upon opening the Settings app, you will see a list of different categories or sections displayed on your screen. These sections cover various aspects of your iPhone’s functionality, such as Wi-Fi, Bluetooth, Display & Brightness, and more.
To proceed with enabling screen sharing, you’ll need to navigate to the section of settings that pertains to screen sharing or mirroring. Depending on the version of iOS installed on your iPhone, this section may be labeled differently, but it is typically found under “Control Center” or “Display & Brightness.”
To locate the screen sharing settings, you can either scroll through the list of categories or sections by swiping up or down on your screen, or you can use the search bar at the top of the Settings app. Simply tap on the search bar and type in keywords like “screen sharing,” “mirroring,” or “Control Center” to quickly find the relevant settings.
Once you’ve found the appropriate section, tap on it to access the screen sharing settings. Here, you will have the option to customize and enable screen sharing functionality on your iPhone.
With the Settings app open and the screen sharing settings in view, you’re now ready to move on to the next step of the process: turning on screen sharing in the Control Center settings. This step is crucial for seamlessly sharing your iPhone’s screen with other devices or users.
Turn on Screen Sharing in the Control Center settings
Once you have updated your iPhone and connected to a stable internet connection, the next step is to turn on Screen Sharing in the Control Center settings. Screen Sharing allows you to display your iPhone’s screen on another device or even mirror it on your TV for a better viewing experience.
To turn on Screen Sharing, follow these easy steps:
- Unlock your iPhone and go to the home screen.
- Swipe down from the top-right corner of the screen to open the Control Center.
- Look for the Screen Sharing icon, which resembles two overlapping rectangles.
- If the Screen Sharing icon is not visible, tap on the “Customize Controls” button at the bottom of the Control Center.
- In the “More Controls” section, you should see the Screen Sharing option. Tap on the green “+” button next to it to add it to the Control Center.
- After adding Screen Sharing to the Control Center, go back to the Control Center by swiping down from the top-right corner of the screen.
- Now, you should see the Screen Sharing icon in the Control Center.
With Screen Sharing enabled, you can easily share your iPhone’s screen with other devices simply by tapping on the Screen Sharing icon in the Control Center. This feature comes in handy for various purposes, such as presenting slideshows, demonstrating apps or games, or even providing remote technical support to a friend or family member.
Remember, Screen Sharing works best when both devices are connected to the same Wi-Fi network. It allows you to enjoy a seamless and lag-free screen sharing experience, making it easier to collaborate or share content with others.
So, next time you want to show something on your iPhone’s screen to a larger audience or troubleshoot a problem remotely, don’t forget to turn on Screen Sharing in the Control Center settings. With just a few taps, you can share your screen and enhance your mobile experience.
The ability to turn on screen sharing on your iPhone can be a valuable tool in many situations. Whether you need to collaborate with colleagues, assist a friend or family member, or simply want to share your screen for a better viewing experience, knowing how to enable this feature is essential. By following the steps outlined in this guide, you can easily turn on screen sharing on your iPhone and enjoy the benefits it offers.
Screen sharing allows you to share your iPhone screen with others, providing a visual way to communicate and collaborate. It can be particularly useful in professional settings, allowing you to conduct virtual meetings, presentations, and demonstrations with ease. In personal settings, screen sharing can facilitate remote troubleshooting or provide a more immersive experience when sharing photos or videos with loved ones.
Whether you’re a business professional, a student, or an individual interested in connecting with others, learning how to turn on screen share on your iPhone can enhance your communication capabilities. Stay connected and share your experiences with just a few taps on your screen. So, don’t hesitate to explore this feature and make the most out of your iPhone’s screen sharing capabilities.
FAQs
1. How do I turn on screen share on iPhone?
To turn on screen share on iPhone, follow these steps:
- Open the Control Center by swiping down from the top-right corner of the screen on iPhone X or later models, or swiping up from the bottom of the screen on iPhone 8 or earlier models.
- Tap on the Screen Recording button, which looks like a solid white circle within a larger square.
- A countdown of three seconds will appear, and the status bar at the top of the screen will turn red, indicating that the screen recording has started.
- To stop the screen recording, tap on the red status bar at the top of the screen and choose “Stop Recording” from the menu that appears.
- The recorded screen share will be saved to your Photos app, where you can access and share it as needed.
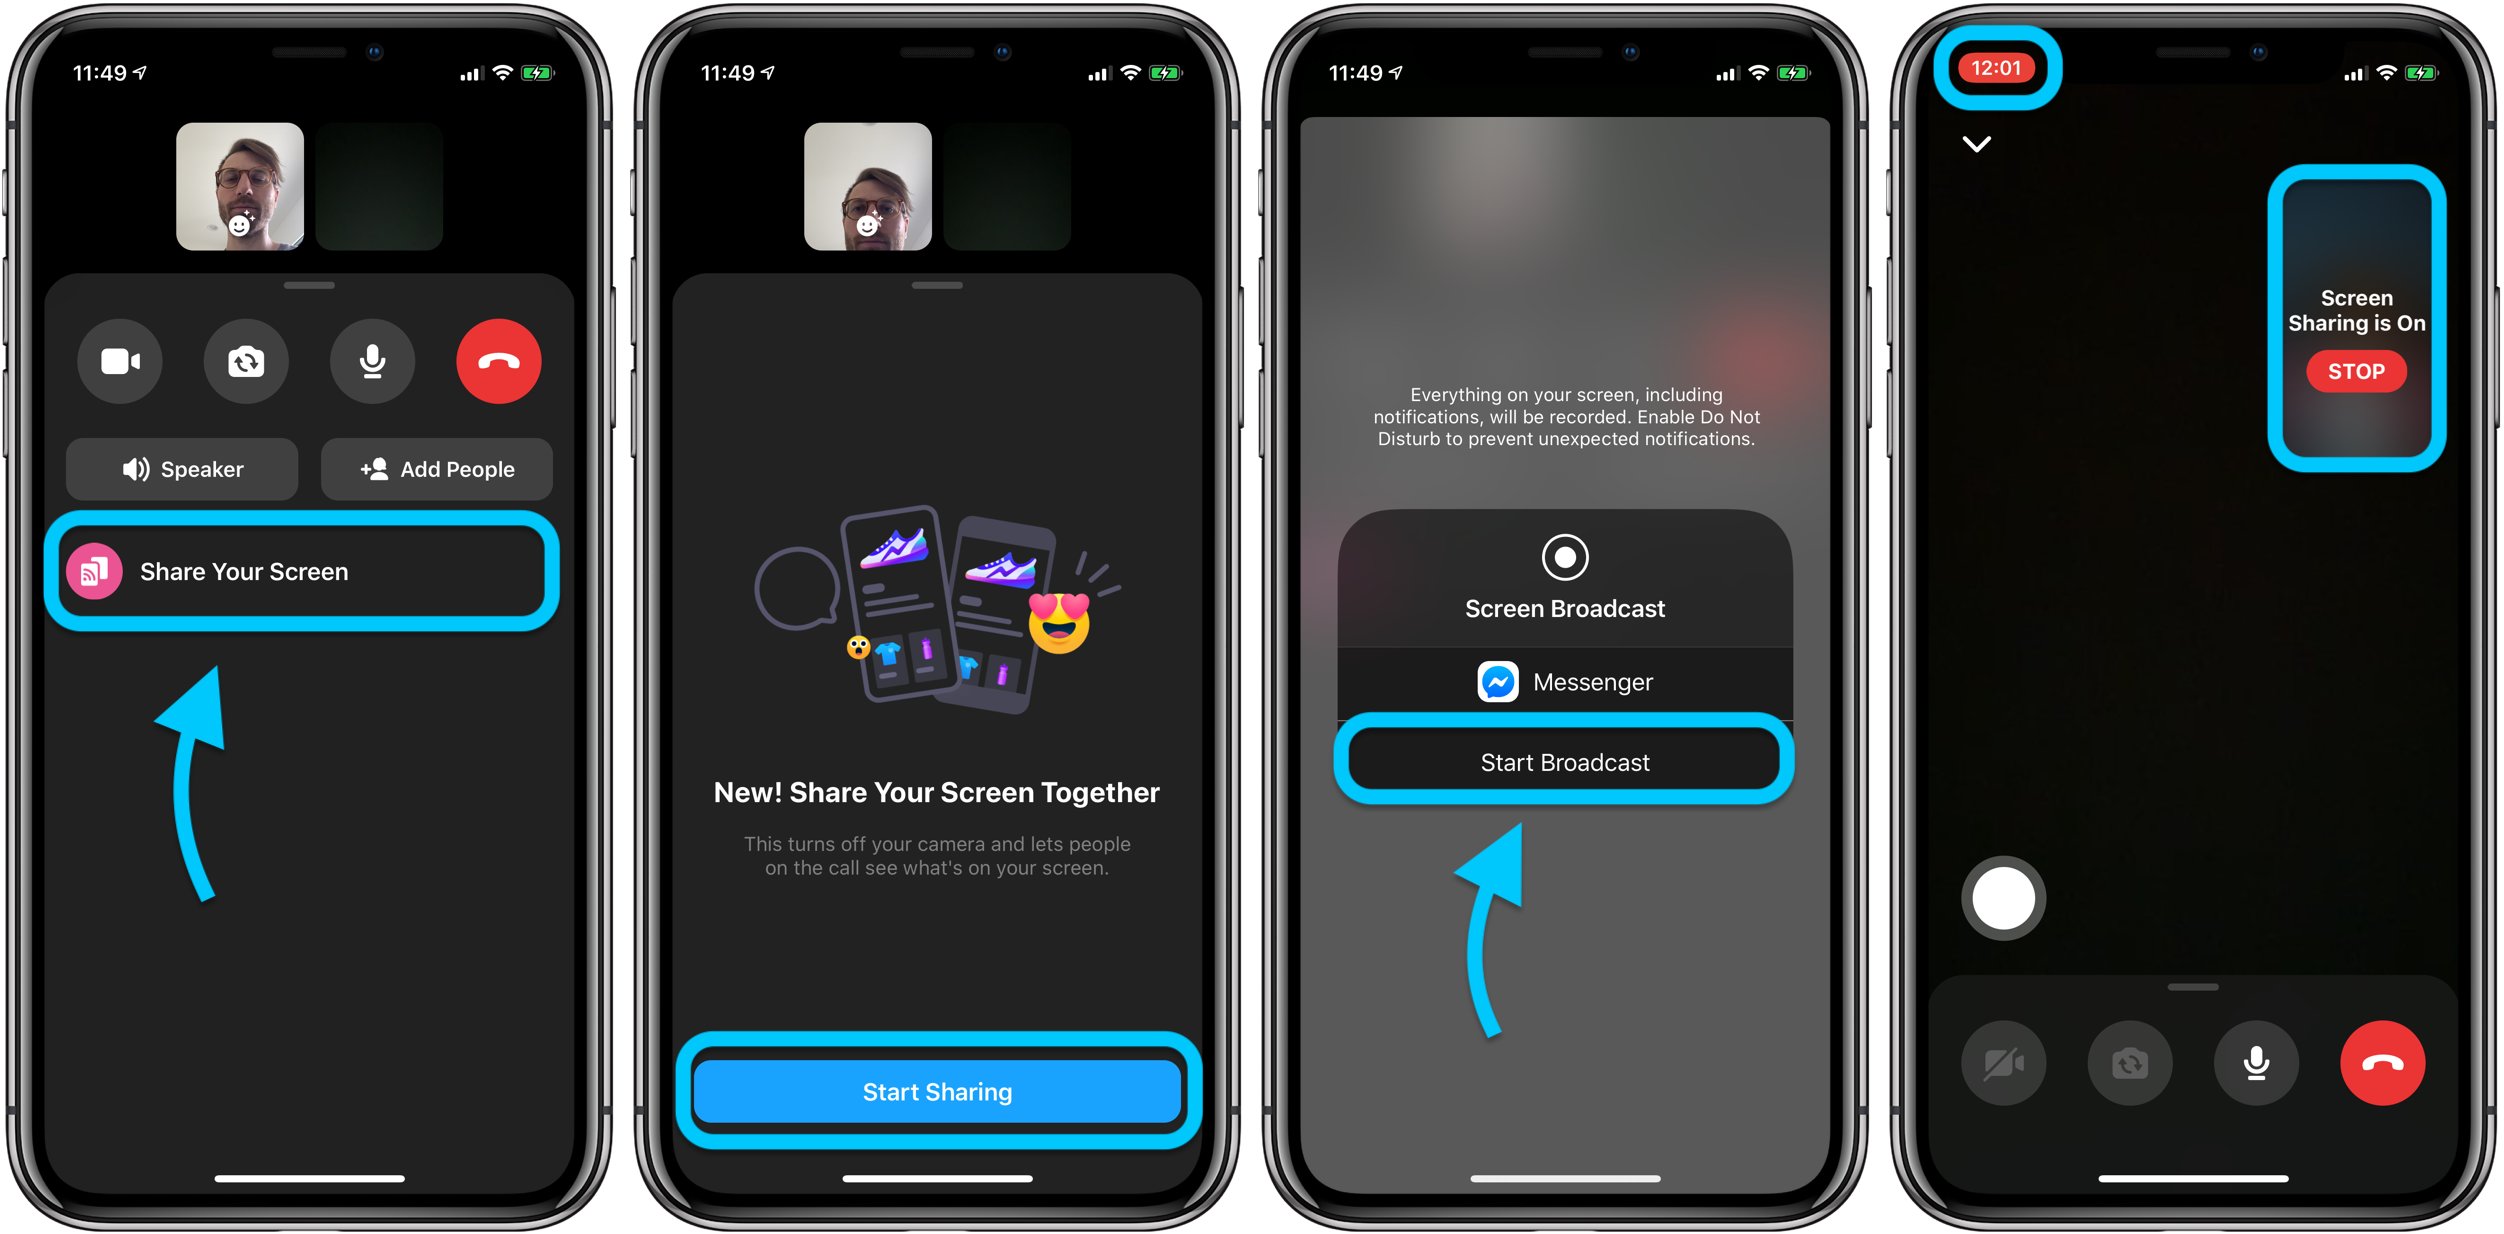
2. Can I screen share on iPhone during a video call?
Yes, you can screen share on iPhone during a video call. However, please note that not all video calling apps support screen sharing. To screen share during a video call, follow these steps:
- Start a video call using your preferred video calling app, such as FaceTime, Skype, or Zoom.
- Once the call is in progress, open the Control Center by swiping down from the top-right corner of the iPhone X or later models, or swiping up from the bottom of the screen on iPhone 8 or earlier models.
- Tap on the Screen Recording button, which looks like a solid white circle within a larger square.
- A countdown of three seconds will appear, and the status bar at the top of the screen will turn red, indicating that the screen recording has started.
- Switch back to the video call, and your screen will be shared with the person on the other end of the call.
- To stop screen sharing, open the Control Center again and tap on the red status bar at the top of the screen, then choose “Stop Recording.”
- You can access and share the recorded screen share from your Photos app.
3. Does screen sharing affect the quality of the call on iPhone?
Screen sharing on iPhone may affect the quality of the call to some extent. When you start screen sharing, the device needs to allocate resources to capture and transmit the content being displayed on the screen. This additional workload can lead to a slight decrease in call quality, such as lower video resolution or occasional audio hiccups. However, the impact on call quality is typically minimal, and it largely depends on the specific device model and the strength of your internet connection.
4. Can I screen share specific apps or documents on iPhone?
Unfortunately, the built-in screen sharing feature on iPhone does not allow you to screen share specific apps or documents selectively. When you initiate screen sharing, it captures and displays everything that is visible on your screen, including notifications, messages, and app content. If you wish to screen share a specific app or document, you might need to explore third-party screen mirroring apps that offer more advanced functionality and allow you to choose which content to share.
5. Is screen sharing on iPhone secure?
Screen sharing on iPhone is generally considered secure. When you enable screen sharing, it only shares the content of your screen with the intended recipient, such as during a video call. However, it is important to ensure that you are using a reputable and secure communication platform or app to conduct your screen sharing activities. Additionally, be cautious while screen sharing sensitive or personal information and make sure to use secure internet connections and update your device’s operating system regularly to patch any known vulnerabilities.