
In today’s fast-paced world, capturing memories through photos has become an integral part of our lives. With the advancements in technology, we are now equipped with smartphones that boast impressive cameras, capable of capturing high-quality images. iPhone, being one of the top players in the mobile phone market, has gained popularity for its exceptional camera features.
However, when it comes to managing and accessing the photos stored on our iPhones, many users find themselves in a bind. Transferring photos from an iPhone to a Macbook can be a daunting task, especially for those who are not tech-savvy. But fear not! In this article, we will guide you through the simple steps to seamlessly upload photos from your iPhone to your Macbook, allowing you to organize, edit, and cherish your precious moments with ease.
Inside This Article
- Method 1: Using AirDrop to transfer photos
- Method 2: Using iCloud Photo Library to sync photos
- Method 3: Using iTunes to import photos
- Method 4: Using the Photos app to import photos
- Conclusion
- FAQs
Method 1: Using AirDrop to transfer photos
AirDrop is a convenient feature available on both iPhones and MacBooks that allows you to wirelessly transfer files between devices. It’s an excellent option for quickly transferring photos from your iPhone to your MacBook without the need for any cables or software.
To use AirDrop, both your iPhone and MacBook should have the feature enabled and be within close proximity to each other. Here’s how you can transfer photos using AirDrop:
- Make sure AirDrop is enabled on your MacBook. To do this, go to the Finder, click on “Go” from the top menu, and select “AirDrop.” Alternatively, you can access AirDrop by opening the Control Center on your MacBook and selecting AirDrop.
- On your iPhone, open the Photos app and navigate to the album containing the photos you want to transfer.
- Select the photos you want to transfer by tapping on the “Select” button located at the top right corner of the screen.
- Once you’ve selected the photos, tap on the share button (the square with the arrow pointing upwards) and look for the AirDrop icon.
- A list of available devices will appear on your iPhone screen. Select your MacBook from the list.
- On your MacBook, a notification will pop up asking if you want to accept the incoming photos. Click on “Accept” to start the transfer.
- After the transfer is complete, you can find the photos in the designated AirDrop folder on your MacBook.
AirDrop provides a seamless and fast way to transfer photos between your iPhone and MacBook. It’s perfect for situations where you want to quickly share or back up your photos without the need for additional cables or software.
Method 2: Using iCloud Photo Library to sync photos
If you’re an Apple user with both an iPhone and a Macbook, syncing your photos through iCloud Photo Library is a convenient and efficient way to keep your photo collection up to date on both devices. With iCloud Photo Library, you can access your entire photo library without taking up valuable storage space on your devices. Here’s how you can easily sync your photos from your iPhone to your Macbook using iCloud Photo Library.
1. Ensure that iCloud Photo Library is enabled on both your iPhone and your Macbook. To do this, go to the Settings app on your iPhone and tap on your Apple ID at the top of the screen. Then, tap on “iCloud” and select “Photos”. Make sure that the “iCloud Photo Library” option is toggled on.
2. Open the Photos app on your Macbook. If you haven’t already signed in with your Apple ID, make sure to do so. You can do this by clicking on “Photos” in the top menu bar and selecting “Preferences”. Then, go to the “iCloud” tab and sign in with your Apple ID.
3. In the Photos app on your Macbook, go to the “Photos” tab in the top left corner. You should see your entire photo library, including the photos synced from your iPhone.
4. If you want to download the photos from your iPhone to your Macbook, simply select the photos you want to download and click on the “Download” button in the toolbar. The selected photos will be downloaded and added to your Macbook’s photo library.
5. Similarly, if you want to upload photos from your Macbook to your iPhone, select the photos you want to upload and click on the “Upload” button in the toolbar. The selected photos will be uploaded to your iCloud Photo Library and synced to your iPhone.
6. Keep in mind that syncing photos through iCloud Photo Library does require an active internet connection. Make sure that both your iPhone and your Macbook are connected to Wi-Fi to ensure successful syncing.
Using iCloud Photo Library eliminates the need for manual transferring or syncing of photos between your devices. It offers a seamless and automatic way to keep your photo collection up to date across all your Apple devices. Give it a try and enjoy the convenience of having your photos readily available on both your iPhone and Macbook.
Method 3: Using iTunes to import photos
If you prefer to have a more systematic way of importing photos from your iPhone to your Macbook, using iTunes is a great option. iTunes allows you to create backups, manage your media files, and sync your photos seamlessly. Follow the steps below to import photos using iTunes:
Step 1: Connect your iPhone to your Macbook using the USB cable that came with your device. Launch iTunes on your Macbook if it doesn’t open automatically.
Step 2: On your Macbook, select your iPhone device that appears on the top-left corner of iTunes.
Step 3: Navigate to the “Photos” tab under your device settings within iTunes.
Step 4: Check the box next to “Sync Photos” and choose the application or folder you want to import the photos to. You can select the “Photos” app or specify a different folder on your Macbook.
Step 5: Select the specific albums or folders you want to import from your iPhone to your Macbook. You can choose to import all photos or select specific albums by checking the corresponding boxes.
Step 6: Click the “Apply” or “Sync” button at the bottom right corner of the iTunes window to start the import process.
Step 7: Wait for the synchronization process to complete. Once finished, you can disconnect your iPhone from your Macbook.
Using iTunes provides you with a convenient way to manage your media files and import photos from your iPhone to your Macbook. It also gives you the option to organize your photos into specific albums or folders, making it easier to locate and access them on your Macbook.
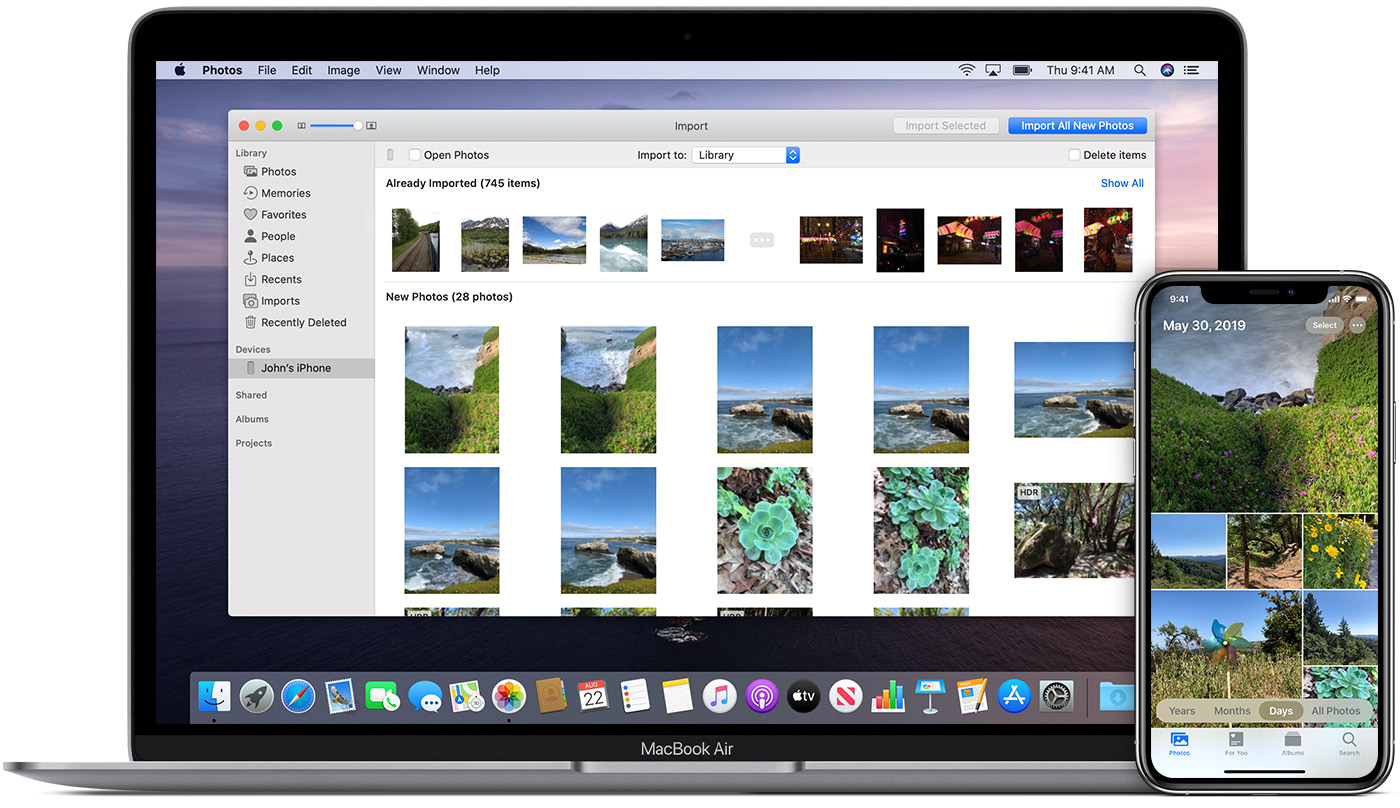
Method 4: Using the Photos app to import photos
If you are looking for a simple and straightforward way to transfer photos from your iPhone to your MacBook, the Photos app is a fantastic option. This native app on both devices allows you to not only import photos but also organize and manage your entire photo library.
Here’s a step-by-step guide on how to use the Photos app to import photos from your iPhone to your MacBook:
- Connect your iPhone to your MacBook using the USB cable that came with your iPhone.
- On your MacBook, open the Photos app. If it doesn’t open automatically, you can find it in your applications.
- In the Photos app, click on the “Import” tab located at the top of the screen. You will see a list of all the photos on your iPhone.
- Choose the photos you want to import. You can either select individual photos or click “Import All New Photos” to import all the latest photos from your iPhone.
- Once you’ve selected the photos, click on the “Import Selected” button. The Photos app will begin importing the photos from your iPhone to your MacBook.
- After the import is complete, you can choose to either keep or delete the photos on your iPhone. If you want to keep them, click on the “Keep” button. If you want to delete them, click on the “Delete” button.
That’s it! The Photos app will take care of the rest, and your photos will be safely imported to your MacBook. You can now access and edit them at your convenience.
The Photos app is not only efficient but also offers additional features such as organizing your photos into albums, creating slideshows, and even editing your photos with a range of editing tools. It provides a seamless experience for managing your photo library across all your Apple devices.
So next time you want to transfer photos from your iPhone to your MacBook, give the Photos app a try. It’s a user-friendly and reliable method to import and organize your precious memories.
Conclusion
Uploading photos from your iPhone to your MacBook is a simple and convenient process. With the various methods available, you can easily transfer your cherished memories to your computer for safekeeping, editing, or sharing with others.
The easiest and most straightforward way is to use the built-in iCloud Photo Library to automatically sync your photos between your iPhone and MacBook. This ensures that your photos are always up to date and accessible on both devices.
If you prefer a more manual approach, you can connect your iPhone to your MacBook with a USB cable and use the Photos app to import your photos directly. This gives you the flexibility to select which photos to transfer and organize them as you like.
For those who want to transfer photos without a cable, AirDrop is a great option. It allows you to wirelessly transfer photos between your iPhone and MacBook, making it quick and convenient.
Regardless of which method you choose, having the ability to transfer photos from your iPhone to your MacBook gives you the freedom to manage and organize your photo library the way you want. So go ahead, start transferring those amazing shots and enjoy the convenience of having your photos accessible on your MacBook.
FAQs
1. Can I upload photos from my iPhone directly to my MacBook?
Yes, you can easily upload photos from your iPhone to your MacBook. There are several methods to do this, including using the USB cable, iCloud Photo Library, or AirDrop. Follow the step-by-step instructions below to learn how to transfer your photos effortlessly.
2. How do I transfer photos from iPhone to MacBook using a USB cable?
To transfer photos from your iPhone to your MacBook using a USB cable, simply follow these steps:
– Connect your iPhone to your MacBook using the USB cable.
– Unlock your iPhone and trust the computer when prompted.
– On your MacBook, the Photos app should automatically open. If it doesn”t, manually open the Photos app.
– In the Photos app, you will see the imported photos from your iPhone. Choose the photos you want to transfer and click on the “Import Selected” button or click on “Import All New Items” to transfer all the photos.
3. How can I use iCloud Photo Library to transfer my iPhone photos to my MacBook?
To use iCloud Photo Library to transfer photos from your iPhone to your MacBook, follow these steps:
– On your iPhone, go to Settings > [your name] > iCloud > Photos and enable iCloud Photo Library.
– On your MacBook, open the Photos app. Check if you are signed in with the same Apple ID that you have on your iPhone. If not, sign in.
– Make sure that iCloud Photo Library is enabled in the Photos app on your MacBook as well.
– Wait for your photos to sync across your devices. Once the sync is complete, all your iPhone photos will be available in the Photos app on your MacBook.
4. How do I transfer photos from iPhone to MacBook using AirDrop?
To transfer photos from your iPhone to your MacBook using AirDrop, follow these steps:
– Ensure that both your iPhone and MacBook have Wi-Fi and Bluetooth enabled.
– On your iPhone, go to the Photos app and select the photos you want to transfer.
– Tap on the Share icon and select the MacBook that appears under the “AirDrop” section.
– On your MacBook, you will receive a notification to accept the photos being sent via AirDrop. Click “Accept” to transfer the photos.
5. Can I transfer photos wirelessly from my iPhone to my MacBook without using iCloud or AirDrop?
Yes, you can transfer photos wirelessly from your iPhone to your MacBook without using iCloud or AirDrop. One such method is to use third-party apps like Google Photos or Dropbox. Install the app on both your iPhone and MacBook, sign in with the same account, and enable the sync feature. Your photos will then be automatically uploaded to the cloud and accessible on your MacBook.