
Welcome to our comprehensive guide on how to upload photos to iCloud and optimize photo storage in 2023. As smartphones continue to evolve and their cameras become more advanced, capturing high-quality photos has become easier than ever. However, with higher resolutions and large file sizes, managing and storing these photos can quickly become a challenge. That’s where iCloud comes in.
iCloud is Apple’s cloud storage service that allows you to securely store your photos, videos, documents, and more. When you enable iCloud Photo Library, it automatically uploads and syncs your photos across all your Apple devices, ensuring that you have access to your precious memories wherever you go.
In this guide, we’ll walk you through the steps to upload photos to iCloud and provide tips on optimizing your photo storage to save space on your devices. Whether you’re a seasoned iPhone user or new to the iOS ecosystem, our tips and tricks will help you make the most of iCloud’s photo storage capabilities.
Inside This Article
- Understanding iCloud Photo Library
- Setting up iCloud Photo Library on your Device
- Uploading Photos to iCloud
- Optimizing Photo Storage on iCloud
- Managing iCloud Storage Space
- Troubleshooting Common Issues
- Conclusion
- FAQs
Understanding iCloud Photo Library
ICloud Photo Library is a feature provided by Apple that allows you to store and access your photos across all your Apple devices seamlessly. It’s a convenient way to keep all your precious memories in one place and ensure they’re backed up and easily accessible. Here’s a closer look at the key features and benefits of iCloud Photo Library.
Secure Storage: With iCloud Photo Library, your photos are securely stored in the cloud, protecting them from accidental loss or damage. Even if you lose your device or it gets damaged, your photos will be safe and can be easily restored on a new device.
Sync Across Devices: When you enable iCloud Photo Library on your iPhone, iPad, or Mac, all your photos and videos are automatically synced across all your devices. This means that if you take a photo on your iPhone, you can view it on your iPad or Mac without having to manually transfer the file.
Optimized Storage: iCloud Photo Library provides an option to optimize storage on your device. This feature automatically manages the storage of your photos and videos, keeping the originals in the cloud while storing optimized versions on your device. This helps save valuable storage space on your device without compromising on image quality.
Shared Albums: With iCloud Photo Library, you can create shared albums and invite friends and family to contribute their own photos and videos. This is a great way to collaborate on photo albums and create shared memories with your loved ones.
Intelligent Organization: iCloud Photo Library intelligently organizes your photos based on time, location, and facial recognition. This makes it easier to find specific photos or create meaningful albums based on specific events or people.
Easy Access: With iCloud Photo Library, you can access your photos from any device with an internet connection. Whether you’re using your iPhone, iPad, Mac, or even a PC through the iCloud website, your entire photo library is just a few clicks away.
Overall, iCloud Photo Library is a powerful tool that simplifies photo management and ensures your memories are safely stored and accessible across all your Apple devices. Whether it’s for personal use or sharing with loved ones, iCloud Photo Library is a valuable feature for any iPhone or Mac user.
Setting up iCloud Photo Library on your Device
Setting up iCloud Photo Library on your device is a simple and straightforward process. By enabling this feature, you can seamlessly sync and access your photos across all your Apple devices. Follow the steps below to set up iCloud Photo Library:
Step 1: Update your iOS or macOS
Before you can set up iCloud Photo Library, make sure you have the latest version of iOS on your iPhone or iPad, or the latest version of macOS on your Mac. Updating your device’s software will ensure that you have access to all the latest features and improvements.
Step 2: Sign in to your iCloud account
On your device, go to the Settings app and tap on your name at the top. Then, select iCloud and enter your Apple ID and password to sign in to your iCloud account. If you don’t have an Apple ID, you can create one by tapping on “Don’t have an Apple ID or forgot it?” and following the prompts.
Step 3: Enable iCloud Photo Library
Once signed in, scroll down and tap on “Photos” within the iCloud settings. Here, you will see the option to enable iCloud Photo Library. Toggle the switch to the right to turn on the feature. You may also choose to enable “Upload to My Photo Stream” to automatically upload recently taken photos to your other devices.
Step 4: Select your storage plan
Depending on your iCloud storage needs, you may need to upgrade to a higher storage plan. By default, Apple offers 5GB of free iCloud storage, which may not be sufficient for storing all your photos. To select a new storage plan, tap on “Manage Storage” and choose the plan that best suits your needs.
Step 5: Wait for photos to upload
Once you have enabled iCloud Photo Library, your device will start uploading your photos to the cloud. The time it takes to upload depends on the number of photos and the speed of your internet connection. You’ll be able to monitor the progress of the upload by going to the Photos app and checking the “Uploads” tab.
Step 6: Access your photos on other devices
Once your photos are uploaded to iCloud, you can access them on your other Apple devices. Whether it’s your iPhone, iPad, or Mac, simply open the Photos app and your entire photo library will be available for viewing and editing. Any changes you make to your photos, such as edits or deletions, will sync across all your devices with iCloud Photo Library enabled.
By following these steps, you can easily set up iCloud Photo Library on your device and enjoy the convenience of accessing your photos from any of your Apple devices seamlessly. Remember to keep an eye on your iCloud storage to ensure you have enough space for all your precious memories.
Uploading Photos to iCloud
Uploading your photos to iCloud is a straightforward process that allows you to safely store and access your images across all your Apple devices. Whether you want to back up your precious memories or free up space on your device, iCloud provides a convenient and secure solution.
Here’s a step-by-step guide on how to upload photos to iCloud:
- Ensure that you have an iCloud account set up on your device. If not, go to Settings, tap on your name, and select iCloud. Then, sign in or create a new iCloud account.
- On your iPhone or iPad, open the Photos app and select the photo(s) you wish to upload. To select multiple photos, tap on the Select button and choose the desired images.
- Once you’ve selected your photos, tap on the Share button, represented by a square with an upward arrow.
- From the share options, select the option that says “Add to iCloud Photos” or “Save to Files” and choose the desired album or folder where you want to upload the photos.
- The selected photos will begin uploading to your iCloud account. The progress can be monitored through the Photos app or by checking the iCloud Drive app on your device.
- Ensure that your device is connected to a stable internet connection throughout the uploading process for a smooth and uninterrupted experience.
Once the upload is complete, the photos will be available in the designated album or folder within iCloud. You can access them on any of your Apple devices that are linked to the same iCloud account.
It’s important to note that the upload speed may vary depending on the size and number of photos being uploaded, as well as the speed of your internet connection. Large files or a slow network can lead to longer upload times.
Additionally, remember that uploading photos to iCloud counts against your allocated iCloud storage space. If you find yourself running low on storage, consider optimizing your photo storage to save space without compromising your precious memories.
Optimizing Photo Storage on iCloud
If you’re an iPhone user, chances are you’ve taken numerous photos with your device. Over time, these photos can take up a significant amount of storage space on your iPhone. Fortunately, iCloud offers a solution to this problem by providing the option to optimize photo storage. This allows you to store your photos in the cloud while saving precious space on your device.
Optimizing photo storage on iCloud is a straightforward process that can be done in a few simple steps. Let’s walk through how to optimize your photo storage on iCloud:
Step 1: Enable iCloud Photo Library
The first step is to ensure that iCloud Photo Library is enabled on your device. To do this, go to Settings on your iPhone, tap on your name at the top of the screen, and then select iCloud. From there, scroll down and tap on Photos. Toggle on the switch next to iCloud Photo Library to enable it.
Step 2: Choose Optimized Storage
Once iCloud Photo Library is enabled, you have the option to optimize your photo storage. Go back to the Photos settings and tap on the “Optimize iPhone Storage” option. This will allow your iPhone to automatically manage your photo storage by storing full-resolution photos in iCloud while keeping smaller, optimized versions on your device.
Step 3: Keep an Eye on Storage Usage
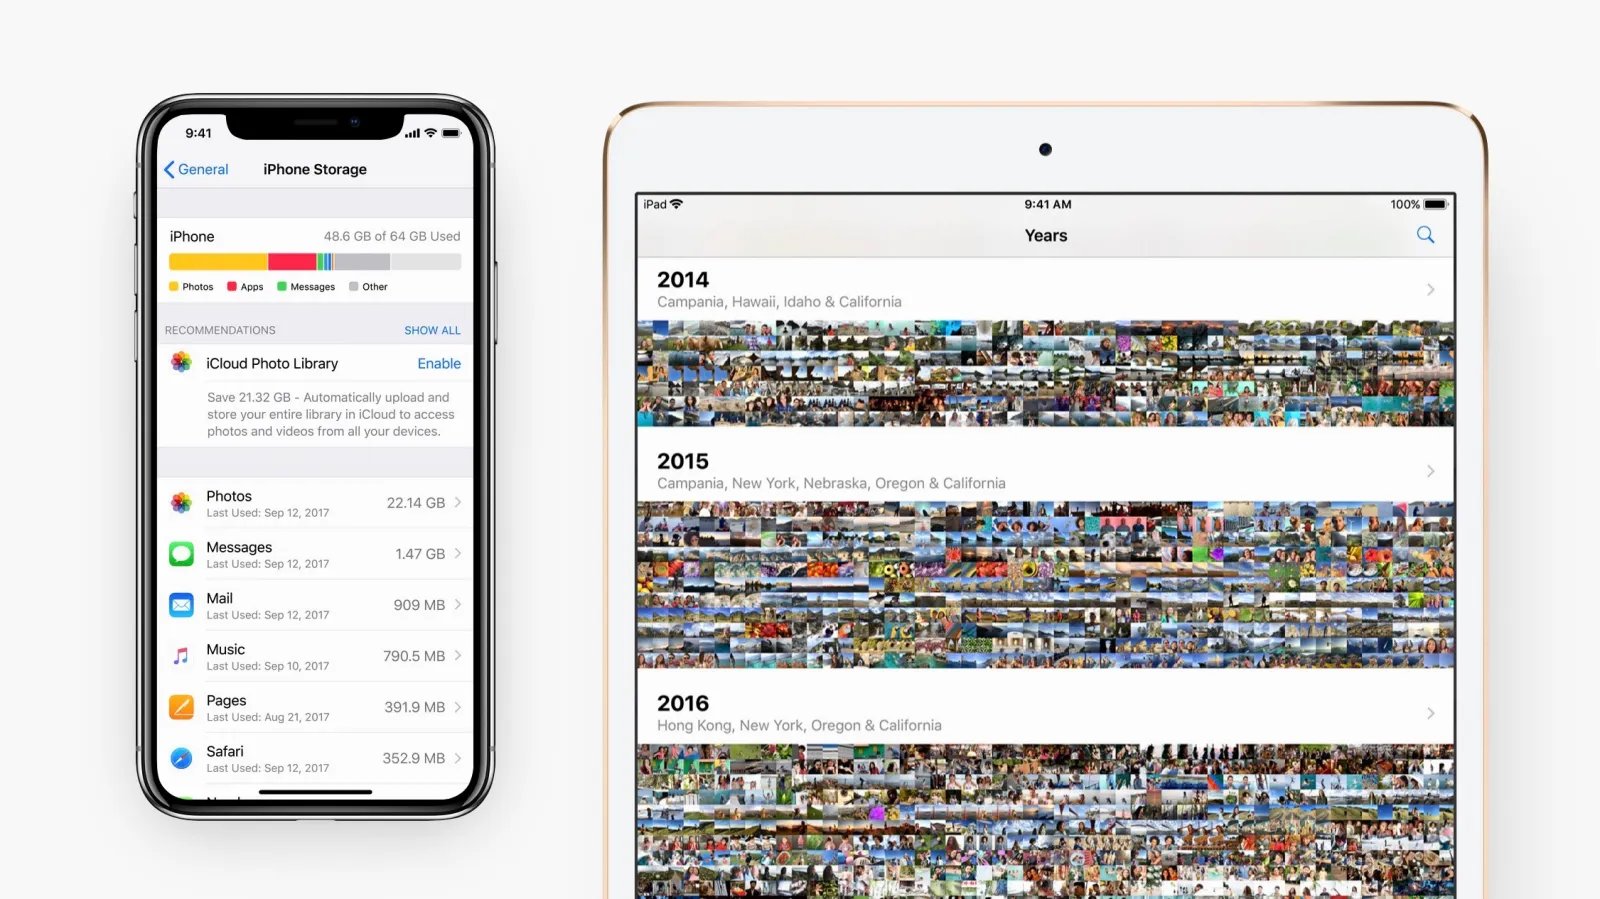
After enabling optimized storage, it’s a good idea to keep an eye on your device’s storage usage. You can do this by going to Settings, tapping on General, and selecting iPhone Storage. Here, you’ll see a breakdown of how your storage is being used, including the space occupied by photos and videos.
Step 4: Adjust Settings if Needed
If you find that your device’s storage is still being filled up, you may need to adjust your photo storage settings further. You can go back to the Photos settings and choose other options like “Download and Keep Originals” or “Optimize Storage.” These options give you more control over how your photos are stored on iCloud and your device.
Step 5: Delete Unnecessary Photos
Lastly, it’s a good practice to regularly delete unnecessary photos from your device. As you optimize your photo storage on iCloud, you can confidently remove photos from your device knowing that they are safely backed up in the cloud. This will free up additional space and help keep your device running smoothly.
By following these steps, you can effectively optimize your photo storage on iCloud, freeing up space on your device while still having access to all your precious memories whenever you need them. So, take advantage of iCloud’s photo storage capabilities and enjoy capturing countless moments without worrying about storage limitations!
Managing iCloud Storage Space
As you continue to upload photos to iCloud, it’s important to keep an eye on your iCloud storage space. Here are some tips on how to manage your iCloud storage effectively:
1. Check your current storage usage: To see how much storage space you’re using on iCloud, go to Settings on your iPhone or iPad, tap on your name at the top, then select “iCloud” and “Manage Storage.” This will provide you with a breakdown of your iCloud storage usage.
2. Review and delete unnecessary files: Take some time to go through your iCloud storage and identify any files or photos that you no longer need. Delete them to free up space. You can do this by tapping on individual files or selecting multiple files to delete at once.
3. Enable iCloud Photo Library optimization: If you have iCloud Photo Library enabled, you can optimize your photo storage to save space. This feature automatically stores your original, full-resolution photos in iCloud while keeping smaller, optimized versions on your device.
4. Use iCloud Drive wisely: Evaluate the files you have stored in iCloud Drive. Consider removing any large files or folders that you no longer need. You can do this by opening the Files app on your device and navigating to the iCloud Drive section.
5. Delete old backups: If you have multiple devices linked to your iCloud account, check the backups stored in iCloud. Delete any old or unnecessary backups to free up storage space. Go to Settings, tap on your name, select “iCloud,” then “Manage Storage,” and finally “Backups.”
6. Purchase additional iCloud storage: If you find yourself running out of iCloud storage frequently, you have the option to upgrade your storage plan. Apple offers various storage plans at affordable prices, giving you more space to store your photos, videos, and files.
7. Offload unused apps: Another way to manage iCloud storage is by offloading unused apps. When you offload an app, it removes the app from your device but keeps the data and documents stored in iCloud. This can help free up valuable storage space.
8. Optimize your device storage: If you’re using an iPhone or iPad with limited storage capacity, consider enabling the “Optimize Storage” option. This feature automatically removes downloaded music and TV episodes that you haven’t listened to or watched in a while, freeing up space on your device.
9. Regularly review your storage: Make it a habit to check your iCloud storage regularly. This ensures that you’re aware of how much space you’re using and allows you to take necessary actions to manage and optimize your storage effectively.
By following these tips, you can ensure that your iCloud storage space is well-managed, allowing you to store your valuable photos and files while avoiding any storage issues.
Troubleshooting Common Issues
While using iCloud Photo Library, you may encounter some common issues. Don’t worry, we’ve got you covered! Here are some troubleshooting tips to help you resolve any problems you may come across:
1. Syncing Issues: If you notice that your photos are not syncing properly across your devices, ensure that you have a stable internet connection. Additionally, check your device settings to make sure iCloud Photo Library is enabled and syncing is turned on. You can also try restarting your devices to refresh the sync process.
2. Storage Space: If you receive notifications indicating that your iCloud storage is full, you may need to manage your storage space. Delete any unnecessary photos or videos, or consider upgrading your iCloud storage plan to accommodate your growing library.
3. Missing Photos: If you find that some of your photos are missing from iCloud Photo Library, check if you have accidentally deleted them. Deleted photos are moved to the “Recently Deleted” album, where they are stored for 30 days before being permanently deleted. Recover any deleted photos from this album within the designated time frame.
4. Library Not Updating: If you add new photos to your device but they don’t appear in the iCloud Photo Library, try signing out and back into iCloud on your device. This can help refresh the library and ensure that all new photos are included in the sync process.
5. Slow Photo Upload: If you notice that your photos are taking a long time to upload to iCloud, check your internet connection speed. Slow internet speeds can significantly impact the upload process. Close any unnecessary apps or downloads that may be consuming bandwidth to speed up the upload.
6. Disabled iCloud Photo Library: If you cannot find the iCloud Photo Library option in your device settings, make sure that you are signed in to iCloud with the same Apple ID across all your devices. If the issue persists, contact Apple Support for further assistance.
7. Recovery Issues: If you have accidentally deleted photos from your iCloud Photo Library and cannot recover them from the “Recently Deleted” album, you may need to restore from a previous iCloud backup. However, be aware that this will replace all existing data on your device with the backup data.
Remember, if you encounter any other issues with iCloud Photo Library that are not covered here, refer to Apple’s official support documentation or contact their support team for assistance. They will be able to provide you with specific troubleshooting steps tailored to your situation.
By following these troubleshooting tips, you can resolve common issues with iCloud Photo Library and continue enjoying the convenience and benefits of storing your photos securely in the cloud.
Conclusion
In conclusion, uploading photos to iCloud and optimizing photo storage is an essential task for anyone looking to securely store and access their memories. With the convenience and reliability of iCloud, you can easily upload and sync your photos across all your Apple devices, ensuring that your precious moments are always at your fingertips.
By following the steps outlined in this guide, you can effortlessly upload your photos to iCloud, take advantage of the optimize storage feature, and free up valuable space on your devices without losing access to your pictures.
Remember to regularly back up your photos and ensure that you have enough storage space in your iCloud account to accommodate your needs. With iCloud’s seamless integration and advanced features, preserving and organizing your photo library has never been easier.
So, why wait? Start uploading your photos to iCloud today and enjoy the peace of mind that comes with having your cherished memories safe and accessible whenever you need them.
Below are some frequently asked questions about uploading photos to iCloud and optimizing photo storage:
FAQs
Q: What is iCloud and how does it relate to photo storage?
A: iCloud is a cloud storage service provided by Apple. It allows users to store files, including photos, in the cloud and access them from various devices. This means that when you upload your photos to iCloud, you can free up storage space on your device while still being able to view and download your photos when needed.
Q: How do I upload photos to iCloud?
A: To upload photos to iCloud, you can follow these steps:
1. On your iPhone or iPad, go to Settings and tap on your Apple ID.
2. Tap on iCloud and then on Photos.
3. Toggle on the “iCloud Photos” option.
4. Your device will start uploading your photos to iCloud. Make sure you have a stable internet connection and enough iCloud storage available.
Q: Can I upload photos to iCloud from my Android device?
A: By default, iCloud is designed to work with Apple devices. However, you can still access your iCloud photos from an Android device by using the iCloud.com website. Simply open a web browser on your Android device, visit iCloud.com, and sign in with your Apple ID. From there, you can access and download your iCloud photos.
Q: Does uploading photos to iCloud affect their quality?
A: When you upload photos to iCloud, they are stored in their original resolution and quality. This means that the photos will not lose any quality during the upload process. However, if you have the “Optimize iPhone Storage” option enabled, iCloud may automatically reduce the file size of your photos on your device to save storage space. The full-resolution version of the photo will still be available in iCloud, and you can download it whenever you need it.
Q: How much iCloud storage do I need for my photos?
A: The amount of iCloud storage you need for your photos depends on the size and number of photos you have. Apple offers various iCloud storage plans, ranging from 5GB to 2TB. If you have a large photo library or plan to store other files in iCloud, you may need to consider a higher storage plan. You can check your current storage usage and upgrade your iCloud storage plan in the iCloud settings on your device.