
Welcome to 2023, where technology continues to evolve at an astounding pace. One of the most significant advancements in the past decade has been the integrated cloud storage systems, such as iCloud, that have transformed the way we manage our data. As an iPhone user, you may have experienced the frustration of accidentally deleting important notes from your device. Fortunately, iCloud offers a solution to this predicament by allowing you to restore your notes. In this article, we will guide you through the process of restoring notes from iCloud, ensuring that you never have to bid farewell to your valuable information again. So, let’s dive in and discover the simple yet effective steps to retrieve your cherished notes from the virtual realm of iCloud!
Inside This Article
- Retrieving Notes from iCloud
- Restoring Notes from iCloud on iOS
- Restoring Notes from iCloud on macOS
- Conclusion
- FAQs
Retrieving Notes from iCloud
When it comes to retrieving your important notes, having a reliable backup is crucial. Fortunately, iCloud offers a seamless way to store and sync your notes across all your Apple devices. Whether you accidentally deleted a note or lost it due to a device malfunction, you can easily restore your notes from iCloud and get back on track. In this article, we’ll guide you through the process of retrieving your notes from iCloud on both iOS and macOS devices.
Before we delve into the steps, it’s important to ensure that your device is connected to the internet and that you have a stable Wi-Fi or cellular data connection. This is essential for accessing your iCloud account and downloading the notes you want to restore.
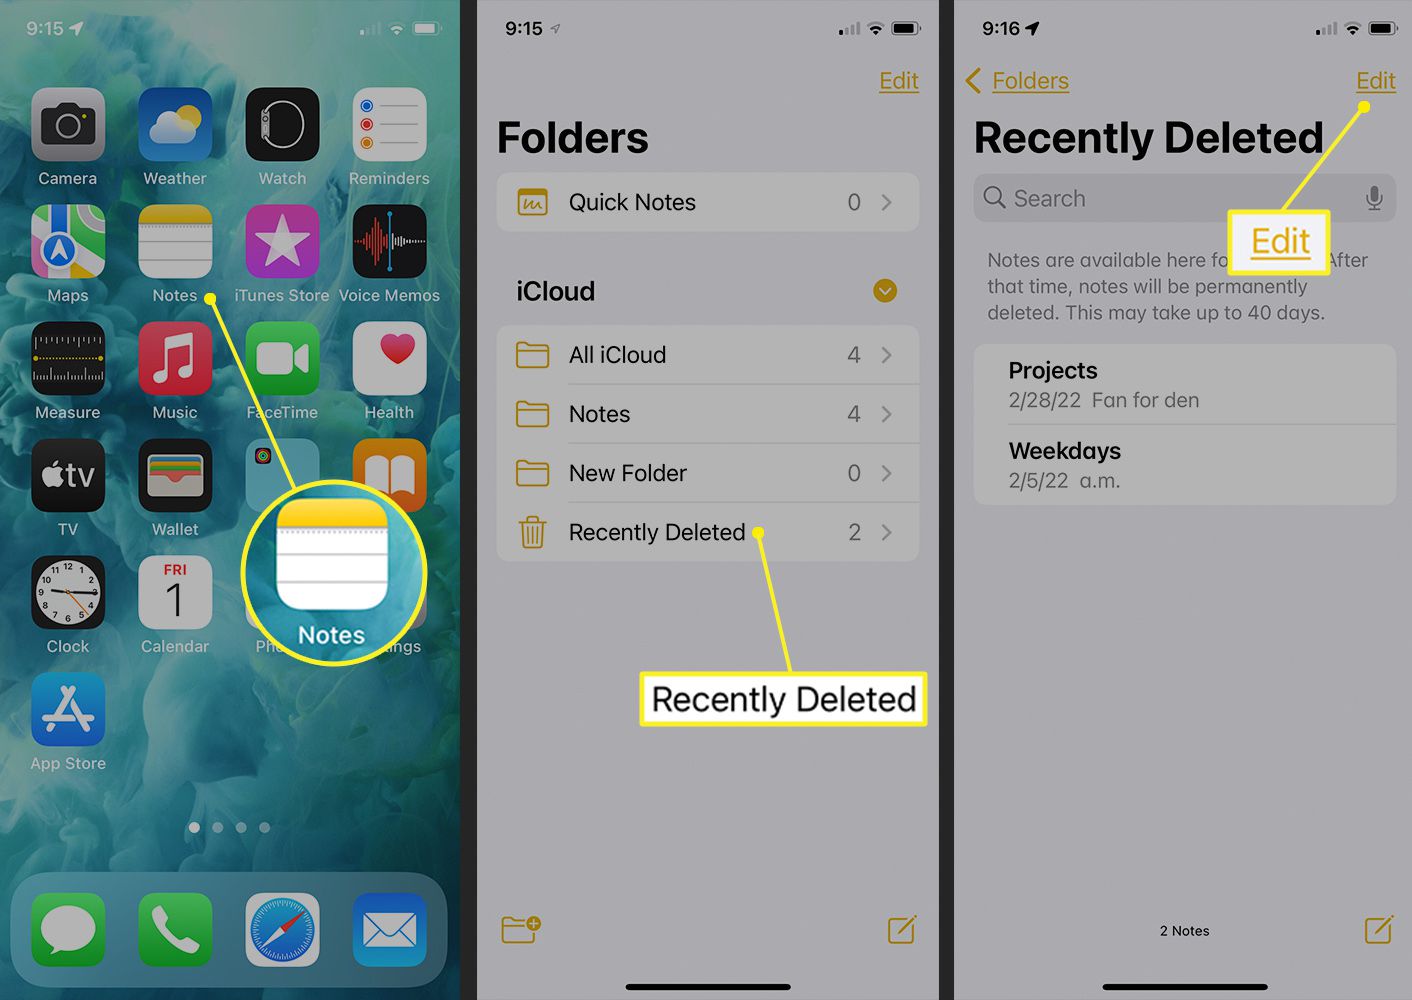
Now, let’s explore how to restore your notes from iCloud on iOS devices such as iPhone or iPad.
- Open the “Settings” app on your iOS device.
- Tap your name at the top of the screen to access your Apple ID settings.
- Scroll down and select “iCloud.”
- Make sure the “Notes” toggle is enabled. If it’s already enabled, proceed to the next step. Otherwise, toggle it on.
- Go back to the main settings menu and select “Notes.”
- Under the “Accounts” section, choose “iCloud.”
- Tap “Recently Deleted” to access the folder where your deleted notes are stored.
- Find the note you want to restore and swipe left on it.
- Tap the “Move To” option and select “Notes” to move the note back to your iCloud Notes folder.
Congratulations! You have successfully retrieved your note from iCloud on your iOS device. Now, let’s move on to restoring notes from iCloud on macOS devices like MacBook or iMac.
- Open the “Notes” app on your macOS device.
- In the menu bar, click on “View” and select “Show Folders” if it’s not already selected.
- In the sidebar, click on “Recently Deleted.”
- Find the note you want to restore and right-click on it.
- From the context menu, select “Move To” and choose “Notes” to restore the note back to your iCloud Notes folder.
And voila! Your note has been successfully restored from iCloud on your macOS device.
Now that you know how to retrieve your notes from iCloud on both iOS and macOS, you can rest easy knowing that your important information is secure and easily recoverable. Remember to regularly backup your notes to iCloud to avoid any potential data loss in the future.
So, go ahead and confidently take notes, knowing that you can always retrieve them whenever the need arises.
Restoring Notes from iCloud on iOS
Restoring your notes from iCloud on iOS devices is a straightforward process that allows you to retrieve any previously synced notes effortlessly. By following these simple steps, you’ll have your important notes back in no time:
1. Ensure that your iOS device is connected to a stable Wi-Fi network.
2. On your iOS home screen, locate and open the “Settings” app.
3. Scroll down and tap on your Apple ID at the top of the screen.
4. Next, tap on “iCloud” and ensure that the “Notes” toggle is enabled. This step ensures that your notes are synced with iCloud.
5. Now, go back to the main settings screen and select “General.”
6. Scroll down and tap on “Reset.”
7. Choose “Erase All Content and Settings” option. This action will delete all data on your device, so it’s crucial to have a backup of your data.
8. Once the device is erased and restarted, follow the setup prompts until you reach the “Apps & Data” screen.
9. On the “Apps & Data” screen, select the “Restore from iCloud Backup” option.
10. Sign in to your Apple ID and choose the relevant iCloud backup that contains your notes.
11. Wait for the restore process to complete. This may take some time, depending on the size of your backup and the speed of your internet connection.
12. Once the restore is finished, your iOS device will restart, and you can access your restored notes through the “Notes” app.
By following these steps, you can successfully restore your notes from iCloud and have them readily available on your iOS device. Remember to keep regular backups of your important data to ensure their security and accessibility.
Restoring Notes from iCloud on macOS
If you are a macOS user and need to restore your notes from iCloud, you’ll be pleased to know that it is a straightforward process. Follow these simple steps to get your notes back:
1. Open the “System Preferences” on your Mac. You can do this by clicking on the Apple menu in the top-left corner of the screen and selecting “System Preferences” from the drop-down menu.
2. In the System Preferences window, click on “Apple ID”. It is usually located near the top of the window.
3. In the Apple ID settings, click on “iCloud” on the left-hand side of the window.
4. Scroll down the list of apps until you find “Notes”. Make sure the checkbox next to Notes is checked.
5. Now, open the “Notes” app on your Mac. You can find it in the Applications folder or by searching for it in Spotlight.
6. In the Notes app, click on “Notes” in the menu bar at the top of the screen and select “Preferences” from the drop-down menu.
7. In the Preferences window, click on the “Accounts” tab.
8. Under Accounts, make sure that “iCloud” is selected. If it is not, click on the “+” button at the bottom left and add your iCloud account.
9. After selecting iCloud, you should see your notes syncing with iCloud. Wait for the synchronization to complete, and your notes will start appearing in the Notes app.
10. If your notes don’t automatically appear, you can manually trigger a sync by clicking on “File” in the menu bar and selecting “Import Notes” or “Sync Now”.
That’s it! Your notes should now be restored from iCloud and readily accessible on your Mac. Remember to stay connected to the internet to ensure proper synchronization with your iCloud account.
Restoring your notes from iCloud on macOS is a quick and hassle-free process, allowing you to access your important information in no time. Whether you accidentally deleted your notes or are switching to a new Mac, following these steps will seamlessly restore your valuable data.
Conclusion
Restoring notes from iCloud can be a lifesaver in many situations. Whether you accidentally delete a note, experience device failure, or simply want to access your notes on a different device, iCloud provides a convenient and reliable solution.
By following the steps outlined in this article, you can effortlessly retrieve your notes and ensure that your valuable information is safely stored and accessible. From accessing iCloud through the Settings app to utilizing the iCloud website, there are multiple methods to restore your notes depending on your specific needs.
Remember to regularly back up your device and enable iCloud synchronization for notes, ensuring that you always have a recent backup to restore from. By staying proactive with your data management, you can avoid the stress and potential loss that can occur from accidental note deletions or device malfunctions.
With iCloud, recovering your lost or deleted notes is a straightforward process, allowing you to focus on what matters most – your productivity and peace of mind.
FAQs
1. Can I restore my deleted notes from iCloud?
Yes, you can restore deleted notes from iCloud. The iCloud service automatically backs up your data, including notes, allowing you to retrieve them in case of accidental deletion.
2. How do I restore notes from iCloud?
To restore notes from iCloud, you need to make sure that you have iCloud synchronization enabled on your iOS device. Then, go to the “Settings” app, tap on your Apple ID, select “iCloud,” and toggle on the “Notes” option. Once enabled, your notes will automatically sync with iCloud, and you can access them by opening the “Notes” app and selecting the “Recently Deleted” folder.
3. Is it possible to recover notes that have been permanently deleted from iCloud?
Unfortunately, notes that have been permanently deleted from iCloud cannot be recovered. It is always recommended to regularly back up your important data, including notes, to avoid any accidental or irreversible deletions.
4. Can I restore my notes to a different iOS device?
Yes, you can restore your notes from iCloud to a different iOS device. Ensure that you are signed in to the same iCloud account on the device and follow the same steps of enabling iCloud synchronization for notes. Once enabled, your notes will sync to the device, allowing you to access them through the “Notes” app.
5. What should I do if my restored notes are not showing up on my device?
If your restored notes are not showing up on your device, make sure that you are signed in to the correct iCloud account and that iCloud synchronization for notes is enabled. Additionally, ensure that you have a stable internet connection to allow for the synchronization process to complete. If the issue persists, try restarting your device or contacting Apple Support for further assistance.