
Are you looking to configure a wireless printer in Windows 7? Look no further! In this article, we will guide you through the process, step by step, to help you set up your wireless printer seamlessly. Whether you need to print important documents or capture precious memories, a wireless printer provides convenience and flexibility. Gone are the days of cumbersome cables and limited accessibility. With a wireless printer, you can easily connect your computer, laptop, or mobile devices to the printer and print from anywhere within the Wi-Fi range. So, let’s dive in and learn how to configure your wireless printer in Windows 7, and enjoy the freedom of wirelessly printing at your convenience!
Inside This Article
- Overview
- Step 1: Check printer compatibility
- Step 2: Connect the printer to the network
- Step 3: Install printer driver
- Step 4: Add the wireless printer in Windows 7
- Conclusion
- FAQs
Overview
Configuring a wireless printer in Windows 7 allows you to print documents and photos without the need for cumbersome cables. It provides the convenience and flexibility of printing from any device connected to your wireless network. In this guide, we will walk you through the step-by-step process of setting up your wireless printer in Windows 7.
Before you begin, it is important to ensure that your printer is compatible with wireless connectivity. Check the printer’s specifications or user manual to confirm if it has built-in Wi-Fi capabilities or supports wireless printing using a Wi-Fi adapter.
Once you have verified the compatibility, the next step is to connect your printer to your wireless network. This can be done by following the instructions provided by the printer manufacturer. Most printers have an LCD screen or control panel that allows you to access the network settings and connect to your Wi-Fi network.
After connecting your printer to the network, you will need to install the printer driver on your Windows 7 computer. The driver is the software that enables communication between your computer and the printer. Many printers come with an installation CD that includes the necessary drivers. Simply insert the CD into your computer and follow the on-screen prompts to install the driver.
If you don’t have the installation CD, you can visit the printer manufacturer’s website and download the latest driver for your specific printer model. Make sure to select the correct driver for Windows 7. Once downloaded, double-click the driver file and follow the installation wizard to complete the driver installation.
Now that the printer driver is installed, you can add the wireless printer to your Windows 7 computer. Go to the Control Panel and click on “Devices and Printers.” Then, click on “Add a printer” and select “Add a network, wireless or Bluetooth printer.” Windows will search for available printers on the network. Once your printer is detected, select it and click “Next” to finish adding the printer.
With the wireless printer successfully added, you can now print wirelessly from your Windows 7 computer. Simply select the document or photo you want to print, choose the wireless printer as the output device, and click “Print.” Your printer will receive the print command over the network and produce the printed output.
Configuring a wireless printer in Windows 7 is a straightforward process that can bring convenience and flexibility to your printing experience. By following these steps, you can set up and start using your wireless printer in no time.
Step 1: Check printer compatibility
Before setting up your wireless printer in Windows 7, it’s essential to ensure that the printer is compatible with your operating system. Checking the compatibility beforehand will save you from unnecessary frustration and troubleshooting later on. Here are the steps to verify printer compatibility:
1. Check the printer’s documentation: Look for information in the printer’s user manual or on the manufacturer’s website regarding compatibility with Windows 7. This information will typically be listed in the system requirements section.
2. Check the manufacturer’s website: Visit the manufacturer’s website and navigate to the support or downloads section. Look for a list of drivers or software available for your printer model. Ensure that Windows 7 is included in the list of supported operating systems. If the website does not explicitly mention Windows 7 compatibility, you may need to reach out to the manufacturer’s customer support for clarification.
3. Consult Microsoft’s compatibility center: Microsoft maintains a compatibility center where you can search for specific printers and see if they are compatible with Windows 7. Visit the Microsoft website and search for the printer model or manufacturer. The compatibility center will provide information on whether the printer is compatible and if any additional drivers or updates are required.
By taking the time to check printer compatibility, you can ensure a smooth setup process and avoid any compatibility issues that may arise. Once you have confirmed compatibility, you can move on to the next steps of connecting the printer to the network and installing the printer driver.
Step 2: Connect the printer to the network
Now that you have checked the compatibility of your wireless printer with Windows 7, it’s time to connect the printer to your network. This step is crucial for the printer to communicate with your computer and other devices wirelessly.
Before you begin, make sure your printer is powered on and within range of your Wi-Fi network. Follow these steps to connect your printer to the network:
- Access your printer’s settings: Depending on the model and brand of your printer, you can usually access the settings through a control panel, LCD screen, or web interface. Refer to the printer’s user manual for specific instructions.
- Select the wireless network option: Once you have accessed the printer’s settings, navigate to the wireless network or Wi-Fi setup menu. Look for an option that allows you to connect to a wireless network. The wording may vary, but it should be intuitive.
- Choose your Wi-Fi network: After selecting the wireless network option, a list of available networks should appear. Locate and choose your Wi-Fi network from the list. If you have multiple networks, such as a 2.4GHz and 5GHz network, make sure to select the one you want your printer to connect to.
- Enter your Wi-Fi network credentials: If your network is password-protected, you will be prompted to enter the Wi-Fi network password or security key. Type in the password correctly to ensure a successful connection. Be careful with upper and lower case letters and any special characters.
- Confirm the connection: Once you have entered the network credentials, double-check that the information is correct. Some printers may show a summary of the network settings before establishing the connection.
- Wait for the connection to be established: After confirming the connection details, your printer will attempt to connect to the Wi-Fi network. This process may take a few moments, so be patient. Once the connection is established, you should see an indication on the printer’s display or control panel.
Congratulations! You have successfully connected your wireless printer to the network. Now, it’s time to move on to the next step and install the printer driver on your Windows 7 computer.
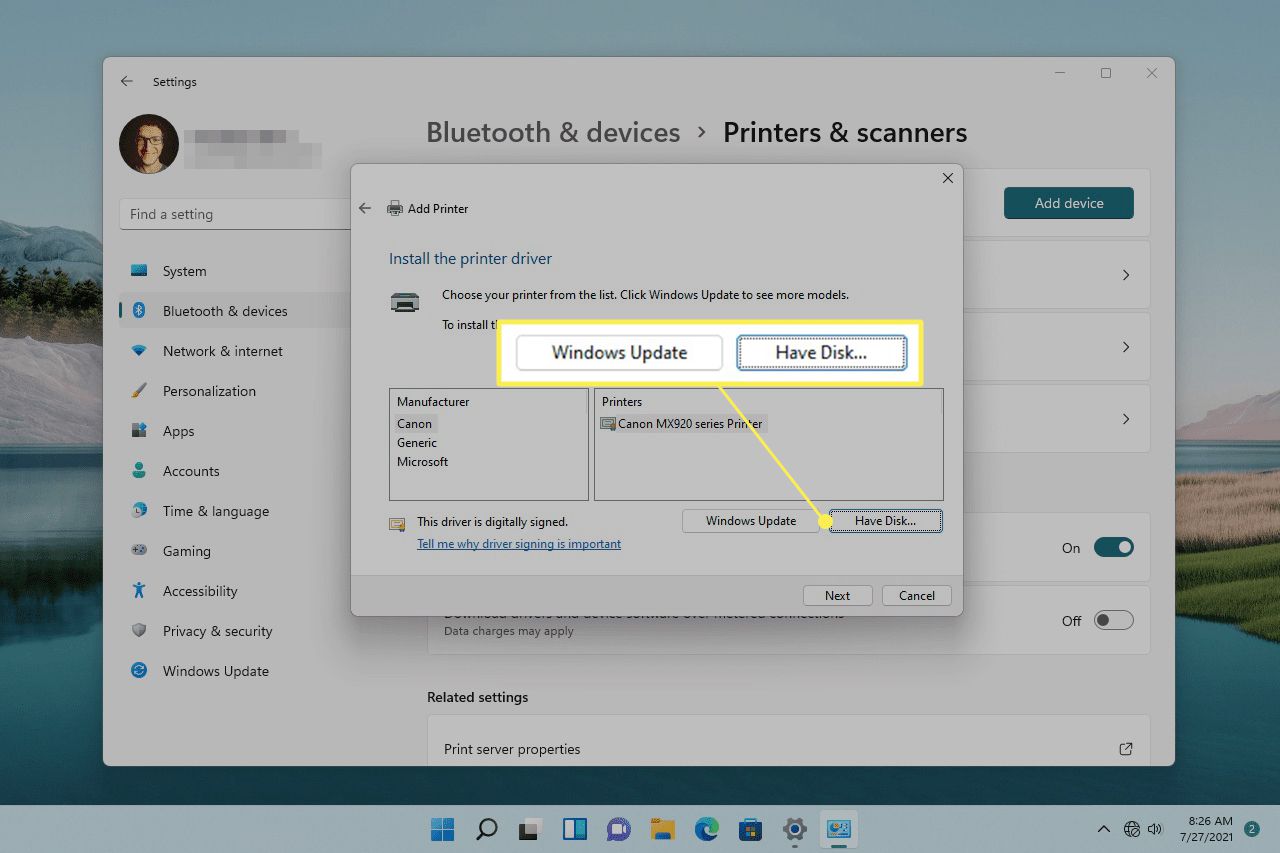
Step 3: Install printer driver
Once you have connected your wireless printer to the network, the next step is to install the printer driver on your Windows 7 computer. The printer driver is a software that enables communication between your computer and the printer, allowing them to work together seamlessly.
Here’s how you can install the printer driver:
- Make sure your computer is connected to the internet. This is important because it allows your computer to download the necessary driver software from the printer manufacturer’s website.
- Open the Start menu on your computer and go to Control Panel.
- In the Control Panel window, click on “Devices and Printers”.
- In the Devices and Printers window, click on “Add a printer”.
- A new window will open displaying the “Add printer” wizard. Click on “Add a network, wireless or Bluetooth printer”.
- The wizard will now search for available printers on the network. Once your printer is detected, select it and click “Next”.
- Windows will now download and install the necessary printer driver software. Make sure your computer is connected to the internet during this process.
- Once the driver installation is complete, you will see a confirmation message. Click “Finish” to complete the installation process.
- You can now go back to the Devices and Printers window to verify that your printer has been successfully installed. Your wireless printer should appear in the list of available printers.
It’s important to note that some printers may come with a CD or DVD that contains the printer driver software. If you have the installation disc, you can insert it into your computer’s CD/DVD drive and follow the on-screen instructions to install the printer driver.
Having the correct printer driver installed is crucial for the proper functioning of your wireless printer. It ensures that your computer and printer can communicate effectively and allows you to take full advantage of the printer’s features.
Step 4: Add the wireless printer in Windows 7
Adding a wireless printer to your Windows 7 computer is a straightforward process that can be done in a few simple steps. Here’s how you can do it:
1. Click on the “Start” button in the bottom-left corner of your screen and select “Devices and Printers” from the menu.
2. In the Devices and Printers window, click on the “Add a printer” button located at the top of the window.
3. Windows will search for any available printers on your network. Wait for the search to complete.
4. If your wireless printer is not automatically detected, you may need to manually enter the printer’s IP address. To do this, select “Add a network, wireless, or Bluetooth printer” and click “Next”.
5. In the next window, select “The printer that I want isn’t listed” and click “Next”.
6. On the next screen, select the option “Add a printer using a TCP/IP address or hostname” and click “Next”.
7. Enter the IP address or hostname of your wireless printer into the provided field and click “Next”. Make sure the printer is connected to the same wireless network as your computer.
8. Windows will attempt to connect to the printer using the provided IP address or hostname. If the connection is successful, it will install the necessary drivers for the printer.
9. Once the drivers are installed, you will be prompted to name your printer. Enter a name for the printer and click “Next”. You can also choose whether or not to set the printer as the default printer for your computer.
10. Finally, Windows will ask if you would like to print a test page to ensure that the printer is functioning correctly. You can choose to print a test page or simply click “Finish” to complete the setup process.
That’s it! You have successfully added a wireless printer to your Windows 7 computer. You can now start printing wirelessly from any application on your computer.
If you encounter any issues during the setup process, make sure that your wireless printer is turned on and connected to the same network as your computer. Additionally, check the printer’s documentation or manufacturer’s website for any specific instructions or troubleshooting steps.
The process of configuring a wireless printer in Windows 7 may seem daunting at first, but with the right knowledge and guidelines, it can be a smooth and hassle-free experience. By following the steps outlined in this article, you can successfully connect your printer to your Windows 7 computer and enjoy the convenience of wireless printing.
Remember, it’s important to ensure that your printer and computer are on the same Wi-Fi network and that you have the necessary drivers installed. Take the time to read the printer’s user manual and consult the manufacturer’s website if needed. With patience and attention to detail, you’ll have your printer up and running in no time.
Now that you know how to configure a wireless printer in Windows 7, you can easily print documents and photos without the hassle of wires and cables. Enjoy the convenience and flexibility of wireless printing as you enhance your productivity and streamline your work process. Don’t forget to keep your printer’s firmware and drivers up to date for optimal performance.
FAQs
1. How do I configure a wireless printer in Windows 7?
To configure a wireless printer in Windows 7, follow these steps:
- Ensure that your printer and computer are connected to the same Wi-Fi network.
- Open the Control Panel on your computer and select “Devices and Printers.”
- Click on “Add a Printer.”
- Select “Add a network, wireless or Bluetooth printer,” and then click on “Next.”
- Windows will scan for available printers. Select your wireless printer from the list and click on “Next.”
- Follow the on-screen instructions to complete the installation process.
2. Why is my wireless printer not connecting to Windows 7?
There can be several reasons why your wireless printer is not connecting to Windows 7. Here are some troubleshooting steps you can try:
- Make sure your printer is turned on and connected to the same Wi-Fi network as your computer.
- Check if the printer’s wireless settings are properly configured.
- Restart your printer and computer.
- Disable any firewall or antivirus software that might be blocking the connection.
- Update the printer drivers on your computer.
- If none of the above steps work, consult the printer’s user manual or contact the manufacturer’s support for further assistance.
3. Can I connect multiple wireless printers to Windows 7?
Yes, you can connect multiple wireless printers to Windows 7. Follow the same steps mentioned earlier to add each printer to your computer. Make sure that each printer is connected to the same Wi-Fi network as your computer and give each printer a unique name to avoid confusion.
4. How do I set a wireless printer as the default printer in Windows 7?
To set a wireless printer as the default printer in Windows 7, follow these steps:
- Open the Control Panel on your computer and select “Devices and Printers.”
- Locate your wireless printer from the list of installed printers.
- Right-click on the printer and select “Set as Default Printer.”
- Your wireless printer will now be the default printer for your Windows 7 system.
5. Can I print from my Windows 7 computer to a wireless printer connected to another network?
In most cases, you cannot print from a Windows 7 computer to a wireless printer connected to another network. Wireless printers usually need to be connected to the same network as the computer in order to print wirelessly. However, some printers may support advanced features like Google Cloud Print or email printing, which would allow you to print remotely. Consult your printer’s user manual or contact the manufacturer’s support for more information.