
In our increasingly wireless world, connecting devices to our laptops without the clutter of cables has become a necessity. One such device is a wireless mouse, which offers convenience and freedom of movement. If you’re wondering how to connect a wireless mouse to your laptop, you’ve come to the right place. In this article, we’ll guide you through the step-by-step process of connecting a wireless mouse to your laptop, providing you with all the information you need to get started. Whether you’re a tech-savvy individual or a novice user, this guide will walk you through the process, making it quick and easy to get your wireless mouse up and running. So let’s dive in and explore the world of wireless connectivity!
Inside This Article
- Wireless Mouse Compatibility
- Enabling Bluetooth Connectivity on Your Laptop
- Pairing the Wireless Mouse with Your Laptop
- Troubleshooting Common Connection Issues
- Conclusion
- FAQs
Wireless Mouse Compatibility
When it comes to choosing a wireless mouse for your laptop, it is essential to ensure compatibility. Incompatible devices can lead to frustration and hinder your productivity. Before making a purchase, consider the following factors to ensure that your wireless mouse is compatible with your laptop:
- Operating System Compatibility: Check whether the mouse is compatible with the operating system running on your laptop. Most wireless mice are compatible with popular systems like Windows, macOS, and Linux. However, it is crucial to verify this information to avoid any compatibility issues.
- Connectivity Options: Wireless mice typically offer different connectivity options, such as Bluetooth, USB dongle, or both. Make sure your laptop supports the connectivity option provided by the mouse you are considering. This will ensure a seamless connection between your laptop and the wireless mouse.
- Hardware Requirements: Some wireless mice might have specific hardware requirements, such as a free USB port or built-in Bluetooth support. Check your laptop’s specifications to verify that it meets the necessary hardware requirements for the wireless mouse you plan to use.
- DPI and Sensor: The DPI (dots per inch) and sensor type determine the sensitivity and accuracy of the mouse. Higher DPI settings are ideal for precise tasks like graphic design, while lower DPI settings are more suitable for general use. Check if the mouse’s DPI range and sensor type meet your specific needs.
- Ergonomics and Comfort: Consider the design and size of the wireless mouse you are interested in. Look for a mouse that fits comfortably in your hand and offers ergonomic features such as a contoured shape and customizable buttons. This will ensure a comfortable user experience, especially for extended periods of use.
- Battery Life: Wireless mice require power to function. Check the estimated battery life of the mouse you are considering and consider whether it aligns with your usage patterns. Mice with long battery life or rechargeable options will minimize downtime and the need for frequent battery replacements.
By considering these factors, you can ensure that the wireless mouse you choose is compatible with your laptop, providing you with a seamless and efficient user experience. Remember to check the product specifications and consult customer reviews if you are unsure about compatibility.
Enabling Bluetooth Connectivity on Your Laptop
Bluetooth technology has revolutionized the way we connect devices wirelessly, and it’s a convenient feature to have on your laptop when you want to connect a wireless mouse. To enable Bluetooth connectivity on your laptop, follow these simple steps:
- Check if your laptop has built-in Bluetooth: First, confirm if your laptop supports Bluetooth connectivity. Look for the Bluetooth icon on your laptop’s keyboard or check the device specifications in the user manual or manufacturer’s website.
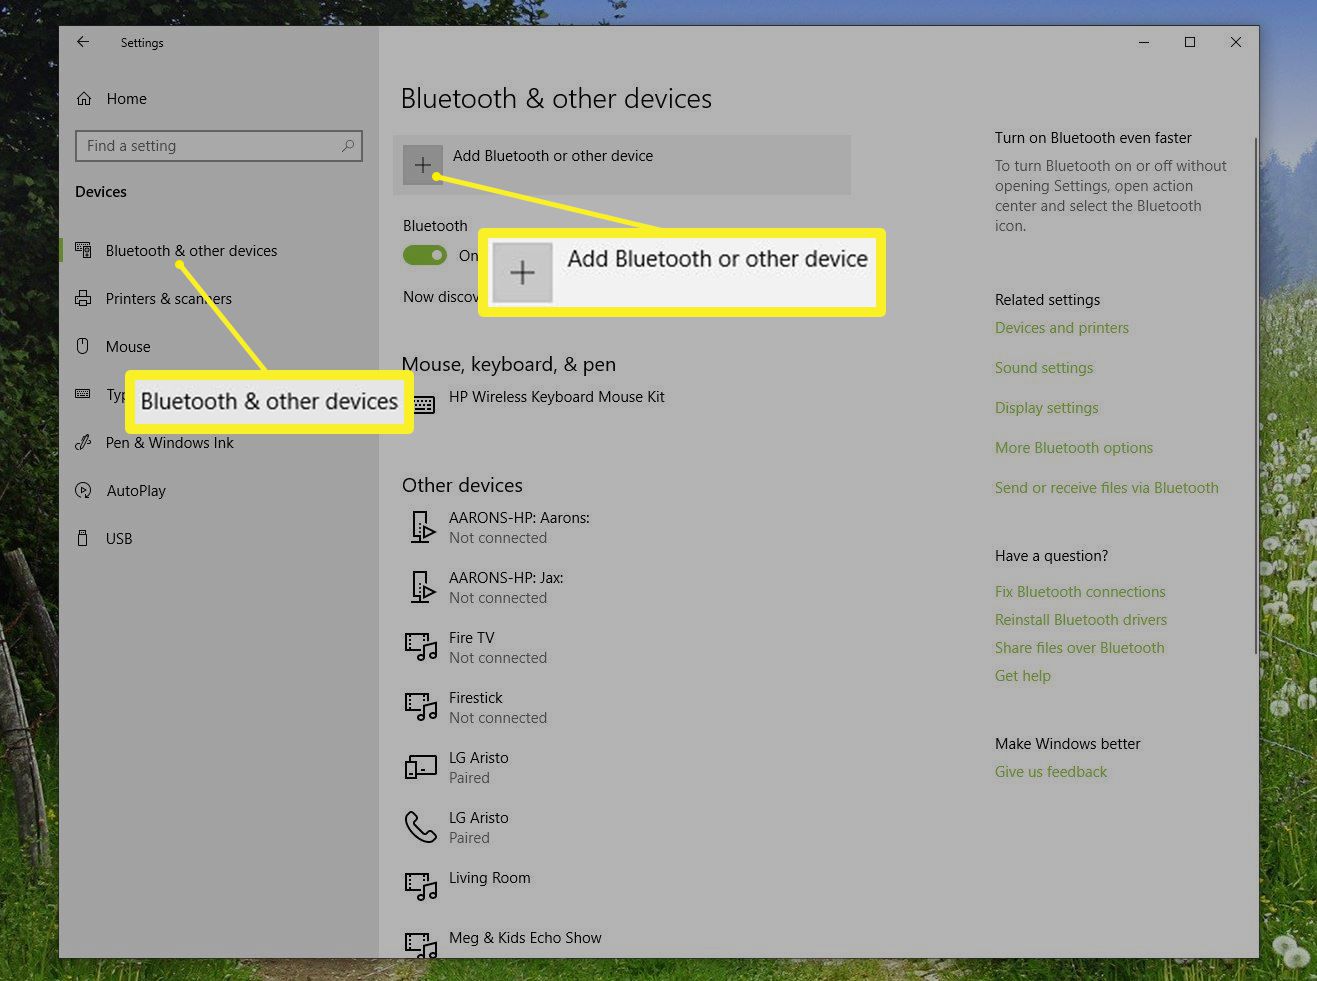
- Access the Bluetooth settings: Once you’ve determined that your laptop has Bluetooth, access the Bluetooth settings. On Windows laptops, click on the Windows Start button and select “Settings.” In the Settings menu, click on “Devices” and then select “Bluetooth & other devices.” On Mac laptops, click on the Apple menu and select “System Preferences,” then click on “Bluetooth.”
- Turn on Bluetooth: In the Bluetooth settings menu, locate the option to turn on Bluetooth. It may be a switch, a button, or a checkbox. Click or tap on the switch, button, or checkbox to enable Bluetooth functionality on your laptop.
- Make your laptop visible to other devices: By default, your laptop is set to be discoverable by other devices. However, if it’s not, you can customize this setting. In the Bluetooth settings menu, look for the option to make your laptop discoverable and check the box if it’s not already checked.
- Install any necessary drivers: In some cases, your laptop may require specific drivers to ensure compatibility with certain Bluetooth devices. Check the manufacturer’s website for any available Bluetooth drivers and install them if needed. This step is essential for a seamless connection with your wireless mouse.
Once you’ve completed these steps, your laptop is ready to connect to a wireless mouse via Bluetooth. Keep in mind that the exact steps may vary slightly depending on your laptop’s operating system and Bluetooth settings interface, but generally, these instructions should help you enable Bluetooth connectivity and set the stage for a successful connection.
Pairing the Wireless Mouse with Your Laptop
If you have recently purchased a wireless mouse and are wondering how to connect it to your laptop, you’re in the right place. Pairing a wireless mouse with your laptop is a simple process that can be done in just a few steps. In this section, we will guide you through the process of pairing your wireless mouse with your laptop.
Before you begin, make sure to check the compatibility of your wireless mouse with your laptop. Most modern laptops are equipped with Bluetooth connectivity, which is required to connect a wireless mouse. However, if your laptop doesn’t have built-in Bluetooth, you may need to purchase a separate Bluetooth adapter.
Now, let’s move on to the pairing process:
- Ensure that the wireless mouse is turned on: Check the bottom of your wireless mouse for a power switch. Turn it on if it’s not already.
- Enable Bluetooth on your laptop: Open the Settings menu on your laptop and navigate to the Bluetooth settings. Make sure that Bluetooth is turned on.
- Put your wireless mouse in pairing mode: Different wireless mice have different methods of entering pairing mode. Refer to the user manual or the manufacturer’s website for instructions on how to put your specific mouse in pairing mode.
- Scan for devices on your laptop: Once your mouse is in pairing mode, your laptop should be able to detect it. Go back to the Bluetooth settings on your laptop and click on “Scan for devices” or a similar option.
- Select your wireless mouse: After scanning, your laptop should display a list of available devices. Look for your wireless mouse in the list and click on it to select it.
- Complete the pairing process: Follow any additional on-screen instructions to complete the pairing process. This may involve entering a passcode or confirming the pairing on both your laptop and the mouse.
And that’s it! You have successfully paired your wireless mouse with your laptop. You should now be able to use your wireless mouse to navigate and interact with your laptop.
If you encounter any issues during the pairing process or if your wireless mouse is not functioning properly after pairing, you may need to troubleshoot the connection. We’ll cover some common troubleshooting steps in the next section to help you resolve any issues you may be facing.
Troubleshooting Common Connection Issues
Despite the convenience of using a wireless mouse with your laptop, it is not uncommon to encounter connection issues. These problems can be frustrating, but fear not! In this section, we will guide you through some common troubleshooting steps to help you get your wireless mouse working seamlessly again.
1. Check the Batteries: One of the most common reasons for a wireless mouse to stop working is dead batteries. Make sure to replace the batteries with fresh ones and ensure that they are properly inserted in the mouse.
2. Remove Interference: Wireless mice can be affected by interference from other devices such as Wi-Fi routers, speakers, or even nearby microwave ovens. Keep these devices away from your mouse and try using your mouse in a different location to see if the connection improves.
3. Reconnect the USB Receiver: If your wireless mouse uses a USB receiver, try unplugging it from your laptop and plugging it back in. Sometimes, a simple reconnection can fix any connection issues.
4. Restart Your Laptop: Restarting your laptop can help resolve various technical glitches. Shut down your laptop completely, wait for a few seconds, and then turn it back on. This can refresh the system and potentially fix any connection problems.
5. Update Mouse Drivers: Outdated or incompatible mouse drivers can cause connection issues. Visit the manufacturer’s website and check if there are any available updates for your mouse model. Install the latest drivers to ensure optimal performance.
6. Check Device Manager: Open the Device Manager on your laptop and look for any yellow exclamation marks next to your mouse. This indicates a driver issue. Right-click on the mouse and select “Update driver” to troubleshoot the problem.
7. Reset the Mouse: Some wireless mice have a small reset button on the bottom. Try pressing and holding this button for a few seconds to reset the mouse and establish a new connection with your laptop.
8. Try a Different Mouse: If all else fails, borrow a different wireless mouse and connect it to your laptop. If the new mouse works without any issues, it could indicate a problem with your original mouse. Consider replacing it or contacting the manufacturer for further assistance.
Remember, each wireless mouse may have its own unique troubleshooting steps, so make sure to consult the manufacturer’s website or user manual for specific instructions. By following these troubleshooting tips, you can overcome common connection issues and enjoy a smooth and hassle-free experience with your wireless mouse.
Conclusion
In conclusion, connecting a wireless mouse to your laptop is a simple and convenient way to improve your productivity and user experience. By following the steps outlined in this guide, you can easily set up a wireless mouse and enjoy the benefits of enhanced mobility and ease of use.
Remember to ensure that your laptop supports wireless connectivity and that the mouse is compatible with your operating system. Additionally, keep in mind that different mice may have slight variations in the setup process, so it’s always a good idea to consult the manufacturer’s instructions if you encounter any difficulties.
With a wireless mouse, you can say goodbye to tangled wires and restricted movement. Whether you’re a student, professional, or casual user, adding this accessory to your laptop can greatly enhance your computing experience. So go ahead, get a wireless mouse, and start enjoying the freedom it offers!
FAQs
1. Can any wireless mouse be connected to a laptop?
While most wireless mice are designed to be compatible with laptops, it’s essential to check the specifications of the mouse you choose. Look for connectivity requirements, such as Bluetooth or USB receivers, to ensure compatibility with your laptop.
2. How do I connect a wireless mouse to my laptop?
Connecting a wireless mouse to a laptop is usually a simple process. First, switch on the mouse and ensure it has batteries or is charged. Next, locate the receiver for the wireless mouse. If it is a USB receiver, plug it into an available USB port on your laptop. If the mouse uses Bluetooth connectivity, ensure your laptop’s Bluetooth is enabled and search for the mouse in the Bluetooth settings. Once the laptop detects the mouse, follow the on-screen instructions to complete the connection.
3. Do I need to install drivers for a wireless mouse?
In most cases, you don’t need to install additional drivers for a wireless mouse. Modern operating systems, such as Windows and macOS, come with generic drivers that recognize and support standard mouse functionality. However, if your wireless mouse has additional features or customization options, you may need to install specific drivers or software provided by the manufacturer.
4. Why is my wireless mouse not working with my laptop?
There can be several reasons why a wireless mouse is not working with your laptop. Here are a few troubleshooting steps you can try:
– Ensure the mouse is switched on and has batteries or is charged.
– Check that the receiver is properly connected to your laptop’s USB port or that Bluetooth is enabled.
– Try using the mouse on a different surface or mouse pad, as certain surfaces may interfere with optical or laser sensors.
– Check for any obstructions or interference between the mouse and receiver, such as other wireless devices or metal objects.
– Restart your laptop and try reconnecting the mouse.
If these steps do not resolve the issue, consult the manufacturer’s instructions or reach out to their support for further assistance.
5. Can I connect multiple wireless mice to my laptop?
In most cases, you can only connect one wireless mouse to a laptop at a time. Each mouse typically requires a specific receiver or Bluetooth connection to establish a link with the laptop. However, some advanced gaming laptops or specialized software may support multiple input devices simultaneously. Refer to your laptop’s user manual or specifications to determine if it has multiple mouse connectivity options.