
If you’re an avid gamer who loves playing on your PlayStation 4 (PS4), you know how crucial it is to have a top-notch audio experience. While the PS4 controller does have a built-in audio jack, wouldn’t it be more convenient to go wireless with your headphones? Connecting wireless headphones to your PS4 opens up a world of immersive gaming with freedom of movement and no tangled wires to worry about.
In this article, we’ll walk you through the step-by-step process of connecting wireless headphones to your PS4. Whether you have Bluetooth headphones or a wireless headset with a USB dongle, we have you covered. We’ll also provide some troubleshooting tips and discuss the advantages of using wireless headphones for gaming on your PS4. So, grab your favorite pair of wireless headphones and get ready to take your gaming experience to the next level!
Inside This Article
- Step 1: Check for Compatibility – Check if your wireless headphones are compatible with the PS4 console.
- Step 2: Put Headphones into Pairing Mode- Turn on your wireless headphones and put them into pairing mode.
- Step 3: Access PS4 Settings- From the PS4 home screen, go to the “Settings” menu.
- Step 4: Navigate to Devices and Bluetooth Devices- In the Settings menu, select “Devices” and then choose “Bluetooth Devices”.
- Step 5: Add a New Device- Select the option to “Add a New Device” to start the pairing process.
- Step 6: Select Your Wireless Headphones- Find and select your wireless headphones from the list of available devices.
- Step 7: Pair and Connect – Follow the on-screen instructions to pair and connect your wireless headphones to the PS4.
- Step 8: Test the Connection- Once connected, test the audio output from your wireless headphones on the PS4.
- Troubleshooting Tips – If you encounter any issues during the pairing process, refer to troubleshooting tips.
- Conclusion
- FAQs
Step 1: Check for Compatibility – Check if your wireless headphones are compatible with the PS4 console.
Before attempting to connect your wireless headphones to your PS4 console, it is crucial to ensure compatibility between the two devices. The PS4 console supports various types of wireless headphones, but it’s important to check if your specific model is compatible to avoid any frustration or disappointment.
Start by referring to the manufacturer’s instructions or visiting their website to determine if your wireless headphones are compatible with the PS4. Look for information regarding compatibility with gaming consoles or specifically with the PS4. This will give you a clear indication of whether your headphones can be connected to your console or if you need to explore alternative options.
Additionally, you can check the PS4’s official website or consult the user manual to find a list of compatible devices. This resource will provide insight into the specific wireless headphones models that are officially supported by the PS4 console.
If you are unable to find compatibility information from either the manufacturer’s website or the PS4’s official resources, you can explore online forums or discussion boards. These platforms often have communities of gamers who may have tested various wireless headphone models and can provide valuable insights into compatibility.
Remember, it’s crucial to verify compatibility before attempting to connect your wireless headphones to the PS4. This will save you time and frustration by ensuring a seamless connection process.
Step 2: Put Headphones into Pairing Mode- Turn on your wireless headphones and put them into pairing mode.
Once you have ensured the compatibility of your wireless headphones with the PS4, it’s time to put them into pairing mode. This step is crucial as it allows the PS4 to discover and connect to your headphones seamlessly.
To begin, make sure your wireless headphones are turned off. Then, locate the power button or switch on your headphones and turn them on. This action will activate the pairing mode, which is necessary for the PS4 to detect your headphones.
The process of putting your headphones into pairing mode may differ depending on the brand and model. Usually, you’ll need to hold down a specific button or combination of buttons for a few seconds until you see an indicator light flashing or hear an audible confirmation. Consult the manual of your wireless headphones for detailed instructions on how to activate pairing mode.
Pairing mode essentially puts your headphones into a state of readiness, waiting for a device, in this case, the PS4, to connect to them. It’s important to note that the amount of time your headphones remain in pairing mode may vary, so it’s essential to complete the pairing process on the PS4 promptly.
Once you have successfully activated pairing mode on your wireless headphones, you are ready to proceed to the next step of connecting them to the PS4.
Step 3: Access PS4 Settings- From the PS4 home screen, go to the “Settings” menu.
Once you have ensured the compatibility of your wireless headphones with the PS4, it’s time to access the system settings on your console. To do this, start by turning on your PS4 and navigating to the home screen.
On the home screen, look for the “Settings” icon, which resembles a toolbox. It is usually located at the top of the screen. Once you spot it, use the controller to highlight and select the “Settings” icon.
By selecting the “Settings” icon, you will be taken to the settings menu of your PS4 console. This menu houses various options and configurations that allow you to customize your gaming experience.
The settings menu is where you can make adjustments to audio, display, network, and other system preferences. In this case, we will be focusing on the audio settings to connect your wireless headphones.
Once you are in the settings menu, navigate through the options using the controller. Look for the “Devices” option and select it. This will take you to a sub-menu with different device-related settings.
Now, within the “Devices” sub-menu, find and select the “Bluetooth Devices” option. This is where you will manage all your Bluetooth connections, including pairing your wireless headphones with the PS4.
After selecting the “Bluetooth Devices” option, you will see a list of previously connected devices, as well as the option to add a new device. This is where you will initiate the pairing process for your wireless headphones.
So, follow the on-screen instructions to continue with the pairing process, as we will cover the specifics in the subsequent steps.
Remember, accessing the PS4 settings menu is a crucial step in connecting your wireless headphones to the console. Once you have successfully reached this point, you are ready to proceed to the next step and add your headphones as a new device.
Step 4: Navigate to Devices and Bluetooth Devices- In the Settings menu, select “Devices” and then choose “Bluetooth Devices”.
To connect your wireless headphones to your PS4, you’ll need to navigate to the “Devices” menu in the Settings. This is where you can manage various connected devices, including Bluetooth devices.
First, make sure your PS4 console is turned on and you are on the home screen. From there, you can access the Settings menu by scrolling to the top row of icons and selecting the one labeled “Settings”.
Once you are in the Settings menu, scroll down to find the “Devices” option. It’s usually located towards the bottom of the list, so you may need to scroll quite a bit to find it. Select the “Devices” option to proceed.
After selecting the “Devices” option, you will see a list of device management options. Look for the “Bluetooth Devices” option and select it. This is where you’ll be able to manage and connect your Bluetooth devices, including your wireless headphones.
Within the “Bluetooth Devices” menu, you will find a list of previously paired devices. If your wireless headphones have been connected to your PS4 before, they may appear on this list. However, if this is the first time you are connecting them, you will need to add them as a new device by selecting the “Add a New Device” option.
Once you have selected the “Bluetooth Devices” option, the PS4 will start scanning for new devices. Make sure your wireless headphones are in pairing mode, as mentioned in the previous steps. When your headphones appear in the list of available devices, select them to initiate the pairing process.
Follow the on-screen instructions to complete the pairing process. This may involve entering a passcode, selecting the audio output options, or confirming the connection. Once the pairing is successful, your wireless headphones will be connected to your PS4 and you can start enjoying the audio wirelessly.
Remember, if you ever want to disconnect or remove your wireless headphones from your PS4, you can do so from the same “Bluetooth Devices” menu within the Settings. Simply select your headphones from the list and choose the appropriate option to disconnect or forget the device.
Now that you have successfully navigated to the “Devices” menu and accessed the “Bluetooth Devices” section, you are ready to proceed with the pairing process for your wireless headphones. Move on to the next step to continue setting up your headphones with your PS4.
Step 5: Add a New Device- Select the option to “Add a New Device” to start the pairing process.
Once you have accessed the “Bluetooth Devices” menu in the PS4’s Settings, it’s time to add your wireless headphones as a new device. This step is crucial as it allows the PS4 to recognize and establish a connection with your headphones.
To begin the pairing process, locate the option that says “Add a New Device” and select it. This action will prompt the PS4 to start scanning for available devices nearby.
Make sure your wireless headphones are in pairing mode, as mentioned in the previous step. This will ensure that they are discoverable by the PS4 console. If you’re not sure how to put your headphones into pairing mode, refer to the user manual or manufacturer’s website for instructions specific to your model.
After selecting “Add a New Device,” the PS4 will start searching for nearby Bluetooth devices. Give it a few moments to complete the scanning process.
Once the scanning is complete, a list of available devices will appear on your screen. Depending on the number of devices in the vicinity, it may take a few seconds for the list to populate.
Locate your wireless headphones on the list and select them. You may need to wait for a moment as the PS4 establishes a connection with your headphones.
If prompted, enter any necessary passcodes or PINs required for pairing. This information can usually be found in the user manual or on the product packaging.
Finally, once the pairing process is complete, you should see a confirmation message on your screen. This indicates that your wireless headphones have been successfully added as a new device and are now ready to use with your PS4.
Congratulations! You are now one step closer to enjoying a truly immersive gaming experience with your wireless headphones on your PS4 console.
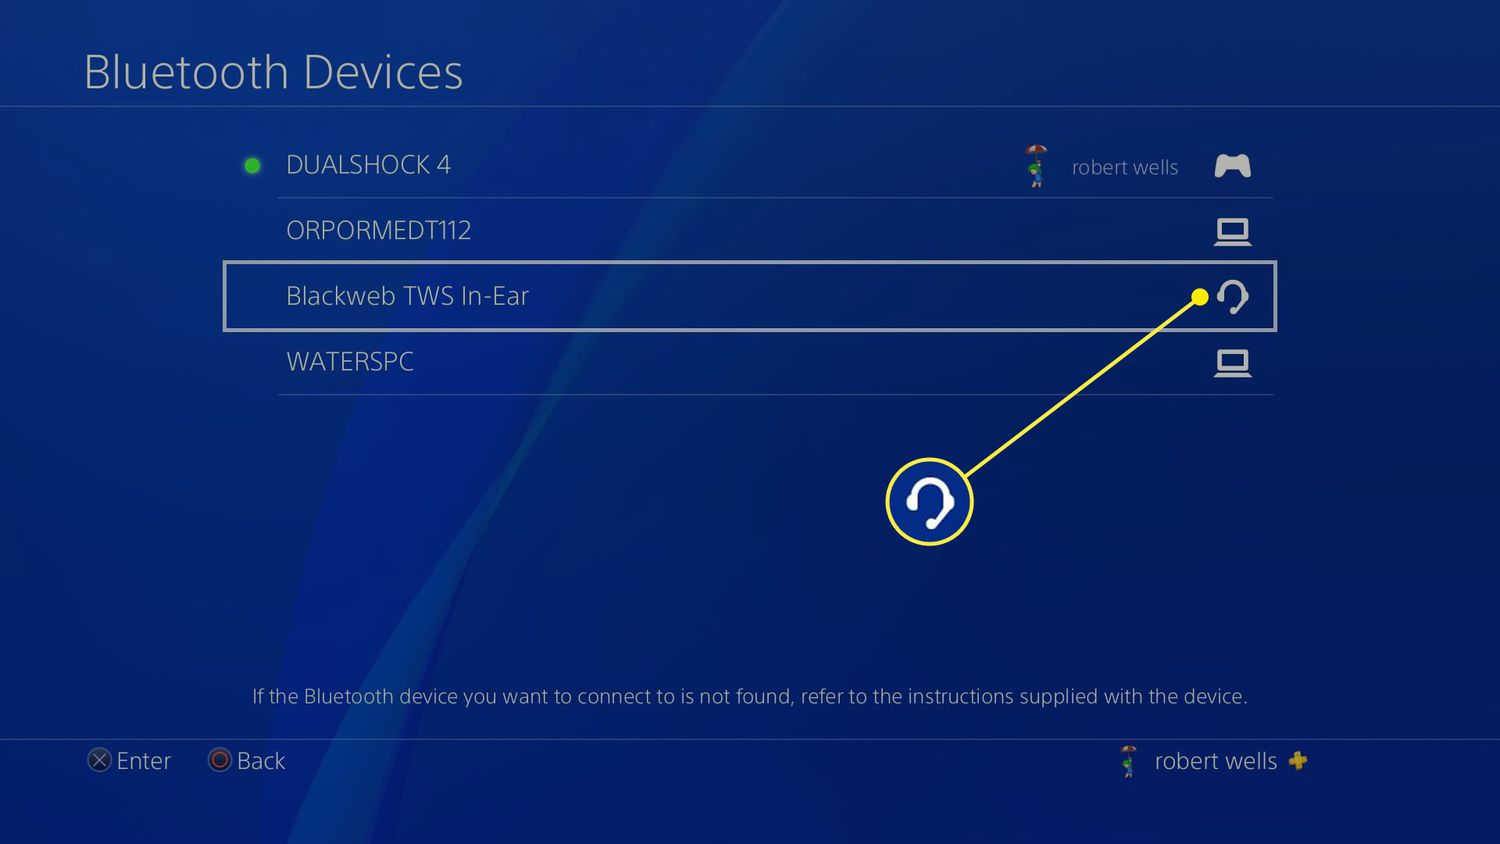
Step 6: Select Your Wireless Headphones- Find and select your wireless headphones from the list of available devices.
Now that you have reached the “Bluetooth Devices” menu on your PS4, it’s time to find and select your wireless headphones from the list of available devices. This step is crucial to establish the connection between your headphones and the console.
When you enter the “Bluetooth Devices” menu, the PS4 will automatically start scanning for nearby Bluetooth devices. This process may take a few seconds, so be patient. Once the scan is complete, you will see a list of available devices displayed on your screen.
Scroll through the list of devices and look for the name of your wireless headphones. The name may vary depending on the brand and model. Look for keywords that indicate your headphones, such as the brand name or a unique identifier.
When you locate your headphones, highlight them by using the arrow keys on your PS4 controller. This will select your headphones and prepare them for pairing with the console. Make sure you don’t accidentally select another Bluetooth device that may be nearby.
Once your wireless headphones are selected, press the “X” button on your controller to proceed with the pairing process. The PS4 will initiate the connection and establish a link between the console and your headphones.
It’s important to note that the pairing process may take a few moments, depending on the speed and stability of the Bluetooth connection. During this time, it’s best to avoid moving too far away from the console to ensure a smooth and successful pairing.
Once the pairing is complete, your wireless headphones will be connected to the PS4. You should see a confirmation message on your screen indicating that the connection was successful. You can now enjoy your gaming experience with the immersive audio provided by your wireless headphones.
Step 7: Pair and Connect – Follow the on-screen instructions to pair and connect your wireless headphones to the PS4.
Once you have selected your wireless headphones from the list of available devices, the PS4 will guide you through the pairing and connection process. Follow the on-screen instructions to complete the setup.
The instructions may vary slightly depending on the model and brand of your wireless headphones, but the general process remains the same. The PS4 will prompt you to press specific buttons on your headphones or enter a passcode if required.
Make sure to carefully follow each step and take your time to ensure a successful connection. Pay attention to any additional instructions or settings that may be mentioned during the pairing process.
It’s worth noting that some wireless headphones may require specific settings to be adjusted on the PS4 for optimal performance. If you are unsure, consult the user manual or the manufacturer’s website for detailed instructions.
Once the pairing process is complete, your wireless headphones should be connected to the PS4. You can now enjoy immersive gaming audio without the constraints of wired headphones.
Remember to adjust the volume settings on both your wireless headphones and the PS4 to achieve the desired audio level. You may also need to change the audio output settings on the PS4 to ensure that the sound is routed to your wireless headphones.
If you encounter any issues during the pairing and connection process, try restarting both your wireless headphones and the PS4. Additionally, double-check that your headphones are in pairing mode and that they are within range of the PS4 console.
By following the on-screen instructions, you can easily pair and connect your wireless headphones to the PS4, enhancing your gaming experience with high-quality audio and the freedom to move around without the hassle of wires.
Step 8: Test the Connection- Once connected, test the audio output from your wireless headphones on the PS4.
Once you have successfully paired and connected your wireless headphones to your PS4, it’s time to test the audio output. Testing the connection will ensure that you can hear game audio, chat with friends, and fully immerse yourself in the gaming experience.
To test the audio output, follow these steps:
- Launch a game or any application that produces sound on your PS4.
- Put on your wireless headphones and ensure they are properly positioned for optimal sound quality.
- Adjust the volume on your headphones to a comfortable level.
- Listen for the audio coming from the game or application.
During gameplay, pay close attention to the details of the audio. Is the sound clear and crisp? Do you hear all the game’s audio cues, like footsteps, gunshots, and background music? If the audio output meets your expectations and you can fully enjoy the game using your wireless headphones, then congratulations! Your connection is successful.
If you encounter any issues with the audio output, here are a few troubleshooting tips you can try:
- Make sure your headphones are fully charged or have fresh batteries.
- Check the volume levels on both your PS4 and your headphones to ensure they are properly adjusted.
- Verify that your headphones are set as the primary audio output device on your PS4.
- Try disconnecting and reconnecting your headphones to see if that resolves any audio problems.
- Consult the user manual for your wireless headphones or visit the manufacturer’s website for further troubleshooting steps.
By testing the audio output, you can ensure that your wireless headphones are functioning correctly and providing you with the best gaming experience possible. Enjoy your gameplay with immersive sound and don’t forget to adjust the audio settings to your preference if needed. Happy gaming!
Troubleshooting Tips – If you encounter any issues during the pairing process, refer to troubleshooting tips.
Pairing wireless headphones to a PS4 console may sometimes present challenges. If you are experiencing difficulties during the pairing process, no worries! We have compiled a list of troubleshooting tips to help you resolve any issues you may encounter. Simply follow these steps to ensure a successful connection.
1. Restart Your PS4 Console: Sometimes, a simple reset can solve the problem. Turn off your PS4, unplug it from the power source, wait for a few minutes, and then plug it back in and turn it on again. This can help resolve any temporary glitches.
2. Check Headphone Compatibility: Ensure that your wireless headphones are compatible with the PS4. Refer to the manufacturer’s documentation or website to confirm compatibility. If your headphones are not compatible, you may need to consider using a different set.
3. Check Bluetooth Signal: Make sure that the Bluetooth signal on your PS4 console is strong enough to establish a connection. Keep any obstructions, such as walls or other electronic devices, out of the way that may interfere with the signal.
4. Move Closer During Pairing: If your headphones are having trouble connecting, try moving them closer to the PS4 console during the pairing process. This can help ensure a stronger signal and facilitate a successful connection.
5. Ensure Headphones Are in Pairing Mode: Double-check that your wireless headphones are in pairing mode. Refer to the manufacturer’s instructions to activate pairing mode correctly. Sometimes, a simple mistake in the pairing process can hinder successful connection.
6. Update PS4 Software: Outdated software can sometimes cause connectivity issues. Make sure your PS4 console is running on the latest software version. Check for system updates in the “Settings” menu and install any available updates.
7. Clear Bluetooth Devices List: If your PS4 console has a long list of previously connected devices, it may be helpful to clear the list before attempting to pair your wireless headphones. This can prevent any conflicts or confusion in the pairing process.
8. Reset Headphones: If all else fails, try resetting your wireless headphones to their factory settings. Consult the manufacturer’s instructions on how to perform a reset. This can often resolve any persistent pairing issues.
By following these troubleshooting tips, you should be able to overcome any obstacles you encounter while pairing wireless headphones to your PS4 console. Remember to remain patient and persistent, and soon you’ll be enjoying the immersive audio experience that wireless headphones can provide!
Conclusion
Connecting wireless headphones to a PS4 opens up a whole new level of gaming experience, allowing for immersive sound without the constraints of a wired connection. By following the simple steps outlined in this article, you can seamlessly pair your wireless headphones with your PS4 console and enjoy crystal clear audio while gaming.
Remember to ensure that your wireless headphones are compatible with the PS4 and that they support the appropriate wireless technology, such as Bluetooth. It’s also important to keep your headphones charged and within the optimal range for a stable connection.
With wireless headphones, you can enjoy the immersive audio of your favorite games without disturbing others or being tethered to your console. So go ahead and make the most of your gaming sessions with the convenience and freedom of wireless headphones on your PS4.
FAQs
1. Can I connect wireless headphones to my PS4?
Yes, you can connect wireless headphones to your PS4. The PS4 supports a variety of wireless headphone options, including Bluetooth headphones. This allows you to enjoy an immersive gaming experience without the hassle of tangled wires.
2. How do I connect wireless headphones to my PS4?
To connect wireless headphones to your PS4, follow these steps:
- Put your wireless headphones in pairing mode.
- Go to the “Settings” menu on your PS4.
- Select “Devices” and then choose “Bluetooth Devices.”
- Your PS4 will search for nearby Bluetooth devices. Select your wireless headphones from the list.
- Once connected, audio from your PS4 will be streamed to your wireless headphones.
3. Do I need any additional equipment to connect wireless headphones to my PS4?
In most cases, no additional equipment is required to connect wireless headphones to your PS4. However, if your wireless headphones use a USB dongle for connectivity, make sure to plug the dongle into one of the USB ports on your PS4.
4. Can I use any brand of wireless headphones with my PS4?
The PS4 is compatible with a wide range of wireless headphone brands. However, it’s always a good idea to check the compatibility of your specific headphones with the PS4 before making a purchase. Refer to the manufacturer’s instructions or website for compatibility information.
5. Can I use the microphone on my wireless headphones while playing games on my PS4?
Yes, if your wireless headphones have a built-in microphone, you can use it while playing games on your PS4. However, it’s important to note that not all wireless headphones have a microphone feature. Make sure to check the specifications of your headphones to confirm if it includes a microphone.