
Are you tired of scrolling through a cluttered photo library on your iPhone or iPad? Well, there’s good news for you. With the advancement of technology, you can now filter images in your photo library with just a few simple steps. Whether you’re looking for that perfect vacation photo or trying to locate a specific screenshot, filtering images can save you time and frustration.
In this article, we will explore how to filter images in the photo library on your iPhone and iPad. From organizing photos by date or location to searching for specific images, we will cover all the tips and tricks you need to effectively manage and find your cherished memories. So, let’s dive in and discover how you can effortlessly navigate through your photo library and quickly find the perfect shot.
Inside This Article
- Methods for Filtering Images in Photo Library on iPhone and iPad
- Using the Photos App
- Using Third-Party Apps
- Filtering by Date or Location
- Filtering by Keywords or Tags
- Conclusion
- FAQs
Methods for Filtering Images in Photo Library on iPhone and iPad
If you have a vast collection of photos in your iPhone or iPad’s Photo Library, finding a specific image can sometimes be a daunting task. Luckily, there are several methods available to help you filter and organize your photos more efficiently. In this article, we will explore four methods for filtering images in the Photo Library on your iPhone and iPad.
1. Using the Search Bar
One of the quickest ways to find specific images in your Photo Library is by using the search bar. When you open the Photos app, you will see a magnifying glass icon at the bottom of the screen. Tap on it to activate the search bar.
Simply enter a keyword, such as a location, person’s name, or even an object, and the search results will display all related photos. This method makes it easy to locate specific images without the need to scroll through your entire Photo Library.
2. Sorting Photos by Date
If you want to filter your photos based on the date they were taken, sorting them chronologically can be a helpful method. To do this, go to the Photos app and select the “Albums” tab at the bottom. Next, tap on “My Albums” and choose the “Recents” album.
In the Recents album, your photos will be automatically arranged in order of the date they were taken, with the most recent photos appearing first. This feature allows you to easily navigate through your photos based on their capture dates.
3. Filtering Photos by Albums
Another effective way to filter images in your Photo Library is by utilizing albums. You can create custom albums to organize your photos into specific categories, such as vacations, family events, or memorable moments.
To create an album, open the Photos app and tap on the “Albums” tab at the bottom. Then, select the “+” icon to create a new album. Give it a name and start adding photos to the album by tapping on the “Select” option in each photo’s view and choosing “Add To” album.
Once you have created albums and added photos to them, you can easily filter your images by tapping on the desired album in the Albums tab. This method provides a convenient way to access specific groups of photos with just a few taps.
4. Applying Filters to Photos
If you’re looking to add some creative flair to your photos while filtering them, you can utilize the built-in filters available in the Photos app. These filters can help enhance the overall look and feel of your images.
To apply a filter to a photo, open the Photos app, select the desired photo, and tap on the “Edit” option. At the bottom of the screen, you will see a series of filter options to choose from. Simply tap on a filter to preview its effect on the photo.
You can also adjust the intensity of the filter by using the sliding scale. Once you are satisfied with the applied filter, tap on “Done” to save the changes. This method allows you to filter and personalize your photos with ease.
By utilizing these methods, you can efficiently filter and organize your images in the Photo Library on your iPhone and iPad. Whether you need to quickly locate a specific photo, sort them by date, create custom albums, or apply creative filters, these techniques will streamline your photo management process. Enjoy exploring your Photo Library with ease and finding your cherished memories in a snap!
Using the Photos App
If you’re looking for a seamless way to filter through your images in the Photo Library on your iPhone or iPad, the built-in Photos app is your go-to solution. With its user-friendly interface and powerful features, you can easily find specific photos by applying various filters.
Here’s how you can make the most of the Photos app to filter through your extensive image collection:
Step 1: Open the Photos app on your iPhone or iPad. It’s usually located on the home screen.
Step 2: Tap on the “Photos” tab at the bottom of the screen. This will display all the photos in your Photo Library.
Step 3: To filter the images based on specific criteria, tap on the “Search” bar at the top of the screen.
Step 4: You can now enter the specific search term you’re looking for. It could be a date, a location, a person’s name, or even an object. As you type, the Photos app will automatically suggest search terms that match what you’re entering.
Step 5: Tap on the suggested search term that matches your desired filter. The Photos app will display all the photos that meet the selected criteria.
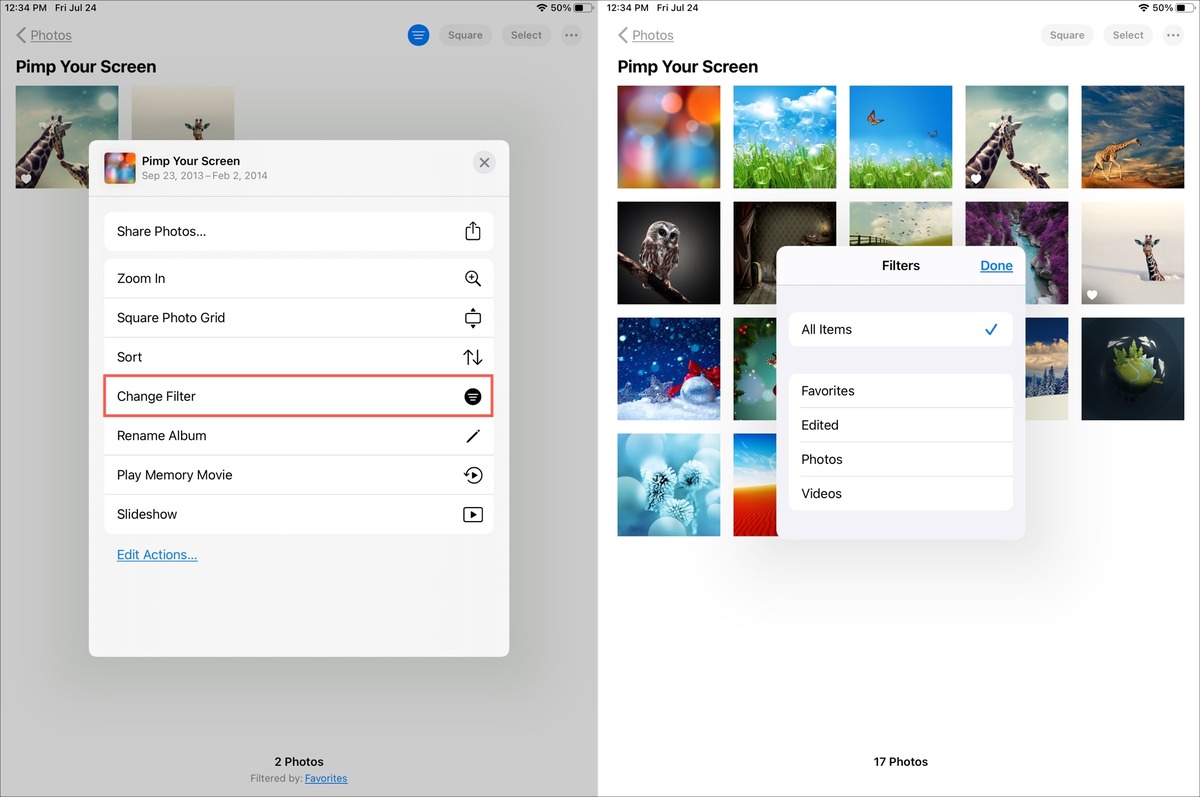
Step 6: If you want to further refine your search, you can tap on the “Filter” button located at the top-right corner of the screen. This will allow you to apply additional filters such as favorites, videos, selfies, portraits, and more. Simply select the desired filter to narrow down your search results.
By using the Photos app and its powerful filtering capabilities, you can quickly find the exact photos you’re looking for without having to scroll through countless images. Whether you want to find a specific date, location, or even a particular object captured in your photos, the Photos app makes it easier than ever to navigate and organize your photo library.
Using Third-Party Apps
If you’re looking for more advanced options to filter your images in the photo library on your iPhone or iPad, you can turn to third-party apps. These apps offer a wide range of features and capabilities to help you organize and filter your photos with ease.
There are numerous third-party apps available on the App Store that specialize in photo management and filtering. Some popular options include Google Photos, Adobe Lightroom, Snapseed, and VSCO. These apps offer powerful editing tools, advanced filters, and efficient organization features.
When using third-party apps, you’ll typically have more control over the filtering process. You can apply specific filters, adjust brightness, contrast, and other settings, and even create your own custom presets to give your photos a unique look. Many of these apps also offer advanced search and sorting options to help you find specific photos quickly.
One of the advantages of using third-party apps is the ability to sync your photos across multiple devices. This means that any changes you make, such as applying filters or organizing albums, will be reflected on all your devices, ensuring that your photo library remains consistent and up to date.
Additionally, these apps often have a more intuitive and user-friendly interface compared to the native Photos app. They are designed to enhance your photo editing and filtering experience, offering a range of tools and effects that can transform your images in just a few taps.
Before choosing a third-party app, take some time to explore the different options available and read reviews to find one that best suits your needs. It’s also worth noting that some of these apps may require a subscription or offer in-app purchases for certain features, so be sure to check the pricing and compatibility before downloading.
By using third-party apps, you can take your photo filtering to the next level and easily achieve the desired look and feel for your images.
Filtering by Date or Location
Filtering your photos by date or location can help you quickly find the specific images you’re looking for. Whether you want to view photos from a specific day or from a particular place, the iPhone and iPad offer convenient ways to filter your photo library.
To filter your photos by date, follow these steps:
- Open the Photos app on your iPhone or iPad.
- Tap on the “Photos” tab at the bottom of the screen.
- Scroll to the top of the screen and tap on the “Search” bar.
- Type in the date you want to filter by using the format “month day, year” (e.g., “June 21, 2022”).
- As you type, the Photos app will show you suggestions based on the available dates in your library. Tap on the correct date from the suggestions.
Once you’ve selected the date, the Photos app will display all the photos taken on that specific day. This makes it easy to browse through and find the images you’re looking for.
If you want to filter your photos by location, here’s what you need to do:
- Open the Photos app on your iPhone or iPad.
- Tap on the “Photos” tab at the bottom of the screen.
- Scroll to the top of the screen and tap on the “Search” bar.
- Type in the location you want to filter by (e.g., “New York City”).
- The Photos app will display suggestions based on the available locations in your library. Tap on the correct location from the suggestions.
After selecting the location, the Photos app will show you all the photos that were taken at that specific place. This feature is especially useful when you want to reminisce about a vacation or find pictures from a particular event.
Filtering your photos by date or location can save you time and make it easier to find the images you’re looking for. Whether it’s reliving a special memory or organizing your photo library, the iPhone and iPad offer intuitive ways to filter and navigate through your vast collection of pictures.
Filtering by Keywords or Tags
Filtering your photo library by keywords or tags is a powerful way to quickly find specific images on your iPhone or iPad. By adding keywords or tags to your photos, you can easily group and categorize them based on various criteria. Here’s how you can filter images using keywords or tags:
1. Open the Photos app on your iPhone or iPad.
2. Tap on the “Search” icon located at the bottom of the screen. It looks like a magnifying glass.
3. In the search bar, type in the keyword or tag you want to filter by. For example, if you want to find all photos of a beach vacation, type in “beach” or “vacation”.
4. As you start typing, the Photos app will display suggestions based on your keyword. Tap on the relevant suggestion to narrow down your search.
5. The search results will now show all the photos that match your keyword or tag. You can scroll through the results to find the specific image you’re looking for.
6. To remove the filter and see all your photos again, tap on the “x” button in the search bar or simply clear the search field.
Filtering by keywords or tags allows you to quickly find photos related to specific events, locations, people, or any other criteria you have assigned. This feature can be especially handy if you have a large photo library and want to locate certain images without scrolling through hundreds or thousands of photos.
By organizing your photos with keywords or tags, you can take advantage of this filtering feature to efficiently browse and manage your photo collection on your iPhone or iPad.
Conclusion
In conclusion, filtering images in the photo library on iPhone and iPad is a simple and effective way to manage your photo collection. By utilizing the built-in features and options provided by iOS, you have the power to easily find the images you’re looking for and organize them in a more structured manner.
Whether you want to search for specific photos based on various criteria, such as location or date, or you prefer to create your own custom filters, the photo library on your Apple device offers a range of tools to make the process seamless and efficient.
Take advantage of the underrated “Now You Know” feature to learn even more about your device’s capabilities and get the most out of your photo collection. With a few taps and swipes, you can filter, sort, and navigate through your images with ease, allowing you to relive your cherished memories or simply find that perfect shot for your next project.
So, go ahead and explore the photo library on your iPhone or iPad today. With the ability to filter images at your fingertips, you’ll be amazed at how much more organized and enjoyable your photo collection can be.
FAQs
1. Can I filter images in the photo library on my iPhone?
Yes, you can filter images in the photo library on your iPhone. The Photos app on iOS provides various options to filter and sort your images for easy organization and navigation.
2. How can I filter images based on date?
To filter images based on date, open the Photos app on your iPhone, tap on the “Photos” tab, then scroll up to reveal the search bar. Tap on the “Search” field and select the “Date” tab. From there, you can choose to filter images by month, year, or specific dates.
3. Is it possible to filter images based on location?
Yes, you can filter images based on location. In the Photos app, go to the “Photos” tab, scroll up to access the search bar, and select the “Places” tab. From there, you can search for specific locations or choose from suggested places to filter your images.
4. Can I filter images by album?
Absolutely! You can filter images by album in the Photos app. Go to the “Photos” tab, scroll up to reveal the search bar, and select the “Albums” tab. From there, you can choose a specific album or create a new one to easily filter your images.
5. Are there any other filters available besides date, location, and album?
Yes, besides date, location, and album, you can also use other filters to find specific images. In the Photos app, go to the “Photos” tab, scroll up to access the search bar, and you’ll find additional filters like “Favorites,” “Media Types,” and “Recently Deleted” to refine your image search.