
LumaFusion is one of the most sought-after apps for mobile video editing. Now, it’s bigger and better! Its newest version had tons of updates to make your videos more professional.
If you are using an iPad or iPhone, we know that you will be editing videos, and iMovie cannot do all the justice. No editing app can supersede Final Cut Pro, but when LumaFusion was released — it all changed.
What Is LumaFusion?
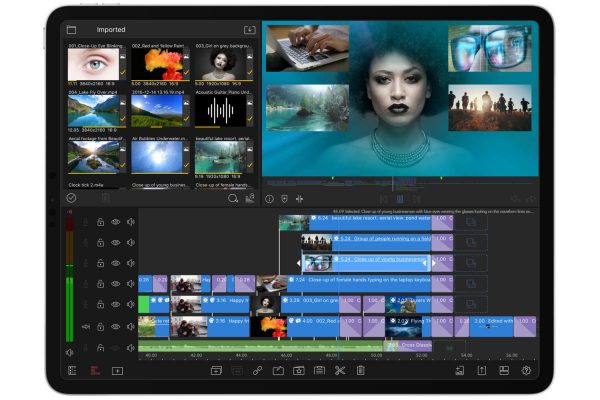
Lumatouch created LumaFusion, a team of video editing professionals designing amazing software for other creative professionals and enthusiasts. It is the first mobile video editor that lives up to the hype; LumaFusion is so ridiculously feature-packed that it seems unfair to pay the developer so little ($20) for it. Instead of a shiny new UI, this app makes use of multi-track editing. This method makes use of three tracks for video with audio and three for audio-only. It is done in a modular user interface, which is reminiscent of Final Cut Pro.
While other apps have limitations and you cannot maximize them on mobile, LumaFusion showcases comprehensive tools in a way that even first-time video editors would understand. Also, if you are using an iPhone, the interface is spacious for you to edit content conveniently.
LumaFusion’s quick help videos make it easier to understand each button for smoother editing. It also has multiple preset layouts to accommodate almost all kinds of editing style.
The app costs $29.99 with in-app features for some add ons. LumaFusion is compatible with the iPad and iPhone with iOS 10 and up.
If you are doing simple editing jobs, then $29.99 is expensive for you, as the editing app of iPad and iPhone, iMovie, is free.
What Are LumaFusion’s Key Features?
Editing
- Six video/audio tracks for photos, videos, audio, titles, and graphics
- Six additional audio tracks for narration, music and sound effects
- Magnetic Timeline with extended features such as insert/overwrite and link/unlink clip
- New track headers for locking, hiding, and muting all tracks
- Dozens of transitions
- Display your Preview on an external monitor
- Add markers to communicate about edits
Media Library
- “Open In” to import compatible files from other apps and mail
- Import multiple media files from Box, Dropbox, Google Drive, OneDrive, or iCloud Drive
- Import from SanDisk iXpand flash drives and network drives, including WD Wireless Pro and the new WD Wireless SSD
- Download media stored in iCloud Photo Library directly to the app
- View detailed information and metadata about your media
- Rename, add notes, color-tag and pre-trim clips in the library
- Multi-select clips for dragging to timeline or color tagging
Audio
- Keyframe audio levels and panning for perfect mixes
- Listen to your mix while adjusting track levels
- Fill-from-left and fill-from-right for dual-mono audio captures
- Select tracks from multiple track files (perfect for screen recordings)
- Duck background music during dialog with Auto-ducking
- Add audio filters and EQ
Title
- Create multi-layer titles with text, shapes, and images
- Adjust font, color, face, border, and shadow
- Import new fonts with “Open In”
- Save title presets or styles
- Apply effects and motion transitions to claims to animate
Effects
- Layer multiple styles, blurs, pixel effects, color, and distortion effects
- The full-color correction allows you to correct problems such as fluorescent light
- Layer effects and color in any order to create endless effects
- Chroma key filter for green screen, blue screen, luma keying and more
- Add unlimited keyframes to animate your effect or color at any frame
- See all of your changes instantly with a real-time preview of all edits and effects
- Save and share motion and effects presets
- Copy and paste effects and attributes between clips
Slow and Fast Motion
- Create slow-motion/fast-motion forward and reverse
- Support for 120fps and 240fps slo-mo and time-lapse video files
Project Management
- Create projects with square, 16:9, 9:16 4:3 or film aspect ratios matching FiLMiC Pro clips (1.66:1, 17:9, 2.2:1, 2.39:1, 2.59:1)
- 2:1 aspect ratio projects for editing 360° videos
- Create projects with 18p, 24p, 25p, 30p, 50p and 60p frame rates to eliminate conversion jitter
- Duplicate, add notes, color-tag, search and sort your projects for easy organization
- Export and Import project archives that include full original media (or trimmed media for smaller archives)
- Support for split-screen multitasking
How to Edit Videos Using LumaFusion?
The first time you open the app, it will ask you to give access to your camera roll. Make sure you click on yes so you can easily import videos from your gallery.
LumaFusion will also prompt you to watch tutorials. Or you can check out this video from Justin Brown-Primal Video and continue reading our article.
Creating Your First Project
Projects can be created in integer and non-integer frame rates from 18-60 frames per second (fps) and aspect ratios including 16:9, 1:1, 9:16, and a variety of other aspect ratios including wide-screen film aspect ratios, and aspect ratios for screen recordings and App Preview videos for different iOS devices.
After you agree to give access to your camera roll, you’ll immediately go to a blank project timeline.
To Start a New Project:
- Tap on the Create Project button at the bottom of the Project Manager. A popup will appear, letting you name the project and set the initial aspect ratio and frame rate.
- Tap on the Create Project button on the panel to create the project. The project manager will close so you can begin editing.
Tips:
- Tap on Help and Settings and go to the Settings tab to change the Frame Rate and Frame Aspect Ratio of your current project.
- You can also change the Frame Rate and Frame Aspect Ratio at the time of export.
- It is always best to duplicate the frame rate of your original clips to the one you want for your project.
- If you shoot at 30fps and set your project to 60fps, you will not be gaining any quality by exporting at a higher frame rate. Every frame will have to be displayed twice to make up 60fps, mainly resulting in a 30fps movie with twice the data.
- For 360° projects, you must set the project aspect ratio to 2:1.
Managing Projects
The Project Manager provides a list of all of your projects, giving you options to create new projects, import projects, duplicate, consolidate and optimize, and delete projects.
Open and close the Project Manager by tapping on the Project Manager button.
Navigating the Project Filmstrip
Each project in the list includes a filmstrip that gives you a quick idea of the project’s contents.
- Click anywhere on the project’s filmstrip or data to select a project.
- Tap a second time on a project to open the project.
- Press the play button under the Preview to play a project.
- Tap on the Info button under the Preview to see information about the project.
LumaFusion goes well with device gestures too. You can tap on a project and slide your finger along the filmstrip to quickly scrub through the selected project. You can also use the standard Preview buttons to play and preview the project without closing the project manager.
Adding a Project
- Open the Project Manager by tapping on the Project Manager button.
- Tap on the Create Project button to create a new project. A popup will appear asking you to name the project and select the Aspect Ratio and Frame Rate (these can be changed at any time in Help and Settings on the Settings tab, and you can change the default values for these on the Preferences tab).
- Tap the Create Project button on the panel to create the project and begin editing (the Project Manager will close automatically).
Color-Tagging a Project
In the Project Manager, tap on the Color Tag button located to the left of the project name to open the color tag popover. You can later search or sort by color tag, helping you to organize your projects.
Renaming a Project
- Tap on the name of the project in the Project Manager to edit the project’s name.
- Tap on the Info button and then on the Project name to rename it.
Adding Notes to a Project
- Tap on the Notes button to edit notes for the project.
- Tap outside of the Notes popover to close it. The Notes popover will appear, and you can type at will.
Remember, if you don’t have a keyboard connected, you can use the microphone button located on the on-screen keyboard to dictate your notes quickly.
If you mistakenly delete a project, you can restore it by accessing the automatic project data backup.
Adding Titles, Effects, and Transitions
The flower icon has all the library you need for your editing. From here, you can access all your photos, files, and imported documents. You can also access story blocks, titles, music, and transitions.
Whenever you switch between sources, LumaFusion will keep track of your last location within each source to quickly find and work with your media.
Adding/Editing Library Sources
You can add, remove, and organize your Library Sources. Limiting the source list to the items you use will help you stay focused and work faster.
To add, remove, or reorder a source:
- Tap on the Add/Edit Sources button.
- Touch and hold on the handle buttons to drag the sources between the Available column and the In-Use column. Items in the In-Use column will appear in LumaFusion in the order shown.
- Move the items up or down in the list to reorder. You can pick up multiple items by tapping and holding on one item, and then tapping on an additional item with another finger.
- Tap on the back button in the upper left of the panel to exit.
Storyblocks
Under the Storyblocks tab you’ll find:
- Contents from the Storyblocks for LumaFusion royalty-free stock footage and music Library including Backgrounds, Footage, Loops, Music, and Sound FX. (Requires internet connection and subscription for the full library – some items are provided for free.)
- Storyblocks clips that have already been downloaded in a Downloaded Media folder
Storyblocks is a separate subscription from LumaFusion.
Titles
Under the Titles tab you’ll find:
- Standard Title templates included with LumaFusion
- Any titles that you’ve created and saved as Title Presets in the Title Editor
Music
The Music tab includes:
- All unprotected media that has been downloaded to your iPhone or iPad using the Music App
- Any media synced to your iPhone or iPad using iTunes, including any videos
LumaFusion provides an advanced multitrack Timeline that gives you complete control to create amazing sequences and compositions while keeping clips on additional tracks in sync with the story on your main Timeline as you make changes.
Transitions
The Transitions tab includes a variety of transitions to add before, after, and between clips on your Timeline.
Transitions are effective animations that can be used to introduce, switch between, or have a clip enter from or exit to black (fade-in or fade-out).
For audio clips or audio associated with a video clip, any transition will work as a volume fade.
If you do not want the audio of a video+audio clip to be faded, triple-tap on the video clip to detach the audio onto a separate track before or after adding the transition.
- They can be added between two clips (video, photo, title, or audio) to create a smooth animation and volume fade between the first clip (A) and the second clip (B).
- Transitions can be added to the head of a Timeline or overlay clip to animate its appearance or fade in the audio.
- Transitions can be added to the tail of the Timeline or overlay clip to animate its disappearance or fade out the audio.
- Tap on the Add Clip button on the Timeline and select Transition.
When the play head is in position on a cut point or at the Timeline’s head or tail, the default transition length will be added.
When the play head is within a selected clip, then the transition will be added at the nearest cut, and the duration will be determined by the distance from the play head to the closest cut.
Tips and Tricks:
Transitions from the Library are quick and easy to use, but it is possible to design and animate your custom transitions by using two tracks on the Timeline. Then using keyframing in the Frame and Fit Editor or the Color and Effects Editor to transition from one clip to another.
Effects
Effect Presets quickly set a base color correction or effect and then, if desired, modify the parameters.
The effects preset are organized into categories: Color, Look Up Tables (LUTs), Styles, Blurs, Distort Effects, Chroma and Luma-Key, and Custom Saved Presets.
Tap on a preset within a category to apply it. If the preset includes any effects not used already, the desired effects will then be added. Otherwise, it will modify the existing impact (s) on the clip.
The Pros and Cons of Using LumaFusion
There are many other things that you can do in LumaFusion; no other phone editor is more powerful than this. You can create critical editing concepts like a ripple effect and click linking.
You can mix audio, add filters, or play with the equalizer and add voice overs.
There is also a speed editor to add character to your video — hyperlapse or slow-mo.
Although this is a powerful editor, your limitation will depend on your device. iPhone and iPad have limited storage, and the only upgrade you can get is subscribing to additional cloud storage.
Unlike editing on a desktop system with a high performing CPU, these units can be upgraded to better speed and memory.
Another challenge is importing and exporting media. Since iPad and iPhones are portable devices, you will need adapters to insert flash drives — unless you are using OTG, type C flash drives, which are used to the latest models.
If you are doing heavy video editing, the screen size would also be a problem. You will miss those movements if you are used to using a mouse when splitting and rearranging clips.
On the contrary, LumaTouch supports gestures to make it easier for the user to perform such actions.
Alternatives to LumaFusion
There are other options for video editing software available for download. If you are just starting, you can use iMovie for your iOS device. It can do justice from splitting clips and adding simple transitions.
If you are into vlogs, you can use Vlogit by Filmora. It has a pretty good UI with added color effects and transitions. It also has a royalty-free music library that you can use for your videos. You can upload directly to Youtube with options to create a thumbnail.
If you are into lifestyle videos, then you can try Quik. It’s the video editing app from Go Pro, but you can still edit videos even if you do not own one.
It has preset video styles complete with thematic music, transitions, and titles. If you are just creating a picture slideshow, Quik will automatically adjust the duration of each photo and video clips.
Other video editing software caters to social media vertical video formats and is perfect for IG stories and Snapchats.
Nonetheless, if you are not sure whether $29.99 is a good price to invest in LumaFusion, you can start with free apps first and get the hang of it.
LumaFusion is currently not available for Android devices. But Android users are surely not left out with these best Android video editor apps.
If you want to try other alternatives, check out our review guides for Adobe Premiere Rush and VivaVideo.