
Have you ever captured a great video on your iPhone or iPad, but there are unwanted parts that you’d like to remove? Well, you’re in luck! With the Photos app on your iPhone or iPad, you can easily trim your videos and keep only the best moments. Trimming a video allows you to get rid of unnecessary footage, adjust the length, and make your video more focused and engaging. In this article, we will explain step-by-step how to trim a video using the Photos app on your iPhone or iPad. Whether you’re a novice or a seasoned user, you’ll find this guide helpful in mastering the art of video editing on your iOS device.
Inside This Article
- How to Trim a Video on iPhone or iPad Photos App
- Frequently Asked Questions
- Opening the Photos App
- Initiating the Trim Function: Discovering the trimming feature in the Photos app – Understanding how to access the editing options for a video
- Trimming Your Video – Step-by-step instructions for trimming a video on iPhone or iPad – Tips for precision trimming and selecting the desired portions of the video
- Additional Editing Options- Exploring other editing functions available in the Photos app- Brief overview of features like applying filters or adding music to videos
- Saving and Sharing Your Trimmed Video
- Troubleshooting and Tips- Common issues and challenges when trimming videos on iPhone or iPad- Useful tips and tricks to enhance your video editing experience
- Conclusion
- FAQs
How to Trim a Video on iPhone or iPad Photos App
The Photos app on your iPhone or iPad is not just for storing and organizing your precious memories. It also offers a range of editing tools to enhance and customize your videos. One of the most commonly used editing features is video trimming, which allows you to remove unwanted sections and create a more concise and polished final video.
To help you master the art of video trimming on your iPhone or iPad Photos app, we have prepared a step-by-step guide that will have you trimming like a pro in no time.
Step 1: Opening the Photos app
Start by locating and opening the Photos app on your iPhone or iPad. This app comes pre-installed on all iOS devices and is represented by a multicolored flower icon. Once you’ve opened the app, you’ll be greeted with your photo library.
Step 2: Selecting the desired video
Browse through your photo library or albums to find the video you want to trim. Tap on the video to open it and view it in full screen mode. You can make sure you have the right video by playing it for a few seconds.
Step 3: Accessing the video editing tools
Tap on the “Edit” button located at the top right corner of the screen. This will bring up the video editing toolbar at the bottom of the screen. The toolbar includes various editing options such as trim, filters, and adjustments.
Step 4: Trimming the video length
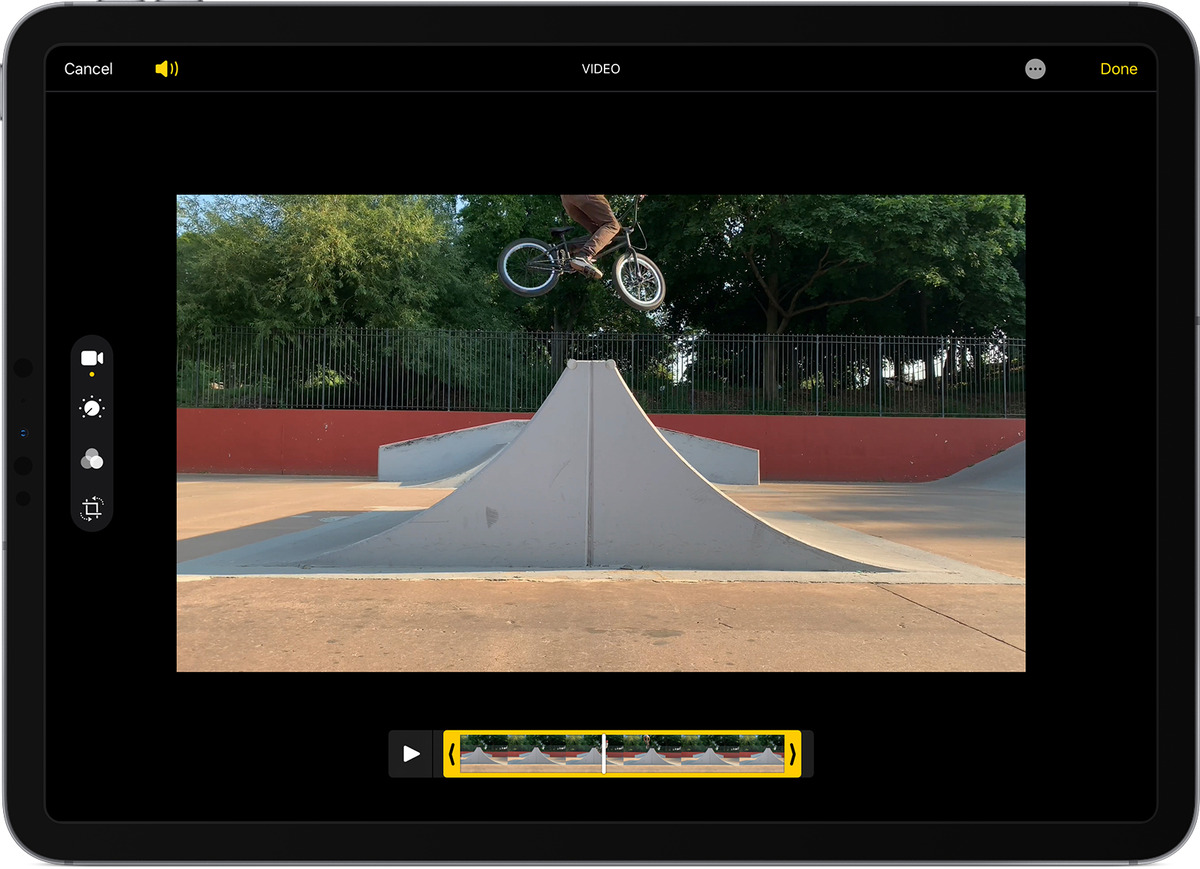
To start trimming the video, locate and tap on the “Crop & Rotate” icon, which looks like a square overlapping two arrows. This will open the video trimming interface.
You will see two yellow handles on the timeline representing the start and end points of the video. To trim the video, simply drag these handles left or right to adjust the desired start and end points. As you move the handles, the preview window above will show the trimmed portion of the video in real-time.
Once you are satisfied with the trim, tap on the “Done” button located in the bottom right corner. This will apply the changes and save the trimmed version of the video to your photo library.
And that’s it! You’ve successfully trimmed a video using the Photos app on your iPhone or iPad. Now you can share your trimmed masterpiece with friends and family or upload it to your favorite social media platform.
Frequently Asked Questions
Q: Can I undo the video trimming if I make a mistake?
A: Yes, you can easily undo the video trimming if you make a mistake. Simply reopen the video in the Photos app and tap on the “Edit” button. From there, you can access the video trimming interface and readjust the start and end points as needed.
Q: Will trimming a video on the Photos app affect the original video file?
A: No, trimming a video on the Photos app does not affect the original video file. The app creates a new trimmed version of the video, leaving the original file intact in your photo library.
Q: Can I trim videos taken with other camera apps using the Photos app?
A: Yes, you can trim videos taken with other camera apps using the Photos app. As long as the video is saved in your photo library, you can easily access it and apply the video trimming feature.
Q: Are there any limitations on the length of the video I can trim?
A: The length of the video you can trim depends on the available storage space on your device. However, it’s worth noting that trimming extremely long videos may impact the overall quality and performance of your device.
Q: Can I re-trim a video after I have already saved the trimmed version?
A: Unfortunately, once you have saved the trimmed version of a video, you cannot re-trim it using the Photos app. If you wish to make further changes to the video, you will need to use a third-party video editing app or software.
Now that you have the knowledge and guidance on how to trim a video on the iPhone or iPad Photos app, go ahead and start perfecting your videos with ease. Enjoy the process of creating impactful and concise videos that will captivate your audience!
Opening the Photos App
When it comes to trimming a video on your iPhone or iPad, the first step is to open the Photos app. This app is your go-to hub for all your photos and videos, making it easy to access and edit your multimedia content.
To open the Photos app, start by locating its icon on your home screen. The Photos app icon features a colorful flower, reminiscent of the app’s purpose – capturing and preserving your precious memories.
Once you’ve located the Photos app icon, tap on it to launch the app. This will take you to the main menu of the Photos app, where you can see your entire photo and video library neatly organized and ready for your exploration.
Accessing the Photos App from the Home Screen
Accessing the Photos app from the home screen is a breeze. Simply locate the Photos app icon and tap on it, just like you would any other app on your iPhone or iPad.
If you can’t find the Photos app icon on your home screen, you can use the search feature. Swipe down on your home screen or swipe right from the far left home screen to access the search bar. Type “Photos” in the search bar, and you should see the Photos app appear in the results. Tap on it to open the app.
Navigating to the Desired Video within the App
Once you’ve successfully opened the Photos app, it’s time to navigate to the specific video you want to trim. With the app open, you’ll see a variety of tabs at the bottom of the screen, such as Photos, For You, Albums, and Search.
Tap on the “Photos” tab to view your entire library of photos and videos. From here, you can browse through your media in chronological order, with the most recent files appearing first.
If you’re looking for a specific video, you can use the “Search” tab to quickly find it. Tap on the “Search” tab, then type in the keyword or title of the video you’re looking for. The Photos app will then display relevant search results based on your query.
Another way to find your desired video is by using albums. Tap on the “Albums” tab at the bottom of the screen to access your different photo and video albums. Browse through the albums until you find the one that contains the video you want to trim. Tap on the album to open it and locate the video.
Once you’ve located the specific video you want to trim, you’re ready to move on to the next step in the process – accessing the video editing tools within the Photos app.
Initiating the Trim Function: Discovering the trimming feature in the Photos app – Understanding how to access the editing options for a video
Trimming a video on an iPhone or iPad can be easily done using the built-in Photos app. This feature allows you to remove unwanted sections of a video, making it more concise and tailored to your needs. To begin the trimming process, follow the steps outlined below.
Step 1: Open the Photos app on your iPhone or iPad. Look for the Photos app icon, which resembles a multicolored pinwheel, and tap on it to launch the app.
Step 2: Select the desired video. Navigate through your photo library or albums to locate the video you wish to trim. Tap on the video to open it in full screen.
Step 3: Access the video editing tools. On the bottom-right corner of the screen, you will find a series of icons. Tap on the ‘Edit’ button, which is represented by three horizontal lines enclosed in a square.
Step 4: Trim the video length. After tapping on the ‘Edit’ button, the video editing options will appear at the bottom of the screen. To start trimming, tap on the ‘Crop’ icon, which looks like a square overlapping two diagonal lines.
Step 5: Adjust the trim points. Once you’re in the editing mode, two vertical yellow lines will appear at the beginning and end of the video timeline. You can drag these lines left or right to adjust the trim points. The area between the trim points represents the portion of the video that will be kept.
Step 6: Preview and save the trimmed video. As you adjust the trim points, the video preview will update accordingly. To preview your changes, tap on the play button located at the bottom of the screen. Once you are satisfied with the trimmed video, tap on the ‘Done’ button to save your changes.
Now you know how to initiate the trim function and access the editing options for a video in the Photos app on your iPhone or iPad. By mastering this feature, you can create more polished and concise videos that are perfect for sharing with friends, family, or on social media.
Trimming Your Video – Step-by-step instructions for trimming a video on iPhone or iPad – Tips for precision trimming and selecting the desired portions of the video
Trimming a video on your iPhone or iPad can be a useful skill to have, especially when you want to remove unwanted content or create shorter clips for sharing on social media platforms. The Photos app on your iPhone or iPad provides an easy and convenient way to trim your videos with just a few taps. In this article, we’ll guide you through the process with step-by-step instructions and share some tips for precision trimming and selecting the desired portions of your video.
Follow these step-by-step instructions to trim a video on your iPhone or iPad:
Step 1: Opening the Photos app
To begin, locate and open the Photos app on your iPhone or iPad. This app allows you to manage and access all the photos and videos stored on your device.
Step 2: Selecting the desired video
Once you’re in the Photos app, navigate to the “Videos” album or simply scroll through your library to find the video you wish to trim. Tap on the video to open it.
Step 3: Accessing the video editing tools
With the video opened, you’ll notice a set of editing tools at the bottom of the screen. Look for the “Edit” button and tap on it to access the video editing options.
Step 4: Trimming the video length
After tapping the “Edit” button, you’ll see the video timeline at the bottom of the screen. To trim the video, drag the handles at either end of the timeline to choose the desired start and end points of the clip. You can also use your fingers to pinch and zoom on the timeline for more precise control.
Remember to preview the video as you trim to ensure you’re selecting the exact portions you want. Once you’re satisfied with the trimming, tap on the “Done” button to save your changes.
Tips for precision trimming and selecting the desired portions of the video:
- Use the zoom-in feature on the video timeline by pinching and zooming with your fingers. This will help you get a more accurate view of the video frames and make precise trim selections.
- Pay attention to the playhead marker on the timeline. It indicates the current position of the video. Use it to navigate to specific parts of the video before making your trim selections.
- If you need to make detailed adjustments to the trim selection, tap on the handles and drag them in smaller increments.
- To undo any trimming changes, tap on the “Reset” button located next to the “Done” button.
By following these simple steps and utilizing the tips mentioned above, you’ll be able to trim your videos on your iPhone or iPad effortlessly. Experiment with different trim selections to create shorter clips for sharing or remove unwanted content from your videos with ease. Enjoy creating and sharing your trimmed videos!
Additional Editing Options- Exploring other editing functions available in the Photos app- Brief overview of features like applying filters or adding music to videos
Aside from trimming your videos, the Photos app on your iPhone or iPad offers a range of additional editing options to enhance your videos further. Let’s take a brief look at some of these features:
1. Applying Filters: The Photos app provides a variety of filters that can transform the look and feel of your videos. Whether you want to add a vintage touch or make your videos vibrant and colorful, you can easily experiment with different filters to achieve the desired effect.
2. Adjusting Exposure and Saturation: With the Photos app, you can fine-tune the exposure and saturation levels of your videos. This allows you to control the brightness and contrast of your videos, ensuring they appear visually appealing to viewers.
3. Adding Music: Want to add a soundtrack to your videos? The Photos app lets you enhance the audio experience by adding music from your device’s library or choosing from the app’s collection of soundtracks. You can even customize the volume levels to ensure the perfect balance between the video’s audio and added music.
4. Applying Text and Titles: The Photos app also allows you to overlay text and titles onto your videos. This feature is particularly useful if you want to add context, captions, or introduce different segments within your videos. You can choose from a variety of fonts, sizes, and styles to suit your preferences.
5. Cropping and Rotating: If you want to change the aspect ratio or orientation of your videos, the Photos app provides options to crop and rotate them. This can be handy for creating videos that are optimized for different platforms or correcting any accidental filming mistakes.
6. Adding Slow Motion or Time-Lapse Effects: The Photos app offers the ability to create captivating slow-motion or time-lapse videos. You can control the speed at which the video plays, allowing you to capture fascinating details or condense long sequences into shorter, more dynamic clips.
These additional editing options in the Photos app provide you with creative ways to enhance your videos without the need for third-party editing tools. Whether you want to apply filters, add music, or make adjustments to the visual elements of your videos, the Photos app has you covered.
Remember to always experiment and have fun with these features to bring out the best in your videos. Happy editing!
Saving and Sharing Your Trimmed Video
After you have successfully trimmed your video using the Photos app on your iPhone or iPad, you might be wondering how to save and share the edited video with the trimmed version. Fortunately, the process is simple and can be done directly within the Photos app. Here’s a step-by-step guide on how to do it:
Saving the Edited Video with the Trimmed Version
Once you have trimmed the video to your desired length, follow these steps to save the edited video:
- Tap on the “Done” button located at the top right corner of the screen.
- A confirmation message will appear, asking if you want to save the video as a new clip or overwrite the original. Choose the option that suits your needs.
- If you select “Save as New Clip,” a duplicate of the trimmed video will be created, while the original video remains untouched. This allows you to keep both versions and decide which one to use in the future.
- If you choose to “Overwrite,” the original video will be replaced with the trimmed version.
- Once you have made your selection, tap on “Save Video” to finalize the process.
Now that you have saved the edited video with the trimmed version, let’s explore the options for sharing it through various platforms.
Options for Sharing the Trimmed Video Through Various Platforms
The Photos app offers multiple ways to share your trimmed video. Here are some common platforms you can use:
- Messages: Tap on the share icon (a square with an upward arrow) located at the bottom left of the screen. Choose “Messages” from the list of options and select the recipient to share the video directly through a text message.
- Email: Similar to sharing through messages, tap on the share icon and select “Mail.” Choose the desired email client from the list and fill in the recipient’s email address to send the video as an attachment.
- Social Media: If you prefer to share your trimmed video on social media platforms, tap on the share icon and select the platform of your choice, such as Facebook, Instagram, or Twitter. The Photos app will open the respective app, allowing you to add captions, tags, and other details before posting the video.
- Cloud Storage: If you use cloud storage services like iCloud, Google Drive, or Dropbox, you can easily save the trimmed video to your preferred cloud storage platform. Tap on the share icon and select “Save to Files” or “Save to iCloud Drive.” Choose the destination folder and save the video for future access from any device.
- Note: To use cloud storage services, make sure you have the relevant apps installed on your device.
These are just a few examples of how you can share your trimmed video through various platforms. The Photos app provides a seamless experience for saving and sharing videos, making it convenient to showcase your creativity and memorable moments with friends, family, and your online community.
Troubleshooting and Tips- Common issues and challenges when trimming videos on iPhone or iPad- Useful tips and tricks to enhance your video editing experience
Trimming videos on your iPhone or iPad can be an essential part of your video editing process. However, it’s not uncommon to encounter a few challenges along the way. In this section, we will explore common issues that users face when trimming videos on their iPhone or iPad and provide some useful tips and tricks to help enhance your video editing experience.
1. Video playback issues: One common challenge that users face is encountering playback issues when trying to trim a video. If you experience this problem, try closing and reopening the Photos app or restarting your device. Sometimes, a simple refresh is all that’s needed to resolve the playback problems.
2. Inaccurate trimming: Another issue you may encounter is inaccurately trimming the video. This can happen when the trimming handles are not positioned correctly or when you mistakenly trim off more or less than intended. To avoid this, be careful when positioning the trim handles and zoom in if necessary to get a more precise view of the video.
3. Loss of video quality: Trimming a video multiple times can sometimes result in a loss of video quality. This is because each trim involves re-encoding the video, which can lead to a degradation in quality. To minimize this, try to trim the video only once and avoid multiple trimming sessions if possible.
4. Unexpected video cropping: When trimming a video, you may occasionally encounter unexpected cropping of the video frame. This can happen if the video aspect ratio is not compatible with the aspect ratio of the project. To prevent this, make sure to check the aspect ratio settings before starting the trimming process and adjust them accordingly.
5. Slow trimming process: If you find that the trimming process is taking too long, it could be due to the size of the video file or the processing power of your device. In such cases, it’s recommended to transfer the video to a computer and use dedicated video editing software for a faster and more efficient trimming experience.
6. Utilize additional editing tools: The Photos app on your iPhone or iPad offers various other editing tools that can further enhance your trimmed videos. Experiment with features like filters, adjustments, and effects to add a professional touch to your videos and make them stand out.
7. Take advantage of third-party apps: If you find that the built-in trimming capabilities of the Photos app are not sufficient for your editing needs, consider exploring third-party video editing apps available on the App Store. These apps often offer advanced features and more flexibility in terms of video editing options.
By troubleshooting these common issues and implementing the tips and tricks mentioned above, you can overcome challenges and enhance your video editing experience on your iPhone or iPad. Remember to practice and experiment with different techniques to improve your skills and create compelling videos that leave a lasting impression.
Conclusion
Trimming videos on your iPhone or iPad using the Photos app is a quick and easy way to edit your footage. Whether you want to remove unwanted sections, adjust the length, or create highlight reels, the built-in video trimming feature has got you covered.
With just a few taps, you can trim your videos to perfection, ensuring that only the best moments are captured. The intuitive interface and simple controls make the process accessible for users of all skill levels.
So, next time you have a video that needs a little touch-up, don’t hesitate to use the editing tools in the Photos app. Get creative, experiment with different trims, and unleash your inner filmmaker!
Start exploring the video trimming capabilities of your iPhone or iPad today and make your videos shine!
FAQs
1. Can I Trim Videos on the iPhone or iPad Photos App?
Absolutely! You can easily trim videos on your iPhone or iPad using the built-in Photos app. It allows you to quickly edit and customize your videos without needing any external apps or software.
2. How do I Trim a Video on the iPhone or iPad Photos App?
To trim a video on your iPhone or iPad, follow these steps:
- Open the Photos app and locate the video you want to trim.
- Tap on the video to open it and then tap the “Edit” option at the top-right corner.
- Below the video, you’ll see a timeline with two brackets that represent the start and end points of the video.
- Drag the brackets inward to the desired start and end positions to trim the video.
- Once you’re happy with the trimmed video, tap “Done” to save your changes.
3. Will Trimming a Video Reduce its Quality?
No, trimming a video on the iPhone or iPad Photos app does not reduce its quality. The trimming process only removes the specified portions without affecting the overall quality of the video.
4. Can I Undo Trimming a Video on the iPhone or iPad Photos App?
Yes, you can undo trimming a video on the Photos app. After you tap the “Done” button, your original video remains intact, and you have the option to revert to the original version. Simply open the video in the Photos app, tap “Edit,” and then tap “Revert” to undo the trimming.
5. Can I Trim Videos and Add Effects Simultaneously?
Unfortunately, you cannot add effects or make any other video edits while trimming a video on the iPhone or iPad Photos app. The trim function is specifically for adjusting the start and end points of the video. If you want to add effects or apply other edits, you’ll need to use third-party video editing apps available on the App Store.