
Are you looking to set up your D-Link wireless router? Look no further! In this comprehensive guide, we will walk you through the step-by-step process of installing your D-Link wireless router.
Setting up a wireless router can seem like a daunting task, especially if you’re not familiar with the technical aspects. But don’t worry, we’ve got you covered. Whether you’re a tech-savvy individual or a beginner, this article will provide you with all the information you need to successfully install your D-Link wireless router and get your home network up and running in no time.
We’ll cover everything from unpacking your router and connecting it to your modem, to configuring the settings and securing your network. So, grab your router, follow along, and let’s get started on setting up your D-Link wireless router!
Inside This Article
- Step 1: Unboxing and Checking Contents
- Step 2: Connecting the Router to Power
- Step 3: Connecting the Router to the Modem
- Step 4: Configuring Basic Settings
- Step 5: Connecting Devices to the Wireless Network
- Step 6: Setting Up Advanced Features
- Troubleshooting Tips
- Conclusion
- FAQs
Step 1: Unboxing and Checking Contents
When you purchase a D-Link wireless router, the first step is to unbox and check its contents. This is an important step to ensure that you have all the necessary components for the installation process.
Begin by carefully opening the packaging of the router. Inside, you should find the router itself, along with a power adapter, an Ethernet cable, and a quick installation guide. Some routers may also come with additional accessories or documentation, so make sure to check everything included.
Inspect the router to ensure that there are no visible damages or defects. Look for any scratches, dents, or loose components. It’s important to have a router in pristine condition to ensure optimal performance.
Next, check the power adapter and Ethernet cable. Ensure that there are no frayed wires or loose connections. These components are vital for powering the router and establishing a wired connection to your modem.
Refer to the quick installation guide for any additional items that should be included. This guide will also provide you with an overview of the installation process and the steps you need to follow.
By thoroughly unboxing and checking the contents of your D-Link wireless router, you can start the installation process with confidence, knowing that you have all the necessary components and a router in good working condition.
Step 2: Connecting the Router to Power
Once you have unboxed your D Link Wireless Router and checked all the contents, it’s time to connect the router to power. This step is essential to provide the necessary electrical supply to the router, enabling it to function properly and emit wireless signals.
To connect the router to power, you will need to locate the power adapter that came with your router. This adapter is designed to convert the standard AC power from your wall outlet into the DC power required by the router. It usually has a cable with a connector on one end that fits into the router’s power input port.
Before connecting the power adapter to the router, you should ensure that the router is placed in a suitable position. It is recommended to keep the router in an elevated position, such as on a table or shelf, to improve the wireless signal coverage. Additionally, make sure that the router is not obstructed by any objects that may interfere with its signal transmission.
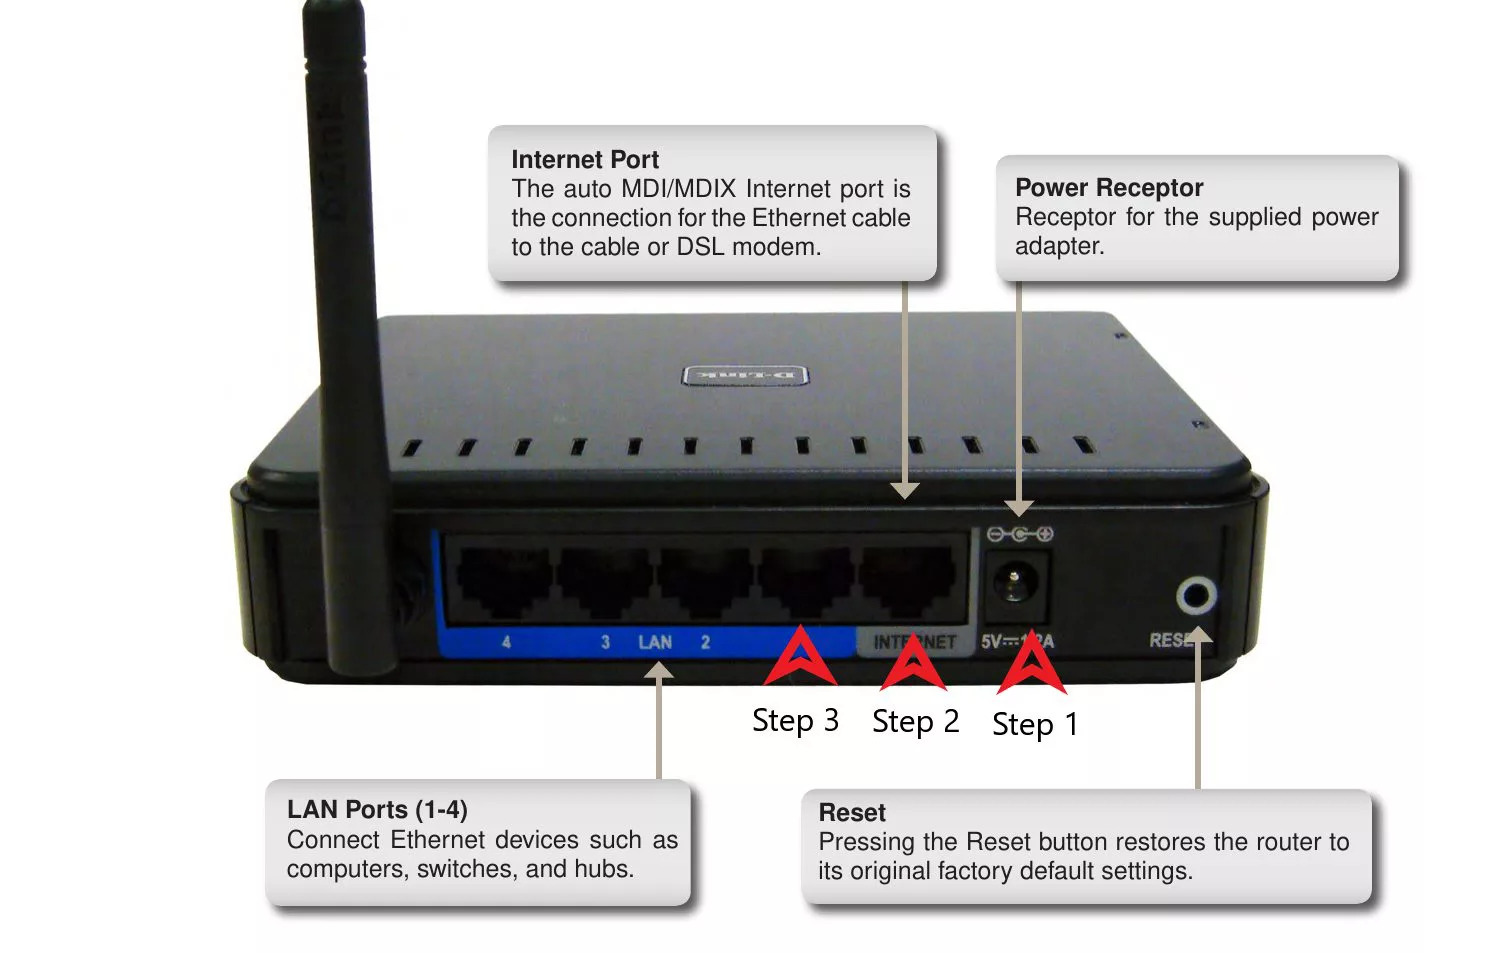
Once you have found a suitable location for your router, plug one end of the power adapter into the power input port on the back of the router. The power input port is typically labeled as “Power” or indicated by a lightning bolt symbol. Insert the connector firmly, making sure it is securely connected.
After connecting the power adapter to the router, you can then plug the other end of the power adapter into a wall outlet or power strip. Ensure that the outlet or power strip is supplying a stable source of electricity and is easily accessible. Avoid plugging the router into a switched outlet or a power strip with a switch, as this may accidentally turn off the router.
Once the power adapter is connected to the router and plugged into a power source, you should see the router’s LED lights illuminate. These lights indicate that the router is receiving power and initializing its startup process. Allow the router a few moments to boot up completely.
It is worth noting that some D Link Wireless Routers may have a power switch located either at the rear or side of the device. If your router has a power switch, make sure it is turned on after connecting the power adapter. This simple step ensures that the router can receive power and function as intended.
With the router now connected to power, you have successfully completed the second step in the installation process. Next, we will move on to connecting the router to your modem, which is vital for establishing an internet connection. Stay tuned for the next step!
Step 3: Connecting the Router to the Modem
Once you have unboxed your D-Link wireless router and connected it to a power source, the next step is connecting it to your modem. This is an essential step to establish a connection between your router and the internet.
Before getting started, make sure you have the necessary cables handy. Typically, you will need an Ethernet cable, which is commonly included with your router.
Follow these simple steps to connect your router to the modem:
- Locate the Ethernet port on the back of your modem. It is usually labeled as “LAN” or “Ethernet”. Plug one end of the Ethernet cable into this port.
- Find the WAN or Internet port on the back of your D-Link wireless router. It is usually labeled and easily distinguishable from other ports. Connect the other end of the Ethernet cable into this port.
- Ensure both ends of the Ethernet cable are securely inserted into their respective ports. A snug fit will ensure a stable connection.
- Power on your modem and wait for it to establish a connection with your internet service provider (ISP). This process may take a few moments, so be patient.
- Once your modem is connected to the internet, it’s time to power on your D-Link wireless router. Locate the power button or switch on the router and turn it on.
- Wait a few moments for the router to establish a connection with the modem. In some cases, you may notice LED lights blinking on both devices, indicating a successful connection.
By following these steps, you will have successfully connected your D-Link wireless router to the modem. This allows your router to access the internet and distribute the connection to your devices wirelessly.
It is essential to establish a secure and stable connection between your modem and router to ensure optimal performance. If you encounter any issues during this process, consult the user manual provided with your D-Link router or contact their customer support for further assistance.
Step 4: Configuring Basic Settings
Once you have successfully connected your D Link wireless router to the modem, it’s time to configure the basic settings to ensure a smooth internet connection. Follow these simple steps to get started:
1. Access the Router’s Web Interface: Open a web browser on your device and enter the default IP address of the router in the address bar (e.g., 192.168.0.1 or 192.168.1.1). Press Enter to proceed.
2. Login to the Router: You will be prompted to enter the username and password for your router. By default, the username is usually “admin” and the password is either blank or “admin”. If you have changed the login credentials previously, use the updated information.
3. Change the SSID (Network Name): The SSID is the name of your wireless network that will be displayed to users. It’s a good practice to customize this name to something familiar and unique. Avoid using personal information or any sensitive data.
4. Set a Strong Password: Secure your wireless network by creating a strong password. Use a combination of upper and lowercase letters, numbers, and special characters. This will prevent unauthorized access to your network.
5. Select Wireless Security: Choose the appropriate wireless security protocol, such as WPA2-PSK (AES), to protect your network. This encryption method provides greater security and is recommended for most users.
6. Enable DHCP: DHCP (Dynamic Host Configuration Protocol) automatically assigns IP addresses to devices connected to your network. Enable this feature to simplify the process of connecting devices without manually entering IP addresses.
7. Save and Apply Changes: Once you have made the necessary changes to the basic settings, click on the “Save” or “Apply” button to save the configurations. Allow the router a few moments to apply the changes.
8. Reconnect Devices: After applying the changes, you may need to disconnect and reconnect devices to the wireless network to establish a new connection with the updated settings.
By following these steps, you will successfully configure the basic settings of your D Link wireless router. Remember to periodically review and update these settings as needed to ensure the security and efficiency of your network.
Step 5: Connecting Devices to the Wireless Network
After completing the previous steps and successfully configuring your D-Link wireless router, it’s time to connect your devices to the network. Here’s how you can do it:
1. On your device, navigate to the Wi-Fi settings. This can usually be found in the settings menu, labeled as “Wireless” or “Wi-Fi.”
2. The Wi-Fi settings will display a list of available networks. Look for the name of your D-Link wireless network, also known as the SSID (Service Set Identifier). It should be something like “D-Link” followed by a series of letters and numbers.
3. Select the network by tapping or clicking on it. You may be prompted to enter a network password.
4. If you’ve set up a password during the router configuration process, enter it now. Make sure to enter the password correctly, as Wi-Fi passwords are case-sensitive.
5. Once you’ve entered the correct password, your device will attempt to connect to the wireless network. It may take a few moments to establish a connection.
6. Once the connection is established, you will see a Wi-Fi symbol or icon on your device’s screen, indicating that you are connected to the D-Link wireless network.
7. Repeat these steps for each device you want to connect to the network, such as laptops, smartphones, tablets, or smart home devices.
8. It is normal for your devices to periodically prompt you to reconnect to the network, especially after a power outage or if the network settings have changed. Simply go back to the Wi-Fi settings, select the D-Link network, and enter the password if prompted.
By following these steps, you can easily connect your devices to your newly installed D-Link wireless router. Enjoy the convenience and freedom of a reliable wireless network throughout your home or office!
Step 6: Setting Up Advanced Features
Once you have completed the basic setup of your D Link wireless router, you can move on to configuring the advanced features. These features will allow you to enhance the functionality and security of your network, providing you with a more personalized and reliable experience.
Here are some key advanced features that you can set up on your D Link router:
- Quality of Service (QoS): QoS allows you to prioritize certain types of traffic on your network. For example, if you frequently use video streaming services, you can prioritize the streaming traffic to ensure a smooth and uninterrupted viewing experience.
- Port Forwarding: Port forwarding is used to redirect incoming internet traffic to a specific device on your network. This is especially useful if you want to host a website or run a server from your home network.
- Virtual Private Network (VPN): Setting up a VPN on your D Link router allows you to establish a secure connection to your home network when you are away. This is particularly important if you frequently access sensitive information or want to ensure secure remote access to your network.
- Parental Controls: With parental controls, you can restrict access to certain websites or set time limits for internet usage. This feature is especially beneficial for parents who want to protect their children from inappropriate content or manage their screen time.
- Guest Network: Creating a guest network on your D Link router allows visitors to connect to the internet without accessing your main network. This provides an added layer of security and privacy for your personal devices and data.
To set up these advanced features, you will need to access the router’s administrative interface. Open your web browser and enter the IP address of your D Link router, followed by your username and password. Once logged in, navigate to the appropriate sections in the router’s settings to enable and configure the desired features.
It’s important to note that the steps to set up advanced features may vary slightly depending on the specific model of your D Link router. Therefore, it is recommended to refer to the user manual or consult D Link’s support website for detailed instructions tailored to your device.
With the advanced features properly set up, your D Link wireless router will provide you with a secure and customized networking experience. Whether it’s prioritizing certain types of traffic, accessing your network remotely, or enhancing parental controls, these features will elevate your home network to the next level.
Troubleshooting Tips
Even with the most reliable devices, you may occasionally encounter issues when installing or using your D-Link wireless router. Here are some troubleshooting tips to help you resolve common problems:
- Check the power source: Make sure that your router is properly connected to a power source and that the power outlet is working. Try plugging the router into a different outlet to rule out any power-related issues.
- Double-check the cables: Ensure that all the cables connecting your router to the modem and devices are securely plugged in. Sometimes a loose connection can cause connectivity problems.
- Restart your devices: Power cycle your router, modem, and connected devices. Simply turn them off, wait for a few seconds, and then turn them back on. This can often clear up minor glitches and re-establish a stable connection.
- Update firmware: Check the D-Link website for any available firmware updates for your specific router model. Upgrading to the latest firmware version can fix bugs and improve overall performance.
- Reset your router: If you are experiencing persistent issues, a factory reset may be necessary. Use a pin or paperclip to press and hold the reset button on the back of the router for about 10 seconds. Be aware that this will erase any custom settings, so make sure to backup your configuration if needed.
- Change wireless channel: If you are experiencing slow or intermittent connectivity, there may be interference from other devices on the same wireless channel. Access your router’s settings and try switching to a different channel to improve signal quality.
- Update wireless drivers: If you are having trouble connecting to the wireless network, make sure that you have the latest drivers installed on your devices. Visit the manufacturer’s website for your device and download the latest drivers for your operating system.
- Disable VPN or proxy: If you are using a VPN or proxy, try disabling them temporarily to see if it resolves any connection issues. Sometimes these services can interfere with the router’s ability to establish a secure connection.
- Contact D-Link support: If you have tried all the troubleshooting steps and are still encountering problems, it may be time to reach out to D-Link’s customer support for further assistance. They will be able to provide you with more advanced troubleshooting solutions.
By following these troubleshooting tips, you can effectively address common issues and ensure a smooth installation and usage experience with your D-Link wireless router.
Conclusion
Installing a D-Link wireless router is a straightforward process that can greatly enhance your internet connectivity and create a seamless network in your home or office. By following the steps outlined in this guide, you can ensure a successful installation without any hassle.
Remember to choose the right router model that suits your needs and to gather all the necessary equipment beforehand to make the installation process smoother. Additionally, make sure to update the router’s firmware regularly to take advantage of any new features and security updates.
Having a reliable wireless network is essential in today’s interconnected world, allowing you to browse the internet, stream media, and connect various devices conveniently. With a D-Link wireless router, you can enjoy fast and stable internet connectivity throughout your space, making your online experience even more enjoyable.
So, why wait? Start your D-Link wireless router installation today and unlock the full potential of your internet connection!
FAQs
1. How do I install a D-Link wireless router?
2. What are the system requirements for installing a D-Link wireless router?
3. How do I connect devices to my D-Link wireless router?
4. Can I set up a D-Link wireless router without a computer?
5. How do I secure my D-Link wireless router?