
Are you struggling with installing a wireless printer on your Windows 7 computer? Don’t worry, we’ve got you covered! In this article, we will guide you step by step on how to install a wireless printer on Windows 7 effortlessly. With the advancements in technology, wireless printers have become increasingly popular due to their convenience and flexibility. Gone are the days of dealing with tangled wires and limited placement options. By setting up a wireless printer, you can easily print documents, photos, and more from any device connected to the same network. So, let’s dive in and discover how you can easily install a wireless printer on Windows 7.
Inside This Article
- System Requirements
- Step 1: Check compatibility
- Step 2: Connect the printer to the power source
- Step 3: Connect the printer to the computer
- Step 4: Install Printer Drivers
- Step 5: Configure wireless settings
- Step 6: Test the wireless connection
- Troubleshooting tips
- Additional resources
- Conclusion
- FAQs
System Requirements
In order to successfully install a wireless printer on Windows 7, you need to ensure that your computer meets the minimum system requirements. Here are the system requirements you should check before proceeding with the installation:
1. Operating System: Your computer should be running Windows 7 or later. Make sure you have the correct version of Windows installed on your system.
2. Processor and Memory: Your computer should have a compatible processor and sufficient memory to handle the printer drivers and wireless connectivity. Check the specifications of your computer to ensure it meets the minimum requirements.
3. Available Disk Space: You need to have enough free disk space to install the printer drivers and any additional software that may be required. Check the storage capacity of your computer and ensure you have adequate space.
4. Internet Connection: An active internet connection is necessary to download the required printer drivers and software updates. Make sure your computer is connected to the internet before starting the installation process.
5. USB Port: Some wireless printers may require an initial USB connection to establish the wireless connection. Check if your computer has an available USB port to connect the printer during the setup process.
6. Wireless Network: To connect your printer wirelessly, you need to have a stable wireless network in your home or office. Ensure that your computer is connected to the same network that you want to connect your printer to.
By verifying these system requirements beforehand, you can ensure a smooth and successful installation of your wireless printer on Windows 7.
Step 1: Check compatibility
Before you begin the installation process, it’s important to ensure that your wireless printer is compatible with Windows 7. This step will save you time and frustration down the line, as you won’t encounter any compatibility issues during the installation process.
The first thing you need to do is check the documentation or the manufacturer’s website to find out if the printer supports Windows 7. Look for any specific system requirements or software updates that might be needed for compatibility. If you cannot find this information, don’t worry – you can always reach out to the manufacturer’s customer support for assistance.
Another way to check compatibility is by looking at the system requirements for Windows 7. Make sure your computer meets these requirements, as they often have minimum specifications for hardware and software compatibility. This includes checking that your operating system is up to date with the latest service packs and updates.
Additionally, you should consider the type of wireless connection your printer uses. Windows 7 supports various types of wireless connections, such as Wi-Fi and Bluetooth. Ensure that your printer is compatible with the type of wireless network you have available. If you are unsure about your wireless network type, consult your modem or router documentation, or contact your internet service provider for assistance.
If your printer is not compatible with Windows 7, you may need to consider upgrading to a newer printer model or contacting the manufacturer for possible workarounds or firmware updates. It’s always recommended to use a printer that is specifically designed for your operating system to ensure optimal performance and compatibility.
Step 2: Connect the printer to the power source
After checking the compatibility of your wireless printer with your Windows 7 computer, it’s time to connect the printer to a power source. This step is essential as it will provide the necessary power for the printer to function properly.
To connect the printer to the power source, follow these simple steps:
1. Locate the power cord that came with your printer. It usually has a three-pronged or two-pronged plug at one end and connects to the printer on the other end.
2. Identify the power input on the back of your printer. It is usually labeled as “Power” or has a power symbol (a circle with a vertical line).
3. Insert the power cord’s plug into the power input on the back of the printer. Make sYOURure it is firmly connected and properly aligned.
4. Plug the other end of the power cord into a wall outlet or a surge protector. Use a nearby electrical outlet for easy access.
5. Ensure that the power source is switched on. Some printers have a physical power switch located near the power input. Flip the switch to the “On” position.
Once you have connected the printer to the power source, it will begin initializing and preparing for the next steps in the installation process.
Important note: Do not connect the printer to the computer during this step. The connection to the computer will be made in the next step. For now, focus on getting the printer powered up and ready for use.
Step 3: Connect the printer to the computer
Connecting your wireless printer to the computer is a crucial step in the installation process. Follow these simple steps to establish a seamless connection:
1. Power on your printer: Make sure your printer is turned on and properly connected to the power source. Check if the printer’s power indicator light is lit, indicating that it is ready for use.
2. Check for wired connection option: Most wireless printers come with an option to establish a wired connection. If your printer has an Ethernet port, you can use an Ethernet cable to connect it directly to your computer. This option can be helpful if you are facing any compatibility issues with wireless connections.
3. Enable Wi-Fi on your computer: Ensure that the Wi-Fi feature on your computer is turned on. You can do this by locating the Wi-Fi icon in your taskbar or system tray and clicking on it to enable the Wi-Fi functionality.
4. Locate the printer’s network name (SSID): Look for the printer’s network name or SSID. This can usually be found on the printer’s control panel or by printing a network configuration report. Note down the network name as you’ll need it in the next step.
5. Connect to the printer’s network: In your computer’s Wi-Fi settings, find the network list and look for the printer’s network name (SSID) that you noted down in the previous step. Select the printer’s network and click on ‘Connect’ to establish a connection between your computer and the printer.
6. Enter the network password (if required): If the printer’s network requires a password to connect, enter the password when prompted. Make sure to enter the correct password to ensure a successful connection. If you are unsure about the password, refer to the printer’s user manual or contact the manufacturer for assistance.
7. Wait for the connection to be established: Once you have entered the network password, wait for a few moments as your computer establishes a secure connection with the printer. The connection status should indicate that it is “connected” or “secured.”
Congratulations! You have successfully connected your wireless printer to the computer. Proceed to the next step to install the necessary printer drivers for proper functionality.
Step 4: Install Printer Drivers
Once you have successfully connected your wireless printer to your Windows 7 computer, the next crucial step is to install the necessary printer drivers. Printer drivers act as the bridge between your computer and the printer, enabling them to communicate and function together smoothly.
Installing the correct printer drivers ensures that your computer can send print commands to the printer correctly and that the printer understands these commands. Follow the step-by-step guide below to install the printer drivers on your Windows 7 system:
- Visit the Manufacturer’s Website: Start by visiting the official website of the printer manufacturer. Look for the “Support” or “Downloads” section, where you can find drivers specific to your printer model.
- Locate and Download the Drivers: Once on the support page, use the search or navigation options to find the appropriate drivers for your printer model. Ensure that you select drivers compatible with Windows 7.
- Run the Driver Installation File: After downloading the drivers, locate the file on your computer and double-click on it to initiate the installation process. Follow any on-screen prompts to proceed with the installation.
- Agree to the End User License Agreement (EULA): During the installation process, you may be asked to review and accept the End User License Agreement. Read through the agreement and select the “Agree” or “Accept” option to continue.
- Choose the Installation Options: In some cases, you may be presented with installation options. Choose the recommended or default settings unless you have specific preferences or requirements.
- Wait for the Installation to Complete: The driver installation process may take a few minutes. Ensure that you do not interrupt it or turn off your computer during this time.
- Restart Your Computer: Once the installation is complete, it is recommended to restart your computer to ensure that all changes are applied correctly.
After following these steps, the necessary printer drivers will be installed on your Windows 7 computer. You can now proceed to the next step of configuring the wireless settings for your printer.
Step 5: Configure wireless settings
Configuring the wireless settings for your printer is an essential step to ensure a seamless and reliable wireless connection. By following these simple steps, you can enjoy the convenience of printing wirelessly from your Windows 7 computer.
Here’s how to configure the wireless settings for your printer:
- Access the printer setup menu: Locate the setup menu on your printer’s control panel. The specific steps may vary depending on the brand and model of your printer. Look for an icon or button that says “Setup” or “Settings.”
- Choose the wireless network option: Within the setup menu, navigate to the wireless network settings. This may be listed as “Network Settings,” “Wireless Setup,” or something similar. Select this option to proceed.
- Select your network name: A list of available wireless networks will be displayed on your printer’s screen. Look for your home network name or SSID (Service Set Identifier) and select it. If your network is hidden, you may need to manually enter the network name and password.
- Enter the network password: If your wireless network is password-protected, you will be prompted to enter the password. Use the printer’s on-screen keyboard or physical buttons to input the password accurately. Be careful as passwords are case-sensitive. Once entered, allow the printer to connect to the network.
- Confirm network connection: After entering the password, the printer will attempt to connect to the wireless network. This process may take a few moments. Once connected, you will see a confirmation message or an icon indicating a successful connection.
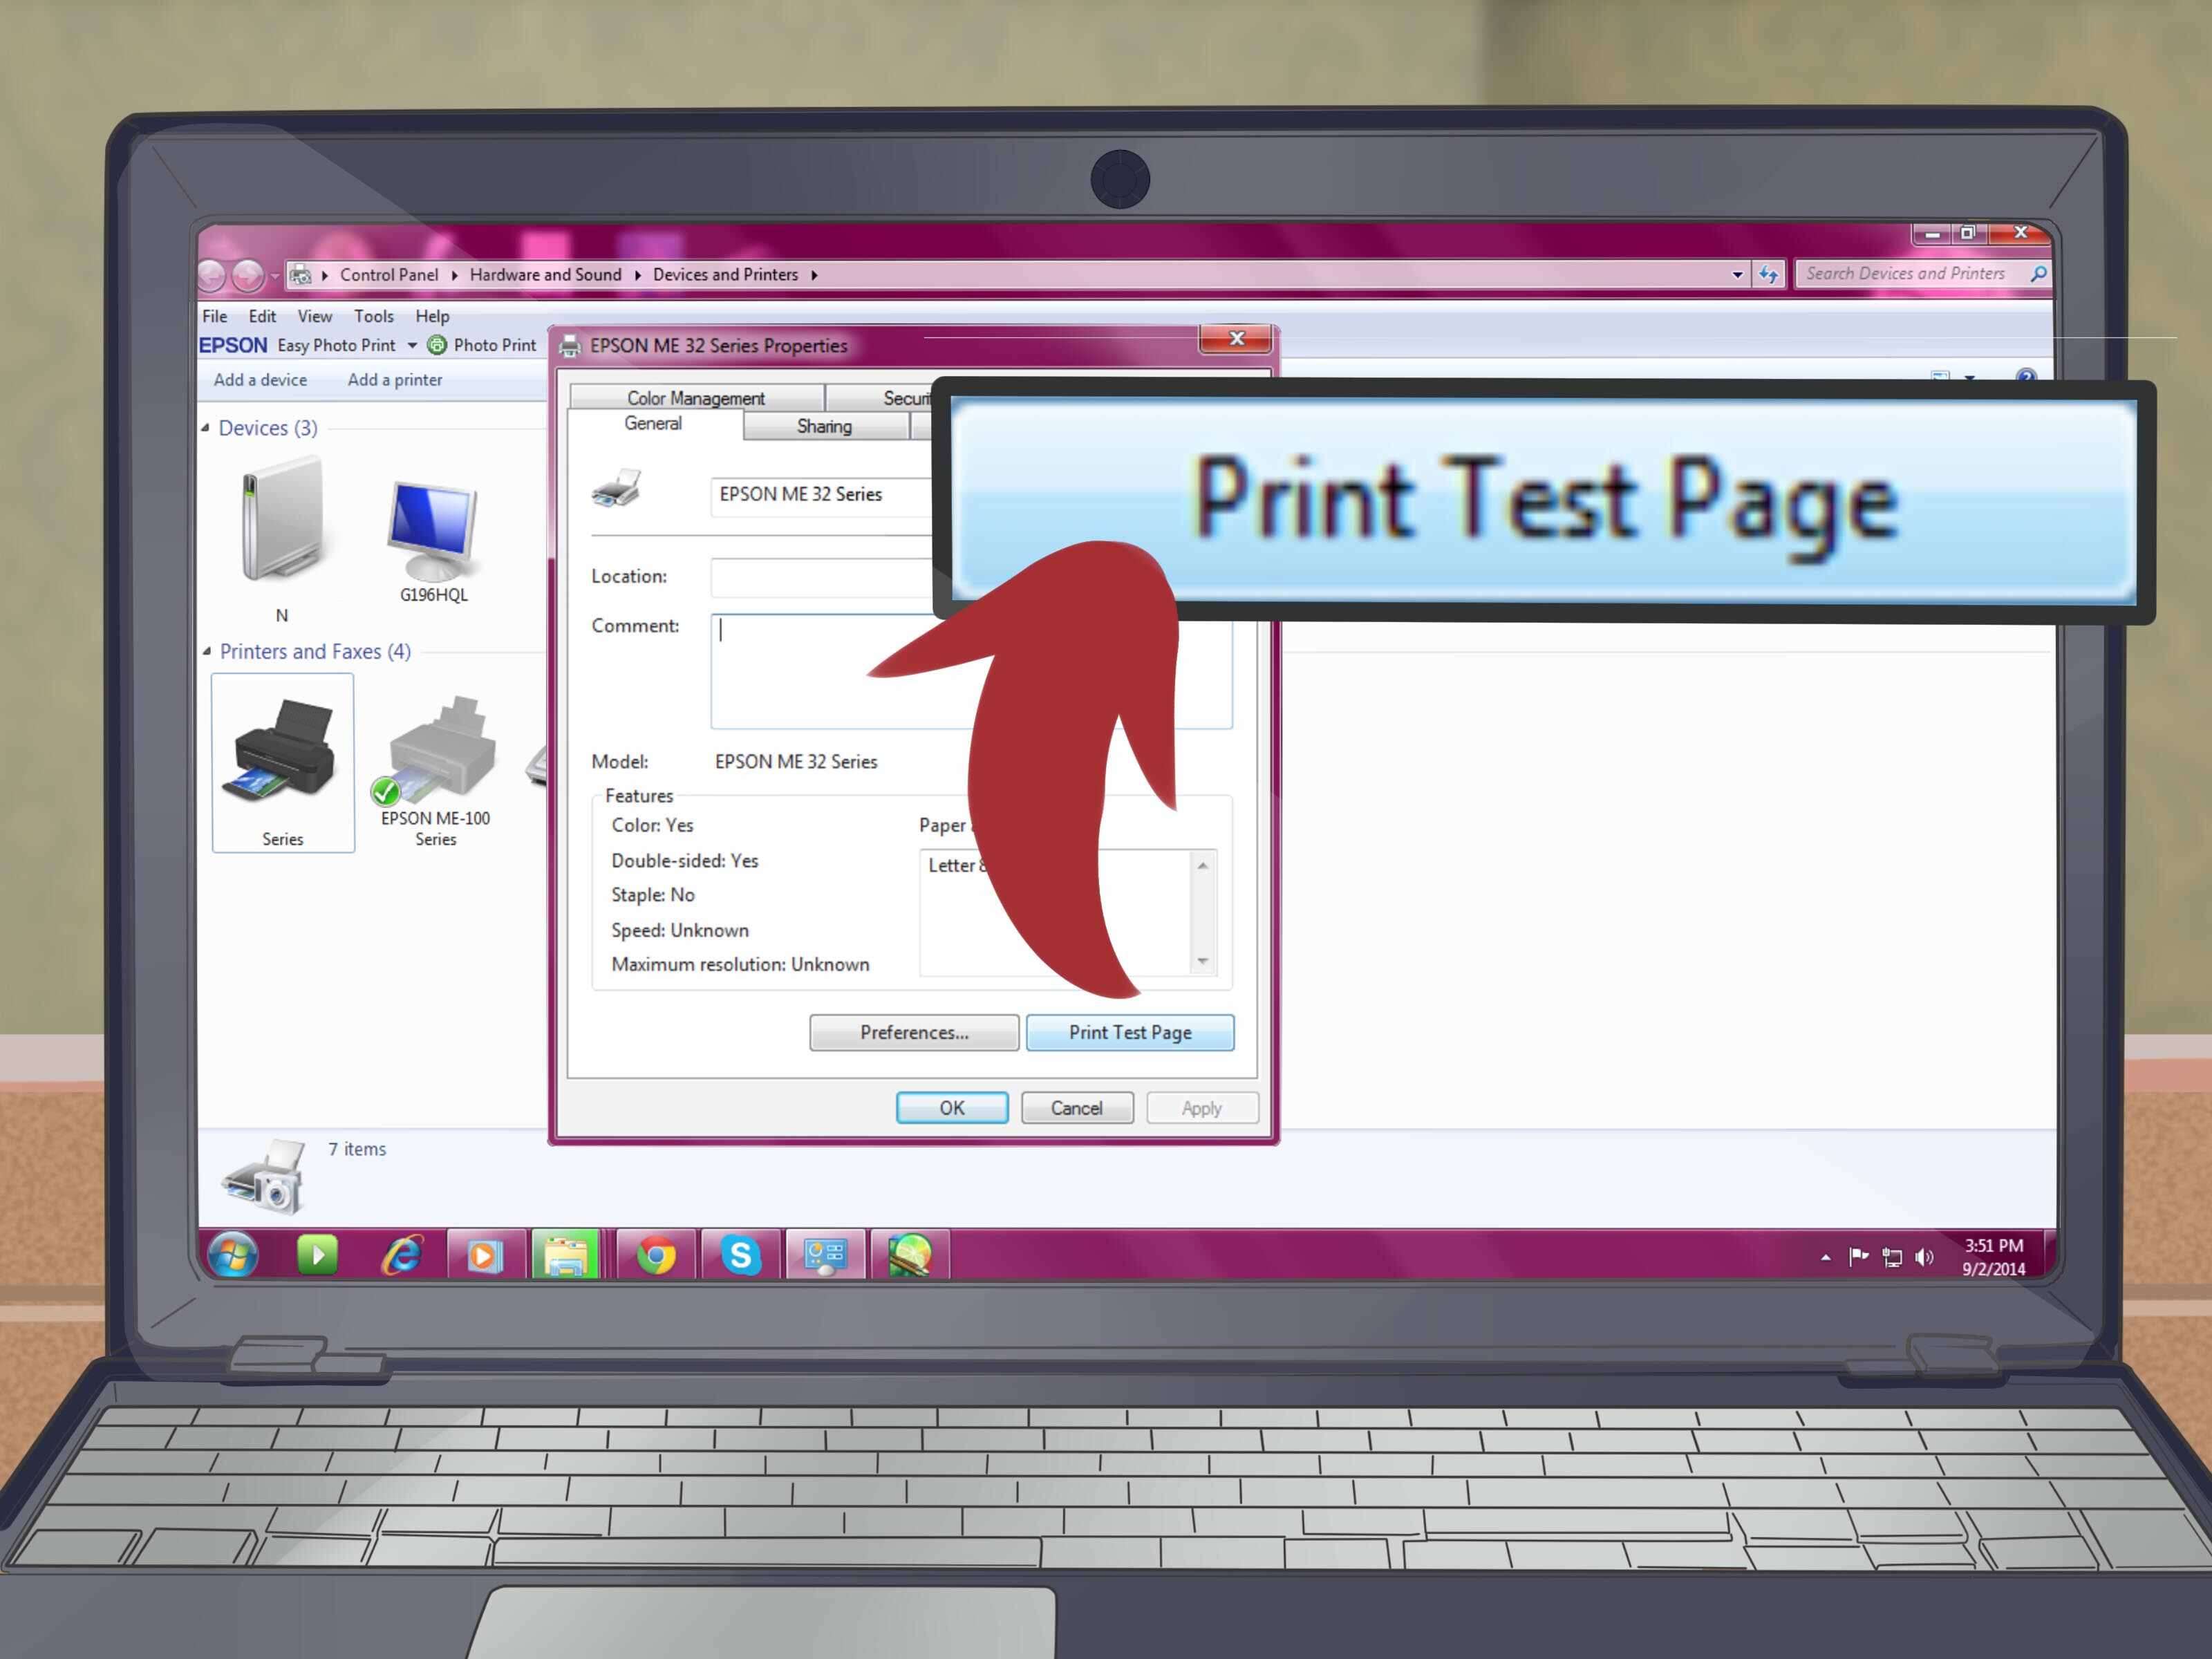
- Test the wireless connection: To ensure that the wireless connection is functioning properly, try printing a test page from your Windows 7 computer. Go to the Control Panel, then select “Devices and Printers.” Locate your printer and right-click on it. Choose the option to print a test page. If the page prints successfully, congratulations! Your wireless settings are configured correctly.
Keep in mind that these steps are general guidelines and may vary slightly depending on your specific printer model. It’s always a good idea to refer to the printer’s user manual or manufacturer’s website for detailed instructions.
By successfully configuring the wireless settings for your printer, you can conveniently print documents, photos, and more without the hassle of connecting cables. Enjoy the freedom and flexibility that wireless printing offers!
Step 6: Test the wireless connection
Once you have completed the installation of your wireless printer on Windows 7, it is important to test the wireless connection to ensure that everything is functioning properly. Testing the connection will help you confirm that the printer is properly connected to your Wi-Fi network and that it can communicate with your computer.
To test the wireless connection, follow these steps:
1. Open any document or image that you want to print.
2. Click on the “File” menu and select “Print”.
3. In the print dialog box, ensure that your wireless printer is selected as the default printer.
4. Verify that the printer settings, such as paper size and print quality, are correctly configured.
5. Click on the “Print” button to initiate the printing process.
6. Observe the printer to check if it receives the print job and starts printing. The printer should respond promptly and start producing the desired output.
7. Inspect the printed document or image for any issues, such as missing text, smudges, or blurry images. If you notice any problems, it may indicate an issue with the wireless connection or printer settings.
8. If the printout appears to be accurate and of good quality, the wireless connection is likely working correctly. You can now use your wireless printer with confidence.
It is recommended to perform this test with different documents and images to ensure consistency in the printing process. This will give you a better understanding of the printer’s performance and help identify any potential issues that may arise.
If you encounter any problems during the testing process, refer to the troubleshooting tips section for guidance. There, you will find solutions to common issues that may be affecting the wireless connection or printing process.
Troubleshooting tips
If you encountered any issues during the installation process, don’t worry! Here are some troubleshooting tips to help you resolve common problems:
1. Check the wireless connection: Ensure that your computer and printer are connected to the same Wi-Fi network. Double-check the wireless settings on your printer and verify that the network name and password are correct.
2. Restart devices: Sometimes, a simple restart can solve connectivity issues. Turn off both your computer and printer, wait for a few seconds, and then power them back on. This can refresh the network settings and resolve any temporary glitches.
3. Update printer drivers: Outdated or incompatible printer drivers can cause installation problems. Visit the manufacturer’s website or use the installation CD to install the latest drivers for your printer. This will ensure compatibility and resolve any software conflicts.
4. Disable firewall or antivirus: In some cases, firewall or antivirus software can prevent the printer from communicating with your computer. Temporarily disable them during the installation process, and then enable them once the installation is complete.
5. Reset network settings: If you’re still experiencing issues, you can try resetting the network settings on your printer. Refer to the printer’s manual or the manufacturer’s website for instructions on how to do this.
6. Restart the router: If the above steps didn’t work, try restarting your wireless router. Sometimes, a router restart can fix connectivity problems between devices on the network.
7. Contact customer support: If none of the above steps resolve the issue, don’t hesitate to reach out to the printer manufacturer’s customer support. They can provide further assistance and troubleshooting solutions specific to your printer model.
Remember, troubleshooting can be a trial-and-error process, and it may take a few attempts to resolve the problem. Remain patient and follow the manufacturer’s guidelines for the best results.
Hopefully, these troubleshooting tips have helped you overcome any obstacles you encountered during the installation of your wireless printer on Windows 7. With the right steps and a bit of troubleshooting, you’ll soon be able to enjoy the convenience of wireless printing!
Additional resources
Installing a wireless printer on Windows 7 may sometimes pose challenges, but with the right resources and information, you can easily troubleshoot any issues that arise. Here are some additional resources to help you navigate the installation process:
1. Manufacturer’s Website: Visit the official website of your printer manufacturer. They often provide detailed instructions, FAQs, and troubleshooting guides specific to your printer model. These resources can be invaluable in resolving any compatibility or connectivity issues you may encounter.
2. Online Forums and Communities: Joining online forums or communities dedicated to printers and Windows 7 can be a great way to find solutions to common installation problems. These platforms allow you to interact with others who have faced similar challenges and can offer valuable insights and advice.
3. User Manuals and Documentation: Make sure to consult the user manual and documentation that came with your printer. These resources often contain step-by-step instructions and troubleshooting tips specific to your device. They can provide valuable information on configuring wireless settings, installing drivers, and resolving common issues.
4. Tech Support: If you’ve exhausted all other resources and still can’t resolve the installation issue, don’t hesitate to reach out to the technical support team of your printer manufacturer. They have the expertise to assist you in troubleshooting and can guide you through the installation process.
By leveraging these additional resources, you’ll be equipped with the knowledge and support necessary to successfully install your wireless printer on Windows 7. Remember, patience and persistence are key, and don’t hesitate to seek help if needed.
Conclusion
In conclusion, installing a wireless printer on Windows 7 is a relatively straightforward process that can greatly enhance your printing experience. By following the steps outlined in this article, you can easily connect your printer to your Windows 7 computer and enjoy the benefits of wireless printing.
Remember to ensure that your printer is compatible with Windows 7 and that you have the necessary drivers installed. Additionally, make sure that your printer is connected to the same Wi-Fi network as your computer to establish a seamless connection.
Once everything is set up, you will be able to print documents, photos, and other files wirelessly, eliminating the need for cables and offering you a more convenient and efficient printing solution.
So, why wait? Get started on installing your wireless printer on Windows 7 today and enjoy the freedom and flexibility that comes with wireless printing!
FAQs
1. Can I install a wireless printer on Windows 7?
Yes, you can install a wireless printer on Windows 7. However, make sure the printer model you have is compatible with Windows 7. You may need to download and install the necessary drivers and software from the printer manufacturer’s website.
2. How do I connect my wireless printer to Windows 7?
To connect your wireless printer to Windows 7, follow these steps:
- Make sure your printer is turned on and connected to your network.
- On your Windows 7 computer, click the Start menu and go to Control Panel.
- Click on “Devices and Printers.”
- Click “Add a printer.”
- Select “Add a network, wireless or Bluetooth printer.”
- Windows will search for available printers. Select your wireless printer from the list and click “Next.”
- Follow the on-screen instructions to complete the installation.
3. What if my wireless printer is not detected by Windows 7?
If Windows 7 does not detect your wireless printer, try the following troubleshooting steps:
- Make sure your printer is turned on and connected to your network.
- Check that your wireless printer is within range of your Wi-Fi network.
- Restart both your printer and Windows 7 computer.
- Update the printer drivers by visiting the printer manufacturer’s website and downloading the latest drivers for Windows 7.
- Try connecting your printer using a USB cable to see if it is recognized. If it is, there may be an issue with the wireless connection.
- Contact the printer manufacturer’s support for further assistance.
4. How do I set my wireless printer as the default printer in Windows 7?
To set your wireless printer as the default printer in Windows 7, follow these steps:
- Click the Start menu and go to Control Panel.
- Click on “Devices and Printers.”
- Right-click on your wireless printer and select “Set as default printer.”
5. Can I print from my mobile devices to a wireless printer on Windows 7?
Yes, you can print from your mobile devices to a wireless printer on Windows 7 if your printer supports mobile printing. Check if your printer has built-in mobile printing capabilities or if there is a mobile printing app provided by the printer manufacturer. Install the necessary app on your mobile device and follow the instructions for connecting and printing to your wireless printer.