
Are you tired of your Windows 10 device automatically connecting to a wireless network, even when a wired connection is available? If so, you’re not alone. Many users prefer the stability and faster speeds of a wired connection, especially when performing data-intensive tasks or online gaming. Fortunately, Windows 10 allows you to prioritize wired connections over wireless ones, ensuring that your device always uses the Ethernet connection when available.
In this article, we will guide you through the steps to make wired connection priority over wireless on Windows 10. Whether you’re using a desktop PC, laptop, or Surface device, you’ll be able to take control of your network connections and enjoy a seamless and reliable wired experience. So, let’s dive in and make your wired connection the top priority on Windows 10.
Inside This Article
- Overview
- Step 1: Open Network Connections – Accessing Network Connections – Opening Network Adapter Properties
- Step 2: Modify Network Adapter Priority – Navigating to Advanced Settings – Adjusting Adapter Priority
- Step 3: Testing Priority Order – Verifying Wired Connection Priority – Checking Wireless Connection Status
- Step 4: Troubleshooting – Common Issues with Network Adapter Priority – Troubleshooting Steps
- Conclusion
- FAQs
Overview
When it comes to internet connectivity, having a reliable and fast connection is crucial. While wireless connections provide flexibility and convenience, there are times when a wired connection is preferred, especially when it comes to activities that require high-speed and stable internet access. Fortunately, Windows 10 allows you to prioritize wired connections over wireless ones, ensuring that your tasks that require a strong and uninterrupted internet connection are prioritized.
In this article, we will guide you through the steps on how to make a wired connection priority over a wireless connection in Windows 10. Whether you’re a gamer, a content creator, or someone who simply values a reliable internet connection, this guide will help you optimize your network settings to achieve the best possible connection.
Before we dive into the steps, it’s important to note that this guide assumes you already have both a wired and a wireless connection set up on your Windows 10 device. If not, make sure to set up your connections accordingly before proceeding with the following steps.
Step 1: Open Network Connections – Accessing Network Connections – Opening Network Adapter Properties
To make wired connection priority over wireless on Windows 10, you need to access Network Connections and open the Network Adapter Properties. Follow the steps below to accomplish this:
1. Right-click on the Start button or press the Windows key + X to open the Power User menu. From the menu, select “Network Connections” to open the Network Connections window.
2. In the Network Connections window, you will see a list of available network adapters. Find the adapter that represents your wired connection. It is usually labeled as “Ethernet” or “Local Area Connection”. Right-click on the wired adapter and select “Properties” from the context menu.
3. The Network Adapter Properties window will open. Here, you can configure various settings related to your wired connection. Look for the “Internet Protocol Version 4 (TCP/IPv4)” or “Internet Protocol Version 6 (TCP/IPv6)” entry, depending on your network setup. Select the appropriate entry and click on the “Properties” button.
4. In the Properties window, you will find the settings for the selected version of the Internet Protocol. Look for the “Advanced” button and click on it.
5. The Advanced TCP/IP Settings window will open. Here, you will see a list of options related to the selected Internet Protocol version. Look for the “Priority” or “Connection Priority” option and select it.
6. In the Connection Priority window, you will find a list of network adapters in your system. The adapter at the top of the list will have the highest priority, while the adapter at the bottom will have the lowest priority. To prioritize your wired connection, simply click on the adapter representing your wired connection and use the “Up” button to move it to the top of the list.
7. After adjusting the priority order, click on the “OK” button to save the changes and close all the windows.
By following these steps, you have successfully accessed Network Connections and opened the Network Adapter Properties to make wired connection priority over wireless on Windows 10.
Step 2: Modify Network Adapter Priority – Navigating to Advanced Settings – Adjusting Adapter Priority
Once you have accessed the Network Connections window, the next step is to navigate to the advanced settings and make changes to the network adapter priority. Follow the instructions below:
1. Right-click on the network adapter that you want to prioritize, whether it is your wired or wireless connection, and select “Properties” from the drop-down menu.
2. In the network adapter properties window, click on the “Advanced” tab. This tab contains a list of advanced settings for the selected network adapter.
3. Scroll through the list of advanced settings until you find an option related to “Priority” or “Adapters Order”. The specific name of this option may vary depending on your network adapter and its drivers.
4. Once you have located the “Priority” or “Adapters Order” option, select it and click on the “Up” or “Down” arrow buttons to adjust the priority of the network adapter. Moving the adapter up the list will increase its priority, while moving it down will decrease its priority.
5. After adjusting the adapter priority, click on the “OK” or “Apply” button to save the changes.
By modifying the network adapter priority in the advanced settings, you can control which connection takes precedence over the other. This means that if you prioritize your wired connection, Windows 10 will automatically prioritize it over your wireless connection when both are available.
It is worth noting that the above steps may vary slightly depending on the version of Windows 10 you are using and the specific network adapter drivers installed on your computer. However, the general idea remains the same across different versions.
Now that you have successfully adjusted the network adapter priority, it is time to move on to the next step: testing the priority order to ensure the changes have taken effect.
Step 3: Testing Priority Order – Verifying Wired Connection Priority – Checking Wireless Connection Status
Once you have made the necessary changes to the network adapter priority, it is important to test and verify if the wired connection is indeed prioritized over the wireless connection in Windows 10. This will ensure that your internet connectivity is seamless and efficient.
To verify the wired connection priority, follow these steps:
- First, ensure that both your wired and wireless connections are active and connected to the network.
- Open a web browser of your choice and navigate to a website. For example, you can try accessing www.google.com.
- Now, pay close attention to the network indicator or the network name displayed in the browser’s address bar. This will indicate the connection being used to access the internet.
If the wired connection is prioritized, you should see the network indicator showing the name of your wired connection, such as “Ethernet” or “LAN”. This indicates that the browser is using the wired connection to connect to the internet.
On the other hand, if the wireless connection is still the default connection despite the changes you made, the network indicator will display the name of your wireless network, such as “Wi-Fi” or “Wireless Network”. In this case, the wired connection is not prioritized, and you may need to revisit the previous steps and ensure that you have made the correct changes to the network adapter priority.
Additionally, you can also check the status of your wireless connection to further confirm if the priority order has been successfully modified. Here’s how:
- Right-click on the network icon in the system tray located at the bottom-right corner of the taskbar.
- Select “Open Network & Internet Settings” from the context menu.
- In the Settings window, click on the “Wi-Fi” option on the left-hand side.
- Under the “Wi-Fi” section, you will see the name of your wireless network along with its status. If the wired connection is prioritized, the status of the wireless network should be “Connected, Secured”.
If the status of the wireless network is “Connected, Secured”, it means that the wireless connection is active but not being used as the primary connection for internet access, indicating that the wired connection is indeed prioritized.
However, if the status shows as “Connected, Secured” for the wireless connection, it means that the changes made to the network adapter priority may not have taken effect. You may need to double-check the prioritization settings and ensure that the changes are correctly applied.
By following these steps, you can effectively test and verify whether the wired connection has been prioritized over the wireless connection in Windows 10. This will help you optimize your internet experience and ensure a faster and more reliable connection.
Step 4: Troubleshooting – Common Issues with Network Adapter Priority – Troubleshooting Steps
Even though setting the wired connection as a priority over wireless on Windows 10 is a straightforward process, there can be some common issues that users may encounter. In this section, we will discuss these issues and provide troubleshooting steps to resolve them.
Issue 1: Wired connection not recognized
In some cases, the wired connection may not be recognized by the system, even after setting it as a priority. This can happen due to various reasons, such as outdated network drivers or hardware compatibility issues.
Troubleshooting steps:
- Check the network cable connections: Ensure that the cables are securely connected to the correct ports on both the router and the computer.
- Update network drivers: Open the Device Manager, locate the network adapter, right-click on it, and select “Update driver.” Choose to search automatically for updated driver software.
- Restart the computer: Sometimes, a simple restart can resolve any temporary glitches in the network connection.
Issue 2: Wireless connection still taking priority
Even after successfully setting the wired connection as a priority, the system may still prioritize the wireless connection over the wired one. This can occur due to conflicting network settings or misconfiguration.
Troubleshooting steps:
- Disable the wireless connection: Open the Network Connections settings, right-click on the wireless adapter, and select “Disable.” This will force the system to prioritize the wired connection.
- Reset network settings: Open the Command Prompt as an administrator and run the following commands one by one: “netsh winsock reset” and “netsh int ip reset.” Then, restart the computer.
- Reset TCP/IP: Open the Command Prompt as an administrator and run the command “netsh int ip reset resetlog.txt”. Restart the computer after the command execution.
Issue 3: Network adapter priority settings not saved
Some users may find that the network adapter priority settings are not saved even after making the necessary changes. This can be due to permission issues or restrictions.
Troubleshooting steps:
- Run Network Adapter troubleshooter: Open the Settings app, go to “Update & Security,” click on “Troubleshoot,” and select “Network Adapter.” Follow the on-screen instructions to detect and fix any issues.
- Change adapter settings as administrator: Open the Network Connections settings as an administrator by right-clicking on the Start button and selecting “Network Connections.” Make the necessary changes in adapter priority and click on “OK.”
- Edit registry settings: Press “Windows Key + R,” type “regedit,” and press Enter. Navigate to the following registry key: “HKEY_LOCAL_MACHINE\SOFTWARE\Policies\Microsoft\Windows\WcmSvc\GroupPolicy”. If a “GroupPolicy” key does not exist, right-click on “WcmSvc” and select “New” -> “Key.” Name it “GroupPolicy.” In the “GroupPolicy” key, create a new DWORD value named “fMinimizeConnections” and set its value to “0”. Restart the computer.
By following these troubleshooting steps, you should be able to resolve any common issues that may arise when setting the wired connection as a priority over wireless on Windows 10. Remember, if the issue persists, it is always recommended to contact your network administrator or seek further assistance.
In conclusion, prioritizing a wired connection over wireless in Windows 10 is a simple process that can greatly improve your network performance and stability. By following the steps outlined in this article, you can ensure that your device connects to the internet through a wired connection whenever one is available.
Whether you rely on your computer for work, streaming, or gaming, a wired connection can offer faster speeds, reduced latency, and a more reliable connection compared to wireless alternatives. It is particularly beneficial for tasks that require a consistent and uninterrupted network connection.
By adjusting the network settings in Windows 10, you can seamlessly switch between wired and wireless connections and prioritize the wired connection whenever it is accessible. This can help you achieve optimal performance and ensure a smooth and reliable online experience.
Conclusion
Prioritizing a wired connection over wireless in Windows 10 is a practical way to improve your network connectivity. By following the steps mentioned in this article, you can easily configure your settings to prioritize wired connections whenever they are available. Take advantage of the speed, stability, and reliability that a wired connection offers and enjoy a seamless online experience.
FAQs
1. Can I prioritize a wired connection over a wireless connection on Windows 10?
Yes, you can prioritize a wired connection over a wireless connection on Windows 10. By modifying the network adapter settings, you can give priority to the wired connection, ensuring a stable and faster internet connection.
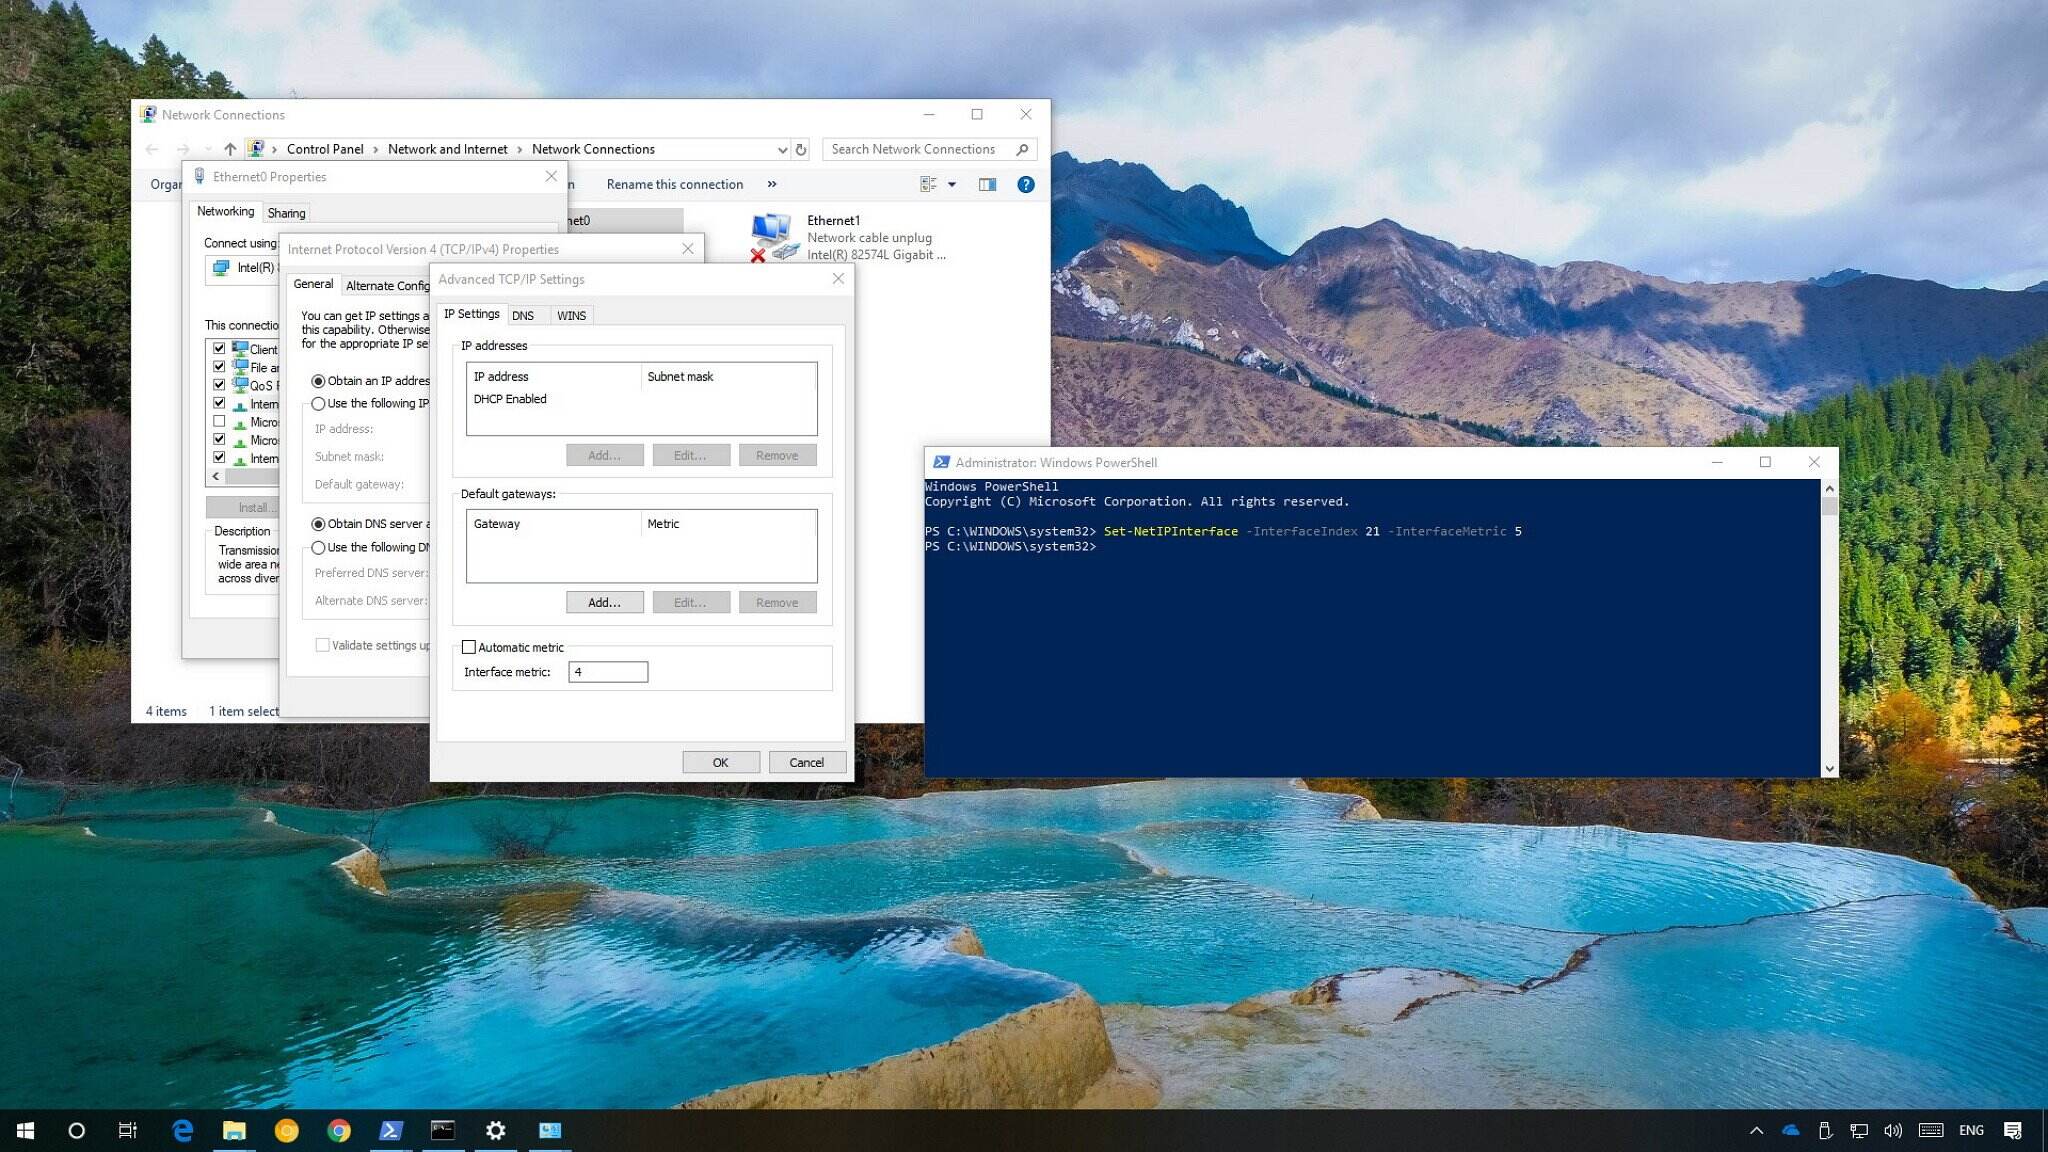
2. How do I change the priority of network adapters on Windows 10?
To change the priority of network adapters on Windows 10, follow these steps:
- Press the Windows key + X on your keyboard and select Network Connections.
- Right-click on the network adapter you want to prioritize and select Properties.
- In the Properties window, click on Internet Protocol Version 4 (TCP/IPv4) and click on Properties again.
- Click on the Advanced button.
- In the Advanced TCP/IP Settings window, uncheck the box next to Automatic metric.
- Enter a lower number in the Interface metric field to give it higher priority. Repeat this process for other network adapters, assigning higher numbers.
- Click OK to save the changes.
3. What is the advantage of prioritizing a wired connection over a wireless connection?
Prioritizing a wired connection over a wireless connection on Windows 10 provides several advantages. A wired connection offers a more stable and reliable connection with lower latency and higher data transfer rates. This is especially beneficial for activities that require a lot of bandwidth, such as online gaming or streaming high-definition content.
4. Can I prioritize a specific application to use the wired connection on Windows 10?
Yes, you can prioritize a specific application to use the wired connection on Windows 10. In the Windows 10 Settings app, you can configure the network settings for individual apps. By selecting the wired connection as the preferred network for a specific application, you can ensure that it uses the wired connection instead of the wireless connection.
5. How can I check if the wired connection is prioritized over the wireless connection on Windows 10?
To check if the wired connection is prioritized over the wireless connection on Windows 10, you can use the netstat command in the Command Prompt. Open the Command Prompt and enter the command netstat -rn. Look for the 0.0.0.0 route with the lowest metric value – this represents your default route and should correspond to the wired connection if prioritized correctly.