
In today’s digital age, having a stable and reliable WiFi connection is crucial for both Mac and iPhone users. However, with the increasing number of WiFi networks available, it can be challenging to ensure your devices connect to the right network at the right time. That’s where the ability to prioritize WiFi networks comes in handy.
By prioritizing WiFi networks on your Mac and iPhone, you can have more control over which networks your devices connect to automatically. This feature allows you to ensure optimal performance, security, and convenience when using your devices.
In this article, we will explore how to prioritize WiFi networks on both Mac and iPhone devices. Whether you want to prioritize your home network, work network, or any other network you frequently use, we’ve got you covered. Let’s dive in and discover how to make the most of your WiFi connections.
Inside This Article
How to Prioritize WiFi Networks on Mac
Having a stable and reliable WiFi connection is essential in today’s connected world. However, you may find yourself in situations where you have multiple WiFi networks available, and you want to prioritize which one to connect to on your Mac. Thankfully, Mac offers a simple way to prioritize your preferred WiFi networks. In this article, we will guide you through the steps to prioritize WiFi networks on your Mac.
There are two methods to prioritize WiFi networks on your Mac:
- Using the Network preferences
- Using the Wireless Diagnostics tool
Method 1: Using the Network preferences
To begin, follow these steps:
- Click on the Apple menu in the top-left corner of your screen.
- Select “System Preferences” from the drop-down menu.
- In the System Preferences window, click on “Network.”
- On the left-hand side, you will find a list of network connections. Click on “Wi-Fi.”
- Click on the gear icon at the bottom-left corner of the window, then select “Set Service Order.”
- A new window will appear, listing all the available WiFi networks. Simply drag and drop the preferred network to the top of the list.
- Click “OK” to save the changes.
By rearranging the order of the WiFi networks, you are prioritizing them according to your preference. Your Mac will automatically connect to the network at the top of the list whenever it is available.
Method 2: Using the Wireless Diagnostics tool
If you encounter issues with your WiFi network or want a more advanced method to prioritize WiFi networks, you can use the Wireless Diagnostics tool. Follow these steps:
- Hold down the “Option” key on your keyboard and click on the WiFi icon in the menu bar.
- A drop-down menu will appear. Select “Open Wireless Diagnostics.”
- In the Wireless Diagnostics window, click on the “Window” tab in the menu bar and select “Scan.”
- Wait for the scan to complete. It will display a list of all available WiFi networks.
- Click on the “Performance” tab in the window.
- Here, you will find a list of WiFi networks sorted by their signal strength. Click on the checkbox next to the preferred network to prioritize it.
- Close the Wireless Diagnostics window.
By prioritizing the WiFi network using the Wireless Diagnostics tool, your Mac will connect to the network with the strongest signal automatically.
How to Prioritize WiFi Networks on iPhone
Having a stable internet connection is essential for staying connected in today’s digital world. However, when you are in an area with multiple WiFi networks, your iPhone may automatically connect to the network with the strongest signal, which may not always be the most reliable or preferred option. To overcome this issue, you can prioritize WiFi networks on your iPhone. In this article, we will guide you through the simple steps to prioritize WiFi networks on your iPhone.
Step 1: Open the Settings App
To begin prioritizing WiFi networks on your iPhone, you need to open the Settings app. Look for the icon that resembles a gear and tap on it to launch the Settings app.
Step 2: Select Wi-Fi
In the Settings menu, scroll down until you find the “Wi-Fi” option. Tap on it to access the WiFi settings on your iPhone.
Step 3: Find the Preferred WiFi Network
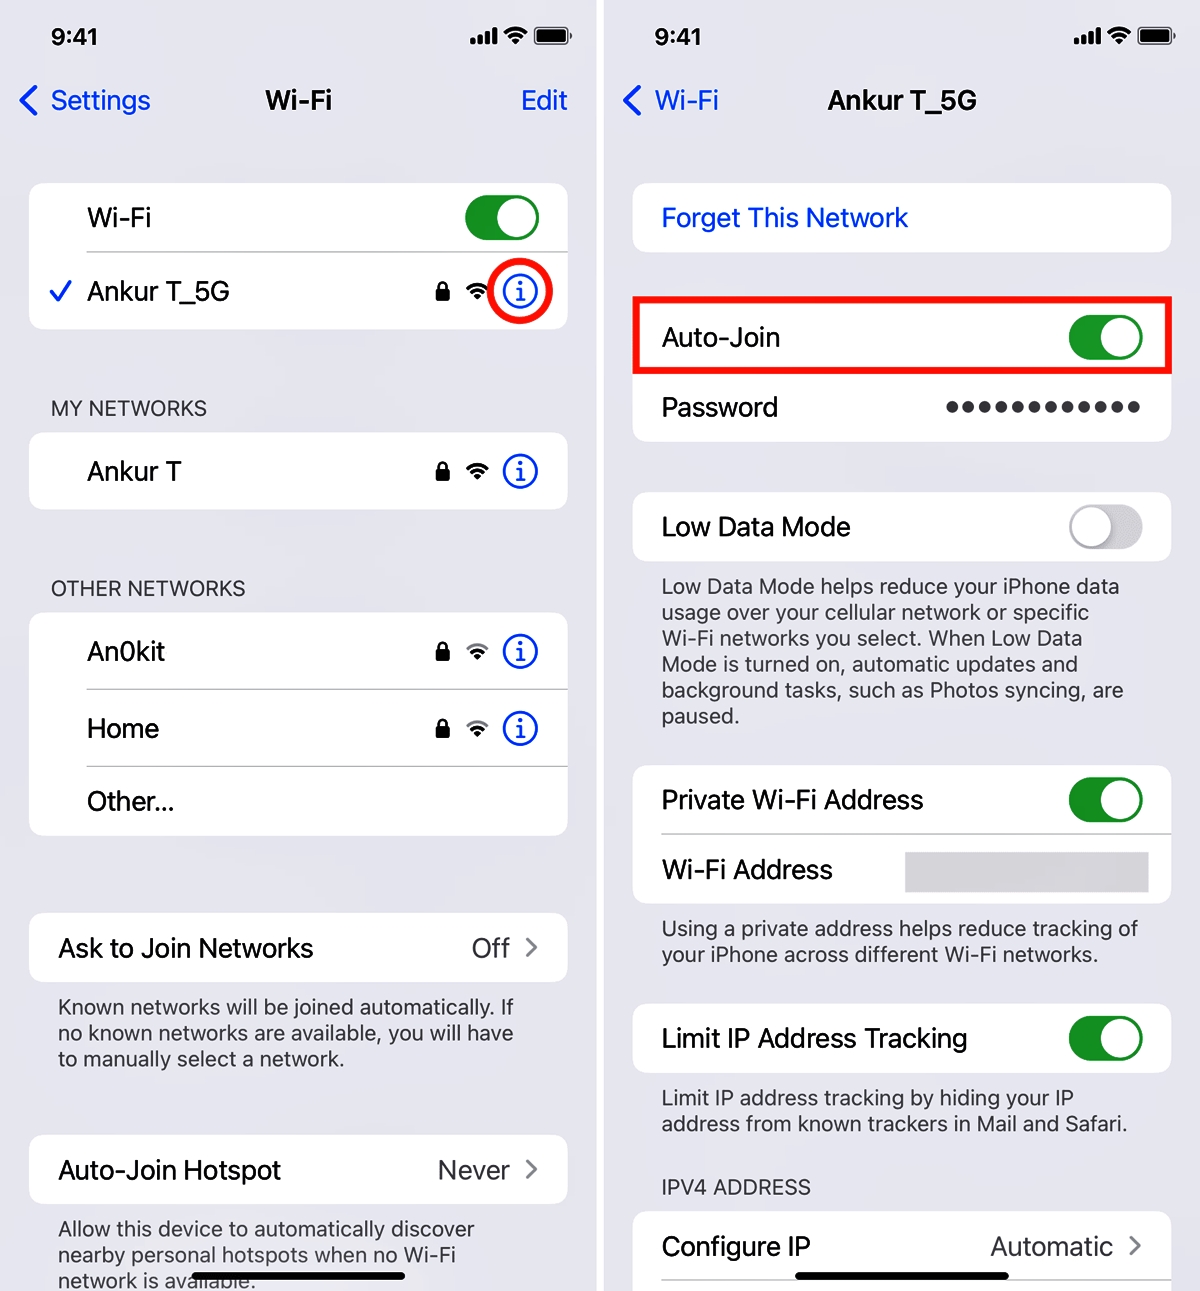
In the WiFi settings, you will see a list of available networks. Look for the network that you want to prioritize and tap on the “info” button (represented by an “i” within a circle) next to it.
Step 4: Adjust the Priority
On the network information page, look for the “Auto-Join” toggle switch. If the toggle switch is turned on (green), it means that your iPhone will automatically connect to this network when available. To prioritize this network, you need to turn off the “Auto-Join” toggle switch. Once turned off, your iPhone will no longer automatically connect to this network unless you manually select it.
Step 5: Repeat for Other Networks
If you have multiple WiFi networks that you want to prioritize, repeat steps 3 and 4 for each network. This will ensure that your iPhone connects to your preferred networks in the order you set.
Step 6: Adjusting Network Order
In some cases, you may want to change the order in which your iPhone connects to the prioritized networks. To do this, go back to the main WiFi settings page. On the list of available networks, you will see a series of horizontal lines or hamburger icon next to each network. Tap and hold the hamburger icon of the network you want to move and drag it to the desired position in the list.
Step 7: Save Changes
After arranging the networks in the desired order, make sure to save the changes. You can do this by tapping on the “Save” button or simply exiting the WiFi settings menu.
And that’s it! You have successfully prioritized WiFi networks on your iPhone. Now, your iPhone will connect to the preferred WiFi networks in the order you have set, ensuring a seamless and reliable internet connection.
Remember that prioritizing WiFi networks on your iPhone is especially useful when you frequently visit places with multiple networks, such as office buildings, cafes, or airports. It helps you have better control over your device’s connectivity and ensures you stay connected to the networks you trust the most.
If you ever want to change the priority or revert back to automatically connecting to all networks, simply follow the steps above and toggle the “Auto-Join” switch accordingly.
So, go ahead and prioritize your WiFi networks on your iPhone to enjoy a more optimized and personalized internet experience!
Conclusion
In conclusion, prioritizing WiFi networks on your Mac and iPhone can greatly enhance your online experience and ensure that you are always connected to the best available network. By following the steps outlined in this guide, you can easily manage and prioritize your preferred networks based on their signal strength and reliability.
Whether you’re working, streaming, or gaming, having a stable and fast WiFi connection is essential. Being able to prioritize networks means you can make the most of your internet connection and enjoy seamless online activities without interruption.
Remember, it’s always a good idea to periodically review and adjust your network priorities, as network conditions may change over time. By keeping your WiFi network preferences up to date, you can stay connected to the best possible network wherever you go.
So, take control of your WiFi experience and optimize your internet connectivity by prioritizing WiFi networks on your Mac and iPhone today!
FAQs
1. How do I prioritize WiFi networks on my Mac?
To prioritize WiFi networks on your Mac, follow these steps:
1. Click on the Apple menu in the top-left corner of your screen and go to System Preferences.
2. Select the “Network” option.
3. In the left sidebar, click on the Wi-Fi network you want to prioritize and drag it to the top of the list.
4. If the network is not already added, click on the “+” button and add it manually.
5. Once rearranged, your Mac will try to connect to the top network on the list first.
2. Can I prioritize WiFi networks on my iPhone?
Yes, you can prioritize WiFi networks on your iPhone. Here’s how:
1. Go to the Settings app on your iPhone.
2. Tap on the Wi-Fi option.
3. Find the list of available networks and tap on the “i” icon next to the network you want to prioritize.
4. In the network details page, tap on the “Forget This Network” option and confirm.
5. Reconnect to the network, and your iPhone will prioritize this network over others if it is available.
3. Why would I want to prioritize WiFi networks?
Prioritizing WiFi networks allows you to have control over which networks your devices connect to first. This is beneficial if you have multiple networks available, such as a home and office network, or if you frequently visit specific places with WiFi networks. Prioritizing networks ensures that your devices automatically connect to the preferred network, providing you with a seamless and efficient internet experience.
4. Can I prioritize WiFi networks on other devices?
The ability to prioritize WiFi networks may vary depending on the device and operating system. While Mac and iPhone allow you to prioritize networks, other devices may not have the same functionality or may use different methods. It’s best to consult the user manual or documentation for your specific device to determine if and how you can prioritize WiFi networks on it.
5. What if the prioritized WiFi network is not available?
If the prioritized WiFi network is not available, your device will automatically connect to the next available network on the list. The prioritization only affects the order in which networks are attempted to be connected, so if the preferred network is not within range or is experiencing connectivity issues, your device will try to connect to the next network in the list.