
Managing wireless networks on Windows 10 is crucial for ensuring a seamless and secure internet experience. Whether you’re connecting to Wi-Fi at home, work, or on the go, having the ability to efficiently manage your wireless networks can make a world of difference. In this article, we will dive into the various ways you can manage wireless networks on Windows 10, from connecting to new networks and forgetting old ones to troubleshooting connectivity issues and optimizing network performance. Whether you’re a seasoned tech guru or a novice user, this guide will provide you with the knowledge and tools needed to take control of your wireless network settings on Windows 10 and ensure a reliable and speedy connection wherever you go.
Inside This Article
- Connecting to a Wireless Network
- Managing Network Settings
- Troubleshooting Wireless Network Issues
- Adding and Removing Preferred Networks
- Conclusion
- FAQs
Connecting to a Wireless Network
In today’s digital age, staying connected to the internet is essential. Whether you’re at home, at work, or on the go, having a reliable wireless network connection is crucial for accessing online services, browsing the web, and staying connected with others. Windows 10 makes it easy to connect to a wireless network with just a few simple steps.
To connect to a wireless network on Windows 10, follow these steps:
- Click on the network icon in the system tray located in the bottom-right corner of the desktop.
- A list of available wireless networks will appear. Select the network you want to connect to from the list.
- If the network is secured, you will be prompted to enter the password. Type in the password and click “Connect.”
- Windows 10 will attempt to connect to the wireless network. Once connected, you will see a confirmation message.
- Congratulations! You are now connected to the wireless network. You can now start browsing the internet and accessing online services.
It’s important to note that Windows 10 also allows you to automatically connect to a network when it is in range. To enable this feature, simply check the box that says “Connect automatically” when entering the network password.
If you’re having trouble connecting to a wireless network, there are a few troubleshooting steps you can try:
- Ensure that the wireless adapter on your device is turned on.
- Restart your router or access point to reset the network connection.
- Check if the wireless network is visible to other devices. If it is not, there may be an issue with the network itself.
- Update the drivers for your wireless adapter.
- If all else fails, try contacting your network administrator or Internet Service Provider for further assistance.
With these simple steps, connecting to a wireless network on Windows 10 is a breeze. Enjoy uninterrupted internet access and stay connected wherever you go!
Managing Network Settings
Managing network settings on Windows 10 is crucial for ensuring a smooth wireless networking experience. Whether you need to connect to a new network, modify existing settings, or prioritize networks, Windows 10 offers a range of options to help you manage your wireless connections efficiently.
To access the network settings on your Windows 10 device, click on the network icon in the system tray at the bottom right corner of the screen. This will reveal a list of available networks in the vicinity.
From this list, you can select the network you want to connect to by simply clicking on it. If the network requires a password, you will be prompted to enter it. Once entered, Windows will automatically connect you to the network, and you will be able to access the internet.
If you want to manage the settings of a network you are already connected to, simply right-click on the network icon in the system tray and select “Open Network & Internet settings.” This will take you to the network settings page, where you can make various modifications.
One of the key features of Windows 10’s network settings is the ability to prioritize the order in which networks are connected. This can be useful if you have multiple wireless networks available and want to ensure that your device automatically connects to the preferred one.
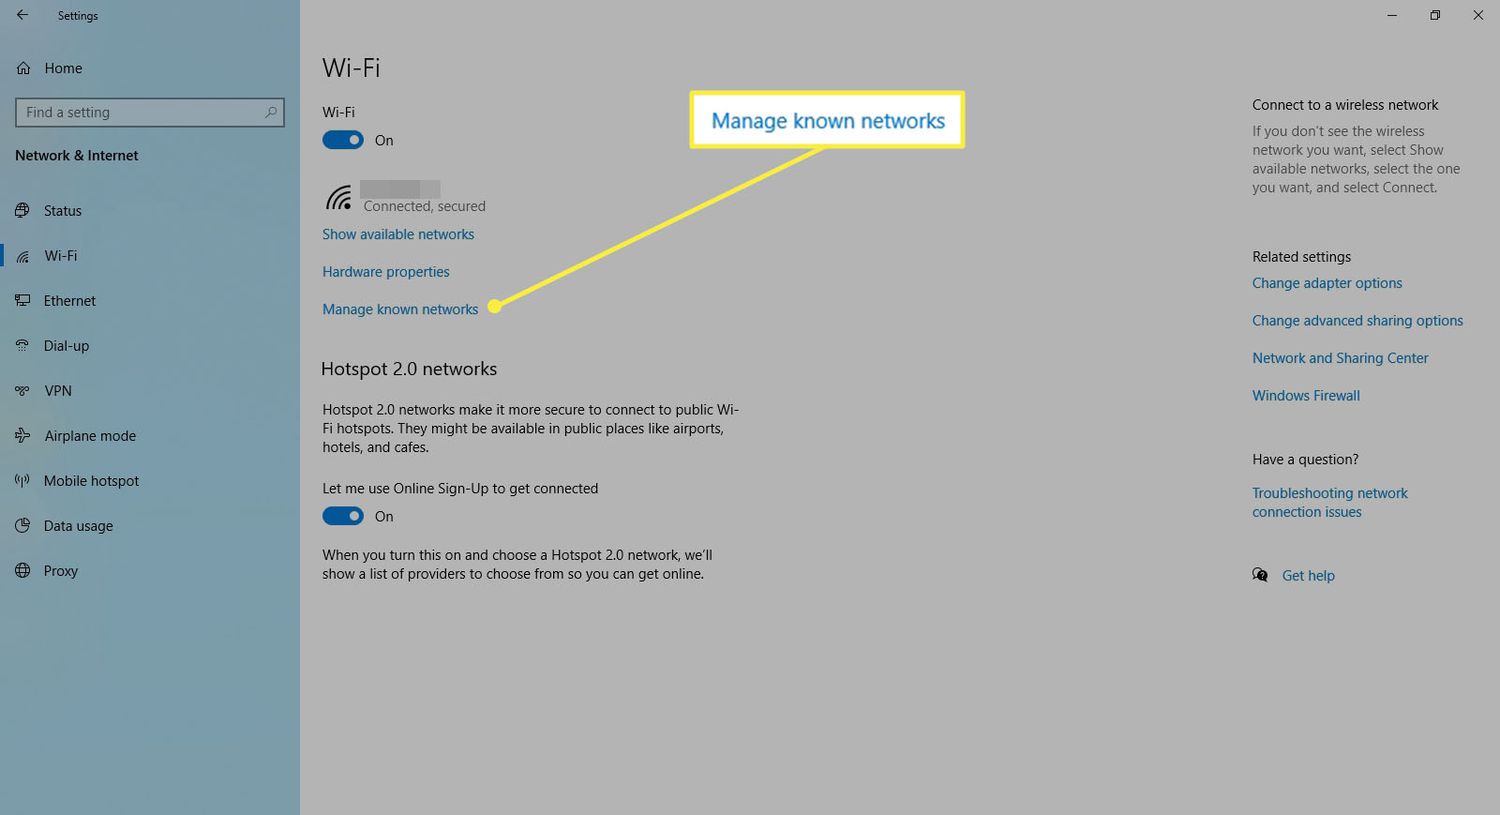
To prioritize networks, navigate to the network settings page and click on “Manage known networks.” From here, you can see a list of all the networks your device has connected to in the past. Simply click on a network and select “Move up” or “Move down” to adjust its priority.
If you want to forget a network and prevent your device from automatically connecting to it in the future, you can do so from the same “Manage known networks” page. Just select the network and click on the “Forget” button.
Additionally, Windows 10 allows you to forget all saved Wi-Fi networks at once. This can be helpful if you are experiencing connectivity issues and want to start fresh. To do this, go to the network settings page, click on “Manage known networks,” and then select “Forget all networks.”
Overall, managing network settings on Windows 10 is a straightforward process that gives you control over your wireless connections. By prioritizing networks and removing unnecessary ones, you can optimize your experience and ensure that your device connects to the right network effortlessly.
Troubleshooting Wireless Network Issues
Having trouble with your wireless network? Don’t worry, we’ve got you covered. In this section, we’ll walk you through some common problems that can occur with wireless networks and provide practical solutions to help you troubleshoot and fix them.
1. No Wi-Fi Connection: If you’re unable to connect to your Wi-Fi network, the first step is to verify that the Wi-Fi is turned on. Check if the Wi-Fi icon is visible in the system tray of your Windows 10 desktop. If it’s not, try pressing the Wi-Fi button on your laptop or restarting your Wi-Fi router. If that doesn’t work, check if Wi-Fi is enabled in your computer’s settings. Go to Settings > Network & Internet > Wi-Fi and make sure it’s turned on.
2. Weak Signal or Intermittent Connection: If you’re experiencing a weak Wi-Fi signal or intermittent connection, try moving closer to your Wi-Fi router. Walls, distance, and other physical barriers can affect the strength of your connection. Alternatively, you can try changing the channel on your Wi-Fi router to reduce interference from other devices. Access your router’s settings by entering its IP address in a web browser and navigating to the wireless settings section.
3. Authentication or Password Issues: If you’re getting an authentication or password error when connecting to your Wi-Fi network, double-check that you’re entering the correct password. Passwords are case-sensitive, so make sure your caps lock key is off. If you’re still facing issues, try forgetting the Wi-Fi network and reconnecting to it. To do this, go to Settings > Network & Internet > Wi-Fi, click on the network, and select “Forget.”
4. Driver or Firmware Updates: Outdated drivers or firmware can cause connectivity issues. Ensure that your wireless network adapter driver is up to date by going to the manufacturer’s website and downloading the latest version. Likewise, check for any available firmware updates for your Wi-Fi router and apply them according to the manufacturer’s instructions.
5. Network Reset: If all else fails, you can try performing a network reset. This will remove all your network settings and reinstall the network adapters on your computer. To do this, go to Settings > Network & Internet > Status, scroll down, and click on “Network Reset.” Keep in mind that this will also remove any VPN connections or virtual switches you may have set up.
Remember, troubleshooting wireless network issues can vary depending on the specific problem and the devices involved. These solutions should help resolve common issues, but if you’re still experiencing problems, it may be best to consult with a professional or your internet service provider for further assistance.
Adding and Removing Preferred Networks
Adding and removing preferred networks on Windows 10 is a straightforward process that allows you to prioritize the networks you frequently connect to. This feature ensures that your device connects to your preferred networks automatically, without the need for manual selection.
To add a preferred network, follow these steps:
- Open the Start menu and click on the Settings icon.
- In the Settings window, select the “Network & Internet” option.
- On the left-hand side, click on “Wi-Fi” to access the Wi-Fi settings.
- Scroll down and click on “Manage known networks”.
- Click on the “Add a new network” button.
- Enter the network name (SSID) and select the appropriate security type.
- If required, enter the network password.
- Check the box that says “Connect Automatically” if you want Windows to connect to this network automatically whenever it’s available.
- Click on the “Save” button to add the network to your list of preferred networks.
To remove a preferred network that you no longer want to connect to automatically, follow these steps:
- Open the Start menu and click on the Settings icon.
- In the Settings window, select the “Network & Internet” option.
- On the left-hand side, click on “Wi-Fi” to access the Wi-Fi settings.
- Scroll down and click on “Manage known networks”.
- Locate the network you want to remove from the list of preferred networks.
- Click on the network name to expand the options.
- Click on the “Forget” button to remove the network from the list.
By managing your preferred networks, you can ensure that your device connects effortlessly to the networks you trust and frequently use. This eliminates the hassle of manually selecting networks every time you want to connect, providing a seamless wireless experience on your Windows 10 device.
Conclusion
Managing wireless networks on Windows 10 can seem like a daunting task, but with the right knowledge and tools, it can be a breeze. Whether you’re looking to connect to a new network, prioritize your connections, or troubleshoot any issues, Windows 10 provides a variety of options to help you manage your wireless networks effectively.
By using the built-in network settings, such as the Network & Internet settings or the Command Prompt, you can easily configure and customize your wireless connections. Additionally, third-party applications like Now You Know can provide an extra layer of functionality and features for managing your networks.
Remember, staying connected and having a seamless wireless experience is essential in today’s digital age. So, take the time to familiarize yourself with Windows 10’s wireless network management tools, and you’ll be well-equipped to handle any network-related tasks that come your way.
FAQs
1. Can I manage wireless networks on Windows 10?
Yes, you can manage wireless networks on Windows 10. The operating system provides a built-in feature that allows you to view, connect to, and manage available wireless networks.
2. How do I access the list of wireless networks on Windows 10?
To access the list of wireless networks on Windows 10, you can click on the network icon in the system tray, which is located in the lower-right corner of the screen. This will display the available wireless networks in your area.
3. How can I add a new wireless network on Windows 10?
To add a new wireless network on Windows 10, you can follow these steps:
- Click on the network icon in the system tray.
- Select “Network & Internet settings.”
- Click on “Wi-Fi” in the left panel.
- Under “Wi-Fi,” click on “Manage known networks.”
- Click on “Add a new network.”
- Enter the network name (SSID) and select the security type.
- Click on “Next” and enter the network password, if required.
- Click on “Next” and you will now be connected to the new wireless network.
4. How do I remove a wireless network on Windows 10?
To remove a wireless network on Windows 10, you can follow these steps:
- Click on the network icon in the system tray.
- Select “Network & Internet settings.”
- Click on “Wi-Fi” in the left panel.
- Under “Wi-Fi,” click on “Manage known networks.”
- Find the wireless network you want to remove and click on it.
- Click on “Forget” to remove the network from your list of known networks.
5. How do I prioritize wireless networks on Windows 10?
To prioritize wireless networks on Windows 10, you can follow these steps:
- Click on the network icon in the system tray.
- Select “Network & Internet settings.”
- Click on “Wi-Fi” in the left panel.
- Under “Related settings,” click on “Manage Wi-Fi settings.”
- Scroll down to the “Manage known networks” section.
- Click on the wireless network you want to prioritize.
- Click on “Move up” or “Move down” to change the priority of the network.
- Repeat the above step to adjust the priority of other networks.