
Are you struggling to manage your wireless networks on your Windows 8 device? Well, worry no more! In this comprehensive guide, we will walk you through the step-by-step process of managing your wireless networks in Windows 8. Whether you need to connect to a new network, troubleshoot connectivity issues, or prioritize your preferred networks, we’ve got you covered.
With the increasing reliance on wireless technology, it is crucial to have a clear understanding of how to effectively manage your wireless networks. Windows 8 provides a user-friendly interface and a range of powerful features to help you stay connected without any hassle. So, let’s dive in and discover the ins and outs of managing wireless networks in Windows 8!
Inside This Article
- How To Manage Wireless Networks In Windows 8
- Connect to a Wireless Network
- Forget a Wireless Network
- Prioritize Wireless Networks
- Manage Network Adapter Settings
- Conclusion
- FAQs
How To Manage Wireless Networks In Windows 8
Windows 8 provides a user-friendly interface for managing wireless networks. Whether you want to connect to a new network, forget a saved network, prioritize your preferred networks, or adjust network adapter settings, Windows 8 offers simple and straightforward options. In this guide, we will walk you through each step to effectively manage wireless networks on your Windows 8 device.
Connect to a Wireless Network
To connect to a wireless network in Windows 8, follow these steps:
- Click on the network icon in the system tray, usually located in the bottom-right corner of the screen.
- A list of available wireless networks will appear. Select the network you want to connect to.
- If the network requires a password, enter the password when prompted.
- Once the password is entered correctly, you will be connected to the wireless network.
Forget a Wireless Network
If you no longer want your Windows 8 device to automatically connect to a certain wireless network, you can forget it. Here’s how:
- Open the Charms bar by moving your cursor to the right edge of the screen or swiping from the right on a touchscreen device.
- Click on the Settings charm and then select “Change PC settings.”
- In the PC settings menu, navigate to the “Network” category.
- Under the “Wireless” section, click on “Manage known networks.”
- A list of all the networks your device has connected to will appear. Select the network you want to forget.
- Click on the “Forget” button to remove the network from your device’s list of known networks.
Prioritize Wireless Networks
In situations where you have multiple saved wireless networks, Windows 8 allows you to prioritize them, ensuring your device connects to the preferred network first. To prioritize wireless networks, follow these steps:
- Open the Charms bar, click on the Settings charm, and select “Change PC settings.”
- Navigate to the “Network” category, then click on “Connections” in the left-hand menu.
- Under the “Wi-Fi” section, click on “Manage known networks.”
- Find the network you want to prioritize in the list of known networks.
- Click on the network and then select the “Move up” or “Move down” buttons to rearrange the priority order.
- The network at the top of the list will be given the highest priority and will be connected to first when available.
Manage Network Adapter Settings
To manage network adapter settings on your Windows 8 device, follow these steps:
- Open the Charms bar, click on the Settings charm, and select “Change PC settings.”
- Navigate to the “Network” category and click on “Connections.”
- Under the “Wi-Fi” section, click on the name of the network you are currently connected to.
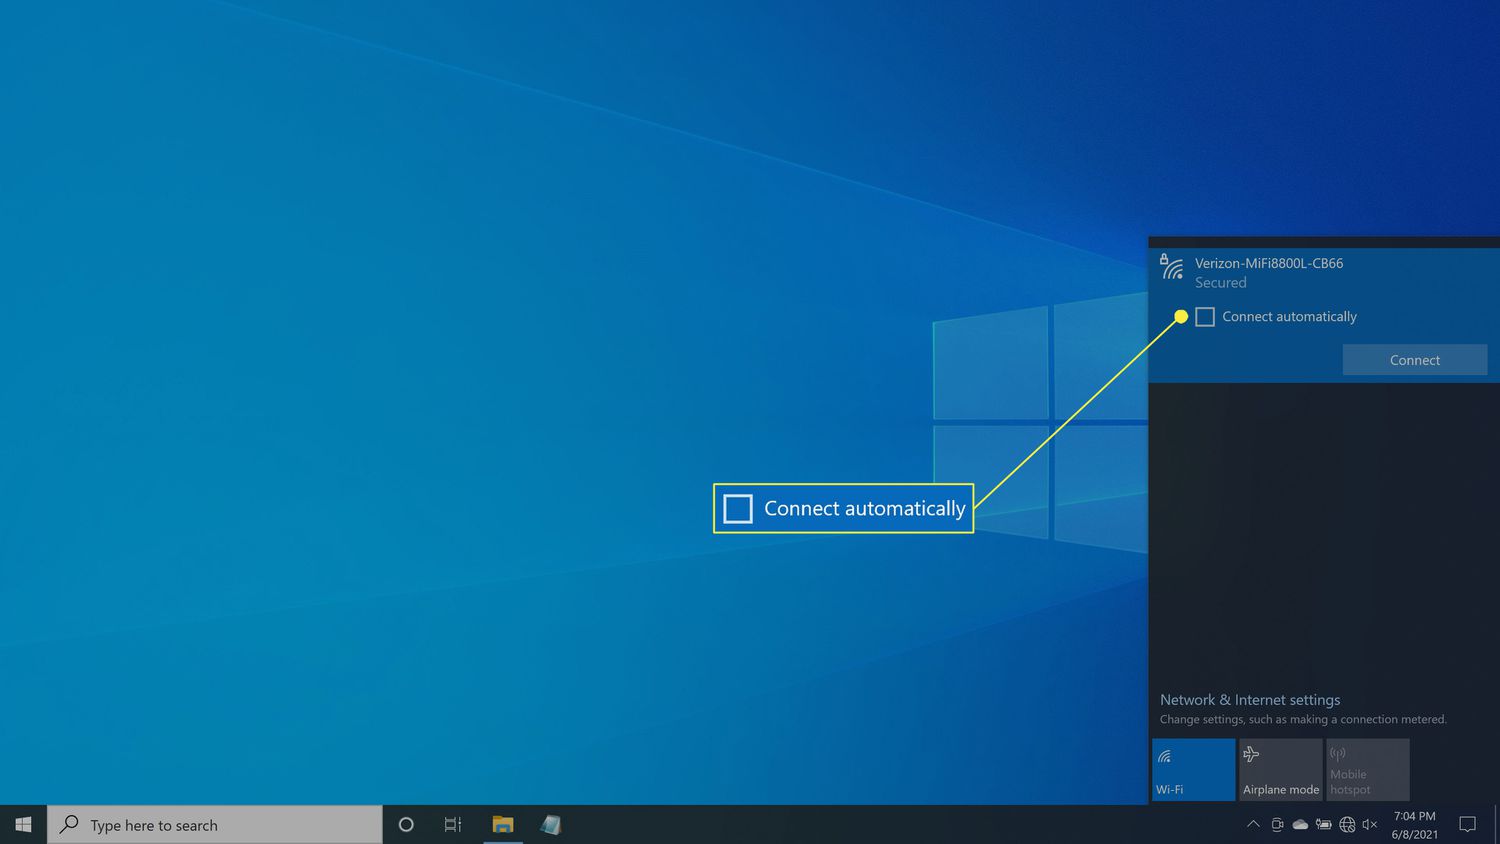
- In the network settings menu, you can toggle options like “Connect automatically” or “Connect even if the network is not broadcasting its name.”
- You can also adjust more advanced settings by clicking on the link that says “Advanced options.”
With these simple steps, you can easily manage wireless networks in Windows 8. Whether you’re connecting to a new network, forgetting an old one, prioritizing networks, or adjusting network adapter settings, Windows 8 provides a convenient way to control your wireless connections.
Connect to a Wireless Network
Connecting to a wireless network is essential for accessing the internet and staying connected. In Windows 8, the process is straightforward and can be done in a few easy steps. Here’s how:
- Click on the Wi-Fi icon in the system tray located at the bottom right corner of the screen. It looks like a series of vertical bars.
- A list of available wireless networks will appear. Select the network you want to connect to.
- If the network is secured, you will be prompted to enter the password. Enter the correct password and click “Connect”.
- Windows will establish a connection to the wireless network, and once connected, you will see a confirmation message.
That’s it! You have successfully connected to a wireless network in Windows 8. Now you can browse the internet, stream videos, and enjoy all the benefits of being connected online.
Forget a Wireless Network
In Windows 8, it’s common to connect to different wireless networks while on the go. Over time, you may find that certain networks are no longer needed or have become unreliable. In these cases, it’s important to know how to forget a wireless network to ensure a smooth and hassle-free connection experience. Follow the steps below to easily forget a wireless network in Windows 8:
- Open the Charms menu by swiping from the right side of the screen or pressing the Windows key + C on your keyboard.
- Click on the Settings option in the Charms menu.
- Select the Network icon to open the Network settings.
- You will see a list of available wireless networks. Right-click on the network you want to forget.
- A menu will appear. Click on the Forget option to remove the network from your device.
By following these steps, you can easily remove unnecessary or problematic wireless networks from your Windows 8 device. This ensures that your device will not automatically connect to these networks in the future, improving your overall wireless experience.
Prioritize Wireless Networks
When you have multiple wireless networks available, prioritizing them can help ensure you always connect to your preferred network. Here’s how you can prioritize wireless networks in Windows 8:
1. Open the Charms bar by swiping in from the right edge of the screen or by pressing the Windows key + C. Click on “Settings” and then select “Network” from the options.
2. In the Network settings window, click on “Wi-Fi” on the left-hand side.
3. Under the “Manage known networks” section, you will see a list of all the wireless networks you have connected to in the past. Click on the network you want to prioritize.
4. Once you have selected the network, click on “Move up” or “Move down” to rearrange the order of the networks. The network at the top of the list will be given the highest priority.
5. After you have arranged the networks in the desired order, click on “Save” to apply the changes.
By prioritizing wireless networks, you can make sure that Windows 8 connects to your preferred network first. This can be particularly useful if you have multiple networks available, such as a home network and a public Wi-Fi network.
Manage Network Adapter Settings
Managing network adapter settings in Windows 8 is essential for ensuring a smooth and reliable wireless network connection. Let’s explore some key settings that you can adjust to optimize your network performance.
1. Configuring IP Address and DNS Settings: To manage network adapter settings, you can start by configuring the IP address and DNS settings. This involves assigning a unique IP address and specifying the DNS server addresses. By properly configuring these settings, you can ensure that your network adapter communicates effectively with the network.
2. Modifying Power Management Settings: Power management settings for network adapters can have a significant impact on wireless network performance. By default, Windows 8 may be configured to conserve power by turning off the network adapter after a certain period of inactivity. However, this can cause delays in reconnecting to the network when you need to access the internet. Adjusting the power management settings to prevent the network adapter from turning off can help maintain a reliable connection.
3. Updating Network Adapter Drivers: Outdated or incompatible network adapter drivers can lead to connection issues and poor performance. It’s vital to keep your network adapter drivers up to date to ensure compatibility with Windows 8 and take advantage of any performance improvements or bug fixes provided by the manufacturer. You can update the drivers manually by visiting the manufacturer’s website or use the Windows Update feature to automatically download and install the latest drivers.
4. Adjusting Advanced Network Adapter Settings: Windows 8 provides various advanced settings for network adapters, allowing you to fine-tune their behavior. These settings include options such as transmit power, fragmentation threshold, and roaming aggressiveness. By adjusting these settings based on your specific network environment, you can optimize the performance and stability of your wireless connection.
5. Configuring Firewall and Security Settings: It’s crucial to configure firewall and security settings to protect your network from unauthorized access and potential threats. Windows 8 includes a built-in firewall that you can customize to permit or block network traffic for specific applications or services. Additionally, you can consider enabling network encryption protocols like WPA2 to enhance the security of your wireless network.
6. Managing Virtual Private Network (VPN) Settings: If you frequently connect to a company network or use a VPN for secure remote access, it’s important to configure the network adapter settings to support VPN connections. Windows 8 provides options for configuring VPN settings, including the type of VPN, IP address or hostname of the VPN server, and authentication details. By correctly setting up VPN configurations, you can establish a secure and reliable connection to your desired network.
Conclusion
In conclusion, managing wireless networks in Windows 8 can be a straightforward process once you understand the steps involved. By following the guidelines outlined in this article, you can easily connect to and manage your wireless networks with ease. Whether you’re setting up a new network, connecting to an existing one, or troubleshooting connectivity issues, Windows 8 provides robust tools and features to make the process seamless.
Remember to keep your network secure by using strong passwords, enabling encryption, and regularly updating your device’s firmware. Stay aware of the latest security recommendations and implement best practices to protect your network and data.
With Windows 8, you can take full advantage of wireless connectivity, ensuring that you stay connected and productive wherever you go. By learning how to manage wireless networks, you can enjoy a seamless and reliable internet experience on your Windows 8 device.
FAQs
1. How do I connect to a wireless network in Windows 8?
To connect to a wireless network in Windows 8, follow these steps:
- Open the Charms bar by swiping from the right edge of the screen or by pressing the Windows key + C.
- Click on “Settings” and then select “Networks.”
- Click on the Wi-Fi icon to see a list of available wireless networks.
- Select the network you want to connect to and click on “Connect.”
- If the network is secure, enter the password when prompted.
- Once connected, you should see the Wi-Fi icon in the taskbar indicating a successful connection.
2. How do I forget a wireless network in Windows 8?
If you no longer want your Windows 8 device to connect to a specific wireless network, you can forget it by following these steps:
- Open the Charms bar by swiping from the right edge of the screen or by pressing the Windows key + C.
- Click on “Settings” and then select “Change PC settings.”
- Click on “Network” and then select “Manage known networks.”
- Choose the network you want to forget and click on “Forget.”
3. How can I troubleshoot wireless network connection issues in Windows 8?
If you are facing problems with your wireless network connection in Windows 8, you can troubleshoot the issue using these steps:
- Open the Charms bar by swiping from the right edge of the screen or by pressing the Windows key + C.
- Click on “Settings” and then select “Change PC settings.”
- Click on “Network” and then select “Connections.”
- Under “Wi-Fi,” click on “Run the troubleshooter.”
- Follow the on-screen instructions to diagnose and resolve the wireless network connection issue.
4. How do I change the wireless network settings in Windows 8?
To modify the wireless network settings in Windows 8, do the following:
- Open the Charms bar by swiping from the right edge of the screen or by pressing the Windows key + C.
- Click on “Settings” and then select “Change PC settings.”
- Click on “Network” and then select “Connections.”
- Under “Wi-Fi,” click on “Manage known networks.”
- Select the network you want to modify and click on “Properties.”
- Make the desired changes to the network settings and click on “Save.”
5. How can I improve the wireless network signal strength in Windows 8?
To improve the wireless network signal strength in Windows 8, try the following:
- Ensure that your router is positioned in a central location, away from obstructions such as walls and electronic devices.
- Update your router’s firmware to the latest version.
- Reduce interference by minimizing the number of wireless devices operating in the same frequency range.
- Consider using a Wi-Fi range extender to extend the coverage area of your wireless network.
- Use a high-gain antenna with your router for better signal reception.