
Are you planning to transfer data from one QuickBooks account to another? Whether you’re migrating to a new version of QuickBooks or simply consolidating multiple accounts, transferring data smoothly and accurately is essential. In this article, we will guide you through the process, providing you with step-by-step instructions and tips to ensure a seamless data transfer. We understand that managing financial data is crucial for businesses, which is why we’ve put together this comprehensive guide to help you make the transition without any hiccups. So, if you’re ready to learn how to transfer data from one QuickBooks account to another, let’s get started!
Inside This Article
- Overview of QuickBooks Data Transfer
- Method 1: Exporting and Importing Data Files
- Method 2: Using the QuickBooks Data Transfer Utility
- Conclusion
- FAQs
Overview of QuickBooks Data Transfer
When it comes to managing your business finances, QuickBooks is a powerful tool that provides seamless data organization and reporting. However, there may be instances when you need to transfer data from one QuickBooks to another, such as when upgrading to a new version or transitioning to a different company file. Understanding the process of data transfer is essential to ensure a smooth transition and prevent any loss or corruption of valuable information.
Transferring data from one QuickBooks to another involves moving important files, such as company files, transaction data, customer and vendor information, and preferences. This process can be achieved through various methods, each with its own advantages and considerations.
One common method of transferring data involves exporting and importing data files. This approach allows you to manually select and export specific data from the source QuickBooks company file, and then import it into the destination QuickBooks file. This method is suitable for smaller datasets and provides greater control over what specific information gets transferred.
Another method that is widely used is utilizing the QuickBooks Data Transfer Utility. This utility simplifies the process by automatically transferring data, including lists, charts of accounts, and transactions, from one QuickBooks to another. It is a convenient option, especially for larger datasets or when dealing with complex data structures.
Before initiating the data transfer process, it’s crucial to create a backup of your source QuickBooks company file to ensure that no data is lost or compromised. Additionally, it is recommended to review and clean up your data before transferring it to the new file to eliminate any potential errors or inconsistencies.
Keep in mind that the process of transferring data from one QuickBooks to another can vary depending on the version and edition of QuickBooks you are using. It is always advisable to refer to the official QuickBooks documentation or consult with a QuickBooks expert to ensure a smooth and successful data transfer.
Method 1: Exporting and Importing Data Files
One popular method for transferring data from one QuickBooks to another is by exporting and importing data files. This method allows you to take specific data from one QuickBooks company file and transfer it to another file, making it a great option for individuals or businesses looking to migrate their data.
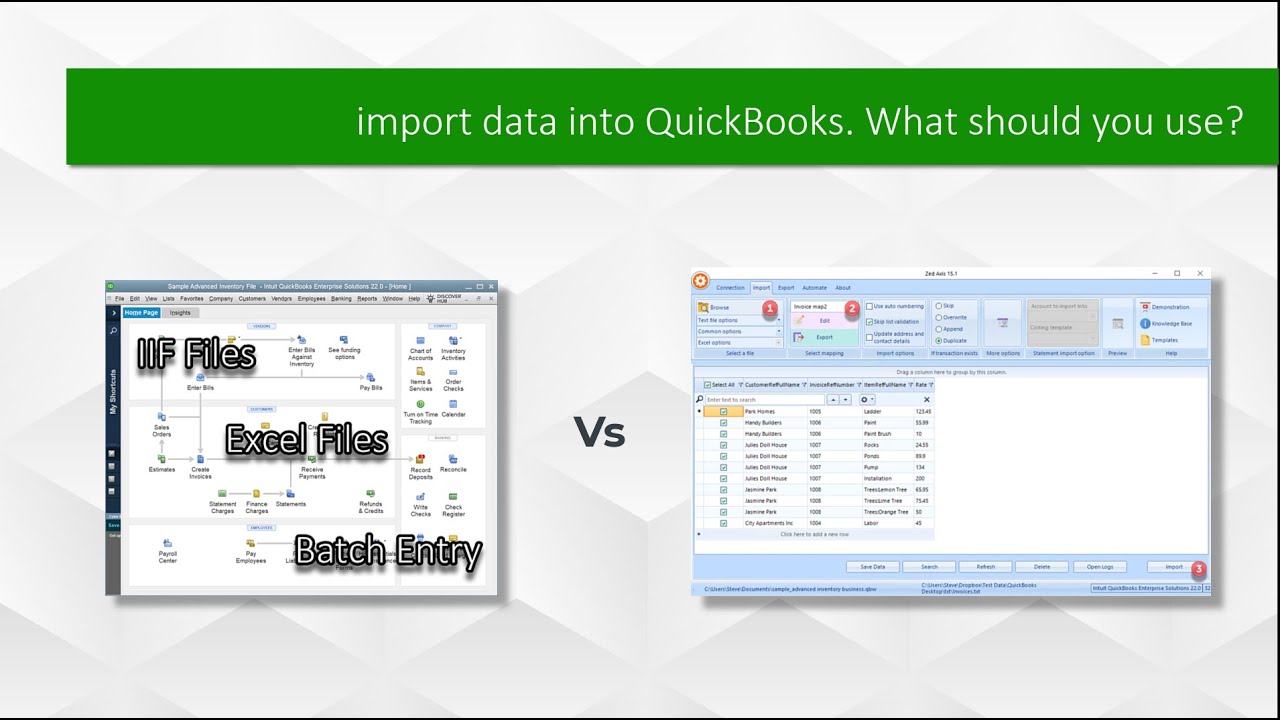
To begin the process, you will need to open the QuickBooks company file from which you want to export the data. Once the file is open, navigate to the ‘File’ menu and select ‘Utilities’, then choose ‘Export’ and ‘Lists to IIF Files’.
Next, you will be prompted to select the specific lists or items that you want to export. This includes lists such as customers, vendors, items, and more. Choose the relevant lists and click ‘OK’ to proceed with the export.
After selecting the lists to export, you will need to choose a location on your computer to save the exported IIF file. It’s important to remember where you save the file, as you will need to locate it in the next step.
Now that you have exported the data from the source QuickBooks file, you can proceed to import it into the destination QuickBooks file. Open the destination QuickBooks company file and navigate to the ‘File’ menu once again.
From the ‘File’ menu, select ‘Utilities’ followed by ‘Import’ and ‘IIF Files’. This will prompt you to locate the previously exported IIF file. Find the file on your computer and select it to initiate the import process.
QuickBooks will then prompt you to review and map the data before completing the import. Ensure that the data fields in the IIF file are correctly mapped to the corresponding fields in the destination QuickBooks file.
Once you have reviewed and mapped the data, click ‘OK’ to complete the import process. The data from the source QuickBooks file will now be transferred and integrated into the destination QuickBooks file, allowing you to access and utilize the transferred data efficiently.
It’s important to note that this method transfers data in the form of IIF files, which can limit the ability to transfer more complex data types such as transactions or reports. However, for transferring lists and items, this method is a handy and straightforward option.
Method 2: Using the QuickBooks Data Transfer Utility
The QuickBooks Data Transfer Utility is a powerful tool that allows you to easily transfer data from one QuickBooks company file to another. This method is particularly useful when you need to move a large amount of data or when the two company files are not accessible on the same computer.
Here are the steps to use the QuickBooks Data Transfer Utility:
- First, make sure you have the QuickBooks Data Transfer Utility installed on your computer. If you don’t have it, you can download it from the Intuit website.
- Open both the source and target company files in QuickBooks.
- In the source company file, go to the File menu and select Utilities > Export > Lists to IIF Files. Choose the lists that you want to transfer to the target company file and click OK. Save the IIF file to a location on your computer.
- Once the lists are exported, open the target company file, go to the File menu, and select Utilities > Import > IIF Files. Locate and select the IIF file that you saved in the previous step and click Open.
- QuickBooks will display a confirmation message indicating that the data has been imported successfully. Click OK to close the message.
- Verify that the data has been transferred correctly by reviewing the lists in the target company file. Check for any discrepancies or missing information, and make the necessary adjustments if needed.
- It is also recommended to run a few sample transactions in the target company file to ensure that the data transfer was successful and that the new file is functioning as expected.
- Once you have confirmed that the data transfer was successful, you can continue using the target company file for your accounting operations while keeping the source company file as a backup.
Using the QuickBooks Data Transfer Utility simplifies the process of transferring data between company files. It eliminates the need for manual data entry and reduces the risk of errors. Whether you are migrating to a new QuickBooks file or consolidating data from multiple files, this method ensures a smooth and efficient transfer.
However, it is important to note that the QuickBooks Data Transfer Utility may not be compatible with all versions of QuickBooks. Before using this method, check the system requirements and compatibility information provided by Intuit. If you encounter any issues or need further assistance, consult the QuickBooks support resources or reach out to a professional advisor.
Conclusion
In conclusion, transferring data from one QuickBooks to another can be a seamless process with the right tools and knowledge. By following the steps outlined in this article, you can ensure that your data is accurately transferred, preserving the integrity of your financial records and saving you valuable time and effort.
Remember to backup your data before initiating the transfer and to verify the accuracy of the transferred data once the process is complete. Additionally, if you encounter any challenges or have specific requirements, don’t hesitate to reach out to QuickBooks support for assistance.
Transferring data between QuickBooks instances can help streamline your accounting processes and ensure that you have access to accurate and up-to-date financial information. With this ability, you can easily manage multiple business accounts or transition to a new QuickBooks platform seamlessly.
Now that you have a comprehensive understanding of how to transfer data from one QuickBooks to another, you can confidently take control of your accounting system and maintain accurate financial records. Start by identifying the transfer method that best suits your needs and follow the step-by-step instructions to successfully migrate your data.
FAQs
1. Can I transfer data from one QuickBooks account to another?
Yes, it is possible to transfer data from one QuickBooks account to another. QuickBooks provides options to export data from one account and import it into another. This can be done through the company file export and import feature in QuickBooks.
2. What data can be transferred between QuickBooks accounts?
The data that can be transferred between QuickBooks accounts includes transactions, customer and vendor information, chart of accounts, inventory items, and other related financial data. It is important to note that not all data may be transferable, and some manual adjustments may be required after the transfer.
3. What is the process to transfer data from one QuickBooks account to another?
To transfer data from one QuickBooks account to another, follow these steps:
a. Open the account from which you want to transfer the data.
b. Export the required data in a compatible format, such as a CSV file.
c. Open the target account where you want to import the data.
d. Go to the import data section and select the appropriate file format.
e. Map the fields from the exported file to the corresponding fields in the target account.
f. Review and confirm the data before importing it into the target account.
4. Are there any limitations or considerations when transferring data between QuickBooks accounts?
Yes, there are some limitations and considerations to keep in mind when transferring data between QuickBooks accounts:
a. Ensure that both accounts have the same or compatible versions of QuickBooks.
b. Backup all data before initiating the transfer to avoid any loss of information.
c. Some data may not be transferable or may require additional manual adjustments.
d. Carefully review and reconcile the transferred data to fix any discrepancies.
e. Consult with a professional or refer to QuickBooks documentation for specific instructions and best practices.
5. Is it possible to merge data from multiple QuickBooks accounts into a single account?
Yes, it is possible to merge data from multiple QuickBooks accounts into a single account. This involves exporting data from each account and then importing it into the target account using the same process mentioned earlier. However, due to the complexity involved in merging data, it is recommended to seek expert assistance or follow detailed guidelines provided by QuickBooks to ensure a smooth and accurate merging process.