
Welcome to our comprehensive guide on how to completely reset the iPhone 13. Whether you’re experiencing technical issues, planning to sell your device, or simply looking to start with a clean slate, knowing how to perform a complete reset can be incredibly helpful. The iPhone 13 is a powerhouse device packed with impressive features, and understanding the steps to reset it can save you time and frustration. In this article, we will walk you through the process step-by-step and provide some useful tips along the way. So, if you’re ready to learn how to reset your iPhone 13 and restore it to its factory settings, let’s dive in!
Inside This Article
- How to Completely Reset iPhone 13
- Back Up Your iPhone
- Step 1: Open the Settings App
- Step 2: Navigate to the “General” Section
- Step 3: Reset All Settings
- Step 4: Choose “Reset All Settings”
- Step 5: Confirm Your Decision
- Step 6: Enter Your Passcode
- Step 7: Wait for the Reset to Finish
- Step 8: Set Up Your iPhone Again
- Erase All Content and Settings
- Restore Your iPhone from Backup
- Conclusion
- FAQs
How to Completely Reset iPhone 13
Resetting your iPhone 13 to factory settings can be a powerful troubleshooting tool to resolve various issues or prepare your device for resale. Whether you’re experiencing software glitches or simply want to start fresh, a complete reset can help. In this article, we’ll guide you through the process of completely resetting your iPhone 13.
Reasons to Reset iPhone 13
There are several reasons why you might want to reset your iPhone 13. If your device is running slow or freezing frequently, a reset can help resolve such performance issues. Additionally, if you’re planning to sell or give away your iPhone 13, resetting it ensures that all your personal data and settings are permanently erased, protecting your privacy.
Important Preparation Steps
Before proceeding with the reset, ensure that you’ve taken the following steps:
- Backup your data: Create a backup of your important data, including contacts, photos, videos, and any other files you want to keep. You can use iCloud or iTunes to back up your iPhone 13.
- Sign out of accounts: Remember to sign out of all your accounts like iCloud, iTunes, and App Store. This prevents any accidental data loss or unauthorized access to your accounts.
- Remove your SIM card: To avoid any data interference, it’s recommended to remove your SIM card before resetting your iPhone 13.
Resetting iPhone 13 using Settings
To reset your iPhone 13 using the device’s settings:
- Open the “Settings” app on your iPhone 13.
- Scroll down and tap on “General”.
- Scroll down again and tap on “Reset”.
- Choose “Erase All Content and Settings”.
- If prompted, enter your passcode or Apple ID password.
- Confirm the reset by tapping on “Erase Now”.
- Your iPhone 13 will now begin the reset process, which may take a few minutes. Once completed, your device will restart as if it were brand new.
Performing a Hard Reset on iPhone 13
If your iPhone 13 becomes unresponsive or frozen, you can perform a hard reset, which forces the device to restart. Here’s how:
- Press and quickly release the volume up button.
- Press and quickly release the volume down button.
- Press and hold the side button until the Apple logo appears on the screen.
- Your iPhone 13 will restart, and hopefully, the issue will be resolved.
By following these steps, you can completely reset your iPhone 13, either through the settings or by performing a hard reset. Remember to back up your data beforehand and sign out of your accounts to ensure a smooth reset process. Whether you’re troubleshooting issues or preparing your device for a new owner, a complete reset can provide a fresh start for your iPhone 13.
Back Up Your iPhone
Backing up your iPhone is an essential step before performing a complete reset. This ensures that all your important data, including your contacts, photos, and apps, are safely stored and can be easily restored after the reset.
There are two methods to back up your iPhone: using iCloud or iTunes. Both methods have their advantages, so it’s up to you to choose the one that suits your needs best. Let’s explore both options.
1. Backing up with iCloud:
To back up your iPhone using iCloud, follow these steps:
- Connect your iPhone to a Wi-Fi network.
- Go to “Settings” on your iPhone.
- Tap on your name at the top of the screen.
- Select “iCloud” from the menu.
- Scroll down and tap on “iCloud Backup”.
- Toggle on the “iCloud Backup” option.
- Tap on “Back Up Now” to initiate the backup process.
Your iPhone will now back up all your data to iCloud. It may take a while depending on the size of your data and your internet connection speed. Make sure to keep your iPhone connected to the Wi-Fi network until the backup is complete.
2. Backing up with iTunes:
If you prefer to back up your iPhone using iTunes on your computer, follow these steps:
- Ensure you have the latest version of iTunes installed on your computer.
- Connect your iPhone to your computer using a USB cable.
- Open iTunes and click on the iPhone icon in the top-left corner.
- In the Summary tab, click on “Back Up Now.
iTunes will now create a full backup of your iPhone on your computer. It’s advisable to encrypt the backup to include sensitive information, such as passwords and health data. This will require you to set a backup password, which will be needed when restoring your iPhone later.
By backing up your iPhone, you can ensure that all your valuable data is safe, and you can easily restore it after performing a complete reset. Whether you choose to back up with iCloud or iTunes, make it a habit to regularly back up your iPhone to prevent any data loss or inconvenience in the future.
Reset All Settings – iPhone 13
Your iPhone 13 can sometimes encounter software glitches or performance issues that can be resolved by resetting all settings. This process reverts your device’s settings back to their factory defaults without deleting any of your personal data or files. It’s a useful troubleshooting step that can help resolve various issues and improve overall performance. Here’s how you can reset all settings on your iPhone 13:
Step 1: Open the Settings App
Start by unlocking your iPhone 13 and tapping on the “Settings” app on your home screen. The Settings app is represented by a gear icon and is where you can customize various options and preferences on your device.
Step 2: Navigate to the “General” Section
Once you have the Settings app open, scroll down and tap on the “General” option. This section contains a wide range of settings and features that apply to your iPhone as a whole.
Step 3: Reset All Settings
In the General settings, scroll down and look for the “Reset” option. Tap on it to access the reset options for your iPhone 13.
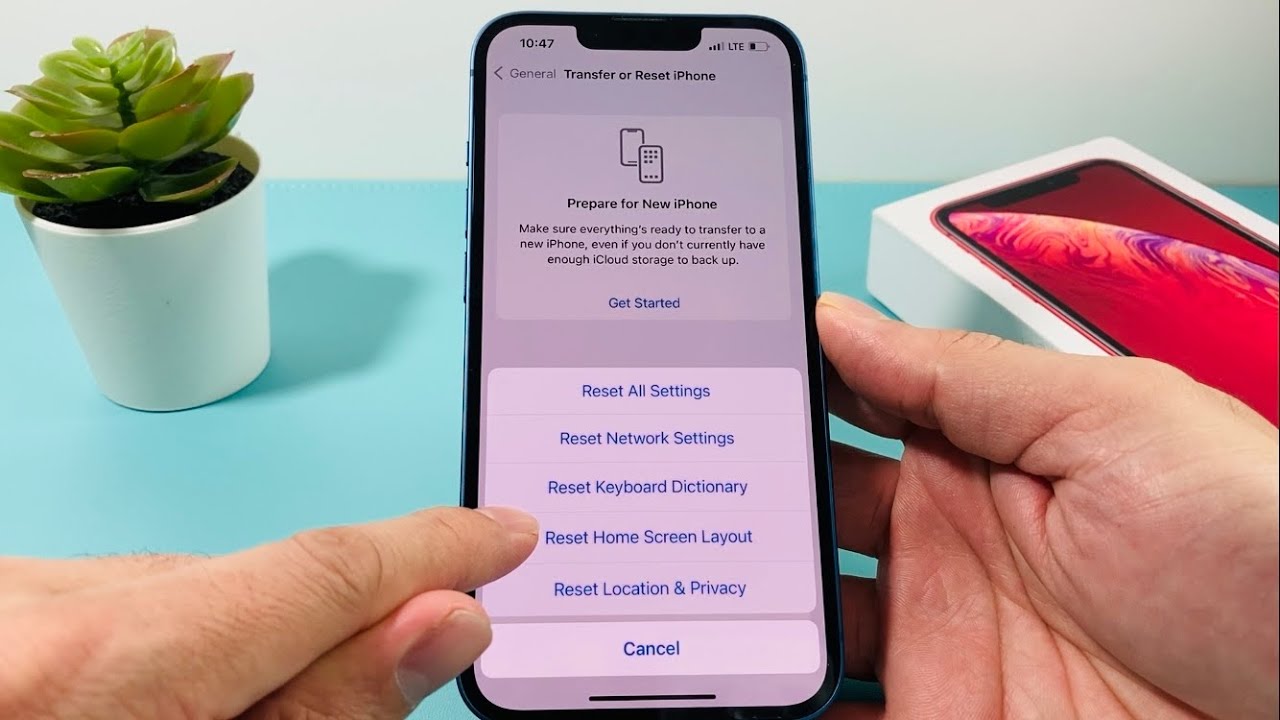
Step 4: Choose “Reset All Settings”
Within the Reset options, you will see several choices including “Reset All Settings,” “Erase All Content and Settings,” and more. Make sure to select the “Reset All Settings” option.
Step 5: Confirm Your Decision
A confirmation prompt will appear, warning you that resetting all settings will erase personalized preferences and return them to their default values. If you’re ready to proceed, tap on “Reset All Settings” again to confirm your decision.
Step 6: Enter Your Passcode
To complete the reset process, you will need to enter your device passcode. This is necessary to ensure that only authorized users can make significant changes to the device settings.
Step 7: Wait for the Reset to Finish
Your iPhone 13 will now start the reset process. It may take a few minutes for the reset to complete, depending on the amount of data on your device.
Step 8: Set Up Your iPhone Again
Once the reset is finished, your iPhone 13 will boot up to the initial setup screen. You can now proceed to set up your device again, customizing settings to your preferences.
Resetting all settings on your iPhone 13 can often resolve software issues, improve performance, and provide a fresh start. However, it’s important to note that this process only resets your settings and preferences and does not delete any personal data or files. If you’re still experiencing issues after resetting, you may consider other troubleshooting steps or contacting Apple support for assistance.
Erase All Content and Settings
If you’ve decided to sell, trade-in, or give away your iPhone 13, performing a complete reset by erasing all content and settings is highly recommended. This ensures that all your personal data, including photos, messages, and apps, are permanently deleted, protecting your privacy and preventing any unauthorized access to your information.
Before proceeding with this process, it is crucial to create a backup of your iPhone 13 to save all your important data. You can back up your device via iCloud or iTunes to ensure that you can restore your data on a new device or retrieve it later if needed.
Once you have backed up your iPhone 13 and are ready to proceed, follow these simple steps to erase all content and settings:
- Open the “Settings” app on your iPhone 13.
- Scroll down and tap on “General.”
- Scroll to the bottom and tap on “Reset.”
- Tap on “Erase All Content and Settings.”
- If prompted, enter your passcode or Apple ID password to verify your identity and continue.
- Read the warning message carefully and, if you’re sure, tap on “Erase iPhone.”
- Your iPhone 13 will now begin the reset process, which may take a few minutes.
Once the reset is complete, your iPhone 13 will restart and present you with the initial setup screen, just like when you first purchased the device. From here, you can set up your iPhone 13 as new or restore it from a backup if you have one available.
It is worth noting that erasing all content and settings is irreversible, and there is no way to recover the data once it has been deleted. Therefore, it is crucial to double-check that you have backed up your important data before proceeding with this reset.
By following these steps, you can ensure a complete reset of your iPhone 13, protecting your privacy and allowing for a smooth transition to a new device.
Restore Your iPhone from Backup
Restoring your iPhone from a backup is a convenient way to transfer all your data, settings, and apps from an old iPhone to a new one. It allows you to seamlessly transition to a new device without losing any important information. Whether you have just gotten a new iPhone or have recently reset your current one, restoring from a backup can save you time and effort in setting up your device.
Here are the steps to restore your iPhone from a backup:
- Make sure you have a backup available: Before you begin the restoration process, ensure that you have a recent backup of your old iPhone saved on iCloud or iTunes. This backup will serve as the source for transferring your data and settings to the new device.
- Connect your new iPhone to a power source: To prevent any interruptions during the restoration process, connect your new iPhone to a power source. This ensures that your device remains powered throughout the restoration.
- Power on your new iPhone: Turn on your new iPhone by pressing and holding the power button until the Apple logo appears on the screen. Proceed with the initial setup steps until you reach the “Apps & Data” screen.
- Select “Restore from iCloud Backup” or “Restore from iTunes Backup”: Depending on where you have your backup stored, choose the appropriate option on the “Apps & Data” screen. If you have your backup saved on iCloud, select “Restore from iCloud Backup.” If your backup is saved on iTunes, choose “Restore from iTunes Backup.”
- Sign in to your Apple ID: If you selected “Restore from iCloud Backup,” sign in with your Apple ID and password. This will allow your iPhone to access your iCloud account and retrieve the backup.
- Choose the backup you want to restore: After signing in, you will see a list of available backups. Select the most recent backup that you want to restore to your new iPhone.
- Wait for the restoration to complete: The restoration process may take some time, depending on the size of the backup and the speed of your internet connection. Ensure that your iPhone remains connected to Wi-Fi and plugged into a power source until the process is complete.
- Set up Touch ID, Face ID, and Apple Pay: Once the restoration is finished, follow the on-screen instructions to set up your Touch ID, Face ID, and Apple Pay features, if applicable.
- Continue with the setup process: After completing the Touch ID, Face ID, and Apple Pay setup, continue with the remaining steps of the initial setup process, such as signing in to your Apple ID, setting up Siri, and configuring your preferences.
- Wait for app downloads: After the setup is complete, your new iPhone will begin downloading your apps from the App Store. Ensure that your device is connected to Wi-Fi and has sufficient storage space for the app downloads.
- Verify your data and settings: Once all the apps are downloaded, you can verify that your data and settings have been successfully restored. Check your contacts, messages, photos, and other important content to ensure everything is in place.
By following these steps, you can easily restore your iPhone from a backup and quickly get back to using your device with all your data and settings intact. It’s a great way to seamlessly transition to a new iPhone or recover your data after a reset.
Conclusion
Resetting your iPhone 13 can be a highly effective solution when you encounter software issues, sluggish performance, or want to wipe all your personal data before selling or giving away your device. By following the steps outlined in this article, you can safely and easily perform a complete reset of your iPhone 13, restoring it to its factory settings.
Remember to backup your data before proceeding with a reset, as it will erase all the content and settings on your device. Once the reset is complete, you can set up your iPhone 13 as a new device or restore your data from a backup, ensuring a fresh start or continuity based on your preference.
With the ability to reset your iPhone 13, you have the power to troubleshoot software issues, optimize performance, and maintain the privacy and security of your personal information. So, don’t hesitate to perform a reset when necessary, and make the most out of your iPhone 13 experience.
FAQs
1. Can I reset my iPhone 13 to its factory settings?
Yes, you can reset your iPhone 13 to its factory settings. This process will erase all your data and settings, returning your device to its original state when you first purchased it. It’s important to note that you should back up your data before initiating a factory reset.
2. How do I perform a factory reset on my iPhone 13?
To perform a factory reset on your iPhone 13, go to the “Settings” app, then tap on “General”. Scroll down and tap on “Reset”, then select “Erase All Content and Settings”. You may be prompted to enter your passcode or Apple ID password. Once confirmed, the reset process will begin.
3. Will a factory reset remove all my personal data?
Yes, a factory reset will remove all your personal data from your iPhone 13. This includes photos, videos, contacts, messages, and any installed apps or settings. It’s crucial to back up your data before proceeding to avoid permanent data loss.
4. How long does it take to reset an iPhone 13?
The length of time to reset an iPhone 13 can vary depending on factors such as the amount of data on the device and its processing speed. On average, a factory reset can take around 10 to 15 minutes. It’s recommended to keep your device plugged in during the reset process to ensure it doesn’t run out of battery.
5. Will a factory reset solve software issues on my iPhone 13?
A factory reset can often resolve software issues on an iPhone 13, especially if they are caused by conflicting settings or corrupt files. However, it’s important to note that a factory reset should be considered as a last resort after trying other troubleshooting methods. If the issue persists after a reset, it’s advisable to seek professional assistance or contact Apple Support for further guidance.