
Are you wondering how to enable MMS messaging on your brand new iPhone 13? Look no further! In this comprehensive guide, we will walk you through the simple steps to activate MMS messaging on your iPhone 13. MMS, or Multimedia Messaging Service, allows you to send and receive messages that include multimedia content such as photos, videos, and audio files. With MMS enabled, you can conveniently share your favorite moments with friends and family in a more interactive and engaging way. So, whether you’re looking to send a funny picture, a heartfelt video, or an audio recording, we’ve got you covered. Let’s dive in and get your iPhone 13 ready to handle all your multimedia messaging needs!
Inside This Article
- Enable MMS Messaging on iPhone 13
- Checking MMS Settings
- Adjusting Cellular Data Settings
- Verifying Carrier Support
- Updating iOS Software
- Conclusion
- FAQs
Enable MMS Messaging on iPhone 13
Are you having trouble sending or receiving MMS messages on your brand new iPhone 13? Don’t worry, we’ve got you covered! In this article, we will guide you through the steps to enable MMS messaging on your iPhone 13, so you can send and receive multimedia messages with ease.
1. Checking MMS Settings
The first thing you need to do is check your MMS settings on your iPhone 13. Start by opening the Settings app and scrolling down to find “Messages.” Tap on it, then make sure that the “MMS Messaging” option is toggled on. This will enable your device to send and receive MMS messages.
2. Adjusting Cellular Data Settings
Another important step is to ensure that your cellular data settings are properly configured for MMS messaging. Go back to the Settings app and tap on “Cellular” or “Mobile Data.” Make sure that your data is turned on and that MMS messaging is allowed. Some carriers may have specific APN settings that you need to enter, so check with your carrier if you are unsure about this.
3. Verifying Carrier Support
It’s crucial to verify that your carrier supports MMS messaging on the iPhone 13. Not all carriers provide this service, so it’s essential to contact your carrier’s customer support or check their website to confirm their MMS capabilities. If your carrier does not support MMS messaging, you may need to consider an alternative messaging solution like using a messaging app that supports multimedia messages.
4. Updating iOS Software
If you have followed the previous steps and still cannot enable MMS messaging on your iPhone 13, it’s possible that your device’s software needs an update. Go to the Settings app, select “General,” and then tap on “Software Update.” If an update is available, follow the prompts to download and install it. Keep in mind that updating your software may also fix other bugs and issues you might encounter.
By following these steps, you should be able to enable MMS messaging on your iPhone 13 and enjoy the freedom of sending and receiving multimedia messages. If you continue to experience issues, we recommend contacting Apple Support or your carrier’s customer service for further assistance. Happy messaging!
Checking MMS Settings
Before you can start using MMS messaging on your iPhone 13, it’s essential to ensure that your MMS settings are properly configured. Follow the steps below to check your settings:
1. Open the Settings app on your iPhone 13.
2. Scroll down and tap on “Messages.”
3. Look for the “MMS Messaging” option and make sure it is toggled on. If it’s already enabled, you can proceed to the next step.
4. If the “MMS Messaging” option is turned off, tap on it to enable it. It should turn green to indicate that it is now active.
5. Once you’ve enabled MMS Messaging, you can also adjust other settings related to MMS, such as Group Messaging and Send Read Receipts, according to your preference.
By following these steps, you will be able to check and configure your MMS settings correctly, allowing you to send and receive MMS messages on your iPhone 13.
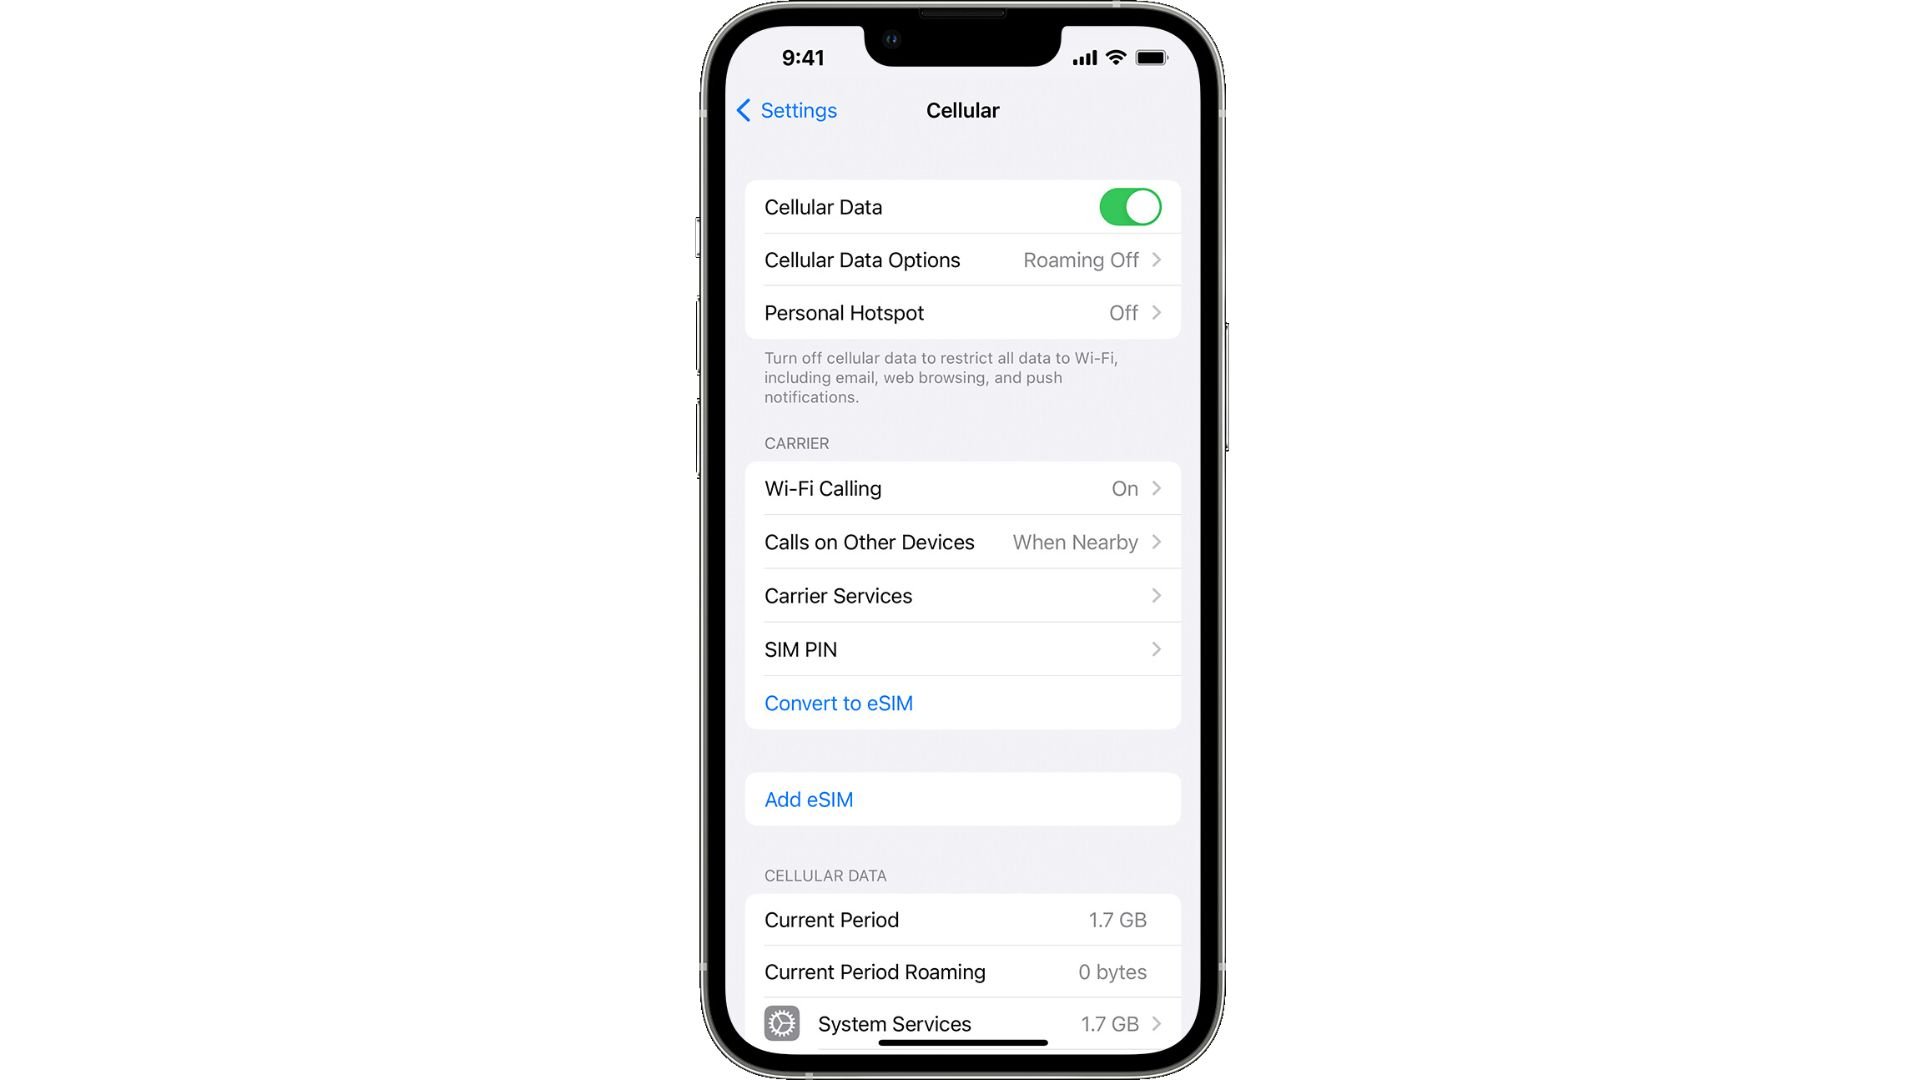
Adjusting Cellular Data Settings
To enable MMS messaging on your iPhone 13, you may need to adjust your cellular data settings. MMS messages require a cellular connection to send and receive multimedia content such as photos, videos, and audio files. To ensure that your iPhone 13 is configured correctly for MMS messaging, follow the steps below:
1. Open the “Settings” app on your iPhone 13.
2. Scroll down and tap on “Cellular”.
3. In the Cellular settings, make sure that the “Cellular Data” option is turned on. MMS messages require an active cellular data connection, so it is important to ensure that this option is enabled.
4. If the “Cellular Data” option is already enabled, try turning it off and then on again to refresh the connection. Sometimes, toggling this setting can resolve any temporary issues with the cellular data connection.
5. Scroll further down in the Cellular settings and locate the “Cellular Data Options” section. Tap on it.
6. In the Cellular Data Options, tap on “Enable LTE”. Here, you can choose between “Voice & Data” or “Data Only”. Make sure that “Voice & Data” is selected to allow for MMS messaging.
7. If you have made any changes to the cellular data settings, exit the settings app and restart your iPhone 13. This can help apply the changes and ensure that the new settings take effect.
By adjusting your cellular data settings, you can ensure that your iPhone 13 is ready to send and receive MMS messages. Remember, MMS messaging requires a cellular data connection and can’t be used over Wi-Fi alone.
Verifying Carrier Support
In order to enable MMS messaging on your iPhone 13, it is important to verify that your carrier supports this feature. MMS messaging involves transmitting multimedia files, such as photos and videos, through cellular networks. Not all carriers may offer MMS functionality, so it is necessary to check if your carrier supports it before proceeding.
To verify if your carrier supports MMS messaging on your iPhone 13, follow these steps:
- Open the Settings app on your iPhone 13.
- Scroll down and tap on Cellular.
- Look for Cellular Data Options or Cellular Data Network and tap on it.
- Under MMS or Message Settings, you should see fields for APN, MMSC, and Proxy.
- If these fields are present, it means that your carrier supports MMS messaging.
If you are unable to locate the MMS or Message Settings section, or if the fields are not visible, it is likely that your carrier does not support MMS messaging on your iPhone 13. In such cases, it is recommended to contact your carrier’s customer support to confirm their MMS messaging support and discuss any available options.
Verifying carrier support is crucial, as attempting to enable MMS messaging without carrier support may lead to unsuccessful sending or receiving of multimedia files. By ensuring that your carrier supports MMS messaging, you can proceed with confidence and fully enjoy the benefits of multimedia communication on your iPhone 13.
Updating iOS Software
Keeping your iPhone 13’s iOS software up to date is crucial for ensuring optimal performance and compatibility with various features, including MMS messaging. Regular iOS updates are released by Apple to address bugs, enhance security, and introduce new functionalities.
To update your iPhone’s software, follow these simple steps:
1. Connect your iPhone 13 to a stable Wi-Fi network. It’s important to have a reliable internet connection to download and install the software update.
2. Open the Settings app on your iPhone and scroll down to find the “General” option. Tap on it to proceed.
3. In the General settings, look for the “Software Update” tab. If a new iOS update is available, you will see a notification indicating the presence of an update.
4. Tap on “Software Update” to view the details of the available update. This screen will provide information about the update size and any new features or improvements that it brings.
5. To start the update process, tap on “Download and Install.” The download size may vary depending on the update, so make sure you have enough storage space on your device.
6. Once the download is complete, tap on “Install Now” to initiate the installation process. Your iPhone will restart during the installation, so ensure that you have enough battery charge or have it connected to a power source.
7. Follow the on-screen prompts and enter your passcode, if required, to authenticate the update installation.
8. After the installation process finishes, your iPhone will restart again, and the updated iOS will be successfully installed.
It’s essential to regularly check for available software updates and install them promptly to ensure that your iPhone 13 is equipped with the latest features and security enhancements. Updated software can also resolve any issues that may be affecting MMS messaging on your device.
Now that you’ve learned how to update your iPhone 13’s iOS software, you can enjoy improved performance and take advantage of the latest features, including MMS messaging capabilities.
Enabling MMS messaging on your iPhone 13 opens up a world of communication possibilities. Whether you want to send photos, videos, or audio recordings, MMS allows you to share moments with your friends and family in a more immersive way.
With just a few simple steps, you can activate MMS messaging on your iPhone 13 and start enjoying this enhanced messaging experience. Remember to check your cellular plan to ensure MMS messaging is included, as some carriers may charge additional fees.
By following the steps outlined in this guide, you can seamlessly enable MMS messaging on your iPhone 13 and unlock the full potential of your device. So go ahead, share those captivating moments, and stay connected in a more visual and engaging way.
FAQs
1. How do I enable MMS messaging on iPhone 13?
To enable MMS messaging on your iPhone 13, follow these steps:
- Go to the Settings app on your iPhone.
- Scroll down and tap on Messages.
- Enable the MMS Messaging option by toggling it on.
- If required, ensure that the Send as SMS option is also enabled.
Enabling MMS messaging will allow you to send and receive multimedia messages, including photos and videos, through the Messages app on your iPhone 13.
2. What is MMS messaging?
MMS stands for Multimedia Messaging Service. It is a feature that allows you to send and receive multimedia content, such as photos, videos, and audio recordings, through text messaging. MMS messaging offers a more enhanced and expressive way of communication compared to standard SMS (Short Message Service) texting, which only supports plain text messages.
3. Are there any charges for sending MMS messages on iPhone 13?
The charges for sending MMS messages on iPhone 13 may vary depending on your cellular service provider and your specific data plan. In some cases, sending MMS messages may consume a small amount of cellular data from your data plan. It is recommended to review your data plan or contact your cellular service provider to understand any potential charges associated with sending MMS messages on your iPhone 13.
4. Can I send MMS messages to non-iPhone users?
Yes, you can send MMS messages to non-iPhone users. MMS messaging is a standardized feature supported by most smartphones, including both iPhone and Android devices. As long as the recipient’s smartphone supports MMS messaging, they will be able to receive the multimedia content you send, regardless of the type of phone they are using.
5. Is there a size limit for MMS messages on iPhone 13?
Yes, there is typically a size limit for MMS messages on iPhone 13. The specific size limit may vary depending on your cellular service provider and network settings. In general, MMS messages have a file size limit of around 300 KB to 600 KB. If you exceed this limit, the MMS message may not be delivered or may be compressed, resulting in a loss of quality. It is recommended to check with your cellular service provider to determine the exact size limit for MMS messages on your iPhone 13.