
Sure, here's the introduction wrapped in the
tag:
Have you ever wanted to capture a memorable moment on your iPhone 14 Pro screen? Whether it’s a high score in a game, a funny conversation, or a tutorial you want to save for later, knowing how to screen record on your iPhone 14 Pro can be incredibly useful. In this article, we’ll explore the step-by-step process of screen recording on the iPhone 14 Pro, uncovering the built-in features that make it a breeze. By the end, you’ll be equipped with the knowledge to effortlessly capture and share your screen activities with friends and family. Let’s dive in!
Inside This Article
- Setting Up Screen Recording
- Recording Your Screen
- Editing and Sharing Your Recording
- Conclusion
- FAQs
Setting Up Screen Recording
Screen recording on your iPhone 14 Pro is a fantastic feature that allows you to capture and share your device’s screen activity with ease. Before you begin, ensure that screen recording is enabled on your device. To do this, navigate to the “Control Center” in your iPhone’s settings and add the “Screen Recording” option if it’s not already included.
Once you’ve added the “Screen Recording” option to your Control Center, you can access it by swiping down from the top-right corner of your screen. This will reveal the Control Center, where you’ll find the “Screen Recording” icon. Tapping on this icon will initiate the screen recording process, allowing you to capture anything happening on your device’s display.
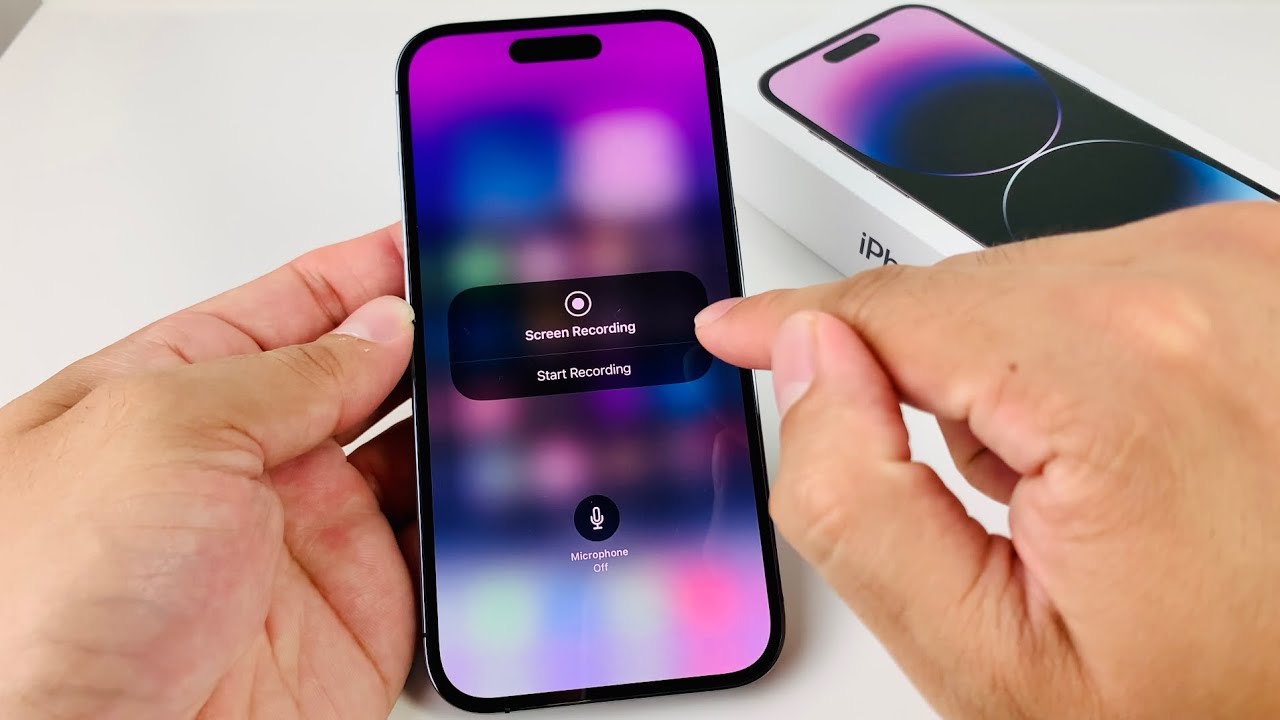
Before you start recording, it’s essential to customize your screen recording settings. You can do this by pressing and holding the “Screen Recording” icon in the Control Center. This action will present you with various options, including the ability to enable microphone audio for capturing commentary or external sounds during the recording.
Recording Your Screen
Once you’ve set up screen recording on your iPhone 14 Pro, capturing your screen is a breeze. To initiate the recording process, simply navigate to the screen or app you want to record. Ensure that everything you want to capture is visible on the screen before proceeding.
Next, swipe down from the upper-right corner of the screen to access the Control Center. Here, you’ll find the screen recording icon, which looks like a solid circle surrounded by a dotted outline. Tap this icon to start the recording. You can choose to record with or without sound, depending on your preference. If you want to capture audio, ensure that the microphone icon is not muted.
Once you’ve tapped the screen recording icon, a three-second countdown will commence, giving you a brief window to prepare the content you wish to record. After the countdown, the status bar at the top of your screen will turn red, indicating that the recording is in progress. Now, everything you do on your device will be captured in real-time.
When you’re finished recording, simply tap the red status bar at the top of the screen. A prompt will appear, asking if you want to stop the recording. Confirm by tapping “Stop,” and the recording will conclude. The video file will be saved to your Photos app, allowing you to review, edit, and share it as desired.
Editing and Sharing Your Recording
Once you’ve captured your screen recording, you may want to make some adjustments before sharing it with others. Fortunately, your iPhone 14 Pro offers simple yet powerful editing tools to help you refine your recording to perfection.
After stopping the screen recording, you can access the video from the Photos app. Tap on the recording, then select “Edit” to begin refining your content. You can trim the beginning and end of the recording to remove any unwanted sections, ensuring that your final video is polished and concise.
Furthermore, you can enhance your screen recording by adding annotations, text, and even audio commentary. This allows you to provide context, explanations, or additional information to make your recording more informative and engaging.
Once you’ve edited your screen recording to your satisfaction, it’s time to share it with others. From the Photos app, simply select the recording, tap the share icon, and choose your preferred method of sharing. Whether it’s through iMessage, email, or social media platforms, sharing your screen recording is just a few taps away.
Alternatively, you can also upload your recording directly to cloud storage services or video sharing platforms. This enables you to distribute your content widely and seamlessly, reaching a larger audience with your valuable insights or captivating demonstrations.
Conclusion
Screen recording on the iPhone 14 Pro is a powerful feature that allows users to capture and share their device’s screen with ease. Whether you want to create tutorials, demonstrate app usage, or simply save memorable moments from your device, the built-in screen recording functionality offers a convenient solution. By accessing the Control Center and initiating the screen recording feature, you can effortlessly capture high-quality videos directly from your iPhone 14 Pro. With the ability to record audio alongside the screen activity, this feature opens up a world of possibilities for content creation and sharing. As technology continues to evolve, the iPhone 14 Pro’s screen recording feature exemplifies the seamless integration of innovation and user experience, empowering individuals to express themselves and communicate in new and engaging ways.
FAQs
1. How do I screen record on iPhone 14 Pro?
To screen record on your iPhone 14 Pro, simply swipe down from the top-right corner of the screen to open the Control Center. Then, tap the Screen Recording icon (a circle with a dot inside) to start recording. You can also press and hold the Screen Recording icon to reveal additional options, such as recording the microphone audio.
2. Can I customize the settings for screen recording on my iPhone 14 Pro?
Yes, you can customize the screen recording settings on your iPhone 14 Pro. After tapping the Screen Recording icon in the Control Center, press and hold the icon to access options like enabling microphone audio, adjusting the recording duration, and choosing where to save the recorded video.
3. Where are the screen recordings saved on my iPhone 14 Pro?
By default, screen recordings are saved in the Photos app on your iPhone 14 Pro. You can access them by opening the Photos app and navigating to the "Screen Recordings" album.
4. Is it possible to edit screen recordings on my iPhone 14 Pro?
Yes, you can edit screen recordings on your iPhone 14 Pro using the built-in Photos app. Simply open the screen recording in the Photos app, tap "Edit," and then use the editing tools to trim, crop, add annotations, or make other adjustments to the recording.
5. Can I share my screen recordings from my iPhone 14 Pro?
Absolutely! You can easily share your screen recordings from your iPhone 14 Pro. After recording, open the Photos app, select the screen recording, tap the "Share" button, and choose the desired sharing method, such as AirDrop, Messages, or social media platforms.
These FAQs should help users understand the process of screen recording on their iPhone 14 Pro and address common queries they may have.