
The iPhone 14 is a powerful and versatile device that offers a wide range of features to cater to the needs of its users. One of the most convenient functionalities it provides is the ability to screen record, allowing you to capture and share important moments on your device. Whether you want to save a video from a social media platform, record a tutorial, or simply capture a memorable in-app moment, the screen recording feature on the iPhone 14 can be incredibly useful. In this article, we will explore the step-by-step process of how to screen record on the iPhone 14, enabling you to make the most of this handy feature. So, let's dive in and uncover the various aspects of screen recording on the iPhone 14!
Inside This Article
- Setting up Screen Recording
- Recording Your Screen
- Editing and Sharing Your Screen Recording
- Conclusion
- FAQs
Setting up Screen Recording
Screen recording on the iPhone 14 is a powerful feature that allows you to capture and share what’s happening on your screen. Before you start recording, it’s essential to set up the feature for easy access. Fortunately, the process is straightforward and can be completed in just a few simple steps.
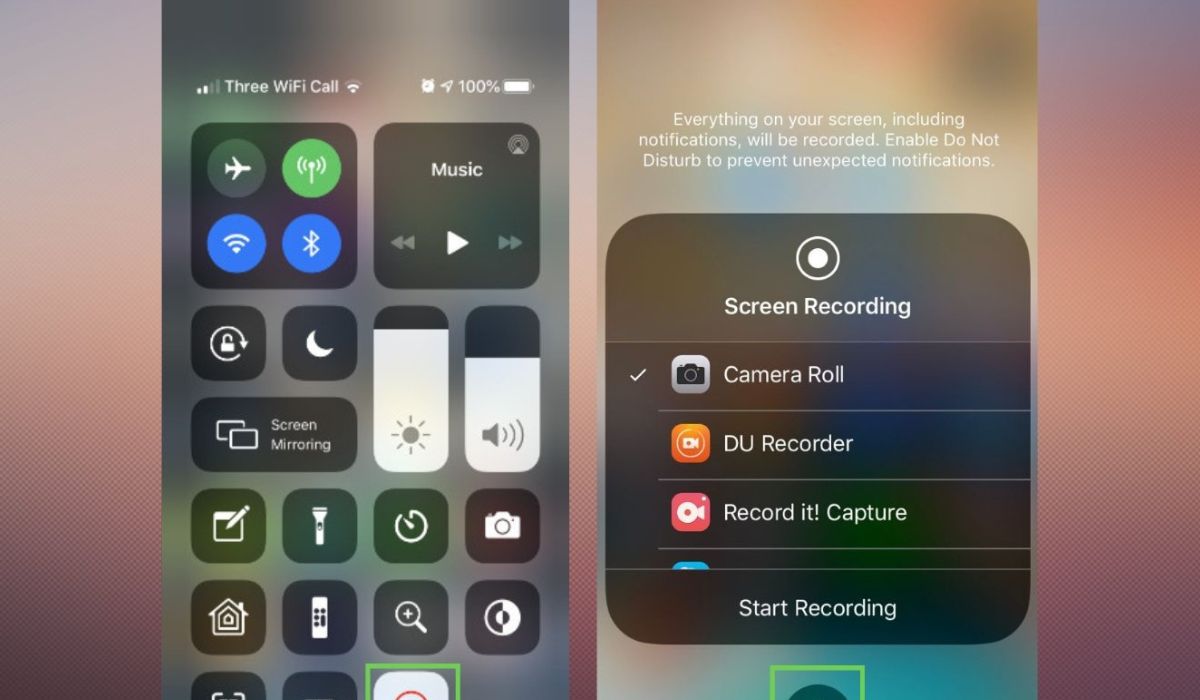
To begin, navigate to your iPhone’s “Settings” and tap on “Control Center.” Here, you can customize the Control Center by adding the “Screen Recording” feature. Simply tap the green plus icon next to “Screen Recording” to include it in the Control Center for quick access.
Once you’ve added the Screen Recording feature to the Control Center, you can access it by swiping down from the top-right corner of the screen to open the Control Center. You’ll find the Screen Recording icon, represented by a solid circle within a circle – this is where you’ll initiate your screen recording sessions.
After setting up the Screen Recording feature, you’re now ready to start capturing your screen activities with ease. The next step is to learn how to initiate and manage your screen recordings effectively.
Recording Your Screen
Once you’ve set up screen recording on your iPhone 14, capturing your screen is a breeze. Simply navigate to the screen you want to record, whether it’s a game, tutorial, or any other content, and get ready to make your recording.
Swipe down from the top-right corner of your screen to access the Control Center. Here, you’ll find the screen recording button, which is denoted by a solid circle within a hollow circle. Tap this button to initiate the recording process.
After tapping the screen recording button, a countdown will begin, giving you a moment to prepare. Once the countdown reaches zero, the recording will start, and the status bar at the top of your screen will turn red, indicating that the recording is in progress.
Now, whatever actions you take on your screen will be captured in real-time. Whether you’re demonstrating a process, showcasing a feature, or simply capturing a memorable moment, your screen recording will faithfully preserve the content of your screen.
**
Editing and Sharing Your Screen Recording
**
After recording your screen on your iPhone 14, you may want to make some edits before sharing it. Fortunately, the built-in editing tools on your iPhone allow you to trim the recording, add annotations, and more.
Once you’ve made the necessary edits, you can easily share the recording with friends, family, or colleagues. Whether you prefer to send it via messaging apps, social media, or email, the process is straightforward and user-friendly.
Additionally, you can take advantage of the various sharing options available on your iPhone 14, such as AirDrop, Messages, Mail, or uploading it directly to platforms like YouTube or Instagram.
Sharing your screen recordings can be a great way to showcase a tutorial, highlight a memorable moment, or collaborate on a project. By utilizing the editing and sharing features on your iPhone 14, you can easily create and distribute engaging content with just a few taps.
**
Conclusion
**
Learning how to screen record on your iPhone 14 opens up a world of possibilities for capturing and sharing memorable moments. Whether you want to save a video call, demonstrate a new app feature, or create engaging content for your social media followers, the screen recording feature offers unparalleled convenience and flexibility. By simply swiping and tapping, you can effortlessly capture what’s happening on your device’s screen, empowering you to share, teach, or simply relive your favorite experiences with ease. With the step-by-step guide provided, you can confidently utilize this feature to its fullest potential, adding a new dimension to your iPhone 14 experience.
FAQs
Q: How do I screen record on iPhone 14?
A: To screen record on your iPhone 14, simply swipe down from the top-right corner to access the Control Center, then tap the Screen Recording icon, which looks like a solid circle within a ring. After a 3-second countdown, the recording will begin.
Q: Can I record audio while screen recording on iPhone 14?
A: Yes, you can record audio while screen recording on your iPhone 14. To enable this feature, long-press or 3D Touch the Screen Recording icon in the Control Center, then tap the microphone icon to turn on audio recording.
Q: Where are my screen recordings saved on iPhone 14?
A: Screen recordings on iPhone 14 are saved in the Photos app. You can access them by opening the Photos app and navigating to the "Screen Recordings" album.
Q: How do I stop a screen recording on iPhone 14?
A: To stop a screen recording on your iPhone 14, simply tap the red status bar at the top of the screen or return to the Control Center and tap the Screen Recording icon again.
Q: Can I edit my screen recordings on iPhone 14?
A: Yes, you can edit your screen recordings on iPhone 14 using the built-in Photos app. Simply open the recording in the Photos app, tap "Edit," and make adjustments as needed.