
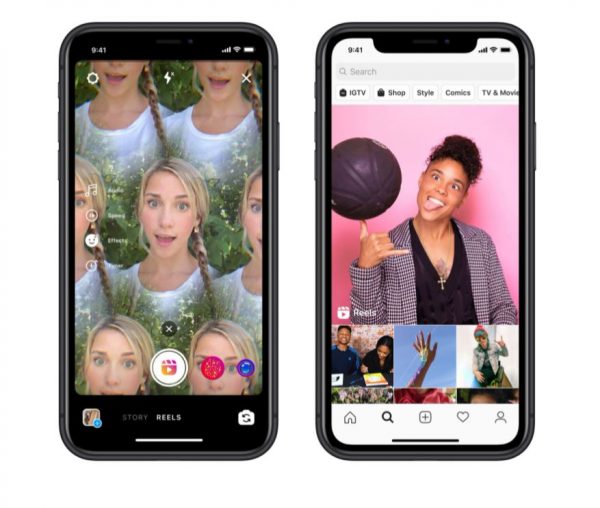
Making Reels on Instagram is a fun and easy way to engage followers and reach new audiences on the platform. Instagram first released Reels in August 2020 to go head-to-head against TikTok, which was quickly gaining traction then. With this new feature, Instagram lets creators post vertical videos to their feeds and be discovered through the new Reels tab. It also increases their chance to be found by more users, as Instagram Reels are given priority over other formats in the Explore page.
Interested in learning how to make Reels on Instagram? We show you the ropes in this tutorial.
Also read: How to Add Music to Your Instagram Stories With Ease
Inside This Article
- How to Make Reels on Instagram
- How to Upload Your Instagram Reels
- Making Multi-Scene Reels on Instagram
- How to Use the Align Tool
- How Long Can Instagram Reels Be?
- Can You Do a Duet With Someone on Instagram Reels?
- How to Download Reels on Instagram
How to Make Reels on Instagram
There are three ways you can access the Reels tab on Instagram. The first is to tap on the Reels icon at the bottom central portion of your screen — the symbol that looks like a closed clapperboard with a play button in the middle. This leads you to the Reels section of the app. Then, tap the camera icon on the interface’s top-right portion to start making your Reel.
The second way you can start making a Reel is by pressing the ‘+’ icon on the home interface of the app. From there, tap on the Reels option on the bottom-right corner.
You can also access the Reels tab by swiping right on the app’s Home screen and then tapping on the Reels option.
Preliminary Steps
Once you’ve accessed the Reels tab on Instagram, you can now begin to make your Reel. You can start by selecting a track, setting the length and speed of the Reel, choosing a video layout, and then adding effects. We tackle the full procedures below.
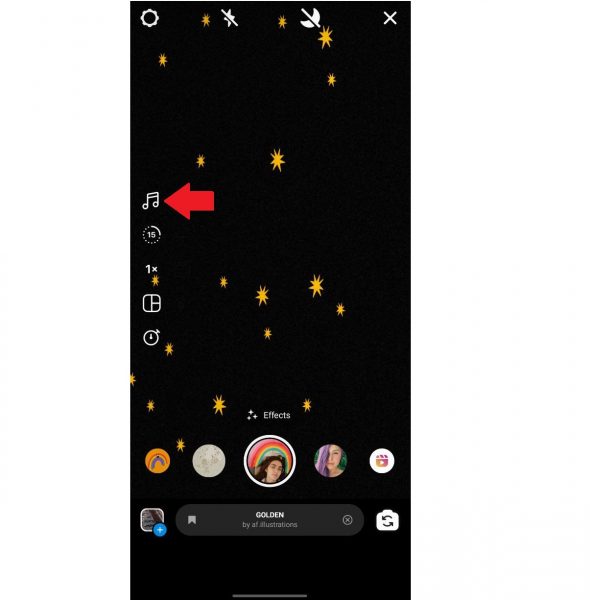
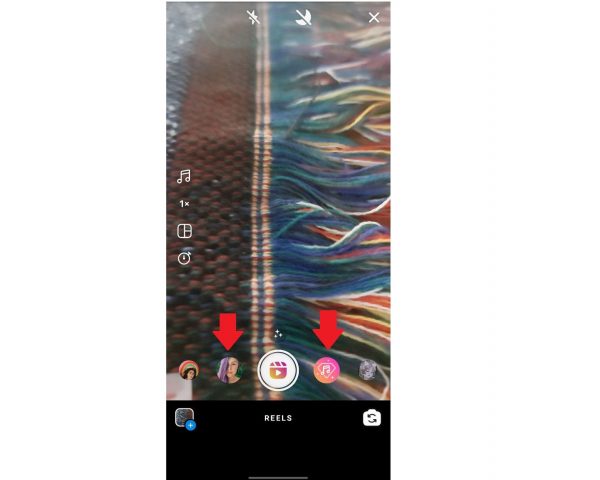
1. Select Your Audio
Adding audio to your Reels is not required. That said, it does help make the video you’re making more engaging. With Instagram, you can use a track from the app’s music library or record your own when you’re already shooting your Reel. To use a track from Instagram’s music library, here’s what you have to do:
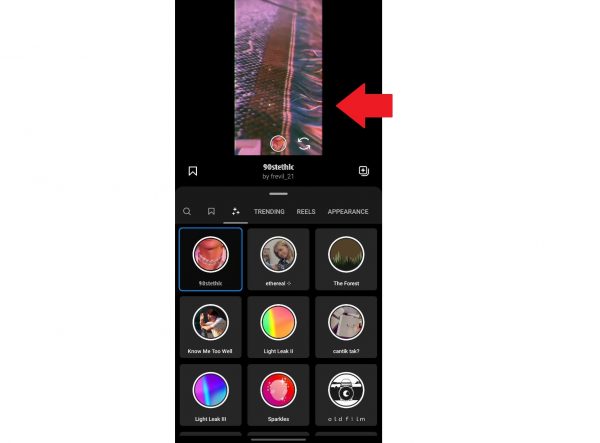
- From the Reels tab on Instagram, tap the audio icon on the left, which looks like a musical note. This takes you to Instagram’s music library.

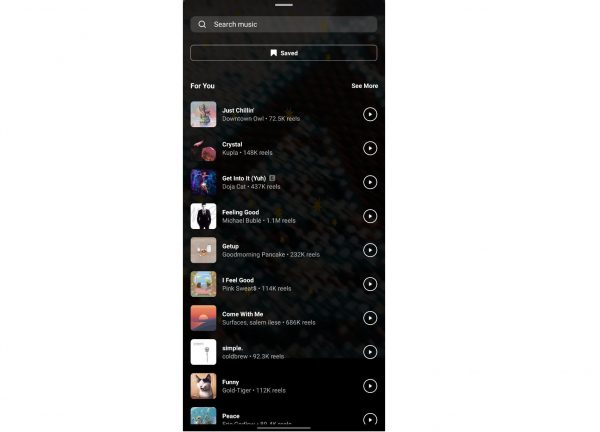
© Cellular News - Select a song from the music library. You can test which track fits your Reel best by tapping on the play button next to the track. If you already have a track or an artist in mind, type the title of the song or the artist’s name in the search bar.

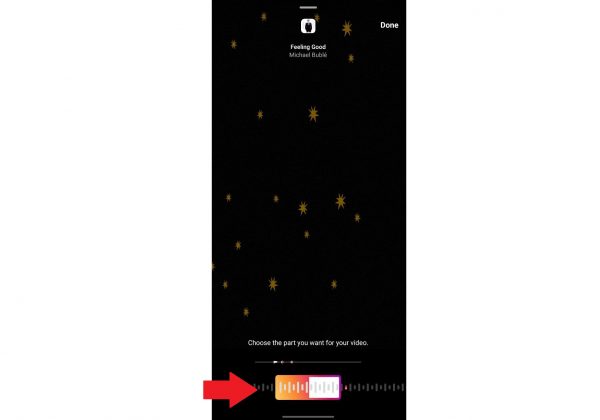
© Cellular News - Once you’ve chosen an audio track, tap it.
- Choose which part of the track you’d like to use in your Reel.

© Cellular News - Tap Done.
2. Set the Length and Speed of Your Instagram Reel
Once you’ve sorted out the audio, you can now set the length and the speed of your Instagram Reel.
Instagram lets you choose between three Reel lengths: 15 seconds, 30 seconds, and 60 seconds. The default length is 15 seconds, so if you want your Reel to be this long, you don’t have to tap anything. However, if you prefer your Reel to be 30 seconds long, tap the Reel length icon once. Tap the same icon twice if you like your Reel to be 60 seconds long.
Want your video to be faster or slower than the normal speed? Tap the speed icon (the one below the timer icon). Then, choose one of the video speed options: 0.3x, 0.5x, 1x, 2x, or 3x.
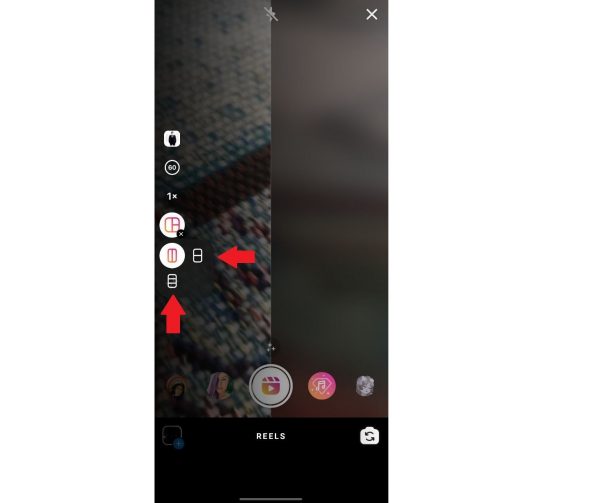
3. Choosing a Video Layout
Instagram also lets you choose a video layout other than the default option. This feature allows you to record and combine two or three video clips into one Reel. You can record these clips either side by side or stacked on each other. If you want the latter, you can record up to three clips.
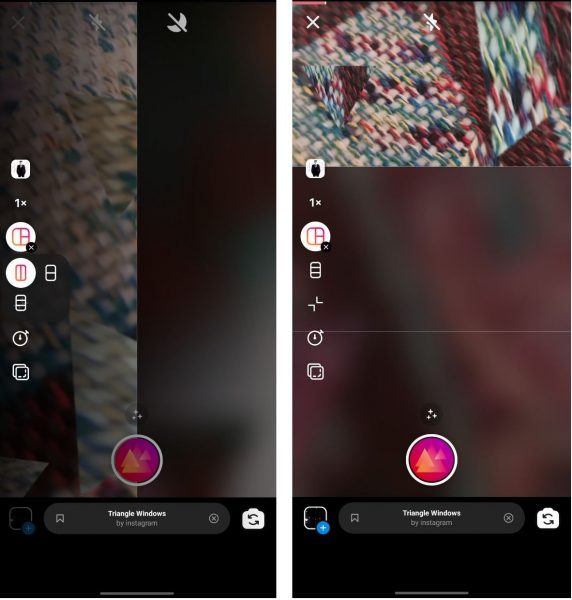
To change your Reel’s video layout, tap the layout icon which you’ll find below the speed icon. This changes your video layout to a vertical one. If you want a horizontal layout, tap the icon with two vertical panels. Then, choose either of the two horizontal layout options that appear.
4. Add Effects
Similar to Instagram Stories, you can also add effects and filters when you’re recording a Reel. To add an effect, you can swipe through the icons next to the record button and tap the one you like.
However, if you want to see more of the effects options at once, tap the effects icon on top of the Reels icon. Then, scroll through the options, and press an effect to test it out. Once you’ve decided on an effect, tap the recording screen to apply it.
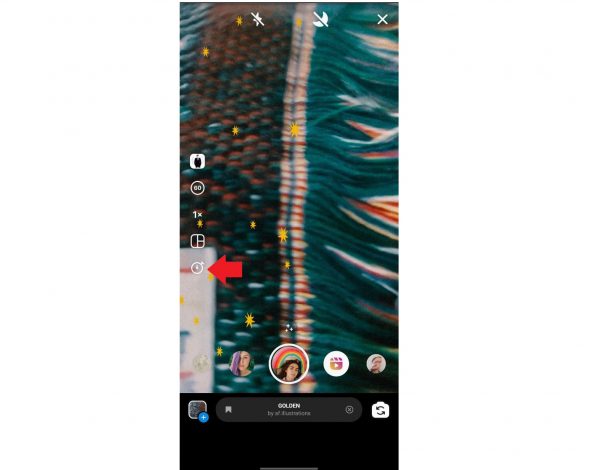
5. Set the Timer and Countdown
Once you’ve decided which effect you want to apply to your Instagram Reel, you can then set the timer and countdown. With those, you can shoot your video hands-free.
To set the said features, follow these easy steps:
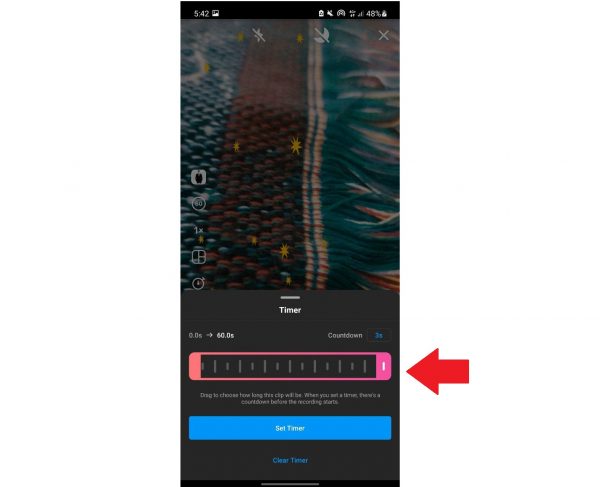
- Tap the stopwatch-like symbol on the interface’s left portion.

© Cellular News - Drag the right end of the slider to set how long the clip you’re going to record (not the entire Reel) will be.

© Cellular News - Then, tap the box next to “Countdown” to set how many seconds the countdown will be before the recording starts. You can choose either 3 seconds or 10 seconds.
- Hit the Set Timer button afterward.
Shooting Your Instagram Reel
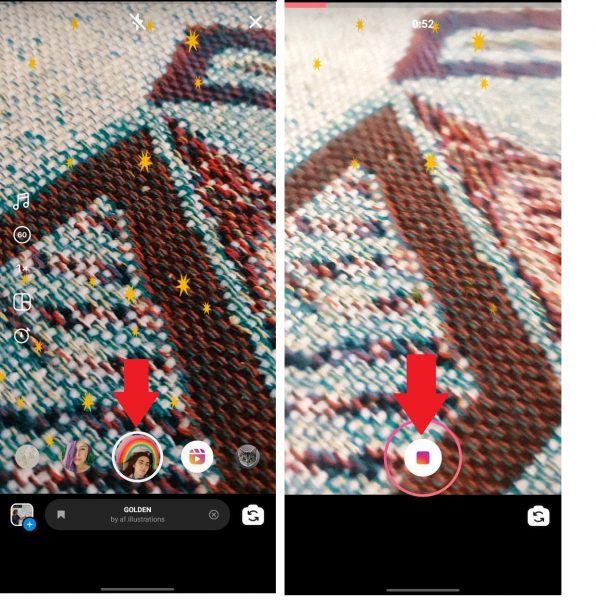
Now that you have the preliminaries sorted, you can start shooting the actual Reel. You can do so hands-free if you’ve already set the timer and countdown. Simply tap the round icon in the middle, and the app will capture the clip for the duration you’ve set and will automatically stop recording. If you opt not to use Instagram Reels’ timer and countdown feature, you’ll need to tap the stop button to stop recording your clip. Then, at the display’s upper portion, a bar indicating the recording progress will be visible.
Take note as well that you can shoot your Instagram Reel all in one go, one clip at a time, or by uploading videos from your phone’s gallery.
Finishing Touches
Once you’ve shot your Instagram Reel, you can already incorporate finishing touches to it. Instagram lets you add voice-overs, captions, as well as stickers and doodles to your Reels. The exact procedure on how to add each of these elements is laid out below.
How to Add Voice-overs
Voice-overs are a great way to explain the content of your video, and luckily, Instagram lets you add them to your Reels. Here’s how you can add a voice-over recording to your Instagram Reels:
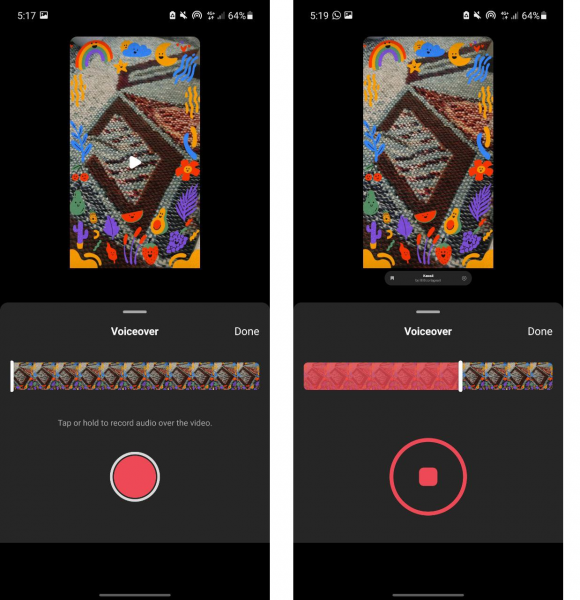
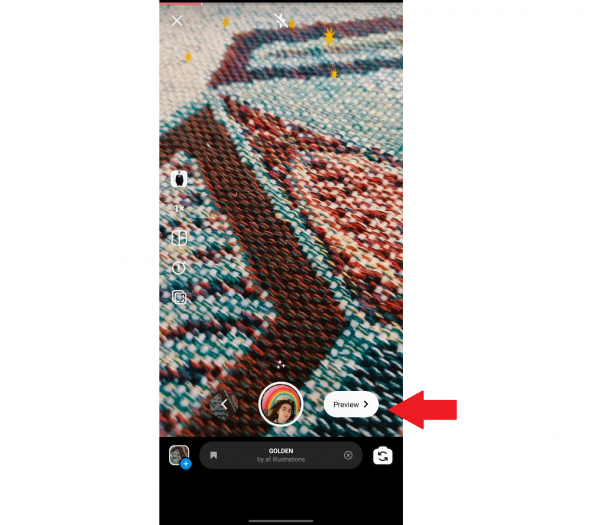
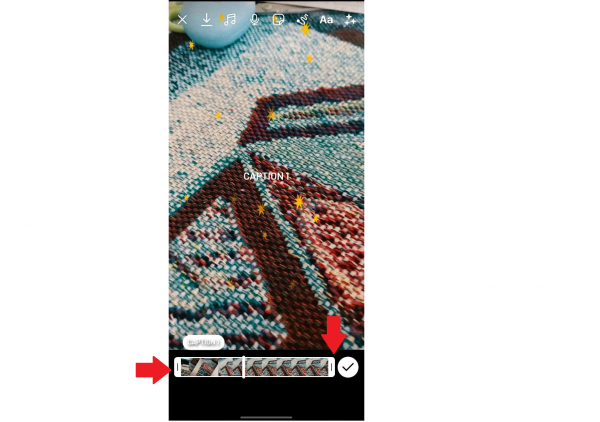
- After recording your clips, tap the Preview button on the bottom-right corner. This takes you to the editing screen.

© Cellular News - Select the microphone icon, the fourth one from the left.

© Cellular News - Tap on or press and hold the red, round button to record your voice-over.
- Hit the stop button to stop recording.

© Cellular News - Select Done once you’re happy with the voice-over you recorded.
How to Manually Add Captions to Your Instagram Reels
Adding captions when making Reels on Instagram helps your video reach a wider audience. Captions allow your viewers who might be hard of hearing or are scrolling through Reels with the sound off to still understand what your video is about. Plus, according to Facebook (now Meta), captions increase your video’s viewing time by 12%. That’s because app users are more likely to stay on and watch your whole Reel if it’s captioned.
To manually add captions to the Reel you just shot, follow these easy steps:
- Tap the Preview button on the lower right-hand corner.

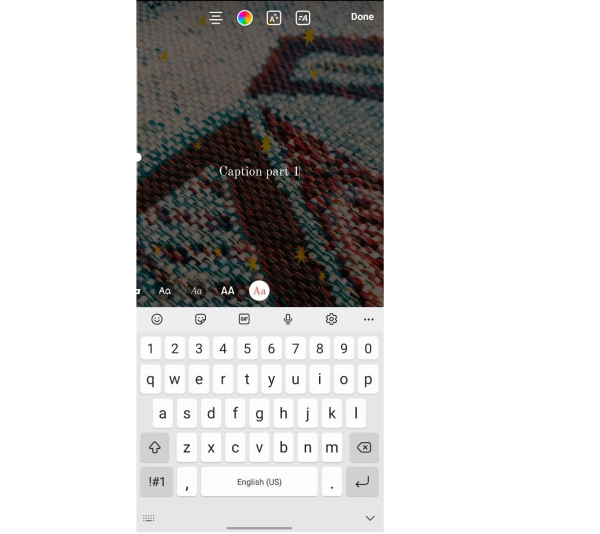
© Cellular News - Select the text icon (the one that has “Aa” on it) on the upper right corner.

© Cellular News - Type your caption (or a portion of it).

© Cellular News - If you want to, you can also adjust the font, font color, background color, and text alignment of your caption.
- Tap Done on the interface’s top-right portion afterward.
- Select which part of your Reel the text will appear by dragging either end of the slider at the bottom of the screen.

© Cellular News - Once you’re happy with the timing of when the text appears on your Reel, tap the checkmark icon on the lower right-hand corner.
- If you want to add more text, press the text icon in the top-right corner again. Then, repeat steps 1 to 7.
- To re-adjust the timing of each text’s appearance on your Reel, tap their corresponding icon along the bottom of the screen. Then, drag either slider to adjust when and how long the text will appear on your Reel.

© Cellular News

Adding Auto Captions to Reels on Instagram
If you’ve added a voice-over to your Instagram Reel or are speaking in the video, you might find it too painstaking to type every word you say. Luckily, Instagram now lets you add auto captions not only to your Stories but also to your Reels. Here’s how:
- Once you’ve shot your Reel’s clips, press the Preview button next to the record button.
- Select the sticker icon at the top of your screen (fourth from the right).
- Tap the captions sticker. If you can’t find it, input “captions” in the search field, then press enter.
- Upon selecting the captions sticker, Instagram will transcribe your audio. How long this takes varies based on video duration and the stability of your Internet connection.
- If you want to, you can switch to another font or caption style by tapping one of the style options along the bottom of the screen.
Also read: How to Use Auto TikTok Captions for a Viral Post
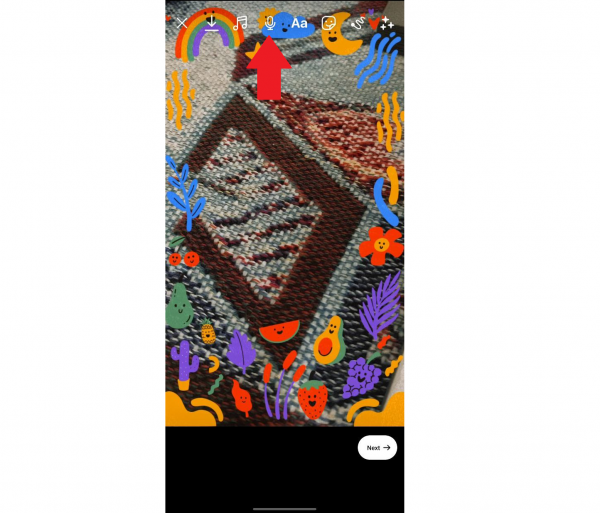
How to Add Stickers and Doodles to Your Instagram Reels
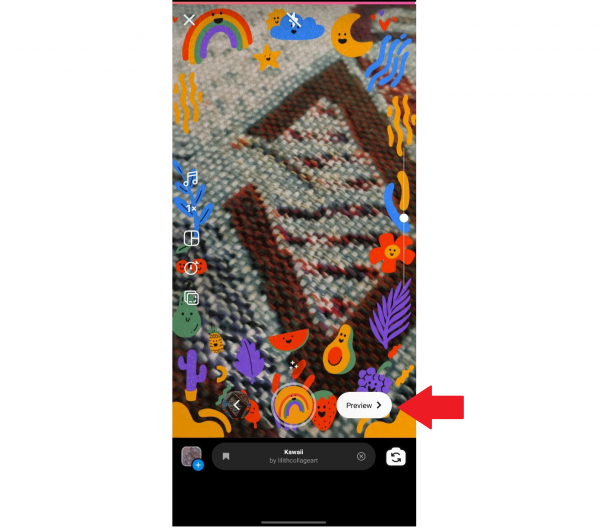
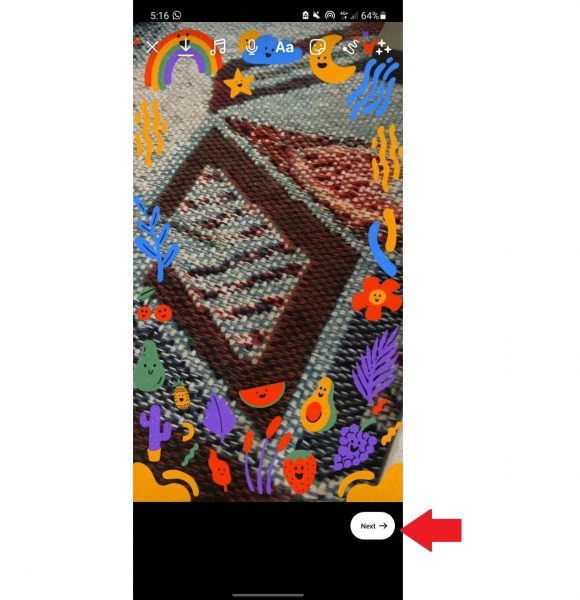
You can also embellish your Reels by adding stickers and doodles to them. To incorporate stickers, simply press the stickers symbol on the display’s top-right portion. Then, scroll through the options, and press the ones you want to add to your Reels. You can also adjust their size and placement on your Reel.
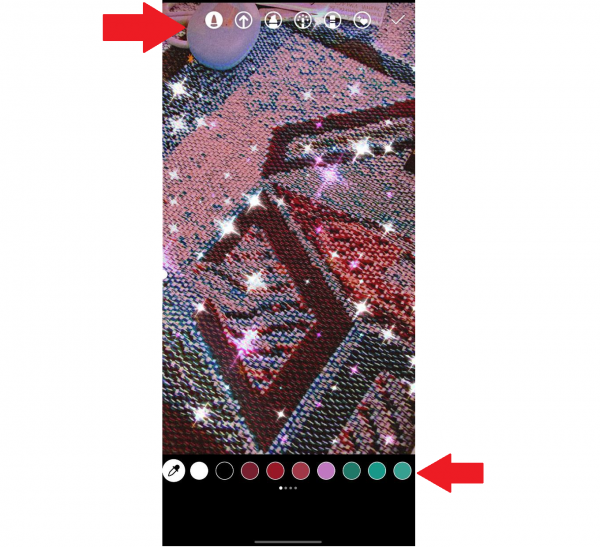
To add a doodle, follow these steps:
- Tap the doodle icon as shown below.

© Cellular News - Choose which marker you want to draw with at the top of the screen. You can also swap the hue of your marker at the bottom of your screen.

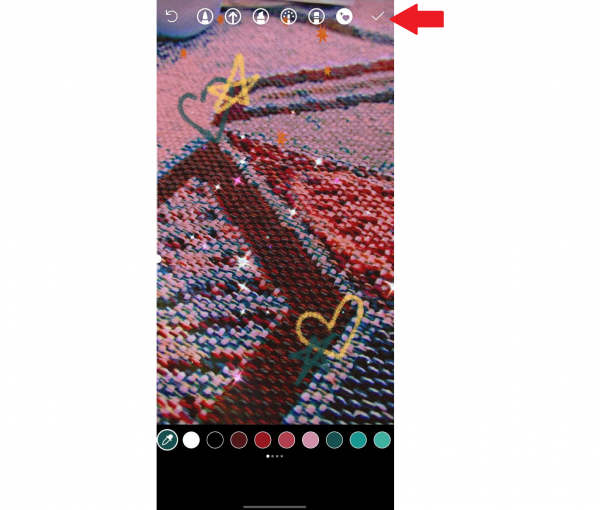
© Cellular News - Draw the object/s you want to incorporate to your Instagram Reel content. If you did something wrong or not as planned, use the undo button on the top-left part of the interface.
- Find and press the checkmark on the interface’s top-right portion once you’re done.

© Cellular News
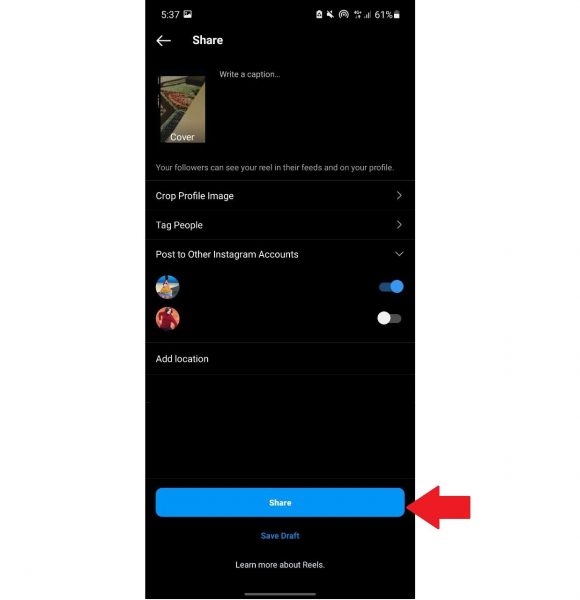
How to Upload Your Instagram Reels
Great! You’ve shot your Reel and added the finishing touches to it. Now, it’s time to upload it and share it with your followers. To do that, follow these easy steps:
- Tap the Next button on the interface’s lower right corner.
© Cellular News - If you want to, you can write a caption, adjust your Reel’s thumbnail, tag other Instagram users, and add a location.
- If you run multiple Instagram accounts, choose which other accounts you want to upload your Reel to.
- Press the Share button afterward.
Making Multi-Scene Reels on Instagram
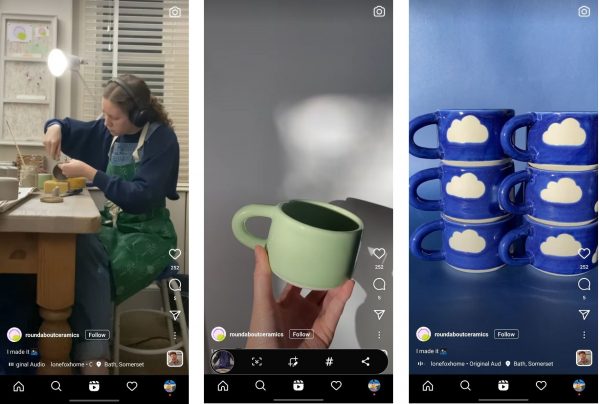
With Instagram Reels, you can record several clips to make multi-scene videos. This type of Reels is great for a wide range of genres, like how-to videos and comedic Reels.
To make multi-scene Reels on Instagram, do the following:
- Go to Instagram’s Reels maker.
- Pick the audio you want to incorporate to your Reel.
- Configure video length and speed, and layout, timer, and countdown if necessary.
- Use the record button to shoot your first clip.
- Tap the stop button to halt the recording.
- To trim the clip, tap the small thumbnail beside the record button. Then, select the scissors icon, and adjust the sliders to select which segment of the clip you want to use. Tap Done afterward.
- Repeat steps 3 to 6 to record the rest of your clips.
If you have pre-recorded clips, you can use them to make your multi-scene Instagram Reel. Take note of these steps:
- Go to Instagram’s Reels maker.
- Select an audio track.
- Set the length, speed, and layout of your video.
- Hit the bottom-left icon on the interface.
- Select your first clip from your gadget’s gallery.
- Using the sliders, select which segments of the clip you want to use.
- Tap Add.
- Repeat steps 4 to 7 to add the rest of your clips.
How to Use the Align Tool

Seamless transitions can be a tricky thing when you’re making a video. But thanks to Instagram Reels’ align tool, you can now easily record smooth transitions between clips. This tool allows you to record a new clip at exactly where the previous clip ended. It’s especially useful for outfit change Reels and those showing before-and-after clips.
Here’s how to record smooth transitions using the align tool:
- Go to Instagram’s Reels maker.
- Record your first clip.
- Once you’re finished recording, the align icon will appear on the left side. Tap this icon. A shadow of the previous clip’s last frame will now be superimposed on the recording screen.
- Now’s the time to set the timer and countdown to make it easier for you to record the next clip.
- Align the next scene you’re going to record with that shadow. When you’re good to go, use the record button to shoot your next clip.
- Press the stop button to discontinue recording.
- Repeat steps 3 to 6 to record any additional clips.
How Long Can Instagram Reels Be?
When Instagram first launched its Reels feature, you could only upload videos that are up to 15 seconds long. However, it has changed that already, and as of writing, the maximum duration of Instagram Reels is 60 seconds. That’s a lot shorter than TikTok’s maximum video duration, which is currently three minutes.
Can You Do a Duet With Someone on Instagram Reels?
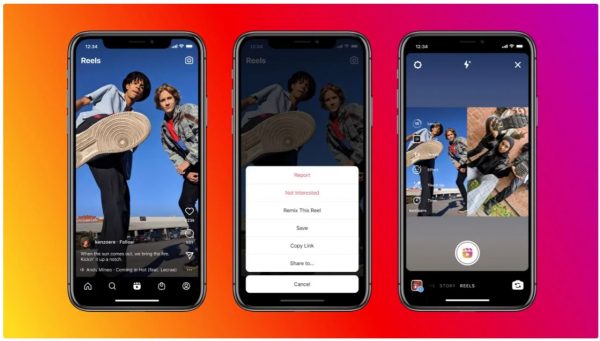
Just like TikTok, you can do a duet with someone on Instagram Reels. However, Instagram calls the feature for that Remix, not Duet. With the said function, you can shoot your Reel alongside another one as it plays. This is great for content like reaction videos and duet videos.
To remix another Instagram user’s Reel, follow these steps:
- Go to the Reels section by tapping on the Reels icon at the central bottom part of the Instagram app.
- Look for a Reel that’s suitable for remixing.
- Press the three vertical dots on the interface’s bottom-right corner.
- Hit the “Remix This Reel” option.
- Record a video to go with the other user’s Reel like you normally would. The video you’re recording will appear on the right side.
- Once you’re finished capturing your video content, tap Preview to go to the interface for edits.
- Add a caption, some stickers, and/or voice-over if necessary.
- Tap Next when you’re happy with your edits.
- Select Share to upload the remixed Reel.
How to Download Reels on Instagram
Downloading Reels lets you save your favorite Instagram content on your phone so that you can watch them offline later. While Instagram allows you to download your Reels to your device, they don’t have a feature that lets you download other users’ Reels. Fortunately, there are workarounds to this limitation. Below, we show you how to download your own Reels as well as others’ Reels on Instagram.
Downloading Your Reels on Instagram
Instagram doesn’t have a feature that lets you download Reels (including your own) once they’ve already been uploaded. However, you can download your Reel while you’re on the editing screen. To do so, simply tap on the save button (the icon with the arrow pointing downward), and your video will be saved to your device.
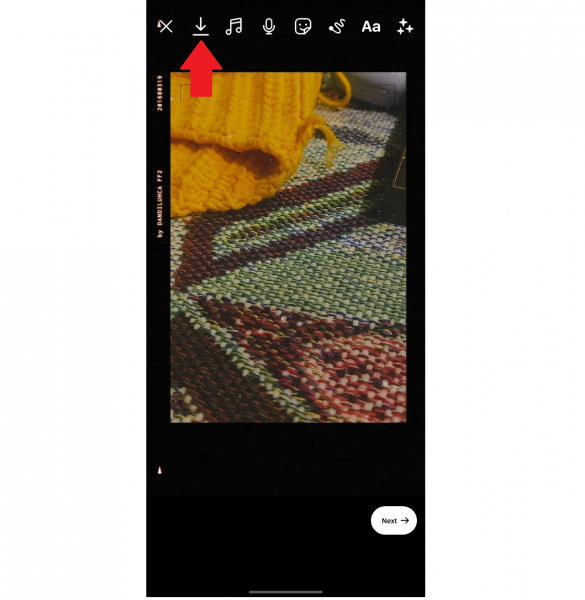
Take note, though, that you can only download your Reel with the audio if you’re using royalty-free music or your audio. Otherwise, the app will remove the audio first before you can download the video.
Downloading Other Users’ Reels on Instagram
Although Instagram doesn’t have a tool that lets you download others’ Reels (unlike TikTok), there are available methods that let you work around that. These methods also work if you want to download your Reels that you’ve already uploaded.
However, before downloading another users’ Reel, keep in mind that you can’t use these videos for commercial purposes — unless, of course, the creator of that Reel gives you permission.
How to Download Other Users’ Reels on Android
If you’re on Android, you can download an app called Video Downloader for Instagram on the Google Play Store so that you can download Reels. Once you have the app downloaded, proceed with these steps:
- Look for the Reel you want to download on Instagram.
- Look for and press the three vertical dots on the interface’s lower right corner.
- Select the Copy Link option.
- Launch Video Downloader for Instagram on your phone.
- The Reel link will automatically be pasted in the app’s URL bar.
- Tap Download to store the Reel to your phone.
And that’s it! To watch the Reel you downloaded offline, simply go to your phone’s media gallery.
How to Download Other Users’ Reels on iOS
As of writing, there isn’t really a reliable iOS app that lets you download Instagram Reels on your iPhone. There is, however, a website you can check out, and it’s called instadp.com. To download an Instagram Reel using the website, follow these steps:
- Look for the Instagram Reel you want to download.
- On the interface’s lower right corner, press the three vertical dots.
- Select Copy Link.
- Head over to “instadp.com” using your device’s web browser.
- Scroll down until you see the Instagram Reels Downloader option and select it.
- Paste the link of the Reel you like to obtain.
- Hit the Continue button and wait for the site to process your download.
- Press Download to add the Reel to your device.
Using Screen Recording to Download Other Users’ Instagram Reels
You can also use your phone’s screen recorder to save an Instagram Reel for offline viewing. The only issue with that is that you won’t be saving just the video; you’ll also be capturing all the icons and text around the video. However, if that doesn’t bother you and if you don’t want to download another app or go to a website, this method works just fine. Below, we show you the basics of screen recording on mobile phones. If you’re an Android user, note that only Android devices that are running on at least Android 10 have built-in screen recorders.
iOS
- Make sure that the screen recording tool can be utilized from the Control Center. If it isn’t there or accessible, add it by going to Settings, tapping Control Center, then on Customize Controls, and then on the plus icon next to Screen Recording.
- Head over to Instagram, and go to the Reel you want to screen record.
- Access your iPhone’s Control Center, and then tap the screen record icon (the one that has a filled-in circle within a circle). Upon tapping, the countdown to start recording will begin.
- Play the Reel once the countdown is up.
- Get back to the Control Center, and tap the screen record symbol again to cease recording.
- To play the Reel you just captured, go to Photos.
Android
- Open the Reel you want to play on Instagram.
- Swipe downward on your gadget’s display to access the Notifications panel. Repeat the swiping motion to expand the interface.
- Pick the option that lets you screen record.
- Under “Sound settings”, tap Media sounds. Then, select Start recording. Your gadget will begin creating the Reel after the countdown.
- On the interface’s top-right portion, press the stop button to halt recording.
- Go to your phone’s gallery to play the Reel you just captured.
Also read: How to Record Screen on Android With or Without an App
Final Thoughts
Knowing how to make Reels on Instagram is vital, especially if your ultimate goal on social media is to expand your audience pool. Luckily, making an Instagram Reel doesn’t take much effort, and it’s fairly easy to learn if you’re new to the app. We hope that, with the help of this guide, you’ll be making Instagram Reels like a pro in no time!