
Changing the battery in a Yale lock is an essential maintenance task that ensures smooth operation and security. Whether you have a traditional deadbolt or a smart lock, knowing how to replace the battery is crucial to avoid getting locked out or compromising the integrity of your home security system. In this article, we will guide you through the steps to successfully change the battery in your Yale lock. From identifying the type of lock and battery required to the actual replacement process, we’ll provide detailed instructions and tips to make the task hassle-free. So, if you’re ready to learn how to change the Yale lock battery and keep your home secure, read on.
Inside This Article
- Understanding the Yale Lock Battery
- Steps to Change the Yale Lock Battery
- Tips and Precautions for Changing the Yale Lock Battery
- Conclusion
- FAQs
Understanding the Yale Lock Battery
When it comes to home security, it’s essential to have a reliable lock on your doors. Yale locks are one of the most trusted brands in the industry, known for their durability and advanced locking mechanisms. Understanding how the Yale lock battery works is crucial for ensuring that your lock operates smoothly and keeps your home secure.
The Yale lock battery is a vital component that powers the electronic features of the lock. Unlike traditional locks that rely on keys, Yale locks utilize battery-powered technology to enable keyless entry and other convenient features. This means that the lock requires a functioning battery to operate effectively.
Yale locks typically use standard alkaline batteries, which provide a reliable power source. These batteries are widely available and easily replaceable, ensuring that you can easily maintain your lock’s functionality. It’s important to note that the type of batteries required may vary depending on the specific model of your Yale lock, so it’s always a good idea to consult the manufacturer’s instructions for the correct battery type.
The Yale lock battery lifespan can vary depending on factors such as usage frequency and the type of batteries used. On average, the batteries in a Yale lock can last anywhere from six months to two years. However, it’s crucial to keep an eye on the battery levels and replace them promptly when they are running low to avoid any lockout situations or compromised security.
Most Yale locks are equipped with a low battery indicator, which serves as a helpful reminder to replace the batteries. This indicator typically emits an audible beep or flashes a light when the battery levels are critically low. It’s recommended to monitor the battery status regularly, especially if you notice any signs of reduced performance or difficulty in operating the lock.
Understanding the Yale lock battery is also essential for troubleshooting any potential issues. If your Yale lock is not functioning properly, or if you are experiencing difficulties with keyless entry or other electronic features, the battery may be the culprit. In such cases, replacing the battery can often resolve the problem and restore the lock’s functionality.
Additionally, it’s worth noting that changing the Yale lock battery is a straightforward process. Most Yale locks are designed with easy-to-access battery compartments, allowing you to replace the batteries quickly and efficiently. However, it’s important to follow the manufacturer’s instructions and take necessary precautions when changing the battery to avoid any damage to the lock.
By understanding the Yale lock battery and its role in powering the lock’s electronic features, you can ensure that your Yale lock operates smoothly and provides the level of security you expect. Regularly monitoring the battery status and replacing them as needed will help you avoid any unexpected lockouts and maintain the overall effectiveness of your home security system.
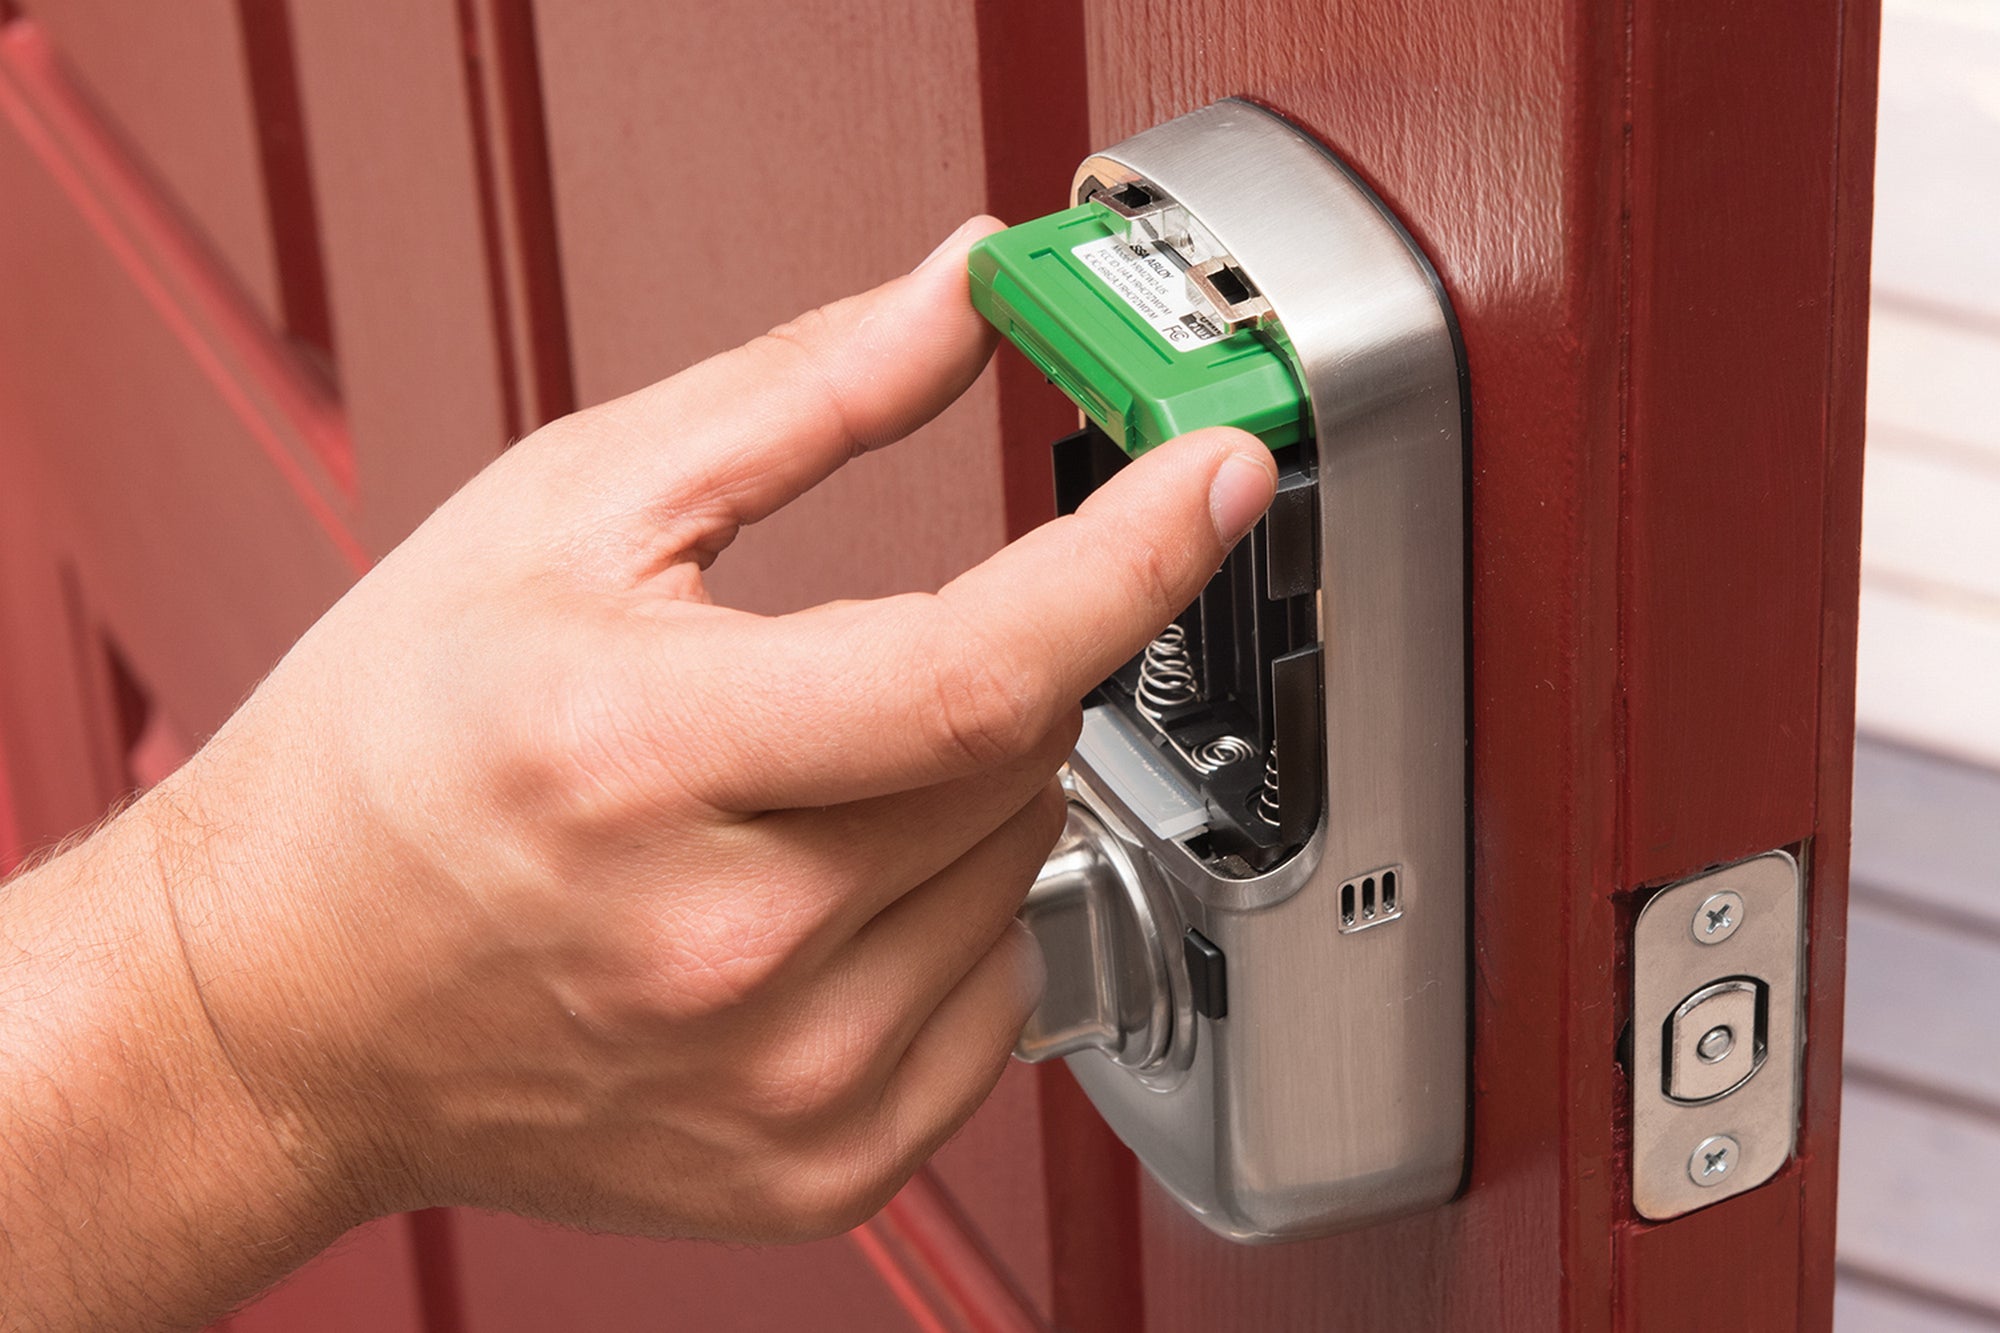
Steps to Change the Yale Lock Battery
Is your Yale lock battery running low? It’s important to change the battery as soon as possible to ensure the continued functionality of your lock. Follow these simple steps to successfully change the Yale lock battery:
- Gather the necessary tools: Before starting, make sure you have the required tools handy. You will typically need a small screwdriver and a fresh set of batteries. Check the product manual or the lock’s specifications to determine the battery size and type required.
- Identify the battery compartment: Locate the battery compartment on your Yale lock. On most models, this is situated either on the interior portion of the lock or on the side of the lock with a removable cover. Refer to the lock’s manual or manufacturer’s website for specific instructions on finding the battery compartment.
- Remove the battery cover: Use the small screwdriver to carefully remove the battery cover. Be gentle to avoid any damage to the lock or cover. Set the cover aside in a safe place to prevent misplacing it during the battery replacement process.
- Replace the old batteries: Take out the old batteries from the battery compartment and properly dispose of them. Avoid leaving old batteries lying around, as they could leak and cause damage. Insert the new batteries into the compartment, ensuring the correct polarity (positive and negative) alignment as indicated by the markings in the compartment.
- Close and secure the battery cover: Once the new batteries are in place, carefully reattach the battery cover. Make sure it is firmly and securely in place to protect the batteries and prevent them from falling out. Double-check that the cover is properly aligned and sealed to maintain the lock’s resistance to water and debris.
- Test the lock: After changing the batteries and securing the battery cover, test the lock to ensure it is functioning correctly. Enter the proper code or use the appropriate method to lock and unlock the door. If the lock does not respond or behaves erratically, double-check the battery installation and contact Yale customer support for further assistance.
By following these steps, you can easily change the Yale lock battery and maintain the security of your home or office. Remember to check the battery level regularly and replace the batteries as needed to avoid any inconveniences caused by a dead battery.
Tips and Precautions for Changing the Yale Lock Battery
Changing the battery in your Yale lock is a relatively simple task, but it’s essential to follow some tips and precautions to ensure a smooth and trouble-free process. Here are some valuable tips to keep in mind when changing the battery in your Yale lock:
- Use the correct battery: It’s crucial to use the right type of battery recommended by Yale for your specific lock model. Using the wrong battery can lead to ineffective performance and potentially damage the lock mechanism.
- Read the user manual: Before attempting to change the battery, refer to the user manual provided by Yale. The manual will outline the specific steps you need to follow for your lock model, ensuring you don’t miss any important details.
- Ensure the lock is in a secure state: Before changing the battery, make sure the lock is in the locked position. This will prevent any accidental unlocking or tampering with the lock’s internal components while the battery is being replaced.
- Inspect the battery compartment: Take a moment to inspect the battery compartment before inserting the new battery. Ensure there are no signs of corrosion or damage that could hinder the battery’s performance. If you notice any issues, clean the compartment, or contact a professional for assistance.
- Handle the battery with care: When handling the new battery, avoid touching the metal contacts or exposing it to moisture or extreme temperatures. This can prevent damage to the battery and ensure optimal performance.
- Properly insert the battery: Insert the new battery into the compartment according to the manufacturer’s instructions. Ensure it is securely placed and that the polarity is aligned correctly. Improper battery insertion can lead to malfunctioning of the lock.
- Test the lock after battery replacement: Once you have replaced the battery, test the lock to ensure it functions correctly. Lock and unlock the door a few times to verify that the battery change was successful and that the lock operates smoothly.
- Set a battery replacement schedule: To avoid unexpected lockouts or issues with your Yale lock, it’s advisable to establish a regular battery replacement schedule. This can help prevent battery failure and ensure your lock continues to work reliably.
- Seek professional assistance if needed: If you encounter any difficulties or are unsure about changing the Yale lock battery, don’t hesitate to seek professional assistance. A locksmith or Yale representative can provide expert guidance and ensure the battery replacement is done correctly.
By following these tips and precautions, you can safely and effectively change the battery in your Yale lock. Remember, proper battery maintenance is crucial for the optimal performance and longevity of your lock, so make it a priority to check and replace the battery as needed.
Conclusion
In conclusion, changing the battery in a Yale lock is a simple and essential maintenance task that ensures the continued functionality of your lock. By following the step-by-step instructions outlined in this article, you can easily replace the battery in your Yale lock. Remember to choose a high-quality battery with the correct specifications to guarantee optimal performance. Regularly checking and replacing the battery when necessary will prevent any inconvenience of finding yourself locked out due to a dead battery. By taking proactive measures to maintain your Yale lock, you can enjoy the convenience and security it provides for years to come.
FAQs
Q: How often do I need to change the battery in my Yale lock?
A: The frequency of battery changes in a Yale lock depends on the usage and battery type. However, it is generally recommended to replace the batteries every 9-12 months to ensure uninterrupted functionality.
Q: What type of battery should I use for my Yale lock?
A: Yale locks typically use standard alkaline AA batteries. It is important to use high-quality batteries from reputable brands to ensure optimal performance and longer battery life. Avoid using rechargeable batteries as they may not provide sufficient power for the lock.
Q: How do I know when the battery needs to be replaced?
A: When the battery in a Yale lock is running low, you will often see a notification on the lock keypad or receive a repeated beeping sound. Additionally, some Yale locks have LED indicators that will flash a low battery warning. If you notice any of these signs, it’s time to replace the battery.
Q: How do I change the battery in my Yale lock?
A: To change the battery in a Yale lock, follow these steps:
1. Locate the battery compartment on the lock, usually on the back or bottom.
2. Use a screwdriver or a coin to open the battery compartment.
3. Remove the old batteries and dispose of them properly.
4. Insert fresh, high-quality AA batteries into the compartment, making sure to match the correct polarity.
5. Close the battery compartment securely.
7. Test the lock to ensure proper functionality.
Q: Will changing the battery erase my Yale lock’s programmed codes?
A: No, changing the battery in your Yale lock will not erase the programmed codes. The lock’s memory is designed to retain the programmed codes even when the battery is removed or replaced. You can confidently change the battery without worrying about losing your settings.
Q: Can I use a rechargeable battery for my Yale lock?
A: It is not recommended to use rechargeable batteries for Yale locks. While they may seem like a budget-friendly and environmentally friendly option, rechargeable batteries may not provide consistent power output, potentially leading to lock malfunctions or battery drain issues. Stick to high-quality alkaline AA batteries for optimal performance.