
In today’s digital age, the need for larger screens and improved ergonomics has led many laptop users to seek ways to connect their laptops to external monitors. One of the easiest and most convenient methods to achieve this is by using a docking station. A docking station is a device that allows you to connect multiple peripherals, such as monitors, keyboards, mice, and speakers, to your laptop with just a single cable. This not only simplifies the setup process but also increases productivity by providing a larger workspace. In this article, we will guide you on how to connect your laptop to a monitor using a docking station, so you can enjoy the benefits of a larger screen and improved workflow.
Inside This Article
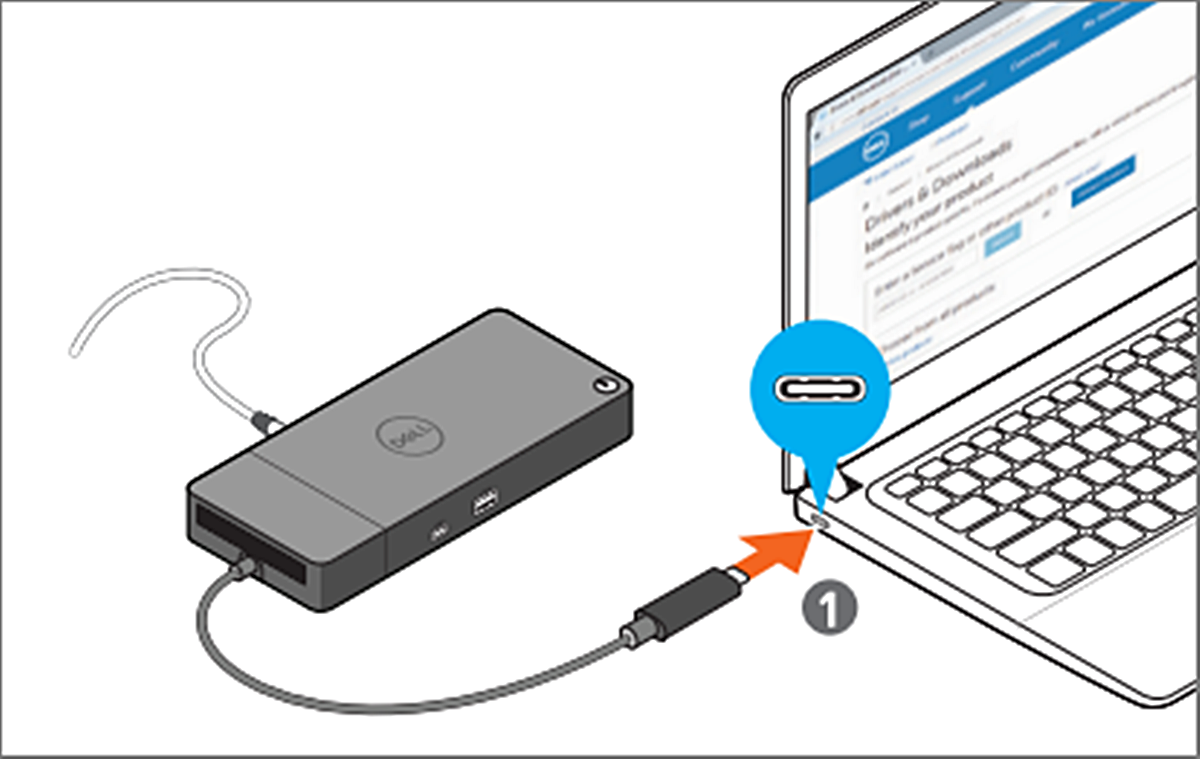
- Connecting Laptop to Docking Station
- Choosing the Right Docking Station
- Connecting the Docking Station to the Monitor
- Adjusting Display Settings
- Conclusion
- FAQs
Connecting Laptop to Docking Station
Connecting your laptop to a docking station can significantly improve your productivity and convenience by providing you with extra connectivity options and making it easier to connect to external monitors, keyboards, and other peripherals. Here are the steps to connect your laptop to a docking station:
1. Choose the right docking station: Before connecting your laptop to a docking station, make sure you have the appropriate docking station that is compatible with your laptop model. Different laptops have different docking station connectors, so ensure you choose one that matches your laptop’s specifications.
2. Position the docking station: Place the docking station in a convenient and accessible location near your workspace. Ensure that there is enough space around the docking station for proper ventilation and easy cable management.
3. Connect the docking station to the power source: Plug the docking station’s power adapter into a power outlet. Make sure the power adapter is securely connected to the docking station and that the power indicator light is on.
4. Connect your laptop to the docking station: Depending on the type of docking station you have, you may need to connect your laptop to it using a cable or by inserting it into the docking station slot. Follow the manufacturer’s instructions to ensure a proper connection.
5. Connect external peripherals to the docking station: Once your laptop is connected, you can now connect your external peripherals such as monitors, keyboards, mice, printers, and other devices to the docking station. Use the available ports on the docking station to connect the peripherals and ensure they are securely connected.
6. Configure display settings: After connecting your laptop to the docking station, you may need to adjust the display settings to enable the external monitor. Right-click on your desktop and select “Display settings” or “Graphics options” to access the display settings. From there, you can choose the desired monitor configuration, such as extending the display or duplicating the screen.
7. Test the connection: Once you have completed all the steps, it is advisable to test the connection by using the connected peripherals and ensuring they work properly. Check if the external monitor is displaying the laptop’s screen correctly, if the keyboard and mouse are functioning, and if any other connected devices are working as expected.
By following these steps, you can easily connect your laptop to a docking station and take advantage of the added convenience and functionality it provides. Whether you are working from home or in an office setting, a docking station can be a valuable tool to streamline your workflow and enhance your productivity.
Choosing the Right Docking Station
When it comes to connecting your laptop to a monitor using a docking station, choosing the right one is crucial. With so many options available in the market, it’s important to consider a few factors that will help you make an informed decision.
Compatibility: The first thing to consider is the compatibility of the docking station with your laptop. Check the specifications of both your laptop and the docking station to ensure they are compatible with each other. Some laptops have specific docking station requirements, so make sure to double-check before making a purchase.
Ports and Connectivity: Another important factor to consider is the number and type of ports available on the docking station. Look for a docking station that has the necessary ports to connect your laptop and your monitor. Common ports to look for include HDMI, DisplayPort, DVI, and VGA. Additionally, make sure the docking station has enough USB ports, Ethernet port, and any other ports you may require for other peripherals.
Power Delivery: If you want to charge your laptop while it’s connected to the docking station, make sure to choose a docking station that supports power delivery. This will ensure that your laptop receives power from the docking station while also being able to transmit data to the monitor.
Resolution and Refresh Rate: If you have a high-resolution monitor or if you need to connect multiple monitors, make sure the docking station supports the required resolution and refresh rate. This will ensure that you get the best display quality and performance from your setup.
Brand and Reliability: Consider opting for reputable brands when choosing a docking station. This can ensure better build quality, reliability, and customer support. Research and read reviews from other users to get an idea of the docking station’s overall performance and longevity.
By considering all of these factors, you can choose the right docking station that meets your specific needs and provides a seamless connection between your laptop and monitor. Remember to double-check the compatibility and connectivity options before making a final decision.
Connecting the Docking Station to the Monitor
Once you have chosen the right docking station for your laptop and monitor setup, it’s time to connect them together. Follow these steps to ensure a smooth and hassle-free connection:
Step 1: Begin by locating the docking port on your laptop. This is usually situated on the side or rear of the device. It is typically labeled with an icon or the word “Dock” to indicate its purpose.
Step 2: Take the docking cable that came with your docking station and connect one end to the docking port on your laptop. Ensure that the connection is secure, with no loose cables or wobbling.
Step 3: Now, locate the docking port on the docking station itself. This may be found on the rear or underside of the device, depending on the model. It should be labeled to indicate its purpose.
Step 4: Take the other end of the docking cable and connect it to the docking port on the docking station. Again, make sure the connection is tight and secure.
Step 5: Once the docking station and laptop are connected, it’s time to connect the monitor. Locate the video output ports on the docking station. These could be HDMI, DisplayPort, or VGA ports, depending on your docking station’s capabilities and the monitor’s input options.
Step 6: Choose the appropriate video cable that matches the output port on the docking station and the input port on your monitor. Connect one end of the cable to the output port on the docking station and the other end to the input port on the monitor. Again, ensure a secure connection.
Step 7: Once all the connections are made, power on your laptop, docking station, and monitor. Your laptop should detect the monitor automatically and extend the display to it. If not, you may need to adjust the display settings on your laptop.
Step 8: To adjust the display settings, right-click anywhere on the desktop and select “Display Settings” from the context menu. From here, you can arrange and customize the display settings according to your preferences.
By following these steps, you should be able to connect your laptop to the monitor successfully using a docking station. Enjoy the increased screen real estate and productivity that an additional monitor can bring to your workstation!
Adjusting Display Settings
Once you have successfully connected your laptop to the monitor using a docking station, the next step is to adjust the display settings to ensure optimal visual experience. Here are the steps to adjust the display settings:
- Access Display Settings: Start by right-clicking on the desktop and selecting “Display Settings” from the context menu. This will open the display settings window.
- Identify the Monitor: If you have connected multiple monitors to your laptop, it’s important to identify the monitor you want to adjust the settings for. The display settings window will show a representation of all the connected monitors. Click on the monitor you wish to adjust.
- Resolution: The first setting to consider is the resolution. The resolution determines the number of pixels displayed on the screen. Higher resolutions offer sharper and more detailed visuals, while lower resolutions may result in larger text and icons. Select the desired resolution from the drop-down menu in the display settings window.
- Orientation: If you want to change the orientation of the monitor (landscape, portrait, etc.), you can do so in the display settings window. Simply select the desired orientation from the drop-down menu.
- Scaling: Scaling refers to the size of text and other graphical elements on the screen. You can adjust the scaling settings to make objects appear larger or smaller. Choose the appropriate scaling option from the display settings window.
- Multiple Displays: If you have multiple displays connected, you can adjust how they are arranged and set the primary display. The display settings window allows you to drag and rearrange the monitors as per your preference. You can also choose which monitor will be the primary display.
- Color Calibration: For accurate color representation, you can calibrate the colors of your monitor. The display settings window provides options to adjust the color temperature, brightness, contrast, and other color-related settings.
- Apply and Save Changes: After making the desired adjustments, click on the “Apply” button to apply the new display settings. If you are satisfied with the changes, click on “OK” to save the settings. Otherwise, you can make further adjustments and repeat the process until you achieve the desired results.
By following these steps, you can easily adjust the display settings of your laptop when connected to a monitor using a docking station. Take some time to experiment with different settings to find the configuration that works best for your needs and preferences.
Conclusion
Connecting your laptop to a monitor using a docking station is a simple and efficient way to enhance your productivity and improve your overall computing experience. With the right docking station, you can easily connect multiple monitors, additional peripherals, and power your laptop all through a single connection.
By following the steps outlined in this guide, you can ensure a hassle-free setup and enjoy the benefits of a larger screen, better desktop organization, and increased multitasking capabilities.
Remember to choose a docking station that is compatible with your laptop’s ports and requirements. Consider factors such as the number of monitors you want to connect, the USB ports available, and the power output needed for your laptop.
Investing in a quality docking station can greatly enhance your productivity, whether you are working on a complex project, indulging in multimedia playback, or simply enjoying a more ergonomic setup. So go ahead, connect your laptop to a monitor using a docking station, and unlock the full potential of your device.
FAQs
Q: What is a docking station?
A: A docking station is a device that allows you to easily connect your laptop to multiple peripherals, such as a monitor, keyboard, mouse, and other devices, with just one cable.
Q: Why should I use a docking station to connect my laptop to a monitor?
A: Using a docking station provides several benefits, such as improved convenience and productivity. You can quickly connect your laptop to a monitor with just one cable, eliminating the need for multiple cables and adapters. It also allows you to use a larger screen for a better viewing experience and multitask more effectively.
Q: What types of cables are commonly used to connect a docking station to a monitor?
A: The most common cables used to connect a docking station to a monitor are HDMI, DisplayPort, and USB-C/Thunderbolt cables. The type of cable you need depends on the available ports on both your laptop and the docking station.
Q: Do all laptops support docking stations?
A: Not all laptops support docking stations, as it depends on the model and manufacturer. However, many modern laptops, especially those designed for professional use, come with docking station compatibility. It’s important to check the specifications of your laptop to ensure compatibility before purchasing a docking station.
Q: Can I connect multiple monitors to my laptop using a docking station?
A: Yes, many docking stations support multiple monitor connections. Depending on the docking station and your laptop’s graphics capabilities, you can connect one or more external monitors for a multi-display setup. This can significantly enhance your productivity and provide a more immersive computing experience.