
Having a smartphone with a high-quality camera, like the iPhone, has revolutionized the way we capture and store our precious memories. However, as time goes on, our photo libraries can quickly become cluttered with duplicates, screenshots, and images we no longer need or want to keep on our devices. If you’re looking to free up some space on your iPhone but don’t want to delete the photos from your iCloud Photo Library, you’ve come to the right place. In this article, we’ll walk you through the process of removing photos from your iPhone while ensuring they remain safely stored in the iCloud Photo Library. Whether you’re an iPhone photography enthusiast or just trying to organize your photo collection, we’ve got the step-by-step instructions you need to declutter your device without losing your cherished memories. Let’s get started!
Inside This Article
- Delete Photos from iPhone: Basic Method
- Managing iCloud Photo Library Settings
- Turning off iCloud Photo Library Sync on iPhone
- Alternative Solutions to Deleting Photos from iPhone
- Conclusion
- FAQs
Delete Photos from iPhone: Basic Method
When it comes to deleting photos from your iPhone, the most basic and convenient method is to use the built-in Photos app. With just a few simple steps, you can easily remove unwanted images from your device.
1.1 Using the Photos App
To delete photos using the Photos app, follow these steps:
- Open the Photos app on your iPhone.
- Navigate to the album or folder where the photos you want to delete are located (e.g., Camera Roll, Selfies, etc.).
- Select the specific photo you want to delete by tapping on it. A blue checkmark will appear on the selected photo.
- If you wish to delete multiple photos, tap on the “Select” option located at the top-right corner of the screen.
- Select additional photos by tapping on them. Each selected photo will have a blue checkmark.
- Once you have selected all the photos you want to delete, tap on the trash can icon at the bottom-right corner of the screen.
- A confirmation pop-up will appear, asking if you want to delete the selected photos. Tap on “Delete X Photos” (X representing the number of selected photos).
1.2 Selecting and Deleting Multiple Photos
If you have a large number of photos to delete at once, it can be time-consuming to select each photo individually. Luckily, the Photos app provides a convenient way to select and delete multiple photos in one go:
- Open the Photos app on your iPhone.
- Navigate to the album or folder containing the photos you want to delete.
- Tap on “Select” located at the top-right corner of the screen.
- Swipe your finger across the screen to select multiple photos in a continuous manner. Alternatively, you can tap on each photo to select it individually.
- Once you have selected all the photos you want to delete, tap on the trash can icon at the bottom-right corner of the screen.
- Confirm the deletion by tapping on “Delete X Photos” (X representing the number of selected photos).
1.3 Using the Recently Deleted Album
If you accidentally delete a photo or change your mind about deleting it, you can recover it within a certain time frame using the “Recently Deleted” album:
- Open the Photos app on your iPhone.
- Tap on the “Albums” tab located at the bottom of the screen.
- Scroll down and find the “Recently Deleted” album.
- Tap on the album to open it.
- Here, you will find all the photos you recently deleted.
- Select the photo(s) you want to recover.
- Tap on “Recover” to move the photo(s) back to the original album or folder where they were located.
- To permanently delete the photos, tap on “Delete All” located at the top-right corner of the screen.
By following these simple methods, you can easily delete photos from your iPhone and create more storage space for new memories. Remember to double-check the photos you want to delete before confirming the deletion to avoid any accidental loss of valuable memories.
Managing iCloud Photo Library Settings
When it comes to managing your iCloud Photo Library, it’s important to understand the various settings and options available to you. This section will cover the following topics:
2.1 Understanding iCloud Photo Library
iCloud Photo Library is a feature that allows you to seamlessly store and access your photos and videos across all your Apple devices. It works by automatically uploading your media to iCloud and keeping it in sync across all devices.
This means that any changes you make to your library, such as adding, deleting, or organizing photos, will be reflected on all your devices. iCloud Photo Library also offers a backup solution, ensuring that your precious memories are safely stored in the cloud.
2.2 Enabling and Disabling iCloud Photo Library
To enable iCloud Photo Library on your iPhone, simply go to Settings, then tap on your Apple ID at the top, and select iCloud. From there, scroll down and tap on Photos. Finally, toggle the switch next to iCloud Photo Library to enable it.
If you want to disable iCloud Photo Library, follow the same steps and toggle the switch to the off position.
It’s important to note that disabling iCloud Photo Library will remove all synced photos from your device, so make sure to back them up beforehand if necessary.
2.3 Managing Optimize iPhone Storage and Download and Keep Originals options
Within the iCloud Photo Library settings, you will find two important options: Optimize iPhone Storage and Download and Keep Originals.
The Optimize iPhone Storage option allows your iPhone to manage storage effectively by automatically replacing full-resolution photos and videos with smaller, optimized versions. This helps free up space on your device without compromising the quality of your media.
On the other hand, the Download and Keep Originals option ensures that your iPhone keeps the full-resolution versions of your photos and videos. This is useful if you need constant access to high-quality media, but it may consume more storage space on your device.
To manage these options, go to Settings, tap on your Apple ID, select iCloud, and then tap on Photos. From there, you can toggle the switches next to Optimize iPhone Storage and Download and Keep Originals based on your preferences.
By understanding and managing these iCloud Photo Library settings, you can customize your photo storage experience to suit your needs, whether it’s optimizing storage space or preserving the highest quality of your media.
Turning off iCloud Photo Library Sync on iPhone
When you no longer want your iPhone to sync photos with iCloud Photo Library, you can turn off the sync feature. This allows you to remove photos from your iPhone without deleting them from iCloud Photo Library. Here are two methods to accomplish this:
3.1 Disabling iCloud Photo Library Sync
To disable iCloud Photo Library sync, follow these steps:
- On your iPhone, go to the “Settings” app.
- Tap on your name at the top of the screen.
- Select “iCloud” from the list.
- Scroll down and tap on “Photos”.
- Toggle off the switch next to “iCloud Photo Library”.
By disabling iCloud Photo Library sync, you will stop the synchronization of photos between your iPhone and iCloud. However, keep in mind that any changes made on other devices will not be reflected on your iPhone.
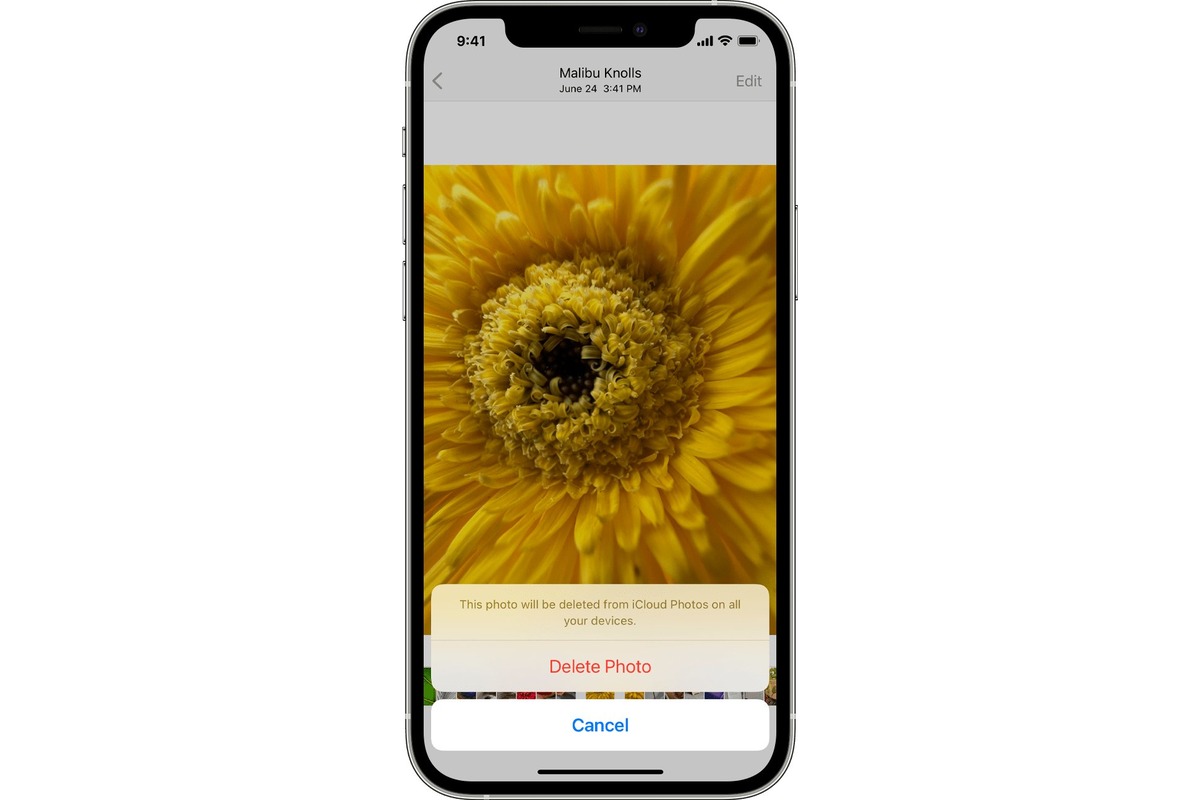
3.2 Removing Photos from iPhone without Deleting from iCloud Photo Library
If you want to remove specific photos from your iPhone without deleting them from iCloud Photo Library, you can follow these steps:
- Open the “Photos” app on your iPhone.
- Navigate to the album or the individual photo you want to remove.
- Tap on the photo to open it.
- Tap the trash bin icon at the bottom right corner of the screen.
- Select “Remove From iPhone”.
This will remove the selected photo from your iPhone, but it will remain available in iCloud Photo Library and can be accessed from other devices synced with the same iCloud account.
By using these methods, you can turn off iCloud Photo Library sync on your iPhone and remove specific photos without deleting them from iCloud Photo Library. This gives you more control over your photo library and allows you to manage your iPhone storage efficiently.
Alternative Solutions to Deleting Photos from iPhone
When it comes to managing your photos on your iPhone, there are a few alternative solutions you can consider if you don’t want to delete them permanently. These options allow you to free up storage space on your device without losing your precious memories. Let’s explore some of these alternatives:
4.1 Using Third-Party Apps
If you’re looking for more advanced options and features to manage your photos, using third-party apps is a great solution. There are numerous apps available on the App Store that allow you to organize, edit, and manage your photos effortlessly. Some popular options include Google Photos, Adobe Lightroom, and Snapseed.
These apps offer a range of powerful tools, such as auto-organization, advanced editing capabilities, and cloud storage integration. With these apps, you can easily upload your photos to the cloud, freeing up space on your iPhone while still having access to your images whenever you need them.
4.2 Transferring Photos to Another Device or Computer
If you have another device or computer with ample storage space, transferring your photos can be a viable alternative to deleting them. You can use the AirDrop feature on your iPhone to quickly transfer photos to another Apple device, such as an iPad or Mac. Alternatively, you can connect your iPhone to your computer and use software like iTunes or iCloud for Windows to import your photos.
Once your photos are safely transferred to another device or computer, you can delete them from your iPhone with confidence, knowing that they are stored elsewhere. This method is especially useful if you have limited storage space on your iPhone but still want to keep your photos accessible.
4.3 Backing Up Photos to External Storage
To ensure the safety of your photos and create additional storage space on your iPhone, backing up your photos to external storage is a reliable solution. There are various external storage devices available, such as USB flash drives or external hard drives, that you can use to store your photos.
You can connect these external storage devices to your computer and transfer your photos from your iPhone to the device. Some external storage devices also offer mobile-specific features, allowing you to directly backup your photos from your iPhone without the need for a computer.
With your photos safely backed up on external storage, you can confidently delete them from your iPhone to make room for new memories. Just make sure to keep your external storage device in a safe place to ensure the long-term preservation of your cherished photos.
By considering these alternative solutions, you can effectively manage your iPhone’s photo library without permanently deleting your photos. Whether you choose to use third-party apps, transfer photos to another device or computer, or backup photos to external storage, you can free up space on your iPhone while still keeping your memories intact.
In conclusion, deleting photos from your iPhone without removing them from iCloud Photo Library is a straightforward process that can help you free up space on your device while keeping your precious memories safely stored in the cloud. By following the steps outlined in this guide, you can easily manage your photo collection and ensure that you have enough storage for new memories.
Remember to regularly review and delete unwanted photos from your iPhone to maintain optimal storage capacity. With the convenience of iCloud Photo Library, you can enjoy the flexibility of accessing your entire photo library across multiple devices while only keeping a selected number of photos on your iPhone.
So go ahead and declutter your device by deleting photos from your iPhone, confident in the knowledge that your photos are safe and sound in iCloud. Preserve your memories without sacrificing storage space – it’s a win-win situation!
FAQs
Q: Can I delete photos from my iPhone without deleting them from iCloud Photo Library?
A: Yes, it is possible to delete photos from your iPhone without removing them from iCloud Photo Library. This can be done by enabling the “Optimize iPhone Storage” feature on your iPhone. It allows you to keep a smaller version of the photo on your device while the original is stored in iCloud. You can access the full-resolution photo whenever you need it and it won’t take up unnecessary storage on your iPhone.
Q: How do I enable the “Optimize iPhone Storage” feature?
A: To enable the “Optimize iPhone Storage” feature, go to Settings on your iPhone, tap on your name at the top, then go to iCloud > Photos. Here, make sure the “Optimize iPhone Storage” option is turned on. Once enabled, your iPhone will manage the storage of your photos intelligently.
Q: Will deleting photos from my iPhone delete them from other devices connected to the same iCloud account?
A: If you have iCloud Photo Library enabled on all your devices and the “Optimize iPhone Storage” feature is turned on, deleting photos from your iPhone will not delete them from other devices connected to the same iCloud account. The photos will still be available on iCloud and accessible from other devices.
Q: Can I delete individual photos from my iPhone but keep them in an album?
A: Yes, you can delete individual photos from your iPhone while keeping them in an album. When you delete a photo from your iPhone, it will be moved to the “Recently Deleted” album, where it will be stored for 30 days before being permanently deleted. During this time, you can still access the photo in the “Recently Deleted” album and restore it if needed.
Q: How do I delete photos from my iPhone permanently?
A: To delete photos from your iPhone permanently, you can go to the “Photos” app, open the “Recently Deleted” album, select the photos you want to delete, and tap on the “Delete” button. This will remove the photos from both your iPhone and iCloud, and they will no longer be recoverable.