
Are you wondering how to download photos from iCloud to your iPhone? Look no further, as we have you covered with a comprehensive guide on how to accomplish this task in 2023. iCloud, Apple’s cloud storage solution, is a convenient way to back up and access your photos and other data across all your Apple devices. Whether you want to retrieve your precious memories or simply want to free up some storage space on your iPhone, downloading photos from iCloud is a straightforward process. In this article, we will provide you with step-by-step instructions and tips to help you easily download photos from iCloud to your iPhone. So, let’s dive in and get those cherished photos back on your device!
Inside This Article
- Access iCloud Photos on iPhone
- Download Individual Photos from iCloud to iPhone
- Download Multiple Photos from iCloud to iPhone
- Download All Photos from iCloud to iPhone
- Access iCloud Photos on iPhone
- Download Individual Photos from iCloud to iPhone
- Download Multiple Photos from iCloud to iPhone
- Download All Photos from iCloud to iPhone
- Conclusion
- FAQs
There are multiple ways to download photos from iCloud to your iPhone. In this article, we will guide you through the process so you can easily access and download your iCloud photos on your iPhone running iOS 14 or later.
Access iCloud Photos on iPhone
Before you can download photos from iCloud to your iPhone, make sure you have iCloud Photos enabled. Here’s how you can check:
- Open the Settings app on your iPhone.
- Tap on your name at the top of the screen.
- Scroll down and tap on “iCloud.
- Under the “Apps Using iCloud” section, make sure “Photos” is turned on.
Once iCloud Photos is enabled, you can access your iCloud photos on your iPhone by following these steps:
- Open the Photos app on your iPhone.
- Tap on the “Photos” tab at the bottom of the screen.
- Scroll through your photo library to browse your iCloud photos.
Download Individual Photos from iCloud to iPhone
To download an individual photo from iCloud to your iPhone, follow these steps:
- Open the Photos app on your iPhone.
- Navigate to the photo you want to download.
- Tap on the photo to open it.
- Tap on the Share icon at the bottom left corner of the screen.
- Choose the “Save Image” option from the Share Sheet.
The selected photo will be saved to your iPhone’s Camera Roll, and you can access it anytime from the Photos app.
Download Multiple Photos from iCloud to iPhone
If you want to download multiple photos from iCloud to your iPhone, you can use the “Select” feature in the Photos app. Here’s how:
- Open the Photos app on your iPhone.
- Tap on the “Photos” tab at the bottom of the screen.
- Tap on the “Select” button at the top right corner of the screen.
- Tap on each photo you want to download to select them.
- Tap on the Share icon at the bottom left corner of the screen.
- Choose the “Save Images” option from the Share Sheet.
All the selected photos will be saved to your iPhone’s Camera Roll for easy access.
Download All Photos from iCloud to iPhone
If you want to download all the photos from your iCloud to your iPhone, you can use the iCloud Photos library sync feature. Follow these steps:
- Open the Settings app on your iPhone.
- Tap on your name at the top of the screen.
- Scroll down and tap on “iCloud”.
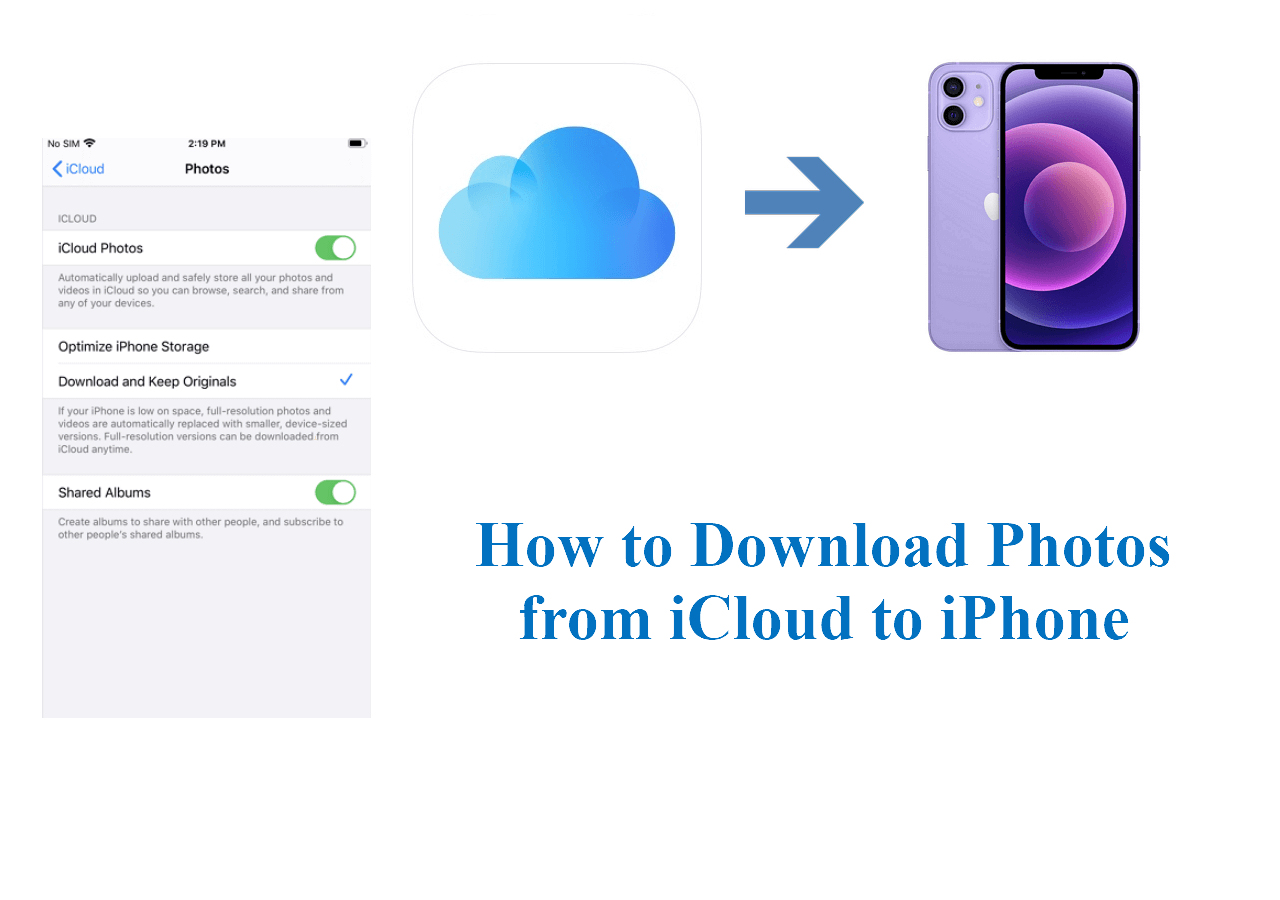
- Tap on “Photos”.
- Toggle on the “Download and Keep Originals” option.
This will start downloading all your iCloud photos to your iPhone. The time it takes will depend on the size of your photo library and your internet connection speed.
Now that you know how to download photos from iCloud to your iPhone, you can easily access and enjoy your precious memories anytime, anywhere. Start downloading and relive those special moments today!
Access iCloud Photos on iPhone
Accessing your iCloud photos on your iPhone is quick and easy. With iCloud, you can store your photos and videos securely in the cloud and access them from any device, including your iPhone. To access your iCloud photos on your iPhone, follow these steps:
- Open the “Settings” app on your iPhone.
- Scroll down and tap on your name at the top of the screen.
- Tap on “iCloud” from the list of options.
- Scroll down and find “Photos” in the list of apps.
- Tap on “Photos.”
- Toggle on the switch next to “iCloud Photos.”
Once you have enabled iCloud Photos on your iPhone, all your photos and videos stored in your iCloud account will be available on your device. You can view and download them whenever you want.
It’s worth noting that enabling iCloud Photos on your iPhone may require sufficient storage space in your iCloud account. If you don’t have enough storage, you may need to upgrade your iCloud plan.
Now that you have accessed your iCloud photos on your iPhone, you are ready to download individual photos or multiple photos to your device. Keep reading to learn how!
Download Individual Photos from iCloud to iPhone
Downloading individual photos from iCloud to your iPhone is a simple and straightforward process. By following these steps, you’ll have your desired photo saved directly to your iPhone’s camera roll in no time:
1. Open the Photos app on your iPhone and make sure you are signed in to your iCloud account.
2. Tap on the “Albums” tab located at the bottom of the screen.
3. Scroll down and find the “iCloud” section. Tap on “All Photos” to access your entire iCloud photo library.
4. Browse through your photos and locate the specific image you want to download. You can use the search bar or swipe through the albums and years to find it.
5. Once you have found the photo, tap on it to view it in full-screen mode.
6. In the bottom-left corner, you’ll see a square icon with an arrow pointing upward. Tap on this icon to reveal the available actions.
7. From the options presented, tap on “Save Image” to download the photo to your iPhone’s camera roll.
You have now successfully downloaded an individual photo from iCloud to your iPhone. You can access it anytime by opening the Photos app and navigating to your camera roll.
Repeat these steps for every individual photo you wish to download from iCloud to your iPhone, and you’ll have your beloved memories at your fingertips.
Download Multiple Photos from iCloud to iPhone
If you have a large collection of photos stored in your iCloud account and want to download multiple photos to your iPhone, there are a few simple steps you can follow. Whether you’re looking to save memories, access photos for a project, or simply want to have them readily available on your device, iCloud offers a convenient way to download multiple photos at once.
To start, make sure you have a stable internet connection on your iPhone. Open the Photos app and tap on the “Albums” tab at the bottom. Scroll down until you find the “iCloud Photos” album and tap on it. This will display all the photos stored in your iCloud account.
Now, tap on the “Select” button located at the top right corner of the screen. You can either select individual photos by tapping on them or choose multiple photos by swiping your finger across the screen. As you select the photos, a blue checkmark will appear on them.
Once you have selected all the photos you want to download, tap on the share icon at the bottom left corner of the screen. This will open a share sheet with various options. Scroll through the options until you find “Save Image” and tap on it.
After tapping “Save Image,” your selected photos will start downloading to your iPhone’s camera roll. Depending on the number of photos and your internet connection speed, the download process may take a few moments. Once the photos are downloaded, you can find them in the Photos app under the “Camera Roll” or “All Photos” album.
Keep in mind that downloading multiple photos from iCloud to your iPhone may require sufficient storage space on your device. If your iPhone’s storage is limited, you may want to consider optimizing your photo library to free up space. This can be done by enabling the “Optimize iPhone Storage” option in the iCloud settings, which automatically stores your photos in iCloud while keeping smaller, optimized versions on your device.
With these simple steps, you can easily download multiple photos from your iCloud account to your iPhone. Whether you’re organizing your photo library or simply looking to have quick access to your favorite memories, iCloud makes it convenient to bring your photos directly to your iPhone.
Download All Photos from iCloud to iPhone
If you’ve been using iCloud to back up your photos and want to download all of them to your iPhone, you’re in luck! With a few simple steps, you can easily retrieve your entire photo library from iCloud and have them readily accessible on your device. Here’s how you can download all your photos from iCloud to iPhone:
1. Open the Settings app on your iPhone and tap on your name at the top of the screen to access your Apple ID settings.
2. In the Apple ID settings, tap on “iCloud” and then select “Photos” from the list of available options.
3. Make sure that the “iCloud Photos” toggle switch is turned on. This ensures that all your iCloud photos are synchronized with your iPhone.
4. After making sure that iCloud Photos is enabled, go back to the main Settings screen and scroll down to find the “Photos” option.
5. Tap on “Photos” and then select “Download and Keep Originals” under the “Transfer to Mac or PC” section. This option ensures that all your iCloud photos are downloaded to your iPhone in their original quality.
6. Depending on the size of your photo library and your internet connection speed, it may take some time for all your photos to download. Make sure your iPhone is connected to a stable Wi-Fi network to expedite the process.
7. Once the download is complete, you can open the Photos app on your iPhone and explore your entire photo library, including all the photos previously stored in iCloud.
Downloading all your photos from iCloud to your iPhone provides you with the convenience of accessing your entire photo collection without needing an internet connection. Whether you’re reminiscing on precious memories or searching for a specific image, having all your photos readily available can be incredibly useful.
Note: It’s important to ensure that you have enough storage space on your iPhone to accommodate all the downloaded photos. If your device is running low on storage, consider backing up or deleting unnecessary files to free up space for your photos.
Now that you know how to download all your photos from iCloud to iPhone, you can enjoy your entire photo collection wherever you go.
Conclusion
Downloading photos from iCloud to your iPhone is a seamless process that allows you to access and enjoy your precious memories anytime, anywhere. By following the simple steps outlined in this guide, you can retrieve your photos from iCloud and have them readily available on your iPhone for easy viewing and sharing.
Remember, iCloud offers a convenient and secure way to store and sync your photos across all your Apple devices. Whether you’re looking to free up storage space or ensure your photos are backed up, iCloud has you covered.
So, go ahead and start downloading your photos from iCloud to your iPhone today. Relive your favorite moments and share them with friends and family with just a few taps. It’s time to rediscover the joy of your memories, right at your fingertips.
Happy downloading!
FAQs
Q: Can I download photos from iCloud to my iPhone?
A: Absolutely! Thankfully, Apple’s iCloud service allows you to easily download your photos from the cloud onto your iPhone. With a few simple steps, you can access your iCloud Photo Library and have your precious memories right at your fingertips.
Q: How do I download photos from iCloud to my iPhone?
A: To download photos from iCloud to your iPhone, follow these steps:
- Make sure you are connected to a stable Wi-Fi network.
- Open the “Settings” app on your iPhone and tap on your name at the top.
- Select “iCloud” and then “Photos”.
- Enable the “iCloud Photos” option.
- Wait for your photos to sync with iCloud.
Q: Are there any alternatives to downloading photos from iCloud to my iPhone?
A: Yes, there are a few alternatives you can consider. One option is to use the iCloud website, where you can log in with your Apple ID and download the photos directly to your computer. From there, you can transfer them to your iPhone using iTunes or a third-party file transfer tool.
Q: Can I access my iCloud photos on an Android device?
A: Unfortunately, accessing iCloud photos on an Android device is not as straightforward as on an iPhone, since iCloud is primarily designed for Apple devices. However, there are third-party apps and services available that claim to provide access to iCloud photos on Android. It’s important to research and choose a reputable option, as these services may have limitations or security risks.
Q: How can I free up space on my iPhone after downloading photos from iCloud?
A: Once you have downloaded your photos from iCloud to your iPhone, you may want to free up some space. One way to do this is by using the “Optimize iPhone Storage” feature in the “Settings” app under “Photos”. This will automatically replace full-resolution photos with smaller versions, saving space on your device without compromising the quality of your viewing experience.