
If you’re a fitness enthusiast who relies on a Fitbit wearable to track your daily activities and monitor your progress, you may find yourself wondering how to export your Fitbit data. Whether you want to analyze your fitness trends over time or share your achievements with your healthcare provider or personal trainer, exporting your Fitbit data can provide valuable insights. In this article, we will guide you through the process of exporting your Fitbit data, step by step. We’ll show you how to access your data from the Fitbit app or website, export it in various formats, and make the most of the valuable information stored in your Fitbit account.
Inside This Article
- Overview
- Step 1: Sign in to your Fitbit account
- Step 2: Access your Fitbit data
- Step 3: Export your Fitbit data
- Step 4: Choose the file format
- Step 5: Save the exported data
- Troubleshooting common issues
- Conclusion
- FAQs
Overview
Exporting your Fitbit data is a convenient way to keep track of your fitness progress, analyze your workouts, and share your achievements with others. Whether you want to store your Fitbit data locally, import it into another app or program, or simply have a backup, this article will guide you through the process step by step.
By exporting your Fitbit data, you can gain deeper insights into your daily activities, sleep patterns, heart rate, and much more. This information can be valuable in monitoring your health and wellness goals and making informed decisions about your fitness journey.
To get started, make sure you have access to a computer or a mobile device with internet connectivity. Exporting your Fitbit data can be done from the official Fitbit website or through the Fitbit mobile app, depending on your preference.
By following the steps outlined in this article, you will be able to export your Fitbit data hassle-free and take full control of your fitness journey.
Step 1: Sign in to your Fitbit account
Before you can export your Fitbit data, you need to sign in to your Fitbit account. This ensures that you have access to all of your personal health and fitness information that is stored within your Fitbit device and app.
To sign in to your Fitbit account, follow these simple steps:
- Open the Fitbit app on your mobile device or visit the Fitbit website on your computer.
- On the login screen, enter your email address or username and password.
- Click or tap on the “Sign In” button to access your Fitbit account.
If you don’t have a Fitbit account yet, you can easily create one by selecting the “Sign Up” or “Register” option. Simply follow the prompts and provide the necessary information to create your account.
Once you have successfully signed in to your Fitbit account, you are ready to proceed to the next step of exporting your Fitbit data.
Step 2: Access your Fitbit data
Once you have signed in to your Fitbit account, you can easily access your data and explore the various insights it provides. Here’s how you can do it:
1. From the Fitbit dashboard, navigate to the main menu and click on the “Data & Privacy” option. This will take you to a page where you can manage your data settings.
2. On the “Data & Privacy” page, you will find a section called “Your Data.” Here, you can choose the specific data you want to access, such as activity, sleep, heart rate, and more.
3. Click on the desired data category, and you will be presented with a detailed overview of your information. Fitbit provides easy-to-understand graphs, charts, and statistics that allow you to track your progress and make informed decisions.
4. To delve deeper into a particular aspect of your data, you can click on individual metrics or sections. For example, if you want to analyze your sleep patterns, click on the sleep category and explore the detailed sleep data.
5. Fitbit also offers the option to set goals for yourself. By clicking on the “Goals” tab, you can set targets for steps, distance, active minutes, and more. This feature can help motivate you and track your progress towards achieving your fitness objectives.
6. Additionally, Fitbit provides the ability to connect with friends and join challenges. By clicking on the “Community” tab, you can engage in friendly competitions and cheer each other on, making your fitness journey more enjoyable and interactive.
7. Finally, don’t forget to explore the other features and settings available in your Fitbit account. You can personalize your profile, sync your device, and customize your notifications to suit your preferences.
By accessing your Fitbit data, you gain valuable insights into your health and fitness activities. Monitoring your progress and making data-driven decisions can help you reach your goals more effectively and live a healthier lifestyle.
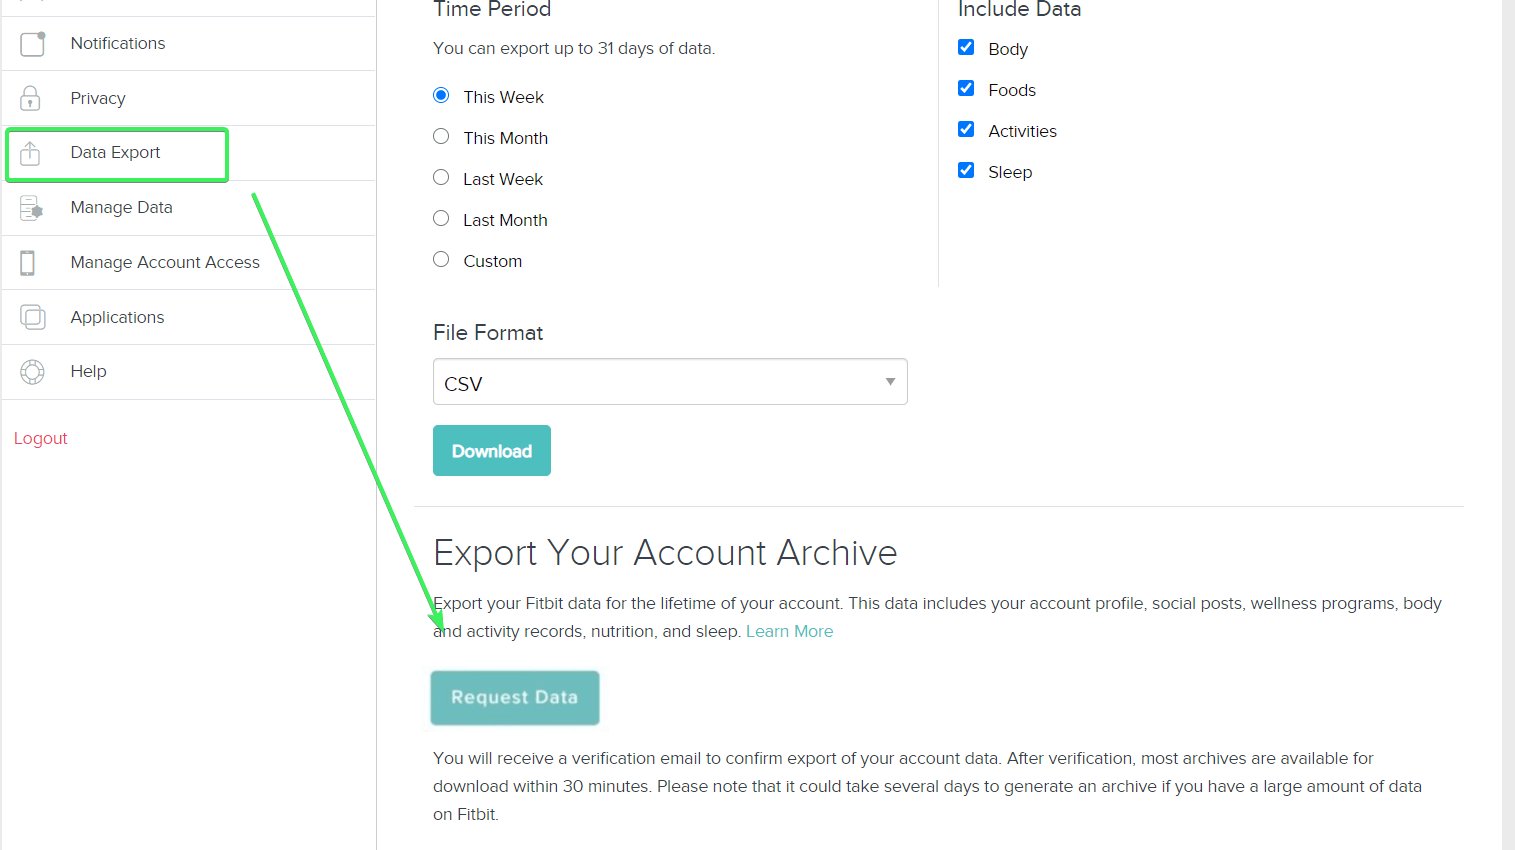
Step 3: Export your Fitbit data
Now that you have accessed your Fitbit data, the next step is to export it. Exporting your Fitbit data allows you to have a local copy of all your information, giving you more control and flexibility with how you use and analyze your data.
To export your Fitbit data, follow these simple steps:
- On your Fitbit dashboard, navigate to the “Settings” tab.
- Scroll down and click on “Data Export” or “Export Your Data”.
- Choose the date range for the data you want to export. You can select a specific range or choose to export all your data.
- Select the data types you want to include in the export. Fitbit offers a wide range of data categories, including activity, sleep, heart rate, and more. You can choose to export all data types or select specific ones based on your preferences.
- Click on the “Export” or “Download” button to initiate the export process.
Fitbit may take a few moments to compile your data and prepare it for download. Once the export is ready, you will receive a notification, and the download link will be available.
It’s worth noting that the time it takes to export your Fitbit data may vary depending on the amount of data you have accumulated over time. If you have a lot of historical data, it may take longer to export.
Additionally, Fitbit allows you to export your data in different file formats, including CSV (Comma Separated Values), XLS (Excel Spreadsheet), and JSON (JavaScript Object Notation). This flexibility enables you to choose the file format that best suits your needs and provides compatibility with various software applications.
Once the download link is available, click on it to start the download process. The exported data will be saved to your computer or device in the selected file format.
Keep in mind that exporting your Fitbit data is beneficial for several reasons. It allows you to keep a backup of your data, analyze it using third-party tools or software, and have more control over your personal health information.
Now that you have successfully exported your Fitbit data, you can explore different ways to analyze and gain insights from it. Whether you want to track your progress, share it with your healthcare provider, or integrate it with other fitness apps, having your Fitbit data exported opens up a world of possibilities.
Step 4: Choose the file format
Once you’ve accessed your Fitbit data and are ready to export it, the next step is to choose the file format in which you want to save your data.
Fitbit offers multiple file format options to cater to different preferences and needs. The most common file formats include:
- CSV (Comma Separated Values): This is a versatile file format that can be easily opened in spreadsheet programs such as Microsoft Excel or Google Sheets. It allows you to organize and analyze your Fitbit data in a tabular format, making it convenient for further analysis or integration with other tools.
- TCX (Training Center XML): This format, commonly used by fitness applications and devices, provides a more detailed representation of your Fitbit activity data. It includes information such as heart rate, pace, and GPS coordinates, making it suitable for athletes and fitness enthusiasts who want a granular view of their workouts.
- JSON (JavaScript Object Notation): For developers or advanced users who prefer a more flexible and customizable format, JSON is a popular choice. It provides a structured representation of data that can be easily processed by programming languages.
When choosing the file format, consider the purpose of exporting your Fitbit data. If you plan to perform in-depth analysis or share your data with others who may not have Fitbit accounts, the CSV format is recommended. If you’re primarily interested in reviewing your workouts and tracking performance metrics, the TCX format offers more detailed information. JSON, on the other hand, is ideal for developers or users who want to integrate Fitbit data into their own applications or systems.
Fitbit allows you to select the desired file format during the export process. Simply follow the prompts or options provided on the export page, and choose the format that best suits your needs.
Step 5: Save the exported data
Once you have successfully exported your Fitbit data, the next step is to save it to your desired location. Saving the exported data allows you to access it at a later time or import it into other applications or devices.
Here are some steps to follow to save your exported Fitbit data:
- Click on the “Save” button or choose the “Save As” option in your browser’s menu.
- A dialog box will appear, prompting you to choose the location where you want to save the file.
- Select the desired folder or directory on your computer or external storage device.
- Give the exported data file a descriptive name that will make it easy for you to identify in the future.
- Choose the appropriate file format for your exported data. Fitbit typically provides options such as CSV (Comma Separated Values) or XLSX (Excel Spreadsheet).
- Click the “Save” button to finalize the process and save the exported Fitbit data.
Remember to choose a location and file name that you can easily remember and locate when needed. It’s also recommended to create a dedicated folder specifically for saving your Fitbit data to keep it organized.
By following these simple steps, you can ensure that your exported Fitbit data is safely saved and readily accessible for future use. Whether you want to analyze your fitness progress or share your data with healthcare professionals, having a backup of your Fitbit data is essential.
Troubleshooting common issues
While exporting Fitbit data can be a straightforward process, there may be some common issues that you could encounter along the way. Here are a few troubleshooting tips to help you overcome any hurdles you may face:
1. Data not appearing: If you find that your exported Fitbit data is not appearing correctly or is missing certain details, double-check your data selection. Ensure that you have selected the correct date range and data types to export. It’s also worth confirming that you have synced your Fitbit device with the Fitbit app to ensure all data is up to date.
2. Slow or unresponsive export: If the export process seems slow or unresponsive, it could be due to a poor internet connection or heavy server traffic. Try exporting your data during periods of lower internet usage or using a more stable internet connection, such as a wired connection if available.
3. Error messages: Occasionally, you may encounter error messages while trying to export your Fitbit data. These error messages may indicate a temporary issue with the Fitbit servers or a problem with the exported file’s format. In such cases, wait for a while and try again. If the issue persists, it may be helpful to reach out to Fitbit support for further assistance.
4. Incomplete data: If your exported Fitbit data appears to be incomplete, make sure that you have selected all the necessary data categories for export. Additionally, check if there are any specific settings on your Fitbit device that could be impacting the data collection process.
5. Compatibility issues: When exporting Fitbit data, you may face compatibility issues with certain file formats. Ensure that you are choosing a file format that is supported by the application or program you plan to use to open and analyze the data. If needed, you can convert the exported file to a different format using compatible software.
6. Missing data: If you notice that specific data points are missing from your exported Fitbit data, it could be due to limitations or restrictions set by the Fitbit platform. Fitbit may not export certain data types or time intervals, such as sleep data or hourly step counts. In such cases, refer to the Fitbit documentation or contact their support for more information.
Remember, troubleshooting common issues while exporting Fitbit data can vary depending on the specific problem you encounter. These tips should help you resolve common hiccups and ensure a successful export of your Fitbit data.
Conclusion
In conclusion, exporting Fitbit data is a simple and valuable process that allows users to take control of their health and fitness information. Whether you’re looking to analyze your progress, share your achievements with others, or even use the data with other health and fitness apps, exporting Fitbit data gives you the freedom and flexibility to do so.
By following the steps outlined in this article, you can easily export your Fitbit data, whether it’s your activity, sleep, heart rate, or any other metrics you’re interested in. Remember to choose the export format that best suits your needs and be sure to securely store and protect your exported data once it’s downloaded.
So don’t hesitate, start exporting your Fitbit data today and unlock new insights and possibilities for your health and fitness journey!
FAQs
Q: How do I export data from my Fitbit device?
To export data from your Fitbit device, follow these steps:
- Open the Fitbit app on your smartphone or visit the Fitbit website on your computer.
- Log in to your Fitbit account.
- Navigate to the Dashboard or main screen of the app.
- Select the specific data you want to export, such as steps, heart rate, sleep, or exercise.
- Once you have chosen the data, tap or click on the export option (usually represented by a share icon).
- Select the desired file format for the export, such as CSV or Excel.
- Choose the method to save or share the exported file, such as email, cloud storage, or directly to another app.
- Follow the prompts to complete the export process.
Q: Can I export my Fitbit data to third-party apps?
Yes, Fitbit allows you to export your data to certain third-party apps and services. To do this, follow these steps:
- Open the Fitbit app or visit the Fitbit website.
- Log in to your Fitbit account.
- Navigate to the Dashboard or main screen.
- Select the data you want to export.
- Tap or click on the share icon or export option.
- Choose the third-party app or service you want to export to.
- Follow the prompts to authorize the data transfer and complete the export process.
Q: What data can I export from my Fitbit device?
You can export various types of data from your Fitbit device, including:
- Steps
- Distance
- Calories burned
- Heart rate
- Sleep duration and quality
- Exercise and activity details
- Weight
The specific data available for export may vary depending on the model of your Fitbit device and the features it supports.
Q: Are there any limitations to exporting Fitbit data?
While you can export a wide range of data from your Fitbit device, there are a few limitations to be aware of:
- Data export options may vary based on the model of your Fitbit device.
- Some Fitbit features and data may not be exportable.
- The export format options may be limited, typically including CSV or Excel.
- Exporting data may require a stable internet connection.
- Third-party apps or services you want to export to may have their own limitations or compatibility requirements.
Q: Can I export my Fitbit data without a smartphone?
Yes, you can export your Fitbit data without a smartphone by using a computer and accessing the Fitbit website. Simply follow the same steps mentioned earlier to log in to your account and export the desired data. However, some features and functionality may be limited when exporting data without a smartphone.