
We’ve all been there – dealing with that frustrating moment when your phone charger wire stops working. Whether it’s a frayed cable, a loose connection, or a complete disconnection, a faulty phone charger wire can be incredibly inconvenient. But fear not! In this article, we will guide you through the process of fixing your phone charger wire so you can get back to charging your device in no time. We will cover common issues and provide step-by-step instructions on how to repair the wire yourself. So, if you’re tired of spending money on replacing chargers or struggling with a finicky wire, read on to discover the solutions and techniques to restore your phone charger wire to its former glory.
Inside This Article
- Common Issues with Phone Charger Wires
- Tools and Materials Needed for Repair
- Step-by-Step Guide to Fixing a Phone Charger Wire
- Additional Tips and Safety Precautions
- Conclusion
- FAQs
Common Issues with Phone Charger Wires
Phone charger wires are essential for keeping our devices powered up and ready to go. Unfortunately, over time, these wires can encounter a variety of common issues that may interfere with their functionality. Let’s take a look at some of the most common problems people encounter with phone charger wires:
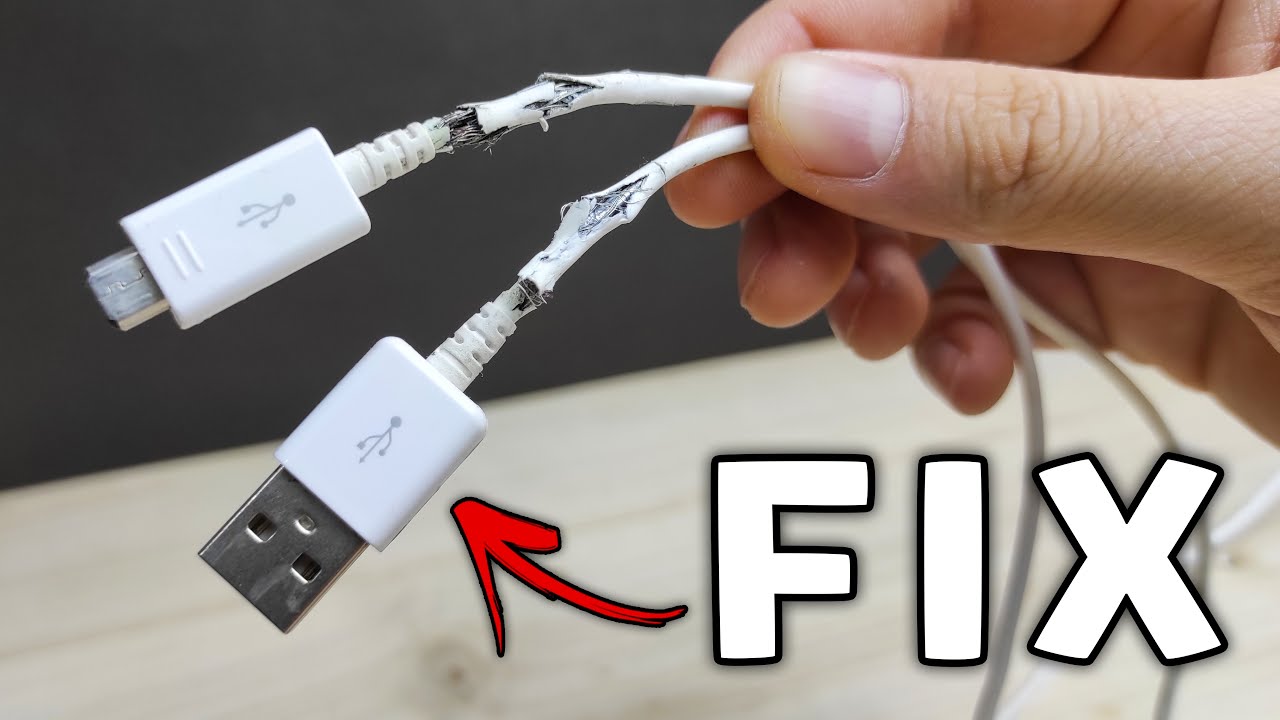
1. Frayed or Damaged Wires: One of the most common issues with phone charger wires is fraying or damage to the wires themselves. This can happen from regular wear and tear, such as bending or twisting the wire too much, or from pets chewing on them. If left untreated, frayed or damaged wires can lead to charging inconsistencies or even pose a safety hazard.
2. Bent or Broken Connectors: Another common problem is bent or broken connectors. These are the metal prongs that you plug into your device and the wall charger. If the connectors become bent or broken, they may not make proper contact, resulting in slow charging or no charging at all.
3. Loose or Worn-out Connections: Over time, phone charger wires can develop loose connections due to frequent plugging and unplugging. When the wire is not securely connected to either the device or the charger, it can cause intermittent charging or a complete failure to charge.
4. Overheating: Phone charger wires can sometimes overheat, especially if they are being used while charging the device or if they are not of good quality. Overheating can not only affect the wire’s performance but can also pose a safety risk.
5. Compatibility Issues: Occasionally, phone charger wires may not work or charge properly due to compatibility issues with certain devices. This can happen if the wire is not designed to work with your specific device or if the device’s charging port is damaged or not functioning correctly.
These are just a few of the common problems that can arise with phone charger wires. If you’re experiencing any of these issues, don’t worry – there are steps you can take to fix them and get your charger working like new again. In the next section, we’ll discuss the tools and materials you’ll need for repairing phone charger wires.
Tools and Materials Needed for Repair
When it comes to fixing a phone charger wire, having the right tools and materials is essential. Here are the things you will need to complete the repair process:
1. Wire cutter/stripper: A wire cutter/stripper is a versatile tool that will allow you to cut and strip the damaged wire insulation. This tool ensures clean and precise cuts.
2. Electrical tape: Electrical tape is used to insulate and protect the exposed wires after the repair. It provides a secure and long-lasting seal, preventing any potential electrical hazards.
3. Heat shrink tubing: Heat shrink tubing is an excellent option for insulating and reinforcing the repaired section of the wire. After applying the tubing, heat is applied, causing it to shrink and create a tight seal over the wires.
4. Soldering iron and solder: If the wire has been severed or needs to be reconnected, a soldering iron and solder will be necessary. This equipment is used to melt solder, which creates a strong bond between the wire ends.
5. Multimeter: A multimeter is a useful tool for troubleshooting and testing electrical connections. It allows you to check for continuity, voltage, and other electrical parameters to ensure a successful repair.
6. Replacement connectors (if needed): In some cases, the connectors on the charger wire may be damaged beyond repair. If this is the case, you may need to replace them with new ones. Make sure to choose connectors that are compatible with your phone’s charging port.
7. Workbench and proper lighting: Having a dedicated workbench with proper lighting is crucial for conducting a successful repair. It provides a stable surface for work and ensures you can see the fine details as you fix the wire.
By gathering these tools and materials before starting the repair process, you’ll be well-prepared to tackle any problems with your phone charger wire.
Step-by-Step Guide to Fixing a Phone Charger Wire
If you find yourself with a broken phone charger wire, there’s no need to panic. With a few simple steps, you can fix it yourself and save some money in the process. Here is a step-by-step guide to help you get your phone charger wire up and running again:
1. Identify the Problem: The first step is to identify where the wire is damaged. Look for any visible cuts, frayed ends, or exposed wires. This will give you a clear idea of what needs to be fixed.
2. Gather Tools and Materials: Next, gather the necessary tools and materials for the repair. You’ll need a wire stripper, electrical tape, heat-shrink tubing, and a heat gun or lighter. These items are readily available at hardware stores or online.
3. Strip the Wire: Using the wire stripper, carefully remove the insulation from the damaged section of the wire. Be cautious not to cut or damage the inner wires while stripping off the insulation.
4. Twist Exposed Wires: Once the wires are exposed, carefully twist them together to ensure a secure connection. This will help restore the continuity of the wire.
5. Apply Electrical Tape: After twisting the wires together, wrap them tightly with electrical tape. This will provide insulation and prevent any further damage or exposure.
6. Use Heat-Shrink Tubing: Slide a piece of heat-shrink tubing over the repaired section of the wire. Make sure the tubing covers the exposed wires completely. Then, use a heat gun or lighter to apply heat evenly to the tubing. The heat will cause the tubing to shrink and create a secure seal around the wires.
7. Test the Wire: To ensure the repair was successful, plug in your phone charger and check if it is charging properly. If it works without any issues, then you have successfully fixed the charger wire.
8. Reinforce with Electrical Tape: For added protection, you can wrap the repaired section of the wire with another layer of electrical tape. This will reinforce the repair and provide extra durability.
Remember, it is essential to practice caution while repairing electrical components. If you are unsure or uncomfortable with the repair process, it is always best to seek professional help.
By following these simple steps, you can fix a broken phone charger wire and extend its lifespan. Not only will this save you money, but it also ensures that you have a reliable charger for your phone whenever you need it.
Additional Tips and Safety Precautions
When it comes to repairing your phone charger wire, it’s important to follow some additional tips and safety precautions to ensure a successful and safe repair. Here are some important points to keep in mind:
1. Unplug the charger before starting any repairs. This is a crucial step to avoid electric shocks or short circuits.
2. Work in a well-ventilated area. If you need to cut or strip the wire, make sure you do it in a space with good air circulation, as some wires might release fumes or emit a burning smell.
3. Use the right tools for the job. It is important to have the appropriate tools, such as wire cutters, strippers, soldering iron, heat shrink tubing, and electrical tape, to ensure a proper and secure repair.
4. Take your time and be patient. Rushing through the repair process can lead to mistakes or further damage. Take your time to carefully follow the steps and ensure a thorough repair.
5. Don’t force anything. If you encounter resistance or difficulty during the repair, stop and reassess the situation. Forcing the wire or the components can result in irreversible damage.
6. Double-check your connections. Once you have completed the repair, make sure to double-check all the connections are secure and properly soldered. Loose or weak connections can cause charging issues or short circuits.
7. Test before use. After the repair, it is important to test the charger with your phone or any other compatible device before regular use. This will help ensure that the repair was successful and that the charger is functioning properly.
8. If in doubt, seek professional help. If you don’t feel confident or comfortable with repairing the charger wire, it’s always recommended to seek professional assistance. They have the experience and expertise to handle the repair safely and effectively.
By following these additional tips and safety precautions, you can successfully repair your phone charger wire while ensuring your safety and the longevity of your charger. Remember to always prioritize safety and take the necessary precautions to avoid any mishaps during the repair process.
In conclusion, knowing how to fix a phone charger wire can save you time and money. By following the steps outlined in this article, you can easily repair a faulty charger cable and avoid the inconvenience of having to purchase a new one. Remember to be cautious when handling the wires and use the appropriate tools to ensure the safety of yourself and your device. Additionally, consider using preventative measures such as cable protectors or sleeves to prolong the lifespan of your charger cables. With a little bit of knowledge and some basic tools, you can extend the life of your phone charger and keep your devices powered efficiently.
FAQs
1. Why is my phone charger wire not working?
There can be several reasons why your phone charger wire is not working. It could be due to a loose connection, a damaged wire, or a faulty adapter. It’s also possible that the charging port on your phone or the charging point on the adapter is dirty or damaged. Troubleshooting the issue by trying a different charger or cleaning the charging port can help identify the exact cause.
2. Can I fix a phone charger wire myself?
Yes, you can often fix a phone charger wire yourself, depending on the extent of the damage. If the wire is simply frayed or the connection is loose, you can use electrical tape or heat shrink tubing to repair it. However, if the wire is completely severed or the damage is more severe, it may be best to replace the charger wire entirely to ensure safe and reliable charging.
3. What tools do I need to fix a phone charger wire?
To fix a phone charger wire, you will need a few simple tools such as wire cutters or scissors, electrical tape or heat shrink tubing, and a heat source like a heat gun or lighter. These tools will allow you to trim and repair the damaged sections of the wire and secure it back together.
4. Are there any safety precautions I should take when fixing a phone charger wire?
Yes, there are a few safety precautions you should keep in mind when fixing a phone charger wire. Ensure that the charger is unplugged from the power source before attempting any repairs. Use caution when handling sharp tools like wire cutters and avoid applying too much heat, as it can damage the wire or surrounding components. If you are unsure about any steps, it’s best to consult a professional or consider purchasing a new charger.
5. How can I prevent my phone charger wire from getting damaged?
To prevent your phone charger wire from getting damaged, there are a few steps you can take. Avoid pulling or twisting the wire excessively when plugging or unplugging your phone. Store the charger in a safe place where it won’t get tangled or bent. Additionally, regularly inspect the wire for any signs of wear or damage and replace it if necessary. Using a cable organizer or sleeve can also help protect the wire from unnecessary strain or bending.