
When it comes to charging our phones, having the right charger is crucial. But what if you’re faced with a charger that doesn’t have clear markings for the positive and negative wires? You’re not alone in this predicament. Many phone chargers don’t come with clear indications of which wire is positive and which is negative. So, how do you determine which wire is which?
In this article, we will delve into the world of phone chargers and unravel the mystery of identifying the positive and negative wires. We’ll explore different methods you can use to determine the polarity of your phone charger and ensure that you connect it correctly every time. So, whether you’re a seasoned tech enthusiast or just starting to navigate the world of mobile charging, read on to discover the secrets of identifying the positive and negative wires on a phone charger.
Inside This Article
- Understanding the Importance of Identifying Positive and Negative Wires
- How to Identify the Positive Wire on a Phone Charger
- How to Identify the Negative Wire on a Phone Charger
- Safety Precautions When Identifying Positive and Negative Wires on a Phone Charger
- Conclusion
- FAQs
Understanding the Importance of Identifying Positive and Negative Wires
When it comes to phone chargers, understanding the importance of identifying positive and negative wires is crucial. The positive and negative wires carry electrical current to power your device, and it is essential to connect them correctly for optimal charging and to prevent any potential damage.
Identifying the positive and negative wires is particularly important when dealing with aftermarket or DIY phone chargers. These chargers may not have clear markings or standardized color coding, making it necessary for you to determine which wire is positive and which is negative.
Connecting the positive wire to the negative terminal or vice versa can result in ineffective charging or, in worst-case scenarios, damage to your phone or charger due to a short circuit. Therefore, taking the time to properly identify the positive and negative wires is well worth the effort.
By understanding which wire is positive and negative, you can ensure proper functionality of your phone charger and protect your phone from potential damage. This knowledge will also come in handy if you need to repair or modify a charger in the future.
Now that we understand the importance, let’s dive into the process of identifying the positive wire on a phone charger in the next section.
How to Identify the Positive Wire on a Phone Charger
When it comes to identifying the positive wire on a phone charger, there are a few methods you can use. Here are some steps you can follow:
1. Look for markings: Many phone chargers have markings on the casing that indicate which wire is positive and which is negative. These markings may be in the form of a plus (+) symbol for positive and a minus (-) symbol for negative. Check the charger for any such indications, which will make your task much easier.
2. Examine the color coding: Another way to identify the positive wire is by examining the color coding. In many cases, the positive wire is red, while the negative wire is black. However, this is not always the case, as manufacturers may use different color schemes. Therefore, it’s essential to verify the color coding against the manufacturer’s specifications.
3. Check the connector: Take a close look at the connector of the charger. Some chargers have a small positive (+) sign embossed or marked on the side of the connector, indicating which wire is positive. This could be helpful in situations where the charger itself doesn’t have any other clear markings.
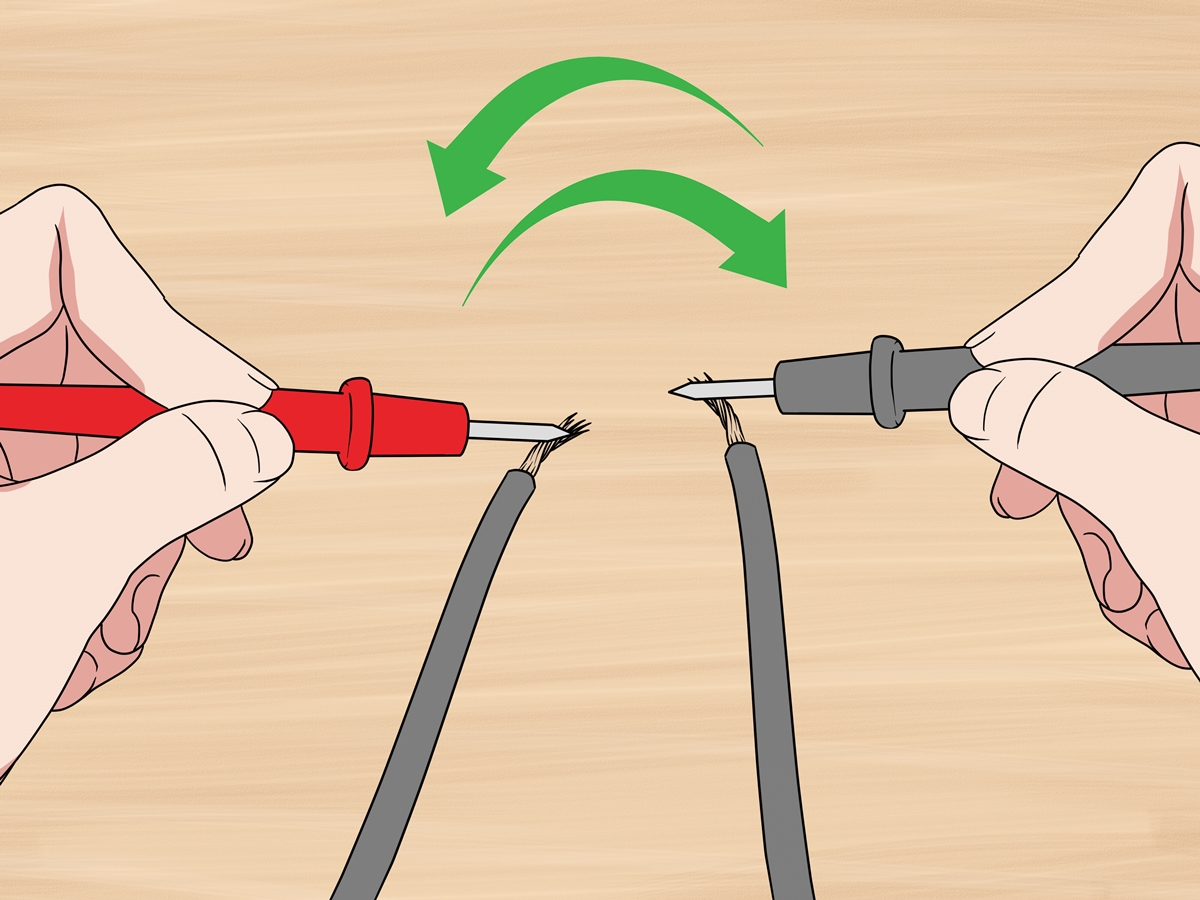
4. Use a multimeter: If you have a multimeter, you can use it to determine which wire is positive. Set the multimeter to measure direct current (DC) voltage and touch the black probe to the negative wire and the red probe to the other wire. If the multimeter displays a positive voltage reading, you have successfully identified the positive wire. If it shows a negative reading or no reading at all, you have identified the negative wire.
Remember, it’s always a good idea to consult the manufacturer’s documentation or user manual to confirm the identification of the positive wire, especially if you are unsure or dealing with a non-standard charger.
By following these steps and taking appropriate precautions, you will be able to identify the positive wire on a phone charger with confidence.
How to Identify the Negative Wire on a Phone Charger
Identifying the negative wire on a phone charger is just as important as finding the positive wire. The negative wire, also known as the ground wire, completes the circuit and ensures the safe flow of electricity. Here are a few steps to help you identify the negative wire on a phone charger:
1. Examine the charger cable: Start by inspecting the cable itself. Most phone chargers have a USB cable that consists of multiple wires bundled together. The negative wire is typically colored black or marked with a “-” sign.
2. Look for markings: Some chargers may have identifying markings on the USB connector or the charger itself. These markings often indicate the negative wire or ground connection. Look for symbols such as “-“, “GND,” or a down arrow, which are commonly used to denote the negative wire.
3. Check the wire insulation: If you cannot find any markings, carefully examine the insulation of each wire in the cable. The negative wire is typically surrounded by a black or dark-colored insulation. Be sure to use a magnifying glass if needed, as the markings or colors may be small and hard to see.
4. Use a multimeter: If you still can’t identify the negative wire visually, you can use a multimeter to test the connectivity of each wire in the charger cable. Set the multimeter to the continuity or resistance mode and touch one end of the multimeter probe to the metal part of the USB connector or the charger’s negative terminal and the other end to each wire in the cable. The wire that shows continuity or low resistance is the negative wire.
5. Seek professional help: If you are unsure or uncomfortable identifying the negative wire on your phone charger, it is always best to seek the assistance of a qualified professional. They have the knowledge and tools needed to accurately determine which wire is the negative wire.
It is crucial to identify the negative wire correctly to avoid any damage to your phone or potential electrical hazards. Always exercise caution and follow proper safety protocols when working with electrical equipment.
Safety Precautions When Identifying Positive and Negative Wires on a Phone Charger
When it comes to identifying the positive and negative wires on a phone charger, it’s essential to exercise caution and prioritize safety. Here are some important safety precautions to keep in mind:
- Ensure the charger is unplugged: Before attempting to identify the positive and negative wires, always make sure that the charger is completely unplugged from the power source. This will prevent any potential electrical shock or accidents.
- Use insulated gloves: To further protect yourself from any electrical hazards, it is advisable to wear insulated gloves while handling the wires. This will minimize the risk of electric shocks and burns.
- Work in a well-ventilated area: It’s important to have proper ventilation when working with phone chargers. This will help dissipate any heat generated during the process and reduce the risk of overheating or fire.
- Avoid using metallic tools: When dealing with the wires, refrain from using metallic tools, as they can conduct electricity and increase the risk of electrocution. Instead, opt for non-conductive tools such as plastic or rubber to handle the wires safely.
- Double-check the charger’s voltage: Before identifying the positive and negative wires, ensure that you are working with a charger that matches the voltage requirements of your phone. Using an incompatible charger can lead to damage or even pose a risk of explosion.
- Watch out for exposed wires: Inspect the charger cable for any signs of fraying or exposed wires. If you notice any damage, it’s important to discard the charger immediately and replace it with a new one. Using a damaged charger can be dangerous and increases the risk of electrical accidents.
- Consult a professional if unsure: If you are uncertain about identifying the positive and negative wires on a phone charger, it is best to seek assistance from a professional or someone with electrical expertise. They can guide you through the process safely and ensure that you do not compromise your safety or that of your device.
By following these safety precautions, you can minimize any risks associated with identifying the positive and negative wires on a phone charger. Remember, safety should always be the top priority when dealing with electrical components.
Conclusion
Understanding which wire is positive and negative on a phone charger is essential for proper usage and troubleshooting. By knowing the correct polarity, you can avoid potential damage to your device and ensure a safe charging experience.
Remember, the positive wire is typically indicated by a red color or a “+” symbol, while the negative wire is usually black or marked with a “-” symbol. It is crucial to double-check the markings and follow the manufacturer’s instructions to avoid any confusion or accidents.
Additionally, always use genuine and certified chargers that are compatible with your specific phone model. Using counterfeit or incorrect chargers can pose a risk of overheating, short-circuiting, or even damaging your device.
By taking the time to understand how phone charger wires work and following the guidelines mentioned in this article, you can ensure efficient charging and prolong the lifespan of your cell phone and its accessories.
FAQs
FAQ 1: How do I identify the positive and negative wires on a phone charger?
Identifying the positive and negative wires on a phone charger can be quite simple. The positive wire is usually marked with a “+” sign, and it is typically color-coded in red. On the other hand, the negative wire is marked with a “-” sign and is usually color-coded in black. However, it’s important to note that not all phone chargers follow the same color-coding scheme, so it’s best to consult the user manual or manufacturer’s specifications to be sure.
FAQ 2: Can I use any charger with my phone?
While most phones these days use a standard USB charging interface, it’s important to use a charger that is compatible with your phone’s specifications. Using an incompatible charger can potentially damage your phone or result in slower charging speeds. It’s recommended to use the charger that came with your phone or a charger that is officially certified by the phone manufacturer.
FAQ 3: Can I use a fast charger with my phone?
Using a fast charger with your phone largely depends on whether your phone supports fast charging technology. Most modern smartphones are compatible with fast chargers, but it’s always a good idea to check your phone’s user manual or manufacturer’s website to confirm. Using a fast charger on a phone that doesn’t support it may not provide any noticeable benefits and can potentially cause harm to the battery or internal components.
FAQ 4: Why does my phone charger get hot?
It is normal for a phone charger to get slightly warm during use. However, if your charger gets excessively hot, it may indicate a problem. Overheating can be caused by various factors such as using a low-quality charger, charging the phone in a high-temperature environment, or a faulty charger cable. If you experience excessive heat from your charger, it’s recommended to stop using it and replace it with a new one.
FAQ 5: Can I charge my phone overnight?
It is generally safe to charge your phone overnight, as most modern smartphones have built-in mechanisms to prevent overcharging. However, it’s important to note that continuously charging your phone for extended periods can lead to minor battery degradation over time. To optimize battery lifespan, it’s recommended to unplug your phone once it reaches a full charge or use features like “battery optimization” if available on your device.