
Introduction:
Are you experiencing issues with your phone charger and suspect that it may be faulty? Testing a phone charger with a multimeter is a simple yet effective way to determine whether it is functioning properly or not. A multimeter is a versatile tool that can measure voltage, current, and resistance, making it ideal for troubleshooting electronic devices like phone chargers.
In this article, we will guide you through the process of testing a phone charger using a multimeter. We will explain the steps you need to follow, highlight the key measurements to look out for, and offer some troubleshooting tips. So, let’s dig in and learn how to test a phone charger with a multimeter!
Inside This Article
- Overview of phone chargers and multimeters
- Step 1: Prepare the Multimeter
- Step 2: Set the multimeter to DC voltage mode
- Step 3: Test the output voltage of the charger
- Step 4: Test the USB port functionality (optional)
- Conclusion
- FAQs
Overview of phone chargers and multimeters
Phone chargers and multimeters are essential tools for anyone who wants to test and troubleshoot their phone charger’s performance. Understanding the basic functions of both devices is crucial for accurately assessing the voltage output and functionality of a phone charger. Let’s take a closer look at these tools and how they work together.
A phone charger is a device that provides electrical power to charge mobile phones and other electronic devices. It consists of two main components: a power adapter and a USB cable. The power adapter connects to a power source, such as a wall outlet, and converts the AC (Alternating Current) voltage into DC (Direct Current) voltage suitable for charging the phone. The USB cable connects the power adapter to the phone, transmitting the power from the adapter to the phone’s battery.
A multimeter, on the other hand, is a versatile testing tool that can measure various electrical parameters, including voltage, current, and resistance. It typically has multiple settings or modes, allowing the user to select the appropriate measurement function. In the context of testing a phone charger, we will focus on the voltage measurement mode.
By using a multimeter to measure the voltage output of a phone charger, you can determine whether the charger is providing the correct voltage to charge your phone effectively. This is important because insufficient or excessive voltage can affect the charging efficiency and potentially damage your phone’s battery.
Additionally, a multimeter can also be used to test the functionality of the USB port on the charger. This can help identify any issues with the USB port, such as loose connections or faulty wiring, which can prevent the charger from delivering power to the phone properly.
Having a clear understanding of both phone chargers and multimeters is crucial when it comes to testing a phone charger’s performance. In the next sections, we will dive into the step-by-step process of using a multimeter to test a phone charger’s voltage output and USB port functionality.
Step 1: Prepare the Multimeter
Before testing a phone charger with a multimeter, you need to ensure that the multimeter is properly prepared. This involves checking its battery, selecting the appropriate settings, and ensuring the probes are correctly connected to the multimeter.
Start by checking the battery of the multimeter. A low battery can affect the accuracy of the readings. Locate the battery compartment on the back or side of the multimeter, and check if the battery needs to be replaced or recharged. It’s important to have a fully charged or new battery to obtain accurate measurements.
Next, set the multimeter to the appropriate mode for testing DC voltage. DC (Direct Current) is the type of current used in phone chargers. To do this, turn the dial or switch on the multimeter to the “DCV” or “VDC” setting. Make sure to use the appropriate range, such as 20V or 50V, depending on the expected voltage output of the charger.
Now, you’ll need to connect the probes of the multimeter to the correct terminals. The red probe is the positive (+) probe, and the black probe is the negative (-) probe. Insert the red probe into the jack labeled “V?mA” or “V?A” for voltage measurements. Insert the black probe into the jack labeled “COM” (common) or the one marked with a negative symbol.
Once the probes are securely connected, ensure that the multimeter is functioning properly by conducting a quick self-test. Turn the dial to the “Ohm” (?) or ” Diode” (?) setting, and touch the tips of the probes together. The multimeter should display a small resistance reading or a value close to zero. This test verifies that the multimeter is operational and ready for use.
By properly preparing the multimeter, you can ensure accurate and reliable measurements when testing a phone charger. Taking the time to check the battery, select the correct settings, and connect the probes correctly will help you obtain precise results throughout the testing process.
Step 2: Set the multimeter to DC voltage mode
After preparing your multimeter according to Step 1, the next step is to set it to DC voltage mode. This is important because phone chargers typically provide direct current (DC) power to charge your devices. Follow the instructions below to set your multimeter to the appropriate mode:
- Locate the dial or button on your multimeter that controls the measurement mode.
- Turn the dial or press the button until you reach the DC voltage (VDC) mode.
- Some multimeters have multiple voltage ranges, such as 20V and 200V. For phone chargers, it is recommended to start with the highest available voltage range, such as 200V, to avoid exceeding the maximum range.
- Verify that the multimeter display shows the selected DC voltage mode. It may display “VDC” or “DCV” to indicate the mode is set correctly.
Setting the multimeter to the correct DC voltage mode ensures that you can accurately measure the output voltage of your phone charger. This is essential for troubleshooting any charging issues or determining compatibility with your device. Remember to handle the multimeter with care and follow the manufacturer’s instructions for proper usage.
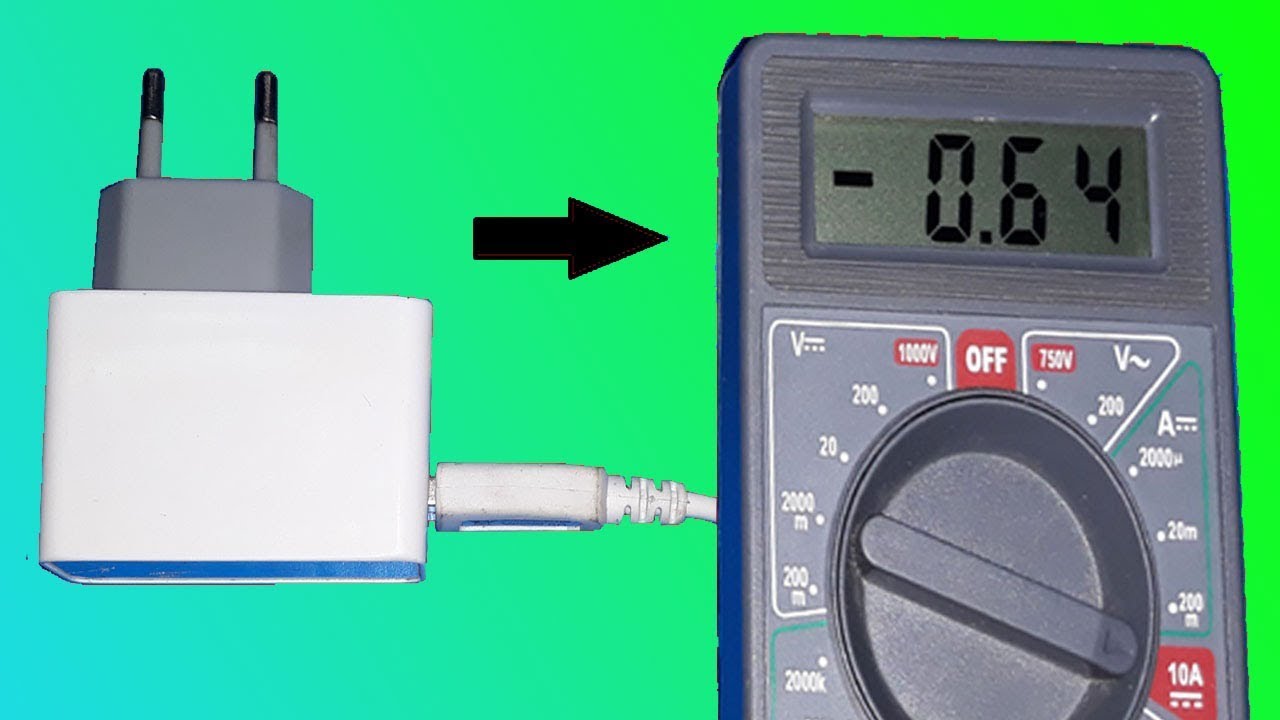
Step 3: Test the output voltage of the charger
Now that you have prepared your multimeter and set it to DC voltage mode, it’s time to test the output voltage of the charger. This step will determine whether the charger is delivering the correct amount of power to your device.
Here’s how you can do it:
- Connect the charger to a power source: Plug the charger into an electrical outlet or a USB port to provide power.
- Connect the multimeter probes: Take the red probe of the multimeter and connect it to the positive (+) terminal of the charger. Then, take the black probe and connect it to the negative (-) terminal of the charger.
- Read the voltage: Once the probes are securely connected, turn on the multimeter and observe the reading on the display. You should see the voltage measurement in volts (V).
Typically, chargers for smartphones and other electronic devices provide a standard output voltage of 5 volts (V). However, some chargers may have different output voltage ratings, so it’s crucial to confirm the voltage specific to your charger.
If the multimeter displays a voltage within the acceptable range, then your charger is functioning properly. However, if the voltage reading is significantly higher or lower than the expected output, it may indicate a faulty charger that could potentially damage your device.
Keep in mind that different chargers may have varying voltage levels based on their intended usage. For instance, fast chargers or chargers designed for specific devices may have higher voltage ratings. Always consult the manufacturer’s specifications or the user manual for accurate information about your charger’s voltage output.
As a general rule, it’s recommended to use the original charger provided by the device manufacturer or a reputable third-party charger that meets the necessary safety standards. Using an incompatible charger can not only affect the charging speed but also pose a risk of damaging your device or reducing its battery lifespan.
By testing the output voltage of your charger, you can ensure that it is delivering the appropriate power to your device, allowing for efficient and safe charging.
Step 4: Test the USB port functionality (optional)
In addition to testing the output voltage of the charger, you may also want to check the functionality of the USB port. This step is optional but can be useful in determining if the port is working properly and capable of transferring data.
To test the USB port functionality, follow these steps:
- Connect the USB cable: Plug one end of the USB cable into the charger’s USB port and the other end into a computer or other compatible device.
- Check for device recognition: Once the cable is connected, check if the computer or device recognizes the connected device. Look for any prompts or notifications indicating a successful connection.
If the device is recognized and you are able to access its files or perform other tasks, it means that the USB port is functioning properly. However, if the device is not recognized or you encounter any issues while trying to access it, there may be a problem with the USB port.
In such cases, you can try the following troubleshooting steps:
- Check the USB cable: Ensure that the USB cable you are using is in good condition and not damaged. Sometimes, a faulty cable can prevent proper data transfer.
- Try a different USB port: If the device is not recognized when connected to one USB port, try connecting it to another port on the computer. This can help identify if the issue lies with the port itself or the device.
- Restart the device: Sometimes, a simple restart of the device can resolve temporary software glitches or conflicts that may be causing the issue.
If none of the above steps work and you are still unable to establish a successful connection, it may be best to consult a professional or contact the manufacturer for further assistance.
Remember, testing the USB port functionality is an optional step and may not be necessary if your main concern is only testing the charger’s voltage. However, if you frequently rely on the USB port for data transfer or charging other devices, it is worth ensuring its proper functionality.
In conclusion, learning how to test a phone charger with a multimeter is an essential skill for anyone who wants to ensure the safety and functionality of their mobile accessories. By using a multimeter, you can accurately measure voltage, current, and resistance to determine if your charger is working properly. Remember to follow the necessary safety precautions and consult the user manual for your specific multimeter model. By taking the time to test your phone charger, you can avoid potential hazards, such as overheating or damaging your device. So, don’t hesitate to put your multimeter to use and ensure the reliability of your phone charger for a seamless and worry-free charging experience.
FAQs
Q: How do I test a phone charger with a multimeter?
To test your phone charger using a multimeter, follow these steps:
- Set your multimeter to the DC voltage mode.
- Insert the charger plug into a power outlet.
- Connect the positive probe of your multimeter to the inner part of the charger’s USB port.
- Connect the negative probe of your multimeter to the outer part of the charger’s USB port.
- Read the voltage displayed on your multimeter. It should match the voltage specifications of your charger.
Q: What voltage should a phone charger have?
Most phone chargers have a voltage output of 5 volts. This is the standard voltage for charging mobile devices like smartphones and tablets. However, there are some chargers that may have different voltage specifications, such as 9 volts or 12 volts, for fast charging capabilities. It’s important to check the voltage rating of your charger and ensure it matches the requirements of your device.
Q: What can go wrong with a phone charger?
There are several issues that can occur with a phone charger, including:
- Frayed or damaged cables that can cause a short circuit or result in a poor charging connection.
- Loose or broken connector pins that can prevent proper contact with the charging port.
- Internal wiring issues or damaged components that can result in a complete charging failure.
- Overheating or excessive heat generation, which can be dangerous and cause damage to the charger or the device being charged.
- Compatibility issues, where the charger may not be suitable for the device you are trying to charge.
Q: Can a faulty phone charger damage my phone?
Yes, a faulty phone charger can potentially damage your phone. Using a charger with frayed cables, loose connector pins, or internal wiring issues can cause short circuits, resulting in damage to both the charger and your device. Additionally, using a charger with a voltage output that exceeds your device’s specifications can lead to overcharging, overheating, and potentially damaging the battery or other internal components of your phone.
Q: Is it safe to use a third-party phone charger?
Using a third-party phone charger can be safe as long as it is a reputable brand and has been certified by relevant safety organizations, such as UL (Underwriters Laboratories). However, it is important to ensure that the charger is compatible with your device and meets the required voltage and current specifications. Poorly made or counterfeit chargers can pose safety risks, such as overheating, short circuits, or electrical shocks. It is recommended to purchase chargers from trusted sources to ensure your safety and the longevity of your device.