
Are you tired of waiting in long lines at the transit station just to refill your transit card? Well, the latest update of iOS 16 has introduced a convenient feature that allows iPhone users to refill their transit cards directly from Apple Maps. This new functionality not only saves you time but also ensures a seamless travel experience without any disruptions. In this article, we will guide you through the step-by-step process of refilling your transit card using Apple Maps on your iPhone. Whether you are a frequent commuter or an occasional traveler, this feature will simplify your journey and make your life more convenient. So, let’s dive in and explore how to refill your transit card from Maps on your iPhone running iOS 16.
Inside This Article
- Step 1: Check Compatibility- Ensuring that your iPhone is running iOS 16- Checking if your transit card is supported for refill through Maps
- Step 2: Add Transit Card to Apple Wallet
- Step 3: Open Maps App – Launching the Maps app on your iPhone – Making sure you are connected to the internet for real-time transit information
- Step 4: Refill Your Transit Card – Finding the transit option in Maps – Selecting your transit card and tapping on the “Refill” button – Following the on-screen instructions to complete the refill process
- Troubleshooting Tips – Common issues and how to resolve them while refilling transit card – Troubleshooting steps for specific error messages
- Conclusion
- FAQs
Step 1: Check Compatibility- Ensuring that your iPhone is running iOS 16- Checking if your transit card is supported for refill through Maps
Before you can start refilling your transit card from Maps on your iPhone, it’s important to check the compatibility of your device. Make sure that your iPhone is running on iOS 16 or a newer version. To do this, follow these steps:
- Open the Settings app on your iPhone.
- Scroll down and tap on “General”.
- Select “About” from the list.
- Look for the “Software Version” or “iOS Version” section.
- If the version number displayed is iOS 16 or higher, you’re good to go. If not, you’ll need to update your iPhone’s software before proceeding.
Additionally, not all transit cards are supported for refill through Maps. Some transit systems or cards may not have integrated this feature yet. To check if your transit card is supported, follow these steps:
- Open the Maps app on your iPhone.
- Search for your city or transit system.
- If your transit system appears on the search results, tap on it.
- Check if the option to refill your transit card is available within the app.
- If the option is not available, it means that your transit card is not currently supported for refill through Maps.
By ensuring that your iPhone is running iOS 16 or newer and checking if your transit card is supported for refill through Maps, you can determine if you can proceed with refilling your transit card using this convenient feature.
Step 2: Add Transit Card to Apple Wallet
Once you have opened the Maps app on your iPhone and located the transit card section, the next step is to add your transit card to Apple Wallet if it is not already added. This will allow you to easily access and refill your card directly from your iPhone.
To begin, you will need to open the Wallet app on your iPhone. The Wallet app serves as a digital wallet where you can store various cards, such as credit cards, debit cards, and transit cards. It is a convenient and secure way to manage your payment options on your device.
If you have previously added your transit card to Apple Wallet, you can skip this step and proceed to Step 3. However, if your transit card is not already added, follow these simple instructions to add it:
- First, locate the Wallet app on your iPhone. It typically appears as a white icon with a blue background and the image of a wallet.
- Tap on the Wallet app to open it. Once you are in the app, you will see a “+” (plus) sign at the top right corner of the screen. Tap on the “+” sign to add a new card.
- A list of available card types will appear. Scroll down or search for the option that corresponds to your transit card. For example, if you have a transit card from a specific transportation agency, look for the option related to that agency.
- Once you have found the relevant card type, tap on it. You may be prompted to enter additional information, such as your card number or account details. Follow the on-screen instructions and enter the required information accurately.
- After entering the necessary details, tap on the “Add” button. This will add your transit card to Apple Wallet.
Congratulations! You have successfully added your transit card to Apple Wallet. This will make it easier for you to manage and refill your card directly from your iPhone.
Now that you have added your transit card to Apple Wallet, you can proceed to Step 3 to learn how to select the refill option and complete the process of refilling your transit card from Maps on your iPhone.
Step 3: Open Maps App – Launching the Maps app on your iPhone – Making sure you are connected to the internet for real-time transit information
Opening the Maps app on your iPhone is the crucial first step to refill your transit card. By following this step, you will gain access to the features and functionality provided by the app, allowing you to conveniently manage your transit card refill.
To launch the Maps app on your iPhone, locate the Maps icon on your home screen. It resembles a compass with a blue background. Tap on the icon to open the app.
Before proceeding further, it is important to ensure that your iPhone is connected to the internet. This is necessary to enable real-time transit information within the Maps app. Whether you’re using Wi-Fi or cellular data, make sure you have a stable and active internet connection to ensure a seamless transit card refill process.
Having a reliable internet connection ensures that you have access to the latest transit schedules, route information, and other relevant details necessary for completing the refill transaction. It also allows the app to accurately present the available refill options and guide you through the payment process.
Once you have verified that you are connected to the internet, you are ready to proceed to the next step in the process, which involves locating the transit card section within the Maps app.
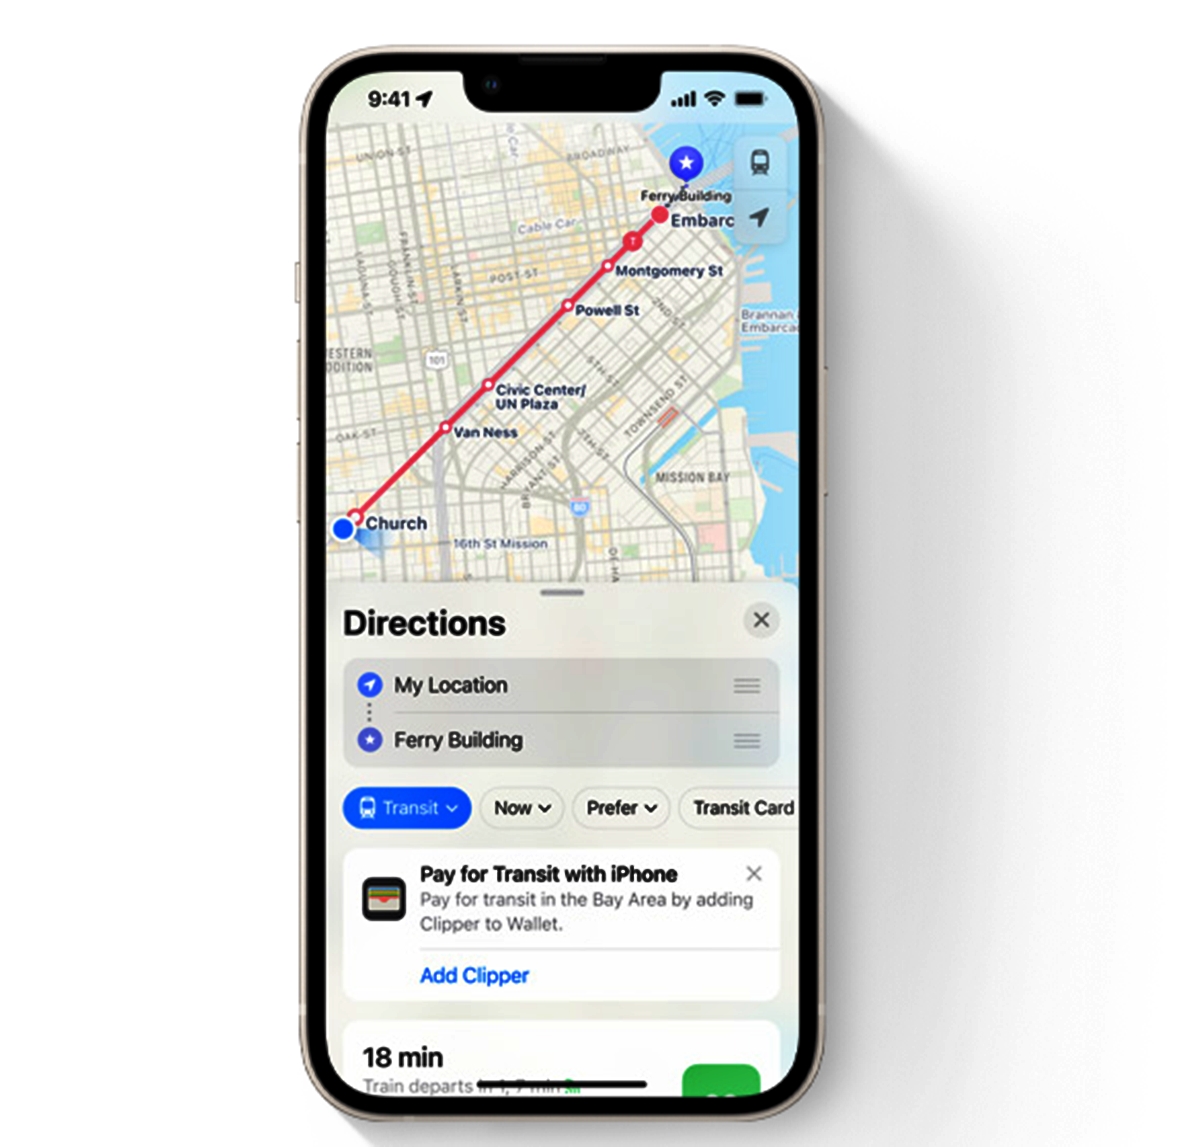
Step 4: Refill Your Transit Card – Finding the transit option in Maps – Selecting your transit card and tapping on the “Refill” button – Following the on-screen instructions to complete the refill process
Once you have opened the Maps app on your iPhone and accessed the transit section, it’s time to refill your transit card. This step is crucial, as it ensures you have enough funds to conveniently use public transportation. Here’s a step-by-step guide to help you with the process:
1. To begin, you need to find the transit option within the Maps app. Look for the transit icon, usually represented by a bus or train symbol. Once you locate it, tap on it to access the transit feature.
2. Within the transit section, navigate to find your specific transit card. This could be identified by a card name or a card number. Once you’ve found it, you should see an option to refill your card. Tap on the “Refill” button to proceed with the process.
3. After tapping on the “Refill” button, you will be guided through the refill process. Follow the on-screen instructions carefully, as they may vary depending on your location, transit provider, and available payment methods. Make sure to read any terms, conditions, or important information presented to ensure a successful refill.
4. One of the essential steps during the refill process is choosing the desired amount to add to your transit card. The available options may include preset amounts or a custom refill amount. Select the appropriate option that suits your needs and budget.
5. Once you have chosen the refill amount, you will be prompted to complete the payment process. This usually involves providing payment details, such as credit card information or using a digital wallet like Apple Pay. Follow the instructions carefully to ensure a secure transaction.
6. After completing the payment process, you will be asked to confirm the refill transaction. Review the transaction details, including the refill amount and any associated fees, before confirming your decision. Double-check for any errors or discrepancies to avoid any issues with your refill.
7. Congratulations! You have successfully refilled your transit card. You should now have the necessary funds to enjoy hassle-free travel on public transportation. Make sure to keep track of your remaining balance and refill your card as needed to ensure uninterrupted use of transit services.
That concludes the step-by-step guide to refill your transit card from Maps on iPhone. Follow these instructions carefully, and you’ll be able to conveniently add funds to your transit card and continue using public transportation with ease.
Troubleshooting Tips – Common issues and how to resolve them while refilling transit card – Troubleshooting steps for specific error messages
While refilling your transit card from Maps on your iPhone (iOS 16), you may encounter certain issues that can hinder the process. In this section, we will discuss some common problems and provide troubleshooting steps to help you resolve them.
1. Poor internet connection: One of the most common issues while refilling your transit card is a poor internet connection. This can cause the transaction to fail or get stuck. Make sure you have a stable internet connection before attempting to refill your card. If you’re facing connectivity issues, try switching to a different network or connecting to a Wi-Fi hotspot.
2. Invalid card information: Another common issue is entering incorrect or invalid card information. Double-check the card details you entered, including the card number, expiration date, and CVV code. Ensure that all information is accurate and up to date. If the issue persists, try using a different payment method or contact your card issuer for assistance.
3. Insufficient funds: If you receive an error message stating that you have insufficient funds to refill your transit card, you will need to add more funds to your account. Check your card balance or linked bank account to ensure that you have enough funds available. If necessary, transfer funds or top up your account before attempting to refill your transit card again.
4. App or system update required: Sometimes, certain errors may occur due to outdated app or system software. Ensure that you are using the latest version of both the Maps app and your iPhone’s operating system. If an update is available, install it and try refilling your transit card again.
5. Error message: “Transaction Failed”
- Step 1: Verify your internet connection and ensure it is stable.
- Step 2: Refresh the Maps app by closing it completely and reopening it.
- Step 3: Check if the payment method you used is valid and has sufficient funds.
- Step 4: Try refilling your transit card again after a few minutes.
- Step 5: If the issue persists, contact the customer support of your transit card provider for further assistance.
6. Error message: “Payment Declined”
- Step 1: Verify that your card details are entered correctly, including the card number, expiration date, and CVV code.
- Step 2: Check if your card has enough available credit or funds to complete the transaction.
- Step 3: Contact your card issuer to ensure there are no restrictions or issues with your payment method.
- Step 4: Try using a different payment method if available, or consider contacting your transit card provider for alternative payment options.
Remember, if you encounter any other specific error messages or issues while refilling your transit card from Maps on your iPhone, refer to the troubleshooting steps provided by your transit card provider or reach out to their customer support for assistance. By following these troubleshooting tips, you can resolve common issues and successfully refill your transit card from Maps on your iPhone (iOS 16).
Disclaimer: The information provided in this article is for educational purposes only. Please refer to your transit card provider’s official documentation or contact their customer support for the most accurate and up-to-date troubleshooting steps.
Conclusion
In conclusion, the ability to refill your transit card directly from Maps on your iPhone (iOS 16) is a game-changer for commuters and travelers alike. With just a few taps, you can seamlessly top up your card and enjoy a hassle-free journey on public transportation.
This convenient feature not only saves you time and effort but also ensures that you always have enough balance on your card to navigate the city with ease. No more searching for a physical top-up location or dealing with long queues – it’s all accessible from the palm of your hand.
Whether you’re a daily commuter or an occasional traveler, take advantage of the refill option in Maps on your iPhone (iOS 16). Say goodbye to the inconvenience of running out of balance and hello to a smoother and more efficient transit experience.
So next time you’re planning your journey, don’t forget to check out the refill feature on Maps – your reliable companion for navigating the urban landscape.
FAQs
1. Can I refill my transit card directly from Maps on my iPhone?
Yes, with the new iOS 16 update, Apple has introduced the feature that allows users to refill their transit cards directly from the Maps app on their iPhone. This convenient feature eliminates the need to visit a physical kiosk or use a separate app to add funds to your transit card. Simply follow the steps outlined in the article to easily refill your transit card from Maps.
2. Are there any additional charges or fees for refilling my transit card from Maps?
No, refilling your transit card from Maps does not incur any additional charges or fees. You will only be charged the regular amount required to add funds to your transit card. However, please note that the availability of this feature may vary depending on your location and the transit system you are using. Some transit systems may have their own fees or fare structures, so it is always a good idea to check with your local transit authority for specific information.
3. What types of transit cards can be refilled from Maps on iPhone?
The feature to refill transit cards from Maps on iPhone is compatible with a wide range of transit systems and cards. Whether you use a contactless payment card, a virtual transit card stored in an app, or a physical transit card, you should be able to refill it directly from Maps. However, it is important to note that the availability of this feature may vary depending on your location and the specific transit system you are using. It is always a good idea to check with your local transit authority or the Maps app for a list of supported cards and systems.
4. Can I set up automatic refills for my transit card in Maps?
Currently, the feature to set up automatic refills for transit cards directly in Maps is not available. However, Apple continuously updates its software, so it is possible that this functionality may be introduced in future updates. In the meantime, you can manually refill your transit card from Maps whenever you need to add funds.
5. Is it safe to refill my transit card from Maps on iPhone?
Yes, it is safe to refill your transit card from Maps on your iPhone. Apple prioritizes the security and privacy of its users, and the transaction process for refilling your transit card is encrypted and secure. However, as with any financial transactions, it is always important to ensure that you are using a secure and trusted internet connection. Avoid using public or unsecured Wi-Fi networks when refilling your transit card to protect your personal and financial information.