
Apple Maps is a powerful navigation tool that has become an integral part of our daily lives. With each new update, Apple continues to make improvements to enhance the user experience. The latest update, iOS 16, introduces a much-awaited feature: the ability to add multiple stops to your Apple Maps route.
Gone are the days of manually inputting each stop on your journey. Now, with just a few taps, you can seamlessly plan your trip with multiple destinations. Whether you’re embarking on a road trip or running errands around town, this feature will save you time and effort.
In this article, we will guide you through the process of adding multiple stops to your Apple Maps route on iOS 16. Let’s dive in and explore this fantastic new addition to Apple Maps!
Inside This Article
- Overview
- Step 1: Open Apple Maps
- Step 2: Start a Route
- Step 3: Add Multiple Stops
- Step 4: Customize the Route
- Step 5: Get Directions and Start Navigation
- Conclusion
- FAQs
Overview
Apple Maps is a powerful navigation app that comes pre-installed on iPhones running iOS 16 or later. It provides turn-by-turn directions, real-time traffic updates, and a variety of other features to help users navigate from point A to point B. One handy feature that Apple Maps offers is the ability to add multiple stops to your route, making it easy to plan trips with multiple destinations in mind.
Whether you’re going on a road trip with friends or running errands around town, adding multiple stops to your Apple Maps route can save you time and effort. Instead of manually inputting each destination one by one, you can plan your entire journey in advance and let Apple Maps guide you along the way.
In this article, we’ll walk you through the steps to add multiple stops to your Apple Maps route in iOS 16. So, grab your iOS device, open Apple Maps, and let’s get started!
Step 1: Open Apple Maps
Adding multiple stops to your Apple Maps route in iOS 16 is a convenient way to plan your journey with multiple destinations. Whether you’re going on a road trip or running errands, this feature allows you to create a comprehensive route that includes all your desired stops along the way.
To get started, open the Apple Maps app on your iOS 16 device. You can find the app on your home screen or by swiping down on the home screen and using the search bar to look for “Maps”. Tap on the Maps icon to launch the app.
Once the app is open, you’ll see the familiar map interface, with your current location displayed as a blue dot. You can use pinch gestures to zoom in or out on the map and swipe with your finger to navigate to different areas.
If you have set a default transportation mode in your settings, such as driving or walking, Apple Maps will suggest a route based on that. However, if you want to change the mode of transportation, you can do so by tapping on the button with the car, walking, or transit icon at the top right corner of the screen.
Now that you have Apple Maps open on your iOS 16 device, you’re ready to start planning your route with multiple stops. In the next step, we’ll guide you through the process of adding those stops to your route.
Step 2: Start a Route
Once you have opened the Apple Maps app on your iOS 16 device, the next step is to start a route. Starting a route will allow you to add multiple stops and customize your journey according to your preferences. Here’s how you can do it:
1. Tap on the “Search” bar at the top of the screen to enter your desired destination. You can either type in the address, the name of a place, or even use keywords to search for a specific location.
2. Apple Maps will provide you with several suggestions based on your search query. Select the destination you want to add as the starting point of your route.
3. Once you have selected the starting point, Apple Maps will display the route details, including the estimated travel time and distance. You can also view alternative routes by swiping left on the route information card.
4. If you’re satisfied with the selected starting point and route, tap on the “Go” button located at the bottom right corner of the screen. This will initiate the navigation process and provide you with turn-by-turn directions to your destination.
5. At this point, you have successfully started a route in Apple Maps. You can now proceed to the next step to add multiple stops along the way.
It’s important to note that starting a route is essential before you can add multiple stops. Without a designated starting point, Apple Maps won’t be able to calculate the most efficient route or provide accurate directions.
Now that you know how to start a route in Apple Maps, let’s move on to the next step – adding multiple stops!
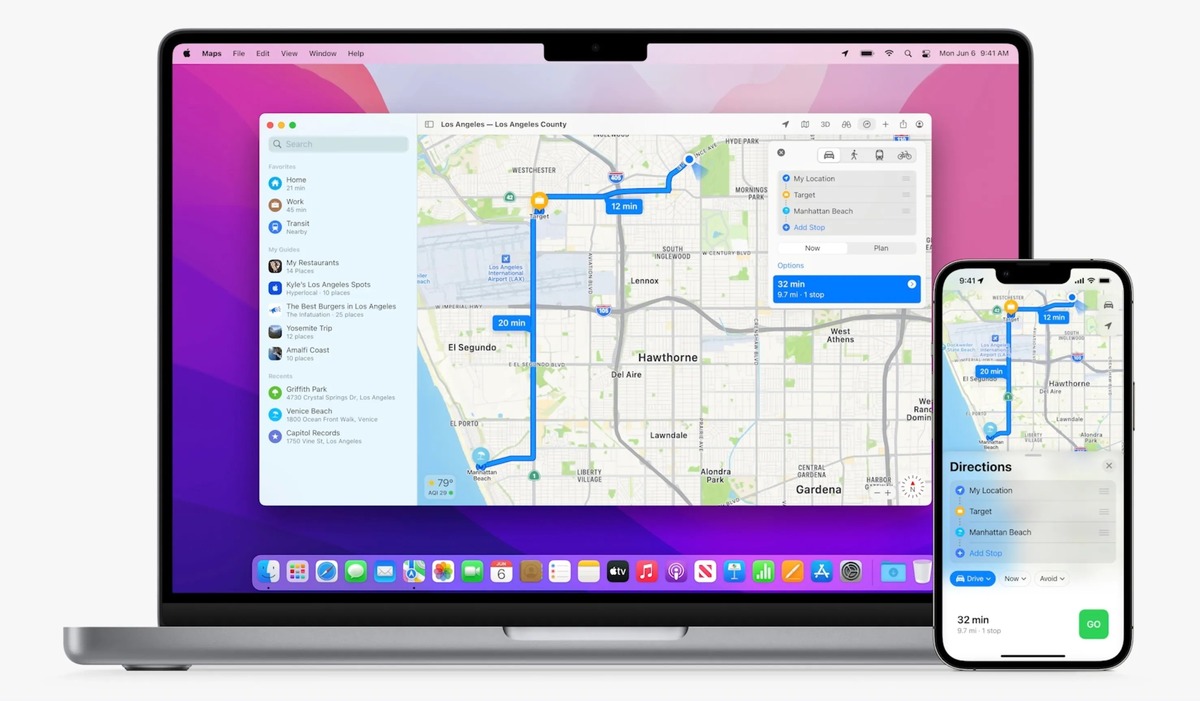
Step 3: Add Multiple Stops
Adding multiple stops to your Apple Maps route in iOS 16 is a convenient feature that allows you to plan a trip with multiple destinations. Whether you are going on a road trip, running errands, or simply exploring the city, this feature will help you optimize your route and save time.
To add multiple stops to your Apple Maps route, follow these simple steps:
1. Open Apple Maps: Launch the Apple Maps app on your iOS 16 device. You can find the app icon on your home screen or by using the search function.
2. Start a Route: Enter your starting point by typing it into the search bar or by using the “Current Location” option. Once you see the route suggestions, select the one that matches your starting point.
3. Add Stops: After setting your starting point, tap on the “+” icon located at the top-right corner of the screen. This will open the “Search for a place” field. Enter the address or name of the first destination you want to add as a stop. Apple Maps will provide suggestions as you type, making it easier to find the correct location.
4. Repeat the Process: Once you have added the first stop, you can continue adding more stops by tapping on the “+” icon again and entering the addresses or names of the additional destinations. You can add as many stops as you need, up to a certain limit.
5. Rearrange the Order: If you need to change the order of the stops, simply tap and hold on a stop, then drag it up or down to the desired position in the list. This way, you can prioritize your stops based on your preferences or the most efficient route.
6. Remove a Stop: If you want to remove a stop from your route, swipe left on the stop you wish to delete, and a red “Remove” button will appear. Tap on it to remove the stop from your itinerary.
By adding multiple stops to your Apple Maps route, you can easily plan out your journey and avoid the hassle of manually entering each destination. This feature is particularly useful for road trips, sightseeing, or running multiple errands in one go.
Note: The availability of the “Add Multiple Stops” feature may vary depending on your iOS version. Make sure you have the latest version installed for the best experience.
Step 4: Customize the Route
After you have added all the necessary stops to your Apple Maps route, you can further customize the route to suit your preferences and needs. Here are some options to consider:
1. Drag and Drop: If you want to change the order of your stops, simply tap and hold the three horizontal lines next to the stop you want to move and then drag it to the desired position.
2. Remove a Stop: If you need to remove a stop from your route, swipe left on the stop and tap the “Delete” button that appears. This will remove the stop from the route, but it won’t delete it from your list of saved addresses.
3. Add a New Stop: If you realize you need to make an additional stop along the way, tap the “+” button in the top-right corner of the screen. This will allow you to search for a new location and add it as a stop on your route.
4. Avoid Tolls or Highways: If you prefer to avoid toll roads or highways during your journey, you can customize your route accordingly. Tap on the “Settings” button in the top-left corner of the screen, then scroll down and tap on “Driving & Navigation.” From there, you can toggle the options to avoid tolls or highways.
5. Choose a Different Transportation Mode: By default, Apple Maps selects the driving mode for navigation. However, if you prefer to walk, take public transportation, or bike, you can customize the transportation mode. Tap the “Settings” button in the top-left corner, then scroll down and tap on “Driving & Navigation” and change the transportation mode as per your preference.
6. Check for Traffic and Alternate Routes: To ensure a smooth and efficient journey, you can check for traffic conditions and alternative routes. Tap on the “Settings” button in the top-left corner, then scroll down and tap on “Driving & Navigation.” From there, you can toggle the options to show traffic and suggest alternate routes.
7. Save and Share the Customized Route: Once you have customized your route to your satisfaction, you can save it for future reference or share it with others. Tap the “Share” button at the top-right corner of the screen to send the route to your contacts or save it to third-party apps like Notes or Reminders.
Remember, these customization options can enhance your driving experience and make your journey more efficient. Take advantage of them to create a personalized route that suits your specific needs.
Step 5: Get Directions and Start Navigation
Once you have added multiple stops to your Apple Maps route in iOS 16 and customized the route according to your preferences, it’s time to get directions and start navigation. Follow these simple steps to get on your way:
1. After you have finished customizing your route, tap on the “Directions” button located at the bottom of the screen. This will display the turn-by-turn directions for your trip, including all the stops you have added.
2. Review the directions carefully to familiarize yourself with the route. Each step of the journey will be listed, detailing the distance, street names, and any turns or exits you need to take.
3. To start navigation, tap on the “Start” button that appears at the bottom of the directions screen. Apple Maps will then guide you through each step of the route, providing voice instructions and visual cues to ensure you stay on track.
4. As you navigate through your route, Apple Maps will automatically update the directions based on your real-time location. This ensures that you always have the most accurate and up-to-date information to reach each stop along the way.
5. During your journey, you can customize your navigation experience by adjusting settings such as voice volume, choosing between 2D or 3D view, or enabling voice prompts only for important maneuvers.
6. If you need to make changes to your route or add additional stops during navigation, simply tap on the “Search” icon or the “+” button on the top-right corner of the screen. This will allow you to search for new locations or add them to your existing route.
7. To end navigation, tap on the “End” button at the bottom-right corner of the screen, or simply close the Apple Maps app. This will bring you back to the map view, and you can continue to use Apple Maps for any other purposes.
8. Keep in mind that Apple Maps relies on a stable internet connection to provide real-time navigation. If you lose internet connectivity during your journey, it may affect the accuracy of the directions. It’s always a good idea to have a backup navigation option or to download offline maps in case of any unforeseen circumstances.
By following these steps, you can confidently use Apple Maps to navigate through multiple stops and reach your destinations with ease. Whether you’re planning a road trip, running errands, or exploring a new city, Apple Maps is a reliable tool to help you get where you need to go.
Conclusion
Adding multiple stops to your route in Apple Maps has become easier and more convenient with the release of iOS 16. This new feature allows you to plan your trips with multiple destinations, making it perfect for road trips, sightseeing, or running errands. By following a few simple steps, you can take full advantage of this functionality and optimize your travel experience.
Now, you no longer have to worry about manually entering each destination one by one or constantly switching between apps. With Apple Maps’ ability to handle multiple stops, you can efficiently plan your route and save valuable time on the road.
So, whether you’re exploring a new city or making a series of quick stops, remember to utilize this feature in Apple Maps for a seamless and hassle-free journey. Start navigating with ease and confidence as you take advantage of the multiple stops feature in iOS 16!
FAQs
1. Can I add multiple stops to a route in Apple Maps on iOS 16?
Yes, with the latest iOS 16 update, Apple has introduced the feature to add multiple stops to a route in Apple Maps. This is a convenient way to plan your journey and make necessary stops along the way.
2. How do I add multiple stops to a route in Apple Maps on iOS 16?
To add multiple stops to a route in Apple Maps on iOS 16, follow these steps:
- Open the Apple Maps app on your iOS 16 device.
- Enter your starting point and destination.
- Tap on the “More” button (represented by three dots) next to the destination.
- Select “Add Stop” and enter the desired location or search for it.
- Repeat the above step to add additional stops to your route.
- Tap “Done” to save the multiple stops.
3. How many stops can I add to a route in Apple Maps on iOS 16?
Apple Maps on iOS 16 allows you to add up to three stops along your route. This gives you the flexibility to plan your journey and include any necessary pit stops or points of interest.
4. Can I rearrange the order of the stops in Apple Maps on iOS 16?
Yes, you can easily rearrange the order of the stops in Apple Maps on iOS 16 by following these steps:
- Tap on the “More” button (represented by three dots) next to the destination.
- Select “Edit Stop Order.”
- Drag and drop the stops to reorder them according to your preference.
- Tap “Done” to save the new order of stops.
5. Can I remove a stop from a route in Apple Maps on iOS 16?
Yes, you can remove a stop from a route in Apple Maps on iOS 16 by following these steps:
- Tap on the “More” button (represented by three dots) next to the stop you want to remove.
- Select “Remove Stop.”
- The stop will be removed from your route.