
Are you looking for a convenient way to send photos as documents in WhatsApp? Look no further! In this article, we will guide you on how to send photos as documents using WhatsApp’s latest features in 2023. WhatsApp has been constantly evolving to offer users more options and flexibility when it comes to sharing files. Whether you want to send high-resolution images to preserve their quality or want to send multiple photos as a single document, we’ve got you covered. Follow our step-by-step instructions, and you’ll be able to send photos as documents effortlessly. So, let’s dive in and explore this exciting feature of WhatsApp!
Inside This Article
- Uploading Photos as Documents in WhatsApp
- Option 1: Using the Document Attachment Feature
- Option 2: Renaming the Photo File Extension
- Option 3: Compressing the Photo as a ZIP File
- Option 4: Using Cloud Storage Services
- Conclusion
- FAQs
Uploading Photos as Documents in WhatsApp
WhatsApp is a popular messaging app that allows users to send text messages, voice notes, and multimedia files, including photos. By default, WhatsApp compresses photos to reduce their size and maintain the quality. However, if you want to send a photo as a document without any compression, you have a few options to choose from.
Option 1: Using the Document Attachment Feature
If you want to send a photo as a document using WhatsApp’s built-in feature, follow these steps:
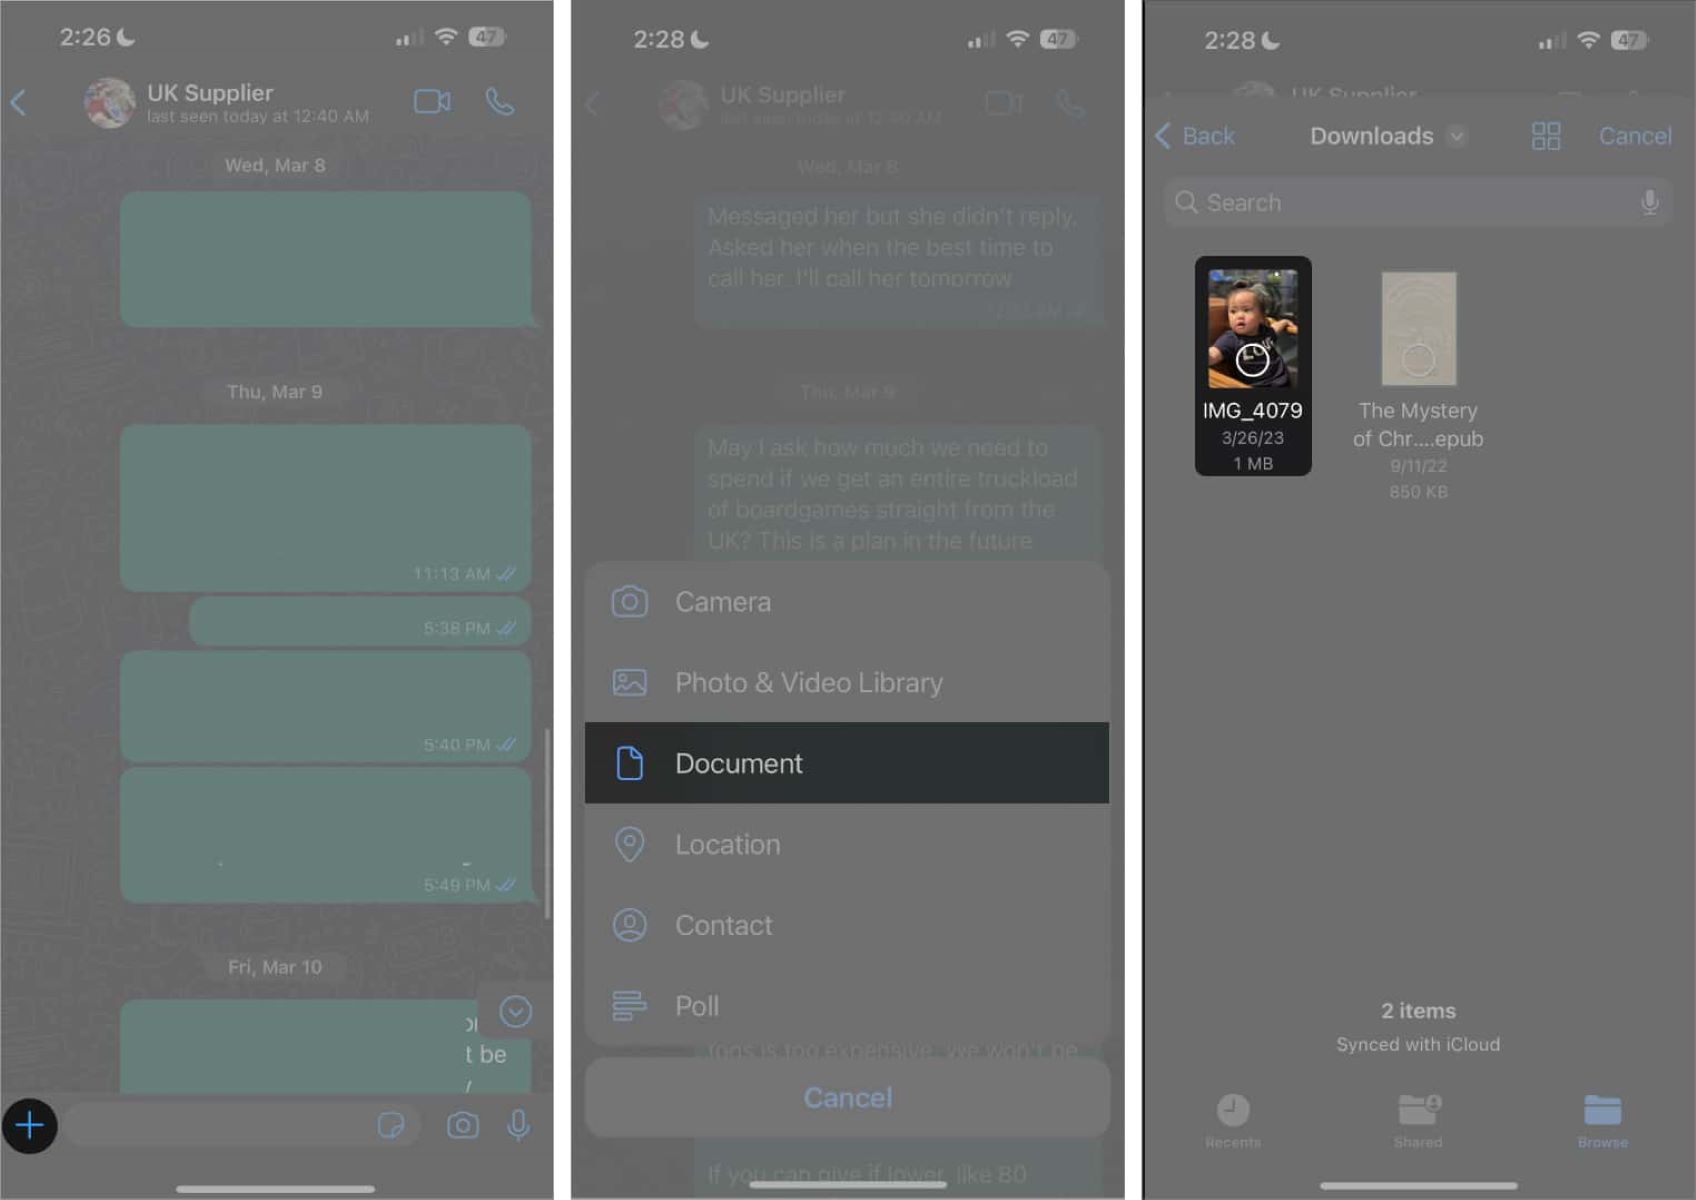
- Open the WhatsApp chat where you want to send the photo.
- Tap on the attachment icon, which is usually represented by a paperclip or a “+” sign.
- Select the document option from the menu that appears.
- Choose the photo you want to send from your device’s gallery or file manager.
- Send the photo as a document to the recipient by tapping the send button.
Option 2: Renaming the Photo File Extension
If you prefer to send the photo as a document by renaming the file extension, follow these steps:
- Locate the photo you want to send in your device’s gallery or file manager.
- Tap and hold on the photo file to display additional options.
- Select the “Rename” option from the menu.
- Edit the file name and change the file extension to “.doc” or “.pdf”.
- Attach the renamed photo file to your WhatsApp message and send it.
Option 3: Compressing the Photo as a ZIP File
If you want to send the photo as a document by compressing it into a ZIP file, follow these steps:
- Install a file compression app from your device’s app store. There are several free options available.
- Open the file compression app and locate the photo you want to send.
- Select the photo and choose the compression option provided by the app.
- Set the compression level according to your preferences and save the file as a ZIP archive.
- Attach the ZIP file to your WhatsApp message and send it to the recipient.
Option 4: Using Cloud Storage Services
If the photo you want to send is too large to be sent as a document, you can use cloud storage services like Google Drive or Dropbox. Follow these steps:
- Upload the photo you want to send to your preferred cloud storage service.
- Generate a shareable link for the uploaded photo.
- Copy the shareable link and paste it into your WhatsApp message.
- Send the message with the link to the recipient.
- The recipient can click on the link to download the photo from the cloud storage service.
These methods provide alternative ways to send photos as documents in WhatsApp, allowing you to bypass the compression process and maintain the original quality of the image. Choose the method that works best for you based on your preferences and the requirements of the photo you want to send.
Option 1: Using the Document Attachment Feature
Step 1: Open the WhatsApp chat where you want to send the photo.
Step 2: Tap on the attachment icon.
Step 3: Select the document option.
Step 4: Choose the photo you want to send from your device’s gallery.
Step 5: Send the photo as a document to the recipient.
This method allows you to send photos as documents in WhatsApp with just a few simple steps. By following these instructions, you can easily share photos without compromising their quality. Let’s dive in and explore how to use the document attachment feature in WhatsApp.
First, open the WhatsApp chat where you want to send the photo. It can be a one-on-one conversation or a group chat. Once you’re in the desired chat, look for the attachment icon. It is typically represented by a paperclip or a “+” symbol.
Next, tap on the attachment icon to open the options menu. Among the available options, select the document option. This will bring up the file selection screen, allowing you to choose a document to send.
In this case, you’ll be selecting the photo you want to send from your device’s gallery. Browse through your gallery and choose the desired photo. It’s important to note that the photo will be sent as a document, preserving its original quality and format.
Once you’ve selected the photo, tap on the “Send” button or icon to send it as a document to the recipient. The photo will now appear as a document attachment in the chat. The recipient can download and view the photo like any other document.
Using the document attachment feature in WhatsApp is a convenient way to share photos without compressing or altering their quality. It’s especially useful when you want to send high-resolution images or sensitive documents that need to be preserved in their original format.
Now that you know how to send photos as documents in WhatsApp, you can easily share your favorite memories, important documents, or any other visual content with your friends, family, and colleagues. Embrace the versatility of WhatsApp and enjoy seamless photo sharing with ease.
Option 2: Renaming the Photo File Extension
Step 1: Locate the photo you want to send in your device’s gallery.
Step 2: Tap and hold on the photo file to display additional options.
Step 3: Select the “Rename” option.
Step 4: Edit the file name and change the file extension to “.doc” or “.pdf”.
Step 5: Attach the renamed photo file to your WhatsApp message and send it.
If you want to send a photo as a document in WhatsApp, one option is to rename the photo file extension. This allows you to bypass the usual limitations on file types when sending attachments in WhatsApp. Here’s a step-by-step guide on how to do it:
Step 1: Start by locating the photo you want to send in your device’s gallery. This can typically be found within the Photos or Gallery app on your device.
Step 2: Once you’ve found the photo, tap and hold on the photo file. This will bring up additional options for that file.
Step 3: From the options menu, look for and select the “Rename” option. This will allow you to change the file name and extension.
Step 4: After selecting the rename option, you can now edit the file name. To send the photo as a document, change the file extension from its default image format (e.g., .jpeg, .png) to a document format like .doc or .pdf.
Step 5: Once you have edited the file name and changed the file extension, you can attach the renamed photo file to your WhatsApp message like you would with any other document. Tap on the attachment icon in the chat window, select the appropriate document option, and choose the renamed photo file. Finally, send the message to the intended recipient.
By following these steps, you can successfully send a photo as a document in WhatsApp by simply renaming the file extension. This method allows you to overcome any restrictions on file types and ensures that your recipient can view the photo as a document.
Option 3: Compressing the Photo as a ZIP File
Photos can often be large files, making it difficult to send them as documents through WhatsApp. However, a practical solution is to compress the photo into a ZIP file before sending it. Here’s how you can do it:
Step 1: Install a file compression app from your device’s app store. There are several apps available that can help you compress files on your device.
Step 2: Open the file compression app and locate the photo you want to send. The app will allow you to browse and select files from your device’s storage.
Step 3: Select the photo you want to send and choose the compression option within the app. This will initiate the compression process and reduce the file size of the photo.
Step 4: Set the compression level according to your preference. Some apps offer different levels of compression, allowing you to choose the balance between file size and image quality that suits your needs.
Step 5: Once you have chosen the compression level, save the file as a ZIP archive. The app will create a compressed version of the photo with a .zip file extension.
Step 6: Attach the ZIP file to your WhatsApp message as a document. When you open WhatsApp and choose the recipient, select the document attachment option and browse for the ZIP file you created.
Step 7: Send the ZIP file through WhatsApp. The recipient will receive it as a document and can easily download and extract the photo from the ZIP file on their device.
Compressing the photo as a ZIP file is a convenient method to send large images through WhatsApp. It allows you to reduce the file size without compromising the quality of the photo, making it easier and faster to share your images with friends and family.
Option 4: Using Cloud Storage Services
Step 1: Upload the photo you want to send to a cloud storage service like Google Drive or Dropbox. These services allow you to store and share files securely in the cloud.
Step 2: After uploading the photo, generate a shareable link. Both Google Drive and Dropbox provide an option to create a shareable link for any file you upload to their platforms.
Step 3: Copy the shareable link for the uploaded photo. This link acts as a direct pathway to the photo stored in the cloud storage service.
Step 4: Paste the shareable link into your WhatsApp message. When composing your message in WhatsApp, simply paste the shareable link into the text field. You can add a short description or explanation if necessary.
Step 5: Send the message with the link to the recipient. Once you have entered the message and attached the link, hit the send button to deliver the message to the intended recipient.
Step 6: The recipient can click on the link to download the photo from the cloud storage service. When the recipient opens the WhatsApp message, they will see the link you sent. By clicking on the link, they will be redirected to the cloud storage service where they can download the photo directly to their device.
Using cloud storage services to send photos as documents in WhatsApp provides a convenient and secure method of sharing large or high-resolution images. It eliminates the need for manually compressing files or converting them to different formats. With just a few simple steps, you can easily transfer photos using the power of cloud storage and instant messaging.
Conclusion
In conclusion, sending photos as documents in WhatsApp is a useful feature that allows users to share high-quality images in their original form. By converting photos into documents, you can avoid compression and loss of quality, ensuring that your recipients receive the best possible image. Whether you need to send professional photos, documents, or any other visual content, this feature provides a convenient and efficient way to do so.
With the step-by-step instructions provided in this article, you can easily learn how to send photos as documents in WhatsApp. So, the next time you want to share a high-resolution image with your friends, family, or colleagues, remember to utilize this feature to ensure superior image quality.
Enjoy seamless photo sharing with WhatsApp and make your conversations more visually engaging!
FAQs
Q: How do I send photos as documents in WhatsApp?
A: To send photos as documents in WhatsApp, you can follow these steps:
1. Open the conversation where you want to send the photo.
2. Click on the attachment icon (paperclip icon) on the chat interface.
3. Select “Document” from the options presented.
4. Navigate to the folder where the photo is located and select it.
5. Choose the “Send” option to share the photo as a document in WhatsApp.
By sending the photo as a document, you can preserve its original quality and file format.
Q: Why should I send photos as documents instead of images in WhatsApp?
A: Sending photos as documents in WhatsApp has its advantages. Firstly, it allows you to send photos in their original quality without any compression applied. Secondly, sending photos as documents preserves their file format, which is particularly useful if you want to share photos in formats such as RAW or TIFF. Additionally, sending photos as documents ensures that the recipient receives the image without any loss in quality caused by WhatsApp’s image compression algorithms.
Q: Are there any size limitations when sending photos as documents in WhatsApp?
A: When sending photos as documents in WhatsApp, the size limitation will depend on the file size limit set by WhatsApp itself. Currently, WhatsApp allows you to send files with a maximum size of 100MB. However, keep in mind that larger file sizes may take longer to upload and download, depending on your internet connection.
Q: Can I send multiple photos as documents in a single WhatsApp message?
A: Yes, you can send multiple photos as documents in a single WhatsApp message. To do this, follow the same steps as mentioned earlier for sending a photo as a document. Instead of selecting one photo, select multiple photos from your gallery or file explorer. WhatsApp will bundle them together as separate documents in a single message.
Q: Can the recipient of the photo as a document save it locally on their device in WhatsApp?
A: Yes, when the recipient receives a photo as a document in WhatsApp, they have the option to save it locally on their device. By tapping on the document, they can download it and then choose to save it in their preferred location, such as the device’s photo gallery or any other folder.