
In our fast-paced and digital-driven world, maintaining focus and managing distractions can be a constant challenge. Luckily, with the introduction of iOS 15, Apple has introduced a new feature called Focus Filters for iPhone. These filters provide users with the ability to customize their device settings to limit notifications and interruptions, allowing them to stay in the zone and be more productive. Whether you’re a student trying to study without distractions, a professional looking to focus on important work tasks, or simply trying to improve your digital well-being, setting up Focus Filters can be a game-changer. In this article, we will guide you through the process of setting up Focus Filters on your iPhone running iOS 15, enabling you to take control of your device and optimize your productivity in a world filled with constant distractions.
Inside This Article
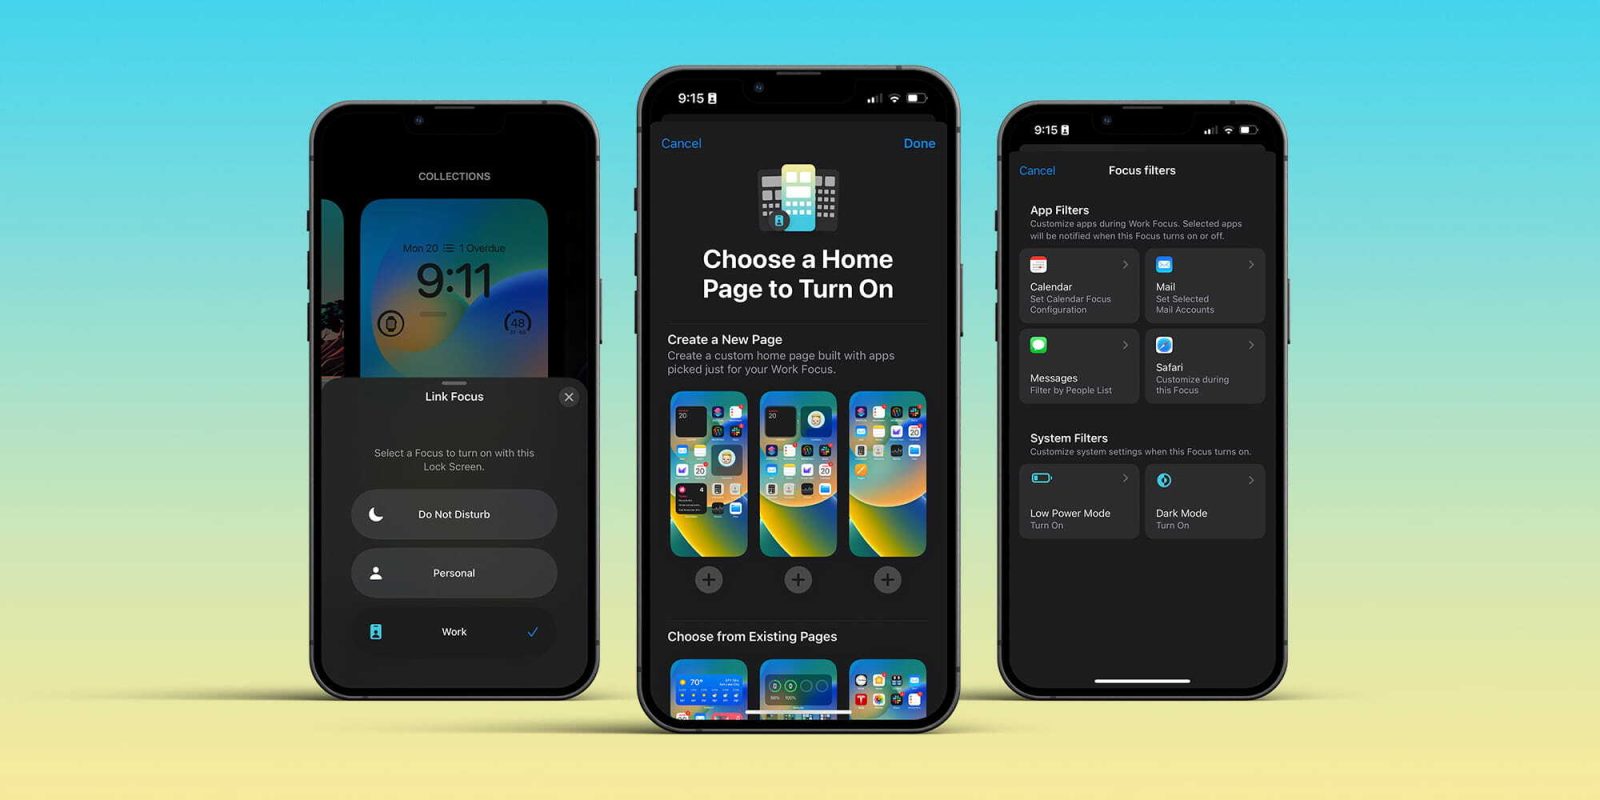
- Overview of iPhone Focus Filters
- Step 1: Accessing the Settings
- Step 2: Enabling Focus Filters
- Step 3: Creating Custom Focus Filters
- Conclusion
- FAQs
Overview of iPhone Focus Filters
Modern smartphones have become essential tools in our daily lives, serving as communication devices, entertainment hubs, and productivity aids. However, with the ever-increasing flow of notifications and distractions, it can be challenging to maintain focus and effectively manage our time. This is where iPhone Focus Filters come into play.
Focus Filters are a new feature introduced in iOS 15 that allow iPhone users to customize and control their notifications, allowing them to concentrate on what matters most without unnecessary interruptions. By setting up Focus Filters, users can tailor their notification experience to suit their specific needs and minimize distractions.
With Focus Filters, you have the flexibility to categorize and prioritize your notifications based on different contexts, such as work, personal time, or sleep. You can create custom filters that determine which apps and contacts can reach you during specific times or activities, ensuring that you receive important notifications while filtering out non-essential interruptions.
By leveraging Focus Filters, you can regain control over your digital life and promote a healthier and more balanced relationship with your iPhone. Whether you are looking to boost productivity during work hours, limit distractions during leisure time, or improve your sleep quality, iPhone Focus Filters offer a versatile solution to customize your notification experience.
Not only do Focus Filters allow you to manage your notifications, but they also provide a more seamless and uninterrupted user experience. When a Focus Filter is enabled, it not only silences notifications from filtered apps and contacts, but it also subtly adjusts the behavior of your iPhone’s Lock Screen, Home Screen, and even Siri suggestions to ensure a consistent and distraction-free interface.
Configuring and customizing Focus Filters is straightforward and can be done directly from your iPhone’s settings. By taking just a few minutes to set up your filters, you can enjoy a more focused and tailored notification experience that aligns with your priorities and lifestyle.
In the following sections, we will guide you through the process of accessing and configuring your iPhone Focus Filters, enabling you to take full advantage of this powerful feature and reclaim control over your digital environment.
Step 1: Accessing the Settings
Accessing the settings on your iPhone is the first step towards configuring the Focus Filters. To access the settings menu, simply locate and tap on the “Settings” app on your iPhone’s home screen. The Settings app icon features a gray gear icon and is usually located on the first page of your home screen.
Once you tap on the Settings app, you will be taken to the main settings menu. This menu contains various options for customizing your iPhone’s settings. Scroll through the list until you find the “Focus” option. It should be located below the “Sounds & Haptics” and above the “Screen Time” options.
Tap on the “Focus” option, and you will be taken to the Focus settings page. This is where you can configure the settings for the Focus Filters, as well as enable or disable the feature entirely. On this page, you will find options to create new Focus modes, manage existing ones, and customize the settings for each mode.
By accessing the settings and navigating to the Focus page, you have unlocked the ability to set up your iPhone’s Focus Filters. In the next steps, we will explore how to configure and customize these filters to suit your needs and enhance your overall mobile experience.
Step 2: Enabling Focus Filters
Once you have accessed the Focus Filters settings, it’s time to enable them and start taking control of your notifications. Enabling Focus Filters allows you to customize the notifications you receive based on different categories or app-specific preferences.
To enable Focus Filters, follow these simple steps:
- From the Focus Filters settings page, tap on the toggle switch next to “Enable Focus Filters”. This will activate the feature.
- You will see a list of pre-defined focus options such as “Personal”, “Work”, “Sleep”, and “Driving”. These allow you to quickly switch between different notification profiles based on your current activity or environment.
- If you want to create a custom focus profile, tap on the “Customize…” option.
- Next, tap on the “+” button to add a new custom focus category.
- Give the category a name that represents the type of notifications you want to filter. For example, you could create a category called “Study” for blocking distractions while studying.
- Toggle the switch next to “Allow Notifications” to enable or disable notifications for this category.
- Below, you will find a list of apps installed on your iPhone. Toggle the switch next to each app to allow or block notifications specifically for this category.
- If you want to set a specific schedule for this custom focus category, tap on the “Scheduled” option. Here, you can define the start and end times for when this filter should be active.
- Once you have configured the custom focus category to your liking, tap on the “Back” button.
- Repeat steps 4 to 9 to add additional custom focus categories, if needed.
- When you’re done creating and customizing your focus profiles, you can always go back to the Focus Filters settings page to make adjustments and toggle between different profiles as per your needs.
By enabling Focus Filters on your iPhone, you have the power to prioritize what notifications you receive, reducing distractions and allowing you to focus on what matters most in different aspects of your life.
Step 3: Creating Custom Focus Filters
Now that you have explored the pre-set Focus Filters on your iPhone running iOS 16, it’s time to take it a step further and create your own custom Focus Filters. Customizing the Focus Filters allows you to tailor the settings according to your specific needs and preferences.
To create a custom Focus Filter, follow these simple steps:
- Open the “Settings” app on your iPhone.
- Navigate to the “Focus” section.
- Tap on “Focus Filters.”
- Scroll down to the bottom of the screen and select “Create New Focus Filter.”
- Choose a suitable name for your custom Focus Filter. For example, you can name it “Work,” “Study,” or “Do Not Disturb.”
- Next, select the people and apps that you want to allow notifications from in this particular Focus Filter. You can add or remove contacts and apps as needed.
- Configure the Focus Duration for this custom Focus Filter. You can set it to a specific time or choose “Indefinitely” if you want the Focus Filter to stay active until you manually disable it.
- Optionally, you can select whether to receive time-sensitive notifications or allow repeated calls to come through even when the Focus Filter is active.
- Once you have customized all the settings, tap on “Next” to review your selection.
- Finally, tap on “Done” to save your custom Focus Filter.
Congratulations! You have successfully created a custom Focus Filter on your iPhone. This filter will now appear in your list of Focus Filters, and you can activate it whenever you want to limit distractions and focus on specific tasks or activities.
Remember, customizing Focus Filters gives you greater control over your notifications, allowing you to prioritize what matters most to you at any given time. Experiment with different filters to find the perfect balance between staying connected and having uninterrupted time for important tasks.
Conclusion
Setting up iPhone Focus Filters in iOS 16 is a powerful tool for maintaining a healthy balance between your digital life and the real world. By enabling focus filters, you can efficiently manage the notifications and distractions that come with using your iPhone. Whether you want to limit social media notifications during work hours or minimize interruptions during your personal time, focus filters provide you with the flexibility to customize your iPhone experience.
With the step-by-step guide provided in this article, you can easily navigate through the settings and set up focus filters according to your preferences. By making use of focus filters, you can enjoy increased productivity, reduced distractions, and improved overall well-being.
Take control of your iPhone experience and harness the power of focus filters today!
FAQs
1. How do I set up Focus Filters on my iPhone with iOS 16?
To set up Focus Filters on your iPhone with iOS 16, follow these steps:
- Open the Settings app on your iPhone.
- Scroll down and tap on “Focus” (formerly known as “Do Not Disturb”).
- Select “Choose Focus” to customize or create a new focus mode.
- Tap on “Add” to create a new focus mode or select an existing one.
- Customize your focus mode by enabling or disabling specific filters for calls, messages, notifications, and apps.
- Tap on “Allow None” or “Allow Some” to choose which contacts or apps you want to allow notifications from during the focus mode.
- Adjust additional settings like automatic replies and scheduled activation, if desired.
- Tap on “Done” to save your changes.
2. Can I schedule the activation of Focus Filters on my iPhone?
Yes, you can schedule the activation of Focus Filters on your iPhone. After creating or customizing a focus mode, you can access the scheduling options. Simply toggle on the “Scheduled” switch and set the desired start and end times for the focus mode to automatically activate and deactivate according to your preferred schedule.
3. Will Focus Filters affect emergency calls and notifications?
No, Focus Filters will not affect emergency calls or notifications on your iPhone. Emergency calls will always come through, regardless of the focus mode you have enabled. Important alerts designated as emergency or government alerts will also bypass the focus mode and reach you.
4. Can I allow specific contacts or apps while using Focus Filters?
Yes, you can allow specific contacts or apps while using Focus Filters on your iPhone. When creating or customizing a focus mode, you have the option to choose between “Allow None” and “Allow Some.” By selecting “Allow Some,” you can add specific contacts or apps that will be allowed to bypass the focus mode and deliver notifications to you.
5. How do I disable or turn off Focus Filters on my iPhone?
To disable or turn off Focus Filters on your iPhone, follow these steps:
- Open the Settings app on your iPhone.
- Scroll down and tap on “Focus” (formerly known as “Do Not Disturb”).
- Select the active focus mode by tapping on its name.
- Toggle off the “Enable This Focus” switch to disable the focus mode.
Alternatively, you can also swipe down from the top-right corner of the screen to access Control Center, long-press or force touch the Focus icon, and tap on “Turn Off” to disable the active focus mode.