
FaceTime is a popular feature that allows you to make video calls on your iPhone or iPad. But did you know that in addition to video and audio, you can also take live photos while on a FaceTime call? That’s right! With just a few taps, you can capture the moment and save it as a live photo, complete with motion and sound. Whether you want to capture a funny moment, a beautiful scenery, or a memorable conversation, taking a live photo on FaceTime is a fun and easy way to preserve those special moments. In this article, we will walk you through the steps of taking a live photo on FaceTime, so you can start capturing and reliving your FaceTime calls in a whole new way. So, let’s dive in and learn how to make your FaceTime calls even more memorable!
Inside This Article
- What is Live Photo on FaceTime?
- Steps to Enable Live Photo on FaceTime
- How to Capture a Live Photo during a FaceTime Call
- Viewing and Saving Live Photos from FaceTime Calls
- Conclusion
- FAQs
What is Live Photo on FaceTime?
Live Photo on FaceTime is a feature available on iPhones and iPads that allows you to capture moments during a FaceTime call in the form of animated photos. When you take a Live Photo on FaceTime, it captures a few seconds of audio and video surrounding the moment, resulting in a more dynamic and immersive visual experience.
With Live Photo on FaceTime, you can preserve the special moments shared with your loved ones during video calls. Whether it’s a heartfelt conversation, a funny gesture, or a surprise reaction, capturing Live Photos adds an extra layer of emotion and depth to your memories.
Live Photos on FaceTime not only freeze a single frame like a traditional photo but also capture the moments leading up to and following that frame. This unique feature brings your photos to life by animating them when viewed in your Photos app or when shared with others.
It’s important to note that Live Photos on FaceTime can only be captured from the device you’re using during the call. So if you’re on an iPhone, you can take Live Photos, but if you’re using an iPad, the feature won’t be available.
Now that you have a better understanding of what Live Photo on FaceTime is, let’s dive into how you can enable and capture these animated photos during your FaceTime calls.
Steps to Enable Live Photo on FaceTime
Live Photos on FaceTime allow you to capture special moments during video calls and preserve them as animated photos. To enable Live Photo on FaceTime, follow these simple steps:
- Open FaceTime: Launch the FaceTime app on your iPhone or iPad. You can find it on your home screen or in the app library.
- Go to Settings: Once the FaceTime app is open, tap on the Settings icon located in the top-right corner of the screen. It resembles a gear or a set of gears.
- Select FaceTime Settings: In the Settings menu, scroll down and tap on the “FaceTime” option.
- Toggle on Live Photos: On the FaceTime settings screen, locate the “Live Photos” option and ensure that the toggle switch is turned on or green. If it is already enabled, you can move on to the next step.
- Exit and Try It Out: You have successfully enabled Live Photos on FaceTime! Go back to the FaceTime app, make or receive a video call, and keep an eye out for the Live Photos button.
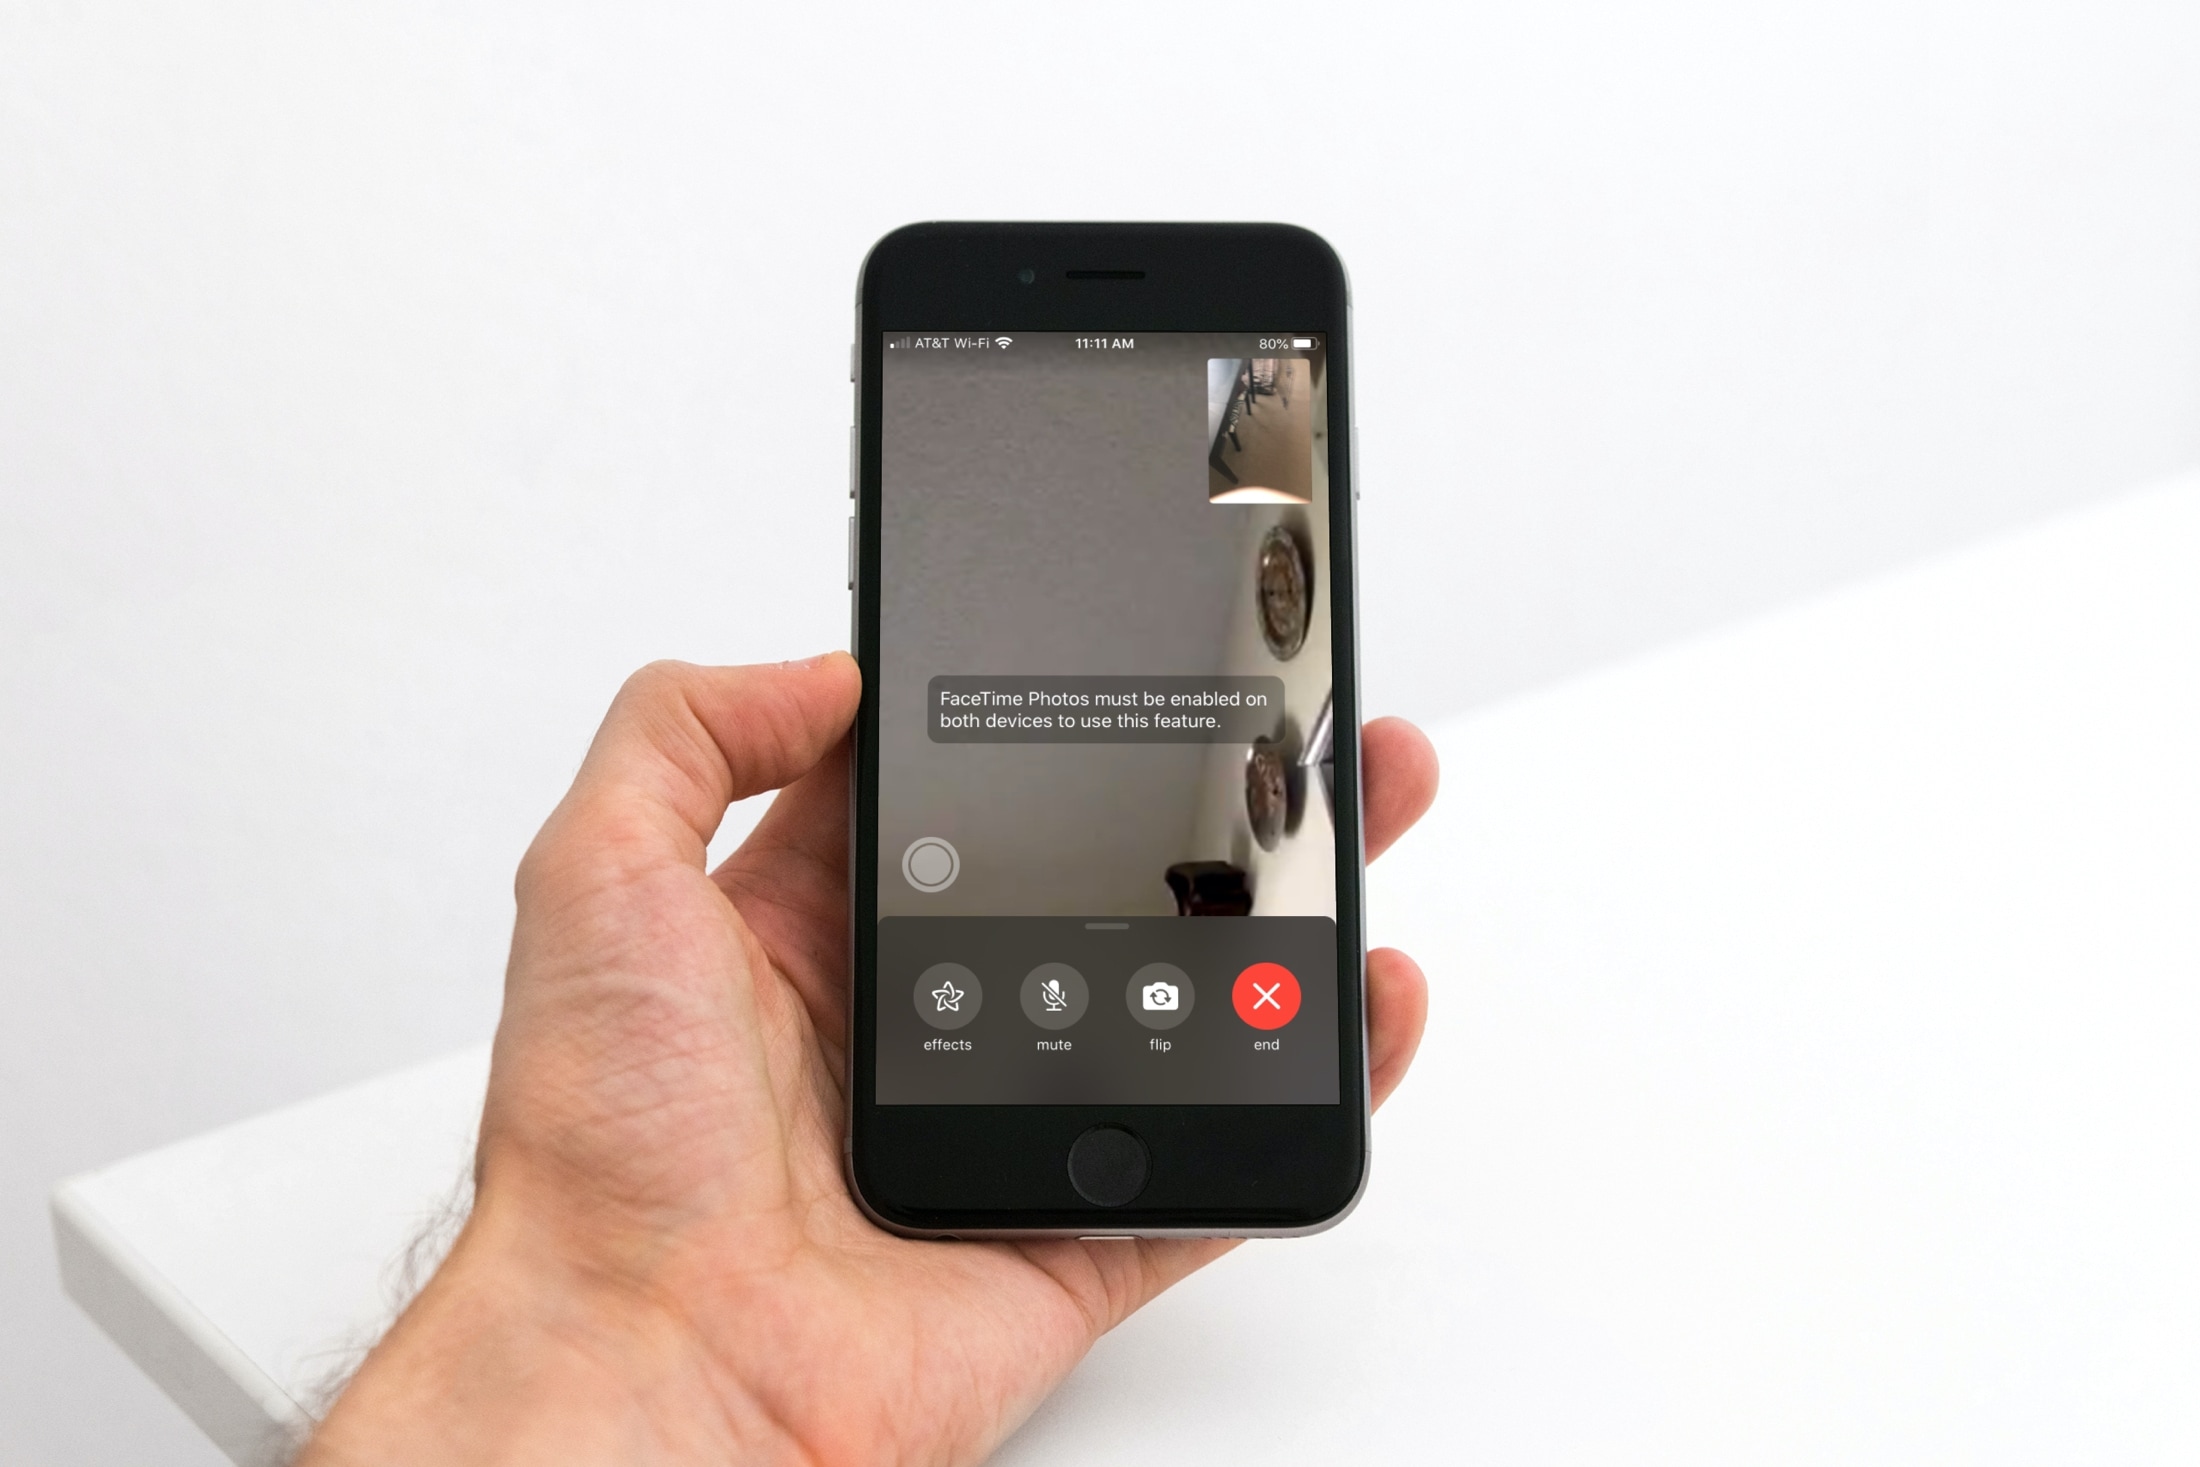
By following these steps, you can effortlessly enable Live Photos on FaceTime and start capturing those memorable moments during video calls. Keep in mind that both you and the person you are conversing with need to have Live Photos enabled for this feature to work.
How to Capture a Live Photo during a FaceTime Call
If you are wondering how to capture a Live Photo during a FaceTime call, you’ll be pleased to know that it’s a simple and straightforward process. With just a few taps, you can freeze a special moment in time and turn it into a dynamic image that comes to life when viewed.
Follow these steps to capture a Live Photo during a FaceTime call:
- During the FaceTime call, locate the FaceTime interface on your device screen.
- Look for the shutter button, which is typically represented by a white circle.
- When you find the shutter button, tap on it to capture a Live Photo.
- You will notice a yellow “Live” icon appear on the screen, indicating that a Live Photo has been successfully captured.
- To view the Live Photo, simply tap on the thumbnail that appears in the bottom-left corner of the screen.
- The Live Photo will play, showcasing the motion and sound that was captured during the FaceTime call.
- If you wish to save the Live Photo, tap on the share button and choose the desired saving option, such as saving it to your camera roll, sending it to another person, or storing it in a specific album.
With these simple steps, you can capture special moments shared during FaceTime calls and relive them in a unique and dynamic way through Live Photos.
Viewing and Saving Live Photos from FaceTime Calls
Once you have captured a Live Photo during a FaceTime call, you may be wondering how to view and save these precious moments. Thankfully, the process is straightforward and easily accessible on your iPhone or iPad. Here’s a step-by-step guide on viewing and saving Live Photos from FaceTime Calls:
- First, locate the Photos app on your device and open it.
- Next, head to the Albums tab at the bottom of the screen and scroll down until you find the “Media Types” section.
- Tap on “Live Photos” to access the album that contains all your Live Photos.
- Scroll through the album until you find the Live Photo you want to view or save.
- To view the Live Photo, simply tap on it, and it will come to life with motion and sound.
- If you wish to save the Live Photo to your device’s camera roll, tap on the share icon (a square with an upward arrow) at the bottom-left corner of the screen.
- A menu will appear with various options. Select “Save Image” to save the Live Photo to your device’s gallery.
- Once saved, you can find the Live Photo in your camera roll along with your other photos.
It’s worth mentioning that you can also view Live Photos from FaceTime calls directly within the FaceTime app itself. Simply open the FaceTime app, find the call with the Live Photo, and tap on the thumbnail located in the bottom-left corner. This will play the Live Photo within the app.
Additionally, if you have enabled iCloud Photos and have the “Upload to My Photo Stream” feature enabled, your Live Photos from FaceTime calls will be automatically synced across your Apple devices signed in to the same iCloud account. This means you can view and save the Live Photos on your iPhone, iPad, Mac, or even Apple TV.
Now that you know how to view and save Live Photos from FaceTime calls, you can easily cherish and share those special moments captured during your video calls. Whether it’s a funny expression, a heartfelt reaction, or a memorable event, Live Photos on FaceTime allow you to capture more than just a static image, preserving the liveliness and emotion of the moment.
Conclusion
In conclusion, taking a Live Photo on FaceTime can add an exciting and dynamic element to your video calls. It allows you to capture unforgettable moments with your friends and family, creating lasting memories. Whether you want to freeze a funny expression, capture a beautiful scene, or document a special occasion, Live Photos on FaceTime offers you the ability to do so seamlessly. By following the simple steps outlined in this article, you can effortlessly take Live Photos during your FaceTime calls and enjoy the benefits of this feature. So, why not enhance your FaceTime experience and start capturing those priceless moments now?
FAQs
1. What is a Live Photo on FaceTime and how does it work?
A Live Photo on FaceTime is a feature that allows you to capture moments during a FaceTime call in the form of short, animated clips. It works by automatically recording a few seconds of video along with audio whenever you take a photo using the FaceTime camera during a call.
2. Can I take Live Photos on FaceTime using any device?
No, the ability to take Live Photos on FaceTime is currently limited to certain Apple devices. To take a Live Photo during a FaceTime call, you will need an iPhone 6s or later, iPad Pro (all models), iPad Air (3rd generation) or later, or iPad mini (5th generation) or later.
3. How do I enable Live Photos on FaceTime?
Enabling Live Photos on FaceTime is simple. First, make sure you have a compatible device and that FaceTime is enabled. During a FaceTime call, tap the shutter button located in the bottom left corner of the screen. The Live Photo will be saved to your Photos app, where you can view, edit, and share it with others.
4. Can I take Live Photos on FaceTime while using the front-facing camera?
Yes, you can take Live Photos on FaceTime using both the rear and front-facing cameras of your device. Whether you want to capture a funny moment with a friend or a precious memory with a family member, you can easily switch between the cameras and take Live Photos during the call.
5. Can I use Live Photos on FaceTime with audio?
Yes, Live Photos on FaceTime capture both video and audio. This means that along with the moving image, you can also hear the sounds that were present during the moment the Live Photo was taken. Whether it’s laughter, conversations, or any other audio, it adds an extra layer of immersion and nostalgia to the captured memory.