
Are you tired of accidentally going live on your iPhone camera when you’re trying to take a photo or record a video? Well, you’re not alone. Many iPhone users struggle with this issue. The live photo feature, introduced by Apple, allows you to capture several seconds of motion and sound, but it can be a nuisance if you don’t want to use it.
In this article, we will guide you on how to turn off live on the iPhone camera and stop those unintentional live moments. Whether you have an iPhone 11, iPhone XS, or any other model, these steps will help you disable the live photo feature and give you complete control over your camera settings.
Inside This Article
- How to Turn Off Live on iPhone Camera
- Disabling Live Photos in Camera Settings
- Disabling Live Photos in the Camera app
- Turning off Live Photos for FaceTime
- Disabling Live Photos for third-party apps
- Conclusion
- FAQs
How to Turn Off Live on iPhone Camera
Live Photos on iPhone cameras are a great way to capture moments in motion, but sometimes you may want to disable this feature to conserve storage or prevent accidental capture. In this article, we will guide you through the steps to turn off Live Photos on your iPhone camera.
1. Disabling Live Photos in Camera Settings
To turn off Live Photos in the Camera Settings, follow these simple steps:
- Open the Settings app on your iPhone.
- Scroll down and tap on “Camera”.
- Scroll down again and toggle off the “Preserve Settings” option.
- Now, go back to the main Settings menu and tap on “Photos & Camera”.
- Under the “Camera” section, tap on “Preserve Settings”.
- Make sure the “Live Photo” toggle is turned off.
By disabling the “Preserve Settings” option, you ensure that Live Photos are turned off by default whenever you launch your camera app.
2. Disabling Live Photos in the Camera app
If you prefer to disable Live Photos on a case-by-case basis, you can do so directly within the Camera app. Just follow these steps:
- Open the Camera app on your iPhone.
- Locate the “Live Photo” icon at the top center of the screen.
- Tap on the icon to switch it off (it should turn from yellow to white).
Now, when you capture photos using the Camera app, Live Photos will be disabled for that session. Remember to turn it back on if you want to use Live Photos again.
3. Turning off Live Photos for FaceTime
If you want to disable Live Photos specifically for FaceTime, here’s what you need to do:
- Open the Settings app on your iPhone.
- Scroll down and tap on “FaceTime”.
- Toggle off “Live Photos” under the “Photos Capture” section.
With Live Photos disabled for FaceTime, your camera won’t capture Live Photos during video calls.
4. Disabling Live Photos for third-party apps
In addition to the native Camera app, some third-party apps have access to the camera and may capture Live Photos. To disable Live Photos for these apps, follow these steps:
- Open the Settings app on your iPhone.
- Scroll down and tap on “Privacy”.
- Tap on “Camera” and locate the list of apps with camera access.
- Toggle off the switch for each app that you want to disable Live Photos for.
Now, the selected third-party apps on your iPhone won’t capture Live Photos.
By following these simple steps, you can easily turn off Live Photos on your iPhone camera. Whether you want to save storage space or avoid capturing accidental live moments, these settings will help you customize your camera experience to your liking.
Disabling Live Photos in Camera Settings
Here’s how you can turn off Live Photos in the Camera Settings on your iPhone:
1. Open the Settings app on your iPhone.
2. Tap on “Camera” in the list of options.
3. Scroll down until you find the “Preserve Settings” option and toggle it off.
4. Go back to the main Settings menu by tapping on the arrow in the top-left corner.
5. Tap on “Photos & Camera” from the list of options.
6. Under the “Camera” section, find the “Preserve Settings” option and tap on it.
7. Make sure that the “Live Photo” toggle is turned off.
By following these steps, you will disable Live Photos in the Camera Settings, ensuring that your photos are captured without the Live Photo feature.
Disabling Live Photos in the Camera app
When using your iPhone’s Camera app, it’s easy to disable Live Photos and capture your photos without the motion and sound effects. Follow these simple steps:
1. Open your Camera app by tapping on the icon on your home screen.
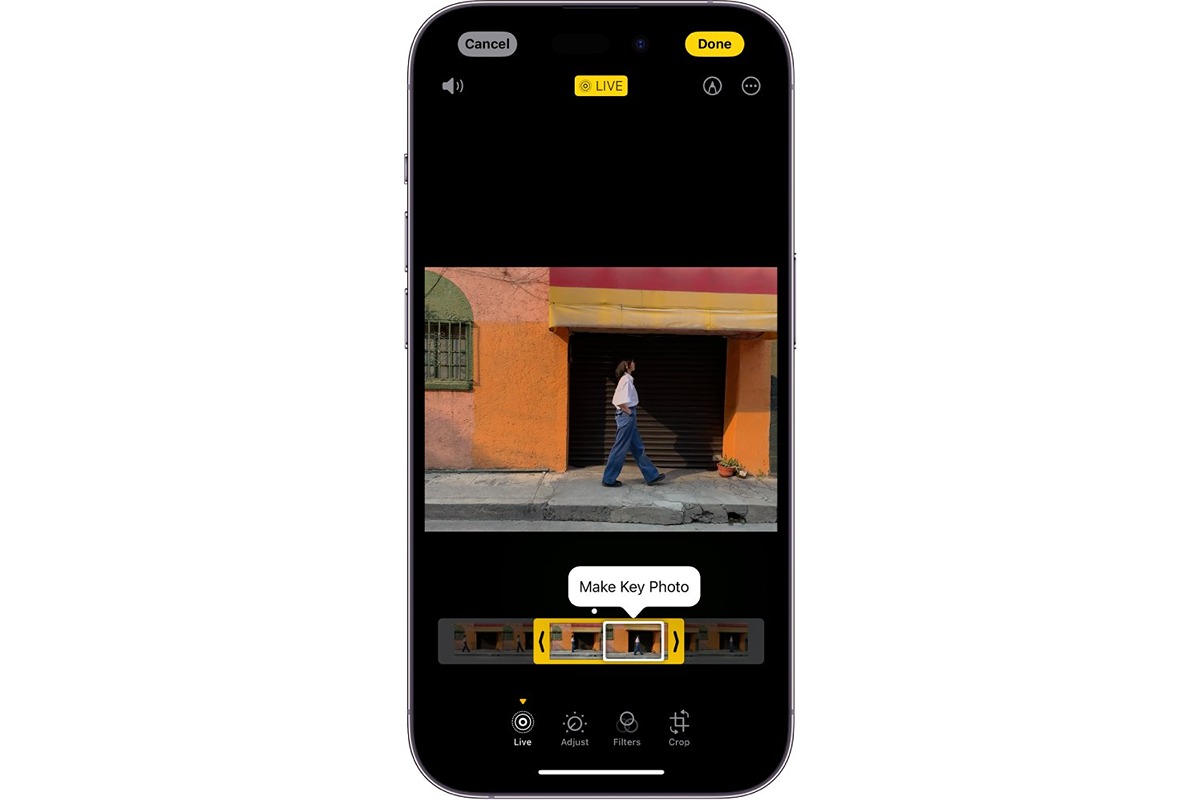
2. Locate the “Live Photo” icon, which is located at the top center of the camera interface. It’s represented by a set of concentric circles.
3. Tap on the “Live Photo” icon. Initially, it may appear yellow, indicating that Live Photos are enabled. Once you tap on it, the icon will turn white, indicating that Live Photos are now disabled.
4. You can now capture your photos without Live Photos enabled. Take pictures as you normally would, without any additional motion or sound effects.
Disabling Live Photos in the Camera app gives you the flexibility to choose whether or not you want motion and sound effects in your photos, depending on your preference or the specific situation you are capturing.
Turning off Live Photos for FaceTime
If you want to disable Live Photos specifically for FaceTime, follow these simple steps:
1. Open the Settings app
To access the FaceTime settings, locate and open the Settings app on your iPhone.
2. Scroll down and tap on “FaceTime”
Once you have opened the Settings app, scroll down until you find the “FaceTime” option. Tap on it to proceed.
3. Toggle off “Live Photos” under the “Photos Capture” section
In the FaceTime settings menu, locate the “Photos Capture” section. You will see the “Live Photos” toggle switch. Simply tap on it to turn it off. Once toggled off, Live Photos will no longer be captured during FaceTime calls.
By following these steps, you can easily disable Live Photos for FaceTime and ensure that only regular photos are captured during your video calls. This can be particularly useful if you wish to conserve storage space or if you find Live Photos distracting during your FaceTime sessions.
Disabling Live Photos for third-party apps
To disable Live Photos for third-party apps, follow these steps:
1. Open the Settings app on your iPhone.
2. Scroll down and tap on “Privacy”.
3. Tap on “Camera” to access the list of apps that have camera access.
4. Locate the specific app(s) from the list that you want to disable Live Photos for.
5. Toggle off the switch next to each app to turn off Live Photos for that particular app.
By turning off Live Photos for third-party apps, you can ensure that they do not capture Live Photos when using the camera within those apps. This is useful if you prefer to capture still photos without the added motion and sound of Live Photos.
Remember that the steps may vary slightly depending on the version of iOS you have installed on your iPhone. However, the overall process of disabling Live Photos for third-party apps should be similar.
Keep in mind that disabling Live Photos for third-party apps only affects the camera functionality within those specific apps. Live Photos will still be available and functional in the default Camera app and other apps that use the iPhone’s camera, unless explicitly disabled within their own settings.
Now you can enjoy capturing still photos without worrying about Live Photos being enabled in third-party apps on your iPhone.
In conclusion, learning how to turn off Live on the iPhone camera can greatly enhance the user experience and save valuable storage space. By deactivating the Live Photo feature, users can eliminate the need to manage large file sizes and enjoy a more seamless and efficient photography experience. Whether it’s for privacy reasons, conserving battery life, or simply personal preference, being able to easily disable Live Photos provides users with greater control over their device. With a few simple steps, anyone can quickly turn off Live on their iPhone camera and start capturing still images without the added motion. So take control of your Live Photo settings and enjoy capturing moments in a whole new way on your iPhone!
FAQs
1. How do I turn off Live on my iPhone camera?
To turn off Live on your iPhone camera, follow these steps:
- Open the Camera app on your iPhone.
- Select the “Photo” mode at the bottom of the screen.
- Look for the yellow “Live” icon at the top of the screen. If it’s highlighted, Live is currently enabled.
- Tap the yellow “Live” icon to disable it. The icon will turn white.
- You have now successfully turned off Live on your iPhone camera.
2. What is Live on iPhone camera?
Live on the iPhone camera is a feature that allows you to capture photos with movement and sound. When Live is enabled, your iPhone camera records a few seconds of video before and after you press the shutter button, resulting in a “Live Photo” that plays back the captured movement when viewed.
3. Can I turn off Live on the iPhone camera for all photos?
Yes, you can turn off Live on the iPhone camera for all photos by following these steps:
- Go to your iPhone’s Settings.
- Scroll down and tap on “Camera”.
- Under the “Camera & HDR” section, find the “Preserve Settings” option and tap on it.
- Toggle on the “Live Photo” option.
With this setting enabled, Live will remain off by default every time you open the Camera app. However, you can still manually enable Live for specific photos if desired.
4. How do I know if Live is on or off on my iPhone camera?
To check if Live is on or off on your iPhone camera, simply open the Camera app and look for the yellow “Live” icon at the top of the screen. If the icon is highlighted and yellow, Live is currently enabled. If the icon is white, Live is disabled.
5. Can I turn Live back on after disabling it on my iPhone camera?
Yes, you can turn Live back on after disabling it on your iPhone camera. Simply follow the steps to turn off Live mentioned in the first question, and tap the white “Live” icon to enable it. The icon will become yellow again, indicating that Live is enabled on your iPhone camera.