
Are you planning to make the switch from an iPhone to an Android device but worried about the hassle of transferring all your data? Look no further – the ‘Switch to Android App’ is here to save the day! This ingenious mobile app simplifies the process of transitioning from an iPhone to an Android device, allowing you to effortlessly transfer your contacts, photos, messages, and more.
In this comprehensive guide, we will walk you through everything you need to know about using the ‘Switch to Android App.’ From how to download and install the app to the step-by-step process of transferring your data, we’ve got you covered. So, get ready to make a seamless transition to your new Android device while leaving behind all the worries of data migration.
Inside This Article
- What is the ‘Switch to Android App’ for iPhone to Android Transfer
- Step 1: Prepare your iPhone and Android devices
- Step 2: Set up your Android device
- Step 3: Install and open the ‘Switch to Android App’
- Step 4: Start the transfer process
- Step 5: Select the content to transfer
- Step 6: Wait for the transfer to complete
- Step 7: Set up your Android device
- Step 8: Finish the setup and start using your new Android device
- Conclusion
- FAQs
What is the ‘Switch to Android App’ for iPhone to Android Transfer
The ‘Switch to Android App’ is a specialized application developed by Google that allows iPhone users to seamlessly transfer their data, such as contacts, messages, photos, videos, and more, to their new Android device. This app simplifies the transition process, making it easier for users to switch from iOS to Android without losing any important information.
With the ‘Switch to Android App’, users no longer have to manually transfer their data or worry about compatibility issues. The app automates the transfer process, ensuring that everything from their iPhone is safely copied to their new Android device. This eliminates the hassle of manually transferring each individual file and significantly reduces the time and effort required to set up a new Android device.
One of the key benefits of the ‘Switch to Android App’ is its ability to seamlessly transfer data from various iOS apps to their Android counterparts. For example, the app can transfer contacts from iPhone’s Contacts app to the Google Contacts app on Android. It can also transfer messages from the iPhone’s Messages app to the Messages app on Android. This ensures that users can continue their conversations and access important contact information without any interruptions.
In addition to transferring data from iOS apps, the ‘Switch to Android App’ also transfers important information such as calendars, email accounts, and even Wi-Fi settings. This ensures that users do not have to go through the hassle of manually setting up their new Android device with the same preferences and configurations that they had on their iPhone.
The ‘Switch to Android App’ is designed to make the transition from iPhone to Android as smooth as possible. It simplifies the process of transferring data, ensures compatibility between iOS and Android apps, and saves users time and effort in setting up their new Android device. Whether you’re switching to Android for the first time or upgrading to a new Android device, the ‘Switch to Android App’ is a valuable tool that helps you seamlessly transfer your data and continue enjoying your favorite apps and content.
Step 1: Prepare your iPhone and Android devices
Before you can transfer your data from your iPhone to your Android device using the ‘Switch to Android App’, you need to ensure that both devices are ready and set up properly. Here’s what you need to do:
1. Make sure your iPhone and Android devices are fully charged or have enough battery power to complete the transfer process. It’s important to have enough power to prevent any interruptions during the transfer.
2. Connect both devices to a stable and reliable Wi-Fi network. The ‘Switch to Android App’ requires a strong internet connection to transfer your data swiftly. Make sure both devices are connected to the same Wi-Fi network for seamless transfer.
3. Back up your iPhone data. It’s always a good idea to create a backup of your iPhone data before transferring it to your Android device. You can use iCloud or iTunes to back up your iPhone data to ensure that no data is lost during the transfer process.
4. Update your iPhone and Android devices to the latest software versions. It’s essential to have the latest software updates on both devices to ensure compatibility and a smooth transfer process. Check for any available updates and install them before proceeding.
5. Free up space on your Android device. Ensure that your Android device has enough storage space to accommodate the data being transferred from your iPhone. Clean up unnecessary files and apps to free up space and make room for the transferred data.
By following these preparations, you can ensure that your iPhone and Android devices are ready to undergo the transfer process using the ‘Switch to Android App’. Once you have completed these steps, you can proceed to the next stage of setting up your Android device for the transfer.
Step 2: Set up your Android device
Now that you have prepared your iPhone for the transfer, it’s time to set up your new Android device. Follow these simple steps to get started:
1. Power on your Android device: Press and hold the power button until your device turns on. You may need to wait a few seconds for the device to boot up.
2. Select your language: On the welcome screen, choose your preferred language from the available options. This will determine the language settings for your Android device.
3. Connect to a Wi-Fi network: To proceed with the setup, you’ll need to connect your Android device to a Wi-Fi network. Tap on the name of your network and enter the password, if required. If you don’t have access to Wi-Fi at the moment, you can skip this step and connect later.
4. Sign in with your Google account: If you have an existing Google account, sign in with your credentials to sync your data and access Google services like Gmail, Play Store, and Google Drive. If you don’t have a Google account, you can create one during the setup process or skip this step and add an account later.
5. Agree to the terms and conditions: Review and accept the terms and conditions presented to you. These terms outline the usage policies and data agreements associated with your Android device.
6. Customize your settings: Depending on the Android device model and version, you may be prompted to customize additional settings like date and time, display preferences, and privacy options. Adjust these settings according to your preferences.
7. Enable device protection, if available: Some Android devices offer features like fingerprint or facial recognition for added security. If your device supports these features, you can set them up during this step.
8. Install software updates: It’s a good idea to update your Android device to the latest software version to ensure optimal performance and security. If there are any available updates, follow the prompts to download and install them.
9. Set up additional accounts and preferences: After completing the initial setup, you can add additional accounts like email, social media, and cloud storage to your Android device. You can also explore the device settings to customize various preferences such as sound, notifications, and app permissions.
Once you have completed the setup process, you are now ready to proceed with the ‘Switch to Android App’ and transfer your data from your iPhone. The next step will guide you through the installation and usage of the app.
Step 3: Install and open the ‘Switch to Android App’
Once you have prepared your iPhone and Android devices, it’s time to move on to the next step: installing and opening the ‘Switch to Android App’. This app is specifically designed to help you transfer your data from your iPhone to your new Android device seamlessly.
To begin, make sure you have a stable internet connection on your Android device. Open the Google Play Store and search for ‘Switch to Android App’. The app should appear in the search results. Tap on it to access the app’s details page.
On the app’s details page, you will find information about the app, including its size and compatibility. Take a moment to review this information to ensure that your Android device meets the requirements for installing the app.
Once you are ready, tap on the ‘Install’ button. The app will begin to download and install on your Android device. Depending on the size of the app and the speed of your internet connection, this process may take a few moments.
After the app has finished installing, you can find it on your Android device’s home screen or app drawer. Look for the ‘Switch to Android App’ icon, which resembles an Android logo with arrows pointing towards it.
Tap on the ‘Switch to Android App’ icon to launch the app. You will be greeted with the app’s welcome screen, which provides an overview of the transfer process and its benefits. Take a moment to read through this information to familiarize yourself with the app’s functionality.
Now that you have installed and opened the ‘Switch to Android App’, you are one step closer to transferring your data from your iPhone to your Android device. In the next step, we will explore the process of starting the transfer process.
Step 4: Start the transfer process
Once you have successfully installed and opened the “Switch to Android App” on your Android device, it’s time to begin the transfer process. This step is crucial as it allows you to migrate all your important data, including contacts, messages, photos, videos, and more, from your iPhone to your new Android device. Here’s how to get started:
1. On your iPhone, ensure that both devices are connected to the same Wi-Fi network. This is important for a seamless transfer process.
2. On your Android device, tap the “Continue” button on the “Switch to Android App” and wait for a 10-digit code to appear on the screen. Make a note of this code as you will need it later.
3. Now, on your iPhone, open the “Settings” app and navigate to the “Wi-Fi” section. Find and connect to the same Wi-Fi network that your Android device is connected to.
4. Once you’re connected to the Wi-Fi network, open the App Store and search for the “Switch to Android App”. Download and install the app on your iPhone.
5. Launch the “Switch to Android App” on your iPhone. You will be greeted with a screen that says “Find your code”. Tap on the “Next” button.
6. On the next screen, you will be prompted to enter the 10-digit code that appeared on your Android device earlier. Type in the code and tap on “Next”.
7. The transfer process will now begin. You may need to wait for a few minutes while the app prepares the data for transfer.
8. During the transfer process, ensure that both devices remain connected to the Wi-Fi network and are kept near each other. This will help maintain a strong and stable connection throughout the transfer.
9. Once the transfer is complete, you will see a “Transfer Complete” message on both your Android and iPhone devices. Tap on “Done” to proceed.
10. On your Android device, tap on “Next” to continue the setup process. You will be guided through the remaining steps to complete the setup of your new Android device.
That’s it! You have successfully started the transfer process using the “Switch to Android App”. Now, you can move on to the next step and select the content you want to transfer from your iPhone to your Android device.
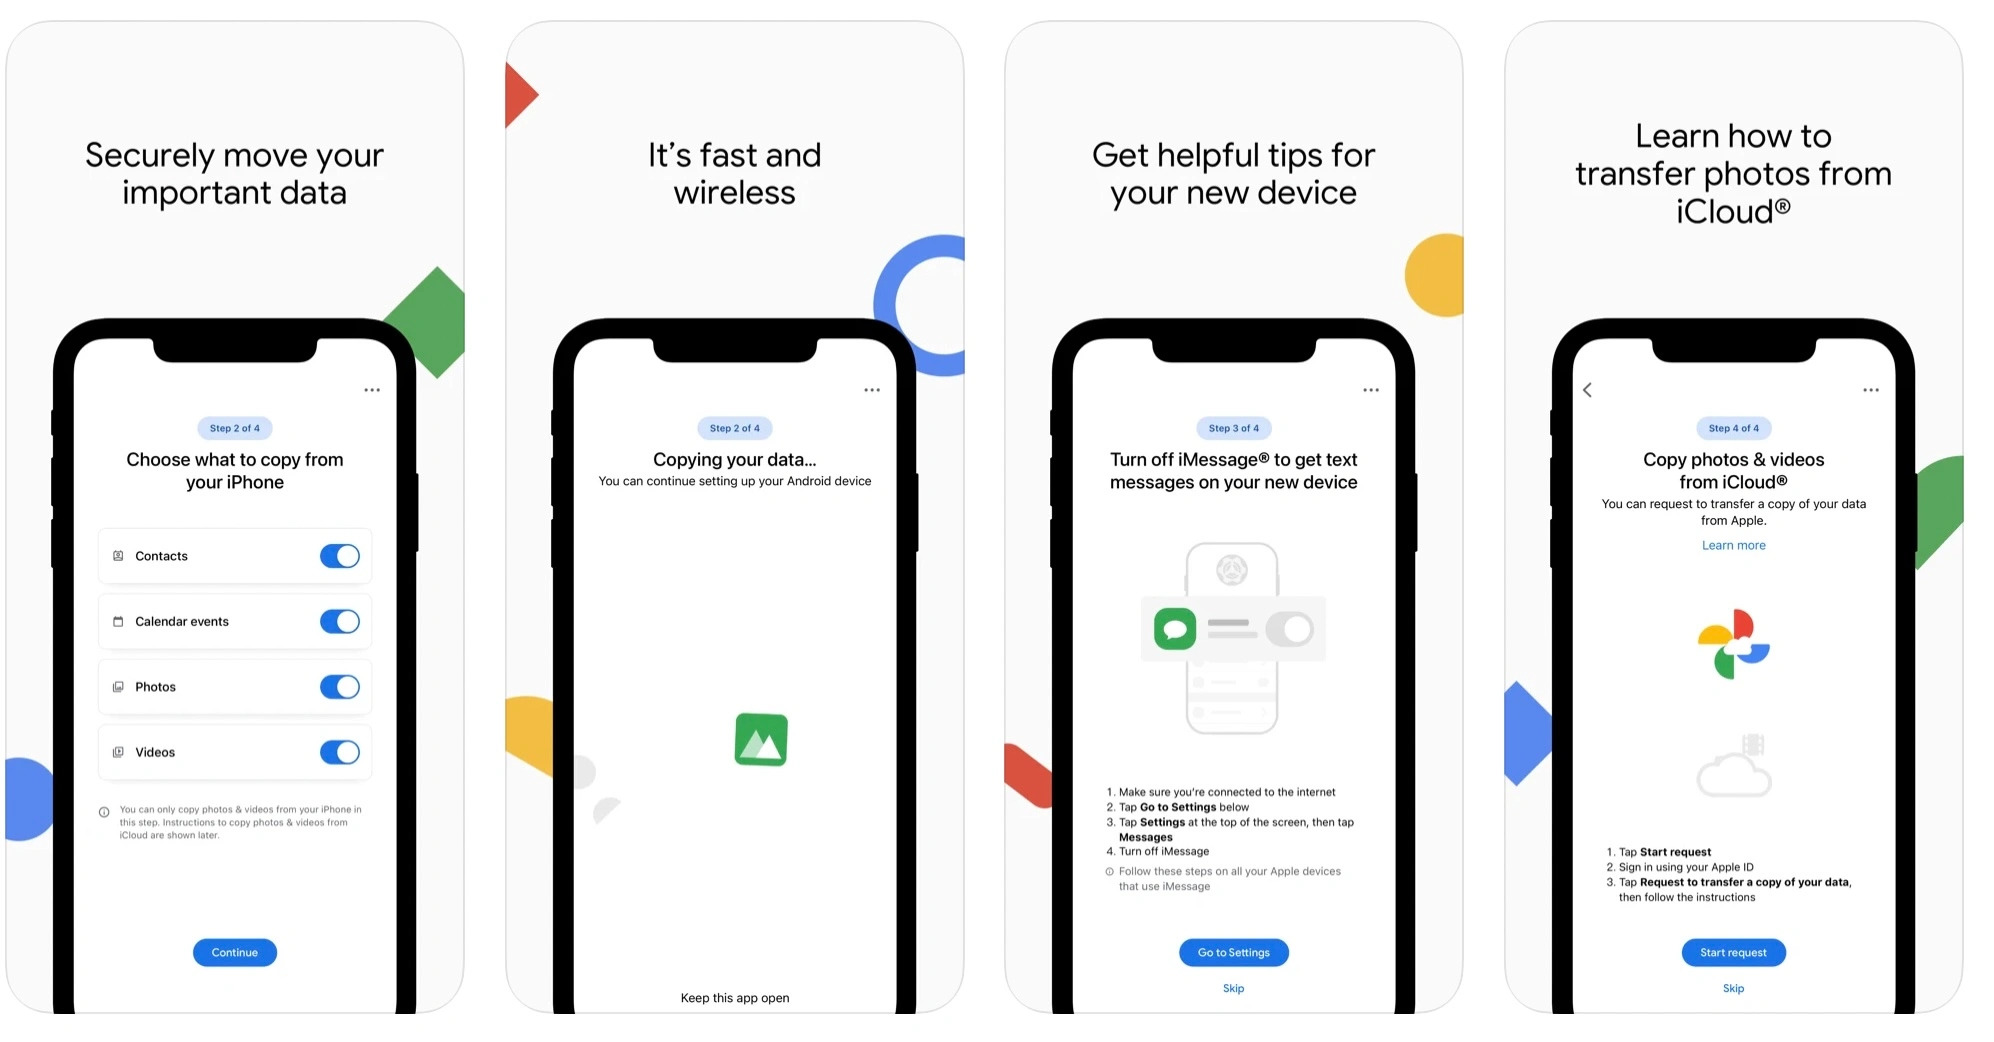
Step 5: Select the content to transfer
Once you have successfully connected both your iPhone and Android devices, it’s time to select the content you want to transfer from your iPhone to your new Android device. The ‘Switch to Android App’ provides you with the flexibility to choose the specific data you wish to migrate.
Here’s a breakdown of the different types of content that you can transfer:
- Contacts: Transfer your contact list, including names, phone numbers, email addresses, and any other relevant details.
- Messages: Move your SMS and MMS messages, including text conversations, attachments, and media.
- Photos: Select and transfer your personal photos, ensuring you don’t lose any cherished memories in the process.
- Videos: Transfer your videos, including home videos, recordings, and downloaded content.
- Calendar: Migrate your calendar events, ensuring you don’t miss any important appointments or reminders.
- Mail Accounts: Transfer your email accounts and associated settings, making the transition to your new Android device seamless.
- Web Bookmarks: Transfer your favorite website bookmarks, allowing you to easily access your preferred web pages on your Android device.
- Wallpapers: Preserve your customized wallpapers and background images, giving your new Android device a touch of personalization.
- Music: Transfer your music library, including songs, playlists, and albums, so you can enjoy your favorite tunes on your Android device.
You can select all the types of content mentioned above or choose only specific categories based on your preferences. Simply check the boxes next to the content you wish to transfer, and the ‘Switch to Android App’ will take care of the rest.
It’s worth noting that the time the transfer process takes may vary depending on the amount of data you’ve selected. Larger files, such as videos or music libraries, might take longer to transfer than smaller files like contacts or messages. However, you can rest assured that the ‘Switch to Android App’ handles the transfer efficiently and securely, ensuring that your content arrives safely on your new Android device.
With the content selection complete, you’re one step closer to enjoying your new Android device and all the features it has to offer. Now, let’s move on to the next step – waiting for the transfer to complete.
Step 6: Wait for the transfer to complete
Once you have selected the content you want to transfer from your iPhone to your Android device, it’s time to sit back and wait for the transfer process to complete. The ‘Switch to Android App’ will handle the transfer in the background, so you can continue with other tasks or simply relax.
During this time, it is important to keep both devices close to each other and ensure that they remain connected to their respective power sources. A stable internet connection is also necessary for a smooth and uninterrupted transfer.
The transfer process may take some time, depending on the amount of data you have selected to transfer. It is recommended to be patient and avoid interrupting the transfer by turning off either device or disconnecting them from the internet.
You may see a progress bar or a notification on your Android device indicating the status of the transfer. This will give you an idea of how far along the transfer process is and how much time is remaining.
During the transfer, it is advisable to refrain from using either device for any other resource-intensive tasks, as this may slow down the transfer or cause interruptions. It’s best to let the ‘Switch to Android App’ do its job without any interference.
Once the transfer is complete, you will be notified on your Android device. At this point, you can safely disconnect your iPhone from your Android device and proceed to the next step of setting up your Android device.
It’s important to note that the transfer process only transfers supported content such as contacts, messages, photos, videos, and bookmarks. Apps and app data cannot be transferred using the ‘Switch to Android App’. You will need to download and install your preferred apps from the Google Play Store after completing the setup process on your Android device.
Now that the transfer is complete, you’re one step closer to fully embracing your new Android device. The next step is to set up your Android device and personalize it according to your preferences. So, let’s move on to step 7 and get started!
Step 7: Set up your Android device
Once the transfer process is complete, it’s time to set up your new Android device. Here’s what you need to do:
1. Turn on your Android device by pressing and holding the power button. You will be greeted with a welcome screen.
2. Select your preferred language for the device. This will determine the language used in the interface and system settings.
3. Connect to a Wi-Fi network. Tap on the Wi-Fi network you want to connect to and enter the password if required. Having a stable internet connection is important to access various features and download updates.
4. Sign in to your Google Account. If you already have a Google Account, enter your email address and password. If you don’t have a Google Account, you can create one by tapping on “Create account” at the bottom of the screen.
5. Set up your device preferences. You’ll be asked to go through a series of prompts to customize your device settings. This includes choosing your display preferences, setting up a secure lock screen, enabling or disabling app suggestions, and more.
6. Restore your apps and data from the ‘Switch to Android App’. During the setup process, you’ll have the option to restore apps and data that were transferred from your iPhone using the ‘Switch to Android App’. Select the apps and data you want to restore, and the system will take care of the rest.
7. Accept Google services and permissions. As part of the setup process, you’ll be prompted to review and accept Google services and permissions. These services enable features like Google Assistant, Google Play Store, and location services. Review the details and tap “Accept” to proceed.
8. Customize your home screen. Once the setup process is complete, you can customize your Android device’s home screen by adding app shortcuts, widgets, and rearranging icons. Long-press on an empty area of the home screen to access these options.
9. Explore the Play Store. Get started with your new Android device by exploring the Google Play Store. Here, you can download a wide variety of apps, games, movies, music, and more. Simply tap on the Play Store icon to access it.
10. Set up additional features. Depending on your device and preferences, you may want to explore and set up additional features such as fingerprint or face unlock, Google Pay, and other system-level settings.
That’s it! You have successfully set up your Android device after transferring your data from your iPhone. Now you can start enjoying the exciting features and functionalities of your new Android smartphone.
Step 8: Finish the setup and start using your new Android device
Congratulations! You have successfully transferred all your data from your iPhone to your new Android device using the ‘Switch to Android App’. Now it’s time to complete the setup and start using your new Android device to its full potential.
1. Set up your Google Account: The next step is to sign in with your Google Account or create a new one if you don’t have an existing account. Your Google Account will be used to access various Google services, including the Play Store, Gmail, Google Drive, and more. Make sure you use a strong and secure password for your account.
2. Configure your settings: Once you have signed in with your Google Account, it’s time to configure your device settings. Go to the Settings app on your Android device and customize your preferences according to your needs. This includes adjusting the display settings, sound settings, Wi-Fi and Bluetooth settings, and more.
3. Install your favorite apps: One of the advantages of using an Android device is the vast selection of apps available on the Google Play Store. Take some time to explore the Play Store and install the apps you regularly use on your iPhone. Whether it’s social media apps, productivity tools, entertainment apps, or games, you’ll find a wide range of options to choose from.
4. Transfer your media files: If you have music, photos, or videos stored on your computer, you can easily transfer them to your new Android device. Connect your Android device to your computer using a USB cable and copy the files to the appropriate folders on your device. Alternatively, you can use cloud storage services like Google Drive or Dropbox to sync your media files across devices.
5. Personalize your home screen: One of the best things about Android is the ability to customize your home screen. Long-press on the home screen to access the customization options. From here, you can add widgets, change wallpapers, rearrange app icons, and create shortcut icons for your most-used apps. Make your Android device truly reflect your style and preferences.
6. Explore the features: Android devices come with a wide range of features and functionalities. Take some time to familiarize yourself with the various features on your device. For example, you can use voice commands with Google Assistant, access quick settings from the notification shade, use gestures for navigation, and much more. Discover all the ways you can make the most out of your new Android device.
7. Secure your device: It’s important to keep your Android device secure and protect your personal information. Set up a lock screen PIN, pattern, or fingerprint to prevent unauthorized access. Enable two-factor authentication for your Google Account and regularly update your device software to ensure you have the latest security patches.
8. Enjoy your new Android device: With the setup complete and your preferences personalized, it’s time to enjoy your new Android device! Whether you’re browsing the web, playing games, staying connected with friends and family, or using productivity apps, your Android device offers a world of possibilities. Enjoy the freedom and flexibility that comes with owning an Android device.
Congratulations again on successfully transitioning from your iPhone to an Android device. With the ‘Switch to Android App’ and following these steps, the process has been made seamless and hassle-free. Embrace the world of Android and make the most out of your new device!
Conclusion
So there you have it – the “Switch to Android App” is a valuable tool for anyone looking to make the switch from an iPhone to an Android device. It offers a seamless and hassle-free way to transfer all your important data, including contacts, messages, photos, and more. With just a few simple steps, you can enjoy your new Android device without losing any of your precious information.
The “Switch to Android App” ensures that the transition from an iPhone to an Android device is smooth and effortless. By following the on-screen instructions and utilizing the app’s Wi-Fi Direct functionality, you can transfer all your files quickly and securely, eliminating the need for manual data transfer.
So, if you’re ready to make the jump from iPhone to Android, don’t let the fear of data loss hold you back. Download the “Switch to Android App” today and embark on a new mobile experience without any worries. Enjoy the freedom, flexibility, and customization that an Android device offers!
FAQs
1. Can I transfer my data from an iPhone to an Android phone using the ‘Switch to Android App’?
Yes, the ‘Switch to Android App’ is specifically designed for transferring data from an iPhone to an Android device. It allows you to easily transfer your contacts, photos, videos, messages, and more.
2. Is the ‘Switch to Android App’ available for all Android devices?
Yes, the ‘Switch to Android App’ is available for all Android devices running Android 4.0 or higher. It can be downloaded for free from the Google Play Store.
3. How do I set up the ‘Switch to Android App’ on my iPhone?
To set up the ‘Switch to Android App’ on your iPhone, follow these steps:
– Make sure your iPhone is connected to a Wi-Fi network.
– Download and install the ‘Switch to Android App’ from the App Store.
– Open the app and follow the on-screen instructions to create a secure connection with your Android device.
4. Can I choose which data to transfer using the ‘Switch to Android App’?
Yes, you can choose which data you want to transfer using the ‘Switch to Android App’. During the setup process, you will have the option to select the types of data you want to transfer, such as contacts, photos, videos, and more.
5. What should I do if the ‘Switch to Android App’ is not working?
If you’re experiencing issues with the ‘Switch to Android App’, here are a few troubleshooting steps you can try:
– Make sure both your iPhone and Android device are connected to a stable Wi-Fi network.
– Update the ‘Switch to Android App’ to the latest version.
– Restart both your iPhone and Android device.
– If the problem persists, you can contact the app’s support team for further assistance.