
The web is everyone’s go-to space for communication, e-commerce, entertainment, and learning thanks to portable computers and mobile phones providing easy access to it. While there are many things you can do online, the virtual environment is not always safe. Cybercriminals might be lurking and ready to steal your credentials or valuable information. On a positive note, there are many things you can do to shield yourself from cyberattacks. For instance, you can opt to change the IP address for your gadget.
Interested in why you should do it and how? You have come to the right place because we will teach you more about an IP address. Moreover, the various methods you can use to change or hide it are outlined in this guide.
What Is an IP Address?

Let’s discuss it in layman’s terms first. Think of your neighborhood and the exact place where you live. The former is like the internet, while the latter is your IP address. This is because the IP or Internet Protocol Address is a unique identifier for hardware or a device that is connected to a network. Furthermore, it usually comes in a numeric Internet Protocol Version 4 (iPv4) or seldomly in the alphanumeric iPv6 configuration. For example, 172.168.255.1 and 2001:db8::ff00:57:8726, respectively.
When it comes to mobile phones, there are two types of IP addresses you should be familiar with: dynamic and static. The dynamic IP address, as the name implies, changes each time you re-establish a network connection. The keyword here is temporary because your connection will only be active for a certain amount of time. This type of IP address is commonly used in public Wi-Fi networks like those on cafes where you are given a unique user and login codes alongside the IP address. With regard to a static IP address, it does not change when you reconnect to the internet. Also, this can be configured on your own or via your ISP.
Why Change IP Address?
There are many reasons why you should or might want to change your IP address. Furthermore, they are most likely related to online security and accessibility, like for many mobile phone users. The three most common reasons below could also be the best advantages of switching IP addresses:
To Avoid Being Tracked
As much as an IP address is like a home address, it can be used to determine your physical location. For instance, cybercriminals might need it for their phishing schemes, authorities for censorship, and websites and apps for analyzing where online visits, clicks, or traffic originates.
Also Read: How to Tell if Your Phone Is Tapped and Being Tracked
To Become Anonymous Online
Sometimes, an IP address can already be associated with who you are. For example, you have provided your fixed IP address for office internet access or any other purpose in the past. As a result, your IT personnel or that specific person you shared it with already knows it is yours. To make it hard to identify you, a regular change of IP address will help.
To Bypass Blocked Websites
Website blocking prevents certain IP addresses from accessing a whole webpage or just a portion of its content. Also, the restriction can be region-based. When you change your IP address, you will be able to bypass blocked and region-locked content and services. This is a common scenario in countries that censor even the most popular pages. For instance, news, social media, and streaming services.
Are There Risks In Changing an IP Address?
To answer this straightforward, there are no serious risks to your mobile phone when the IP address is changed. On the other hand, you and your device’s security might be compromised if the method or service you rely on is not safe. For example, you used a website or app that gets your private information without you knowing or one that has malware. This is why it is important to know the various methods so you can choose well, convenience- and safety-wise.
How to Change IP Address on a Mobile Phone?
There is more than one method to change the IP address on iPhones and Android phones. In this guide, you will learn the best ways that many other mobile device users also try. Additionally, you will find most methods simple and easy to do, even if you are not an expert with gadgets.
1. Unplug and Restart Router
Your home router assigns dynamic IP addresses each time it establishes a connection, so just reboot it to repeat the process. As a result, you get a different IP address for your Android phone or iPhone. Rebooting is one of the first methods to try because it is quick to do.
Here are universal instructions for resetting a Wi-Fi router:

1. Long press on the Power On/Off button.
2. Release the button once the indicator light switches off.
3. Remove the router’s plug carefully from the wall or floor socket.
4. Plug the unit again after five to 10 seconds.
5. Hold the router’s power button until the lights switch on.
6. Scan for and connect to the Wi-Fi network using your mobile phone.
2. Make a Change IP Address Request for Router (iPhones Only)
If you are an iPhone user, you can opt not to reboot or restart the router to make it reassign or change the IP address. In fact, it is possible to request the router to give your device a dynamic IP address again through your iPhone’s settings menu.
Here’s how to do it:
1. Launch the Settings menu from the iPhone’s home screen.
2. Click on Wi-Fi among the options.
3. Look for the active Wi-Fi network you are typically using.
4. Tap the round icon with an “i” beside it.
5. On the Wi-Fi network information page, click on the Renew Lease option.

6. Confirm the action from the pop-up window.
3. Forget Network
Making the mobile device forget the network works the same as the previously discussed method. Furthermore, it can be done on Android phones and iPhones. Consequently, the gadget gets a new dynamic address once it re-establishes a new connection with the network. Below are the methods for mobile phones to forget a network:
On Android
1. Head over to your smartphone’s Settings menu.
2. Click on Connections afterward.
3. Select Wi-Fi among the options.
4. Choose the Wi-Fi network your device is connected to and tap on its cog icon.
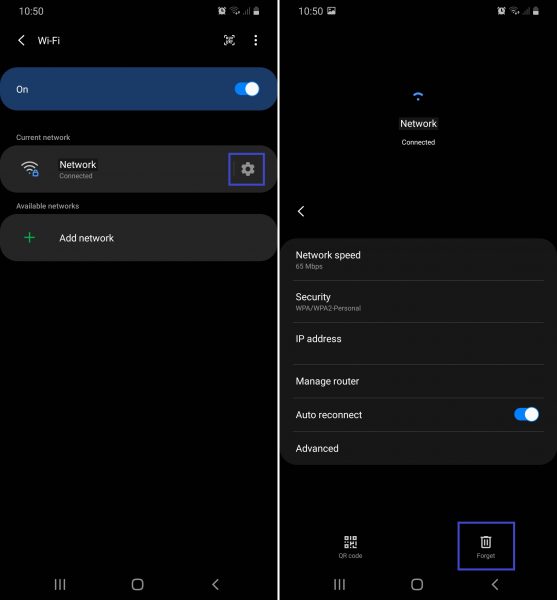
5. Click on the Forget icon on the bottom of the screen.
6. Switch the Wi-Fi slider off then on again.
7. Once the forgotten network is detected, sign in using your credentials.
On iOS
1. Open Settings from the iPhone’s home interface.
2. Click on Wi-Fi afterward.
3. Tap the round “i” icon beside the network to be forgotten.
4. Click on Forget This Network.
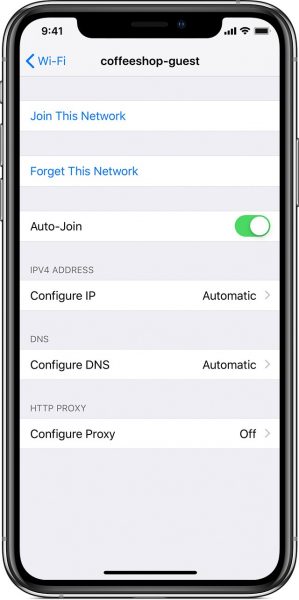
5. Tap Forget on the next prompt to finalize the action.
In case you encounter network issues once you reconnect or your mobile device does not detect the network, reset network settings instead. The process clears existing configurations but fixes most problems regarding Wi-Fi and mobile networks. Also, remember to back up your network credentials beforehand.
4. Assign Static IP
If you are using a dynamic IP address from your home Wi-Fi router, you might want to switch to a static IP address instead. Assigning the latter type of IP address is possible through the Android phone or iPhone’s network settings. Below are the steps on how to use a fixed IP address:
On Android
1. Go to your app dashboard from the home screen.
2. Click on the Settings icon from the dashboard.
3. Tap Connections or Wireless & Networks.
4. Click on Wi-Fi from the available options afterward.
5. Tap the cog icon for or long-press on the Wi-Fi network name you usually connect to.
6. Select Advanced or Modify Network from the next page.
7. Under IP Settings, click on the drop-down arrow beside DHCP, then select Static.
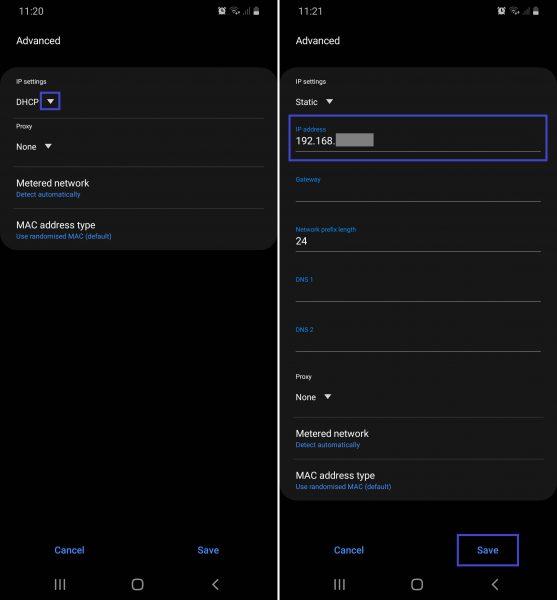
8. Make the last digits of the IP address any number between 1 and 225.
9. Click Save to finalize the setting.
10. Try a different number if the digit you chose did not work.
*A combination of digits not working in Step 8 just means that the IP address is already taken by another connected device.
On iOS
1. Click on the Settings icon from your iPhone’s home screen.
2. Select Wi-Fi afterward.
3. Tap the specific Wi-Fi network you want to connect to.
4. Select the Configure IPv4 option on the page.
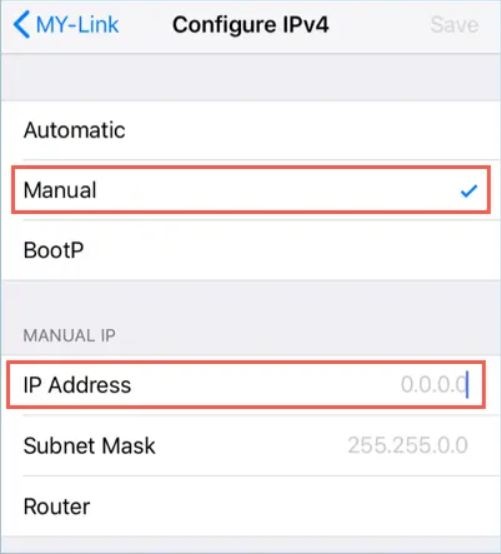
5. Tick Manual when the checkmark is on Automatic.
6. Enter your new Static IP in iPv4 or numeric configuration on the IP address field at the bottom of the screen.
5. Use Virtual Private Network
A Virtual Private Network (VPN) is a service that can connect your Android phone or iPhone securely to a public Wi-Fi network. To elaborate, it hides your IP address by turning it into the VPN’s IP address that is detected by the network and encrypted. This is to protect your personal information and credentials from being stolen online. Furthermore, VPNs nowadays come in the form of apps that you can download from the Google Play Store or App Store.
In this guide, let us discuss two of the best VPN for Android and iOS devices, NordVPN and PureVPN, and how to use them to change the IP address. Both apps are free to download but will require you to pay a monthly fee to access the full service. Follow the instructions below:
Via NordVPN
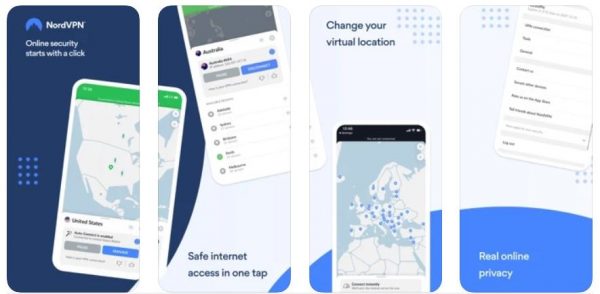
1. Subscribe to the service through the NordVPN Checkout Page.
2. Download and install the NordVPN app on your Android phone or iPhone.
3. Sign in to your account on the app afterward.
4. Select your country of choice to switch to the VPN IP address associated with that region.
5. You have a new IP address afterward, so you can start surfing the web.
Download from Google Play Store
Via PureVPN
1. Avail the trial or subscription from the PureVPN Order Page.
2. Download and install the PureVPN app from the Google Play Store or App Store.
3. Launch the app on your mobile phone afterward.
4. Login using the email address and password you used for the subscription account.
5. Click on the central button on the app’s home interface to start a connection with a new IP address.
Download from Google Play Store
6. Use Tor Browser (Android Only)
Tor is a browser that can lend your device its IP addresses so you can browse websites securely and access blocked pages. It supports data encryption, but not the two-way type. To explain, only the information sent from your gadget to the Tor network is protected. Despite this, it is used by many to mask or change the IP address on a computer.
There is a way to use Tor Browser on a mobile phone and that is through the Orbot: Tor app. Note that it is only applicable to Android devices for now.
Here is how to use Orbot: Tor:
1. Download the Orbot: Tor app from the Google Play Store.
2. Install it on your Android phone afterward.
3. Set it to your preferred language as prompted.
4. Read the Terms & Conditions and proceed if all that is stated is fine with you.
5. Choose the pop-up option that lets you continue without Superuser access.
*Superuser access requires you to root your Android phone, which compromises device safety and voids warranty.
6. Remember or jot down the Orbot-compatible browsers from the list that will appear on the screen.
7. Tap Next or Continue until the Finish button appears.
8. Once taken back to the Orbot app home interface, click the power or start/stop icon to activate it.
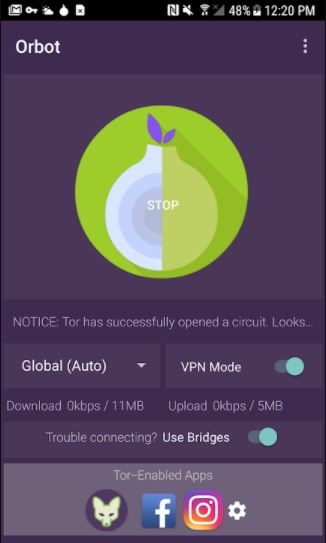
9. Install your browser of choice which you have taken note of from the list.
10. Your IP address will be masked with a Tor IP address, so you can surf the web on the new browser app safely.
Download from Google Play Store
Also Read: Failed to Obtain IP Address Error: How to Fix It on Android
7. Contact Internet Service Provider
If you do not want to change your IP address on your own and want the experts to do it, contact your ISP. In fact, most if not all ISPs allow it but have rules and limitations on reissuing dynamic IP addresses or requesting for a static one.
If you just want to change the dynamic IP address, though, it might not be worth the time because what will be assigned to you will also change. In fact, the better option to take is to request a static IP address.
As you request for a static IP address, you will be asked for your current IP address and other information, so have the former written down on a piece of paper. Moreover, the service will come at a price so make sure you have the budget for this.
Wrap-Up
Out of all the methods discussed in this guide, you might be wondering which one is the best to try. If you ask us, our answer would depend on two factors: simplicity and safety. For the former, it is the router change IP address methods that can be done from within the settings of your Android phone or iPhone. In terms of the latter, it is VPN that is the most effective. Alternatively, you can test everything to know what works well for your device. After all, this is the best way to evaluate every technique you find online.