
Are you someone who frequently needs to dial extensions on your Android phone? Perhaps you often find yourself struggling to navigate through automated phone systems that require you to enter an extension for a specific department or person. Fret not! In this article, we will walk you through the step-by-step process of dialing an extension on your Android device. We’ll cover both the traditional method and some handy tricks to make the process faster and more efficient. So whether you’re trying to reach a client, a colleague, or a support line, you won’t have to waste any more time scrambling to figure out how to enter those elusive extensions on your Android phone. Let’s get started and simplify your calling experience!
Inside This Article
- Overview of Dialing Extensions on Android
- Step 1: Open the Phone App
- Step 2: Enter the Phone Number
- Step 3: Add the Extension
- Step 4: Dial the Number with the Extension
- Additional Tips and Troubleshooting
- Conclusion
- FAQs
Overview of Dialing Extensions on Android
When using your Android device to make phone calls, you may encounter situations where you need to dial an extension. Extensions are additional numbers that are added to a phone number to reach a specific department or person within an organization. Dialing extensions on Android is a simple process that can be done directly from the phone app.
In this article, we will guide you through the steps to dial an extension on your Android device, ensuring that you can connect with the intended recipient quickly and effortlessly.
By following these simple steps, you will be able to easily dial extensions on your Android device and connect with the person or department you need to reach. Whether you’re making business calls or trying to reach a friend, knowing how to dial extensions on your Android will come in handy in various situations.
Before we dive into the steps, it’s important to note that the specific screens and options may vary slightly depending on the make and model of your Android device. However, the general process remains the same across most Android devices.
Are you ready to learn how to dial extensions on Android? Let’s get started!
Step 1: Open the Phone App
When it comes to dialing extensions on your Android device, the first step is to open the Phone app. The Phone app is usually represented by a green icon resembling a telephone handset.
To open the Phone app, locate the app icon on your home screen or in your app drawer. Tap on the icon to launch the app. In most cases, the app will be preinstalled on your device, but if it isn’t, you can download it from the Google Play Store.
Once the Phone app is open, you’ll be greeted with the main interface, which typically displays the dialer keypad, call history, and other relevant options and settings.
Note that the appearance and layout of the Phone app may vary depending on the manufacturer and Android version of your device. However, the general process of dialing extensions remains consistent across different Android devices.
Step 2: Enter the Phone Number
Once you have opened the Phone app on your Android device, the next step is to enter the phone number you wish to dial. This is the main number that you want to call before adding the extension.
To enter the phone number, you can either manually type it using the virtual keypad on your screen or use the contact list to select the desired number. If you choose to manually enter the number, make sure to double-check for any errors before proceeding to the next step.
If you prefer to use the contact list, tap on the Contacts or Address Book icon within the Phone app. This will display a list of your saved contacts. Scroll through the list or use the search bar to find the contact whose number you wish to dial. Once you have located the contact, simply tap on their name to automatically populate the phone number field.
In some cases, you may need to dial an international number before entering the phone number. If the number you are calling is located in a different country, you will need to add the international dialing code before entering the phone number. This can be done by tapping on the “+” or “0” button on the virtual keypad and selecting the appropriate country code.
Remember to include any necessary area codes or prefixes if you are making a local or long-distance call. These additional digits are typically required to ensure that your call reaches the intended recipient.
Once you have successfully entered the phone number, you are ready to proceed to the next step, which is adding the extension to your call.
Step 3: Add the Extension
Adding an extension while dialing a phone number on your Android device is a straightforward process. Follow these simple steps to seamlessly include the extension:
1. Once you have entered the main phone number, locate the “#” or “*” button on your phone’s on-screen keypad. These buttons are typically used to enter special characters or access additional options during a phone call.
2. Press the “#” or “*” button on your keypad to reveal a menu with options specific to dialing extensions.
3. In the extension menu, you will find various options such as “Pause,” “Wait,” or “Extension.” The specific wording may vary depending on your phone model and Android version.
4. Select the “Extension” option from the menu. This will allow you to enter the extension number after a brief pause.
5. Once you’ve selected the “Extension” option, you can proceed to enter the extension number using the on-screen keypad. Simply type in the numeric digits of the extension.
6. After entering the extension, you can either press the green “Call” button to dial the number with the extension immediately, or you can further customize the extension by adding additional options like “Pause” or “Wait” to control the timing of the extension dialing.
Remember, if you need to dial multiple extensions, you can repeat Steps 3 to 6 to add them one by one. Just make sure to separate each extension number with a pause or wait command to allow the call to connect properly.
By following these steps, you can easily add extensions while dialing a phone number on your Android device. It allows you to navigate automated phone systems and reach the desired department or individual with ease.
Step 4: Dial the Number with the Extension
Now that you have entered the phone number and added the extension, it’s time to dial the number with the extension on your Android device. Follow these simple steps to make the call:
1. Double-check the phone number and extension: Before dialing, make sure you have entered the correct phone number and extension. It’s important to avoid any typos or errors to ensure a successful call.
2. Tap the “Call” button: Once you are confident that the number and extension are correct, tap the “Call” button on your Android device. This will initiate the call.
3. Wait for the call to connect: After tapping the “Call” button, your Android device will start dialing the number with the extension. Wait for the call to connect and for the other party to pick up the phone.
4. Listen and respond: Once the call is connected, listen for any automated messages or prompts requesting the extension. Some systems may require you to enter the extension during the call. Follow the instructions and enter the extension when prompted.
5. Dial the extension if required: If you need to manually enter the extension during the call, use the keypad on your Android device to input the extension numbers. Once you have entered the extension, tap the “Dial” or “Enter” button to proceed.
6. Wait for the call to connect with the extension: After entering the extension, wait for the call to connect again. The system will recognize the extension and route the call accordingly.
7. Start your conversation: Once the call is connected with the extension, you can start your conversation as you would with any other phone call. Speak clearly and make sure to communicate effectively.
That’s it! You have successfully dialed a number with an extension on your Android device. Remember to end the call when you’re finished by tapping the “End Call” button on your device.
If you encounter any issues while dialing a number with an extension, double-check the extension number, ensure you have a strong network connection, and verify that you are using the correct dialing format. If the problem persists, you may need to contact your service provider for further assistance.
Additional Tips and Troubleshooting
While dialing extensions on Android is generally a straightforward process, there are a few additional tips and troubleshooting steps you can follow to ensure a seamless experience. Check out the following:
1. Use a comma to pause before dialing the extension: Some phone systems require a pause before the extension can be dialed. To add a pause, simply enter a comma (“,”) after the phone number, followed by the extension. This will ensure that the extension is dialed after a brief delay.
2. Use a semicolon to automatically dial the extension: In some cases, a phone system may require the extension to be dialed automatically without any user intervention. To achieve this, use a semicolon (“;”) instead of a comma. This will initiate the dialing of the extension as soon as the call connects.
3. Save the number with the extension as a contact: If you frequently call a number with an extension, consider saving it as a contact on your phone. By saving it as a contact, you can easily access and dial the number, eliminating the need to manually enter the extension each time.
4. Check for compatibility issues: While Android devices are generally compatible with most phone systems, rare compatibility issues can arise. If you are experiencing problems dialing extensions, check with your phone service provider or IT department to ensure that your phone is compatible with their system.
5. Try using a third-party dialer app: If you are still having trouble dialing extensions on your Android device, consider trying a third-party dialer app from the Google Play Store. These apps often offer advanced features and customization options that may help resolve any compatibility issues.
By following these additional tips and troubleshooting steps, you should be able to dial extensions on your Android device with ease. If you encounter any further issues, don’t hesitate to seek assistance from your phone service provider or IT department for further guidance.
Conclusion
In conclusion, dialing extension numbers on Android devices is a straightforward process that can be accomplished using either the built-in keypad or various third-party dialer apps. With the ability to store and easily access contacts, as well as the option to use speed dial shortcuts, dialing extensions has never been easier. Additionally, Android users can take advantage of features like auto-dialing and automated dialing sequences to save time and effort.
Remember, each Android device may have slight variations in the dialing process, so it’s always advisable to refer to the specific instructions provided by the manufacturer or consult the user manual. By following the steps outlined in this guide, you’ll be able to dial extensions effortlessly and efficiently, ensuring seamless communication in both personal and professional settings.
So, the next time you need to reach someone with an extension, fear not. Your Android device has you covered, making it convenient for you to connect with the person you need to reach.
FAQs
FAQ 1: How do I dial an extension on Android?
To dial an extension on Android, follow these steps:
- Open the Phone app on your Android device.
- Enter the main phone number that you intend to dial.
- After dialing the main number, locate the extension button or option.
- Tap the extension button or option and enter the extension number using the keypad.
- Finally, tap the call button to initiate the call, including the extension number.
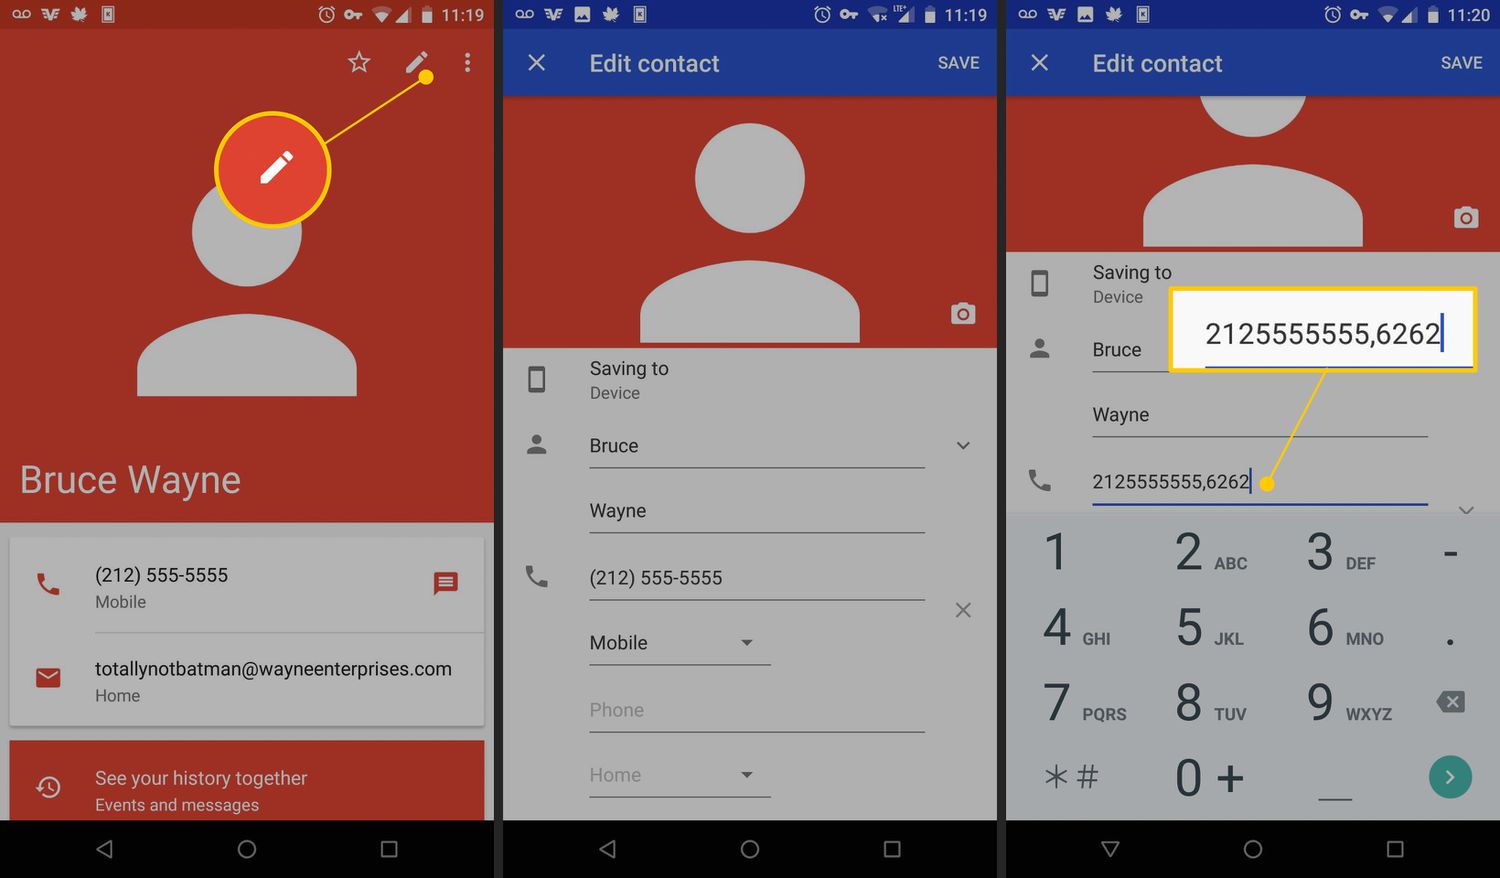
FAQ 2: Can I save an extension number in my contacts?
Yes, you can save an extension number in your contacts on Android:
- Open the Contacts app on your Android device.
- Create a new contact or edit an existing one.
- In the phone number field, enter the main phone number.
- After the main phone number, add a comma (,) followed by the extension number.
- Save the contact, and now you can easily dial the extension from your contacts list.
FAQ 3: Is there a shortcut to dial an extension directly?
Yes, Android provides a shortcut to dial an extension directly:
- Open the Phone app on your Android device.
- Enter the main phone number that you intend to dial.
- After dialing the main number, add a comma (,) followed by the extension number.
- Tap the call button to initiate the call, including the extension number.
FAQ 4: Can I use a dialer app to make it easier to dial extensions?
Yes, there are various dialer apps available on the Google Play Store that can make it easier to dial extensions. These apps often provide features such as automatic extension dialing, quick access to favorite contacts, and other handy tools to streamline the calling process.
FAQ 5: Are there any Android dialer apps you recommend for dialing extensions?
While there are several dialer apps to choose from, two popular options for dialing extensions on Android are Truecaller and ExDialer.
- Truecaller: Truecaller is a dialer app that not only allows you to save extensions in your contacts but also automatically identifies spam calls and blocks them. It offers a user-friendly interface and quick access to extensions for seamless calling.
- ExDialer: ExDialer is another feature-rich dialer app that enables you to dial extensions easily. It offers customizable themes, smart contact search, and other handy features to enhance your calling experience.
Both apps are available for free on the Google Play Store, with optional premium features for a more advanced calling experience.