Do you find your home screen messy? Are you starting to develop a sense of OCD upon seeing how disorganized your files are on your iPhone? These are just some of the common concerns one may experience especially if you are one of those iPhone users who loads their smartphones with files and apps. This is where folders come in handy. But how to make folders on iPhone, you may ask?
Before we give you the nitty-gritty on how to make folders on your iPhone, understanding the use of folders is imperative. It’s no rocket science to know that folders help make your work screen or desk clean and pleasing. This is exactly what this feature in the iPhone (or iPad) wants to achieve. And in this article, this is what we will be discussing over.
Related: How to Hide Apps on iPhone for Beginners & Long-Time Users
Inside This Article
How to Make Folders on iPhone For Files?
Many iPhone users, especially students, consider their iPhones as an extension of their student or work lives. And a closer inspection of the Files folder would reveal just how messy these files can be. With this in place, it would require a little organization by knowing how to make folders on your iPhone.
Here’s how can create a folder on the Files app to start organizing your files:
- Open the Files app from your home screen.
- Tap the Browse tab.
- Next, select a location where you wish to create a folder in. Choose a location where you saved the majority of your files at.
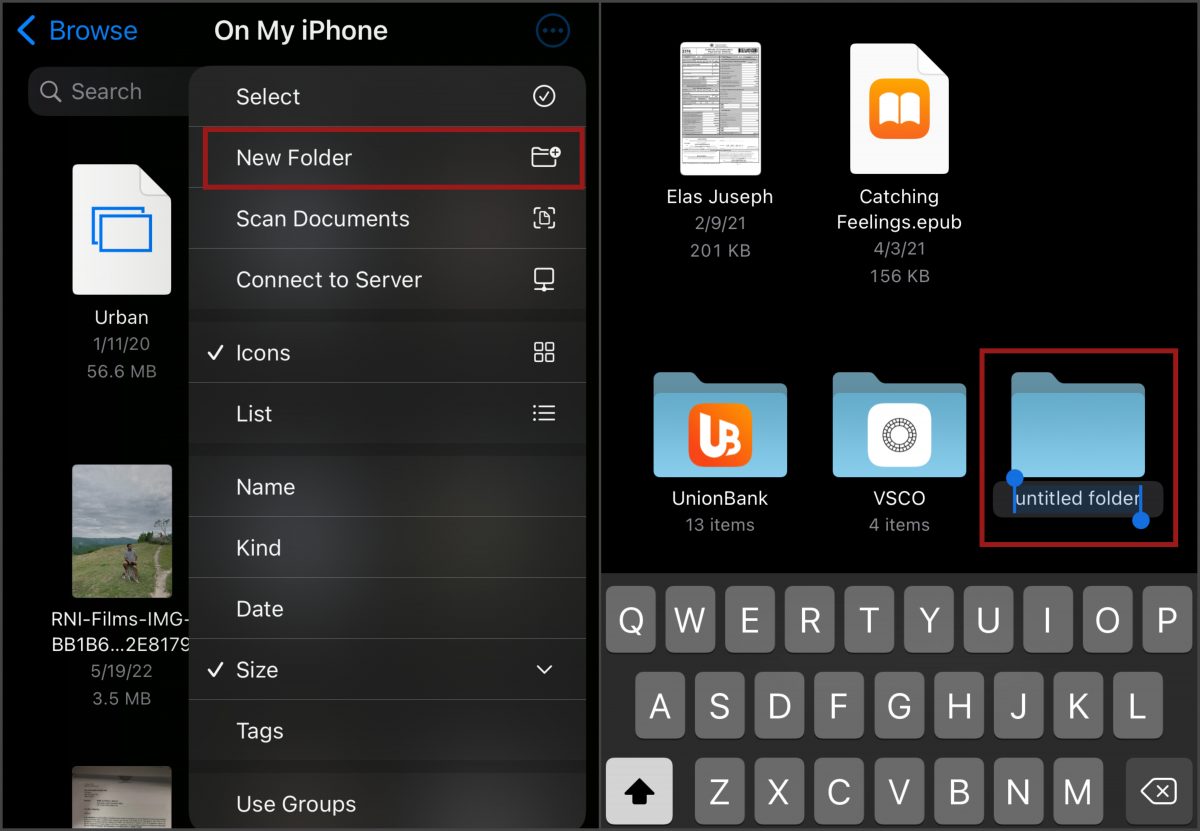
- Now, to create a folder within that location, tap the three-dot icon on the top right corner of the screen.
- Select New Folder then rename the folder as you see fit.
- Tap Done.

Now you have a folder where you can save the many files you have.
A. How to Tag Folder for Files
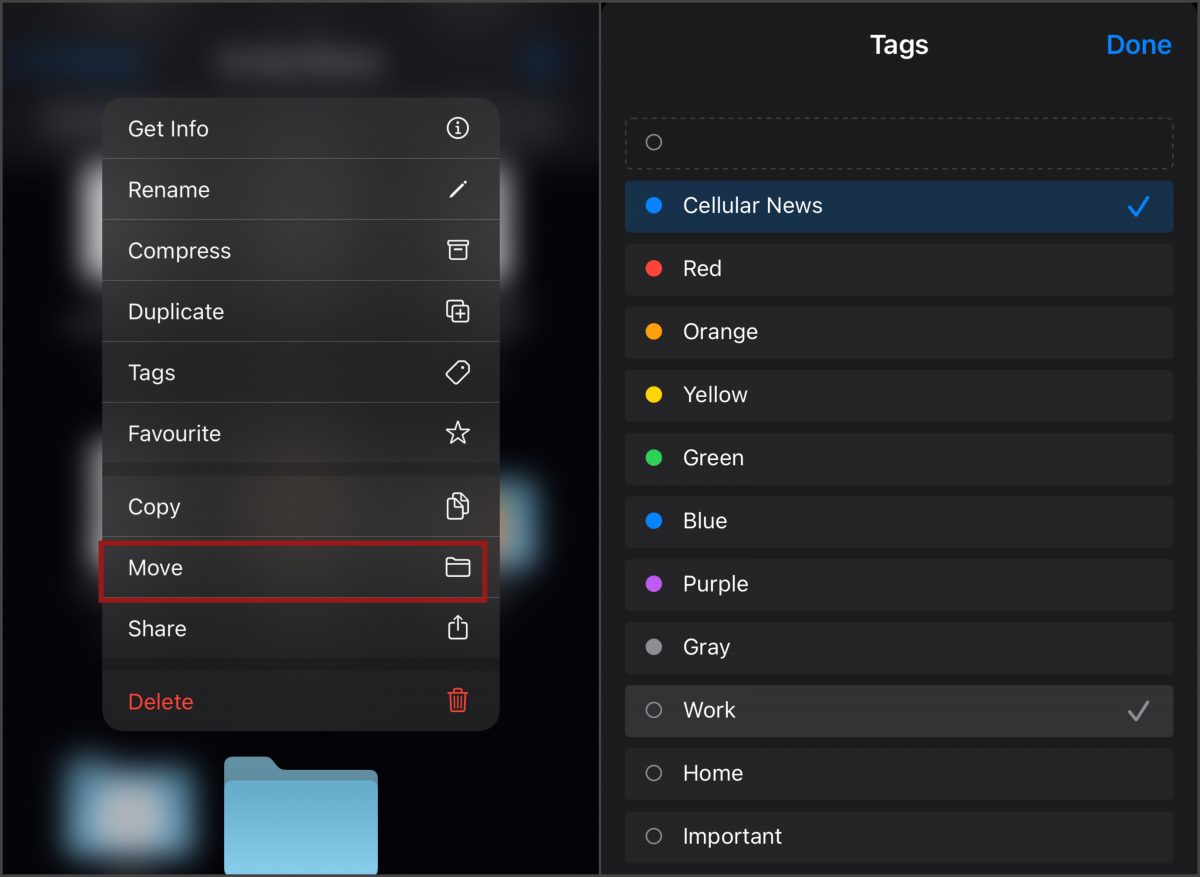
Tagging your folders is another way to (1) organize them once you have more than one folder in the Files app and (2) access them easily. Within the Files app, under the Tags section, you’ll see the color tagging available; it ranges from Red, Orange, Yellow, Green, Blue, Purple, to Gray. You, as the user, get to define the importance or meaning of these colors.
Additionally, you can assign a specific category for each folder depending on what files are saved; they can range from Work, Home, to Important.
Here’s how you can assign a color and category for your folder/s in the Files app:
- In the Files app, locate the folder you have created.
- Long-press the folder until the options pane appears then select Tags.
- From here, you can select a color tag you wish to associate the folder with. Moreover, you can also select a category for the folder.
- Alternatively, you can create a new tag (but not a category) for the folder.
- Once you have selected a color tag and category, tap Done.

Now, the folder will have the tag and category you have assigned. If you head back to the main Browse window and clicked Work, you’ll see the folder saved under the Work category. You can do this for the other folders you will create and access them this way.
B. Move/Copy Files to a Sub-Folder
Now that you know how to make folders on your iPhone, you now need to move your files to each folder where they are better sorted. Here’s how you can move your files in these folders easily:
- On the Files app, locate the location where your files are saved for now.
- Now, tap the three-dot icon on the top right corner of the screen then tap on Select.
- Select all the files you wish to move/copy in a sub-folder.
- Tap the folder icon at the bottom band options (middle icon).
- Locate the folder you created earlier where these files are going to be moved.
- Select the folder then tap Move.
Now you have the files moved and your Files app organized!
How to Make Folders for Apps on iPhone?
Is your home screen clattered with all the apps you downloaded? Are you having a hard time locating the app you need simply because everything is disorganized? Then let this be a sign for you to learn how to make app folders on your iPhone!
Here’s how you can organize your app using app folders:
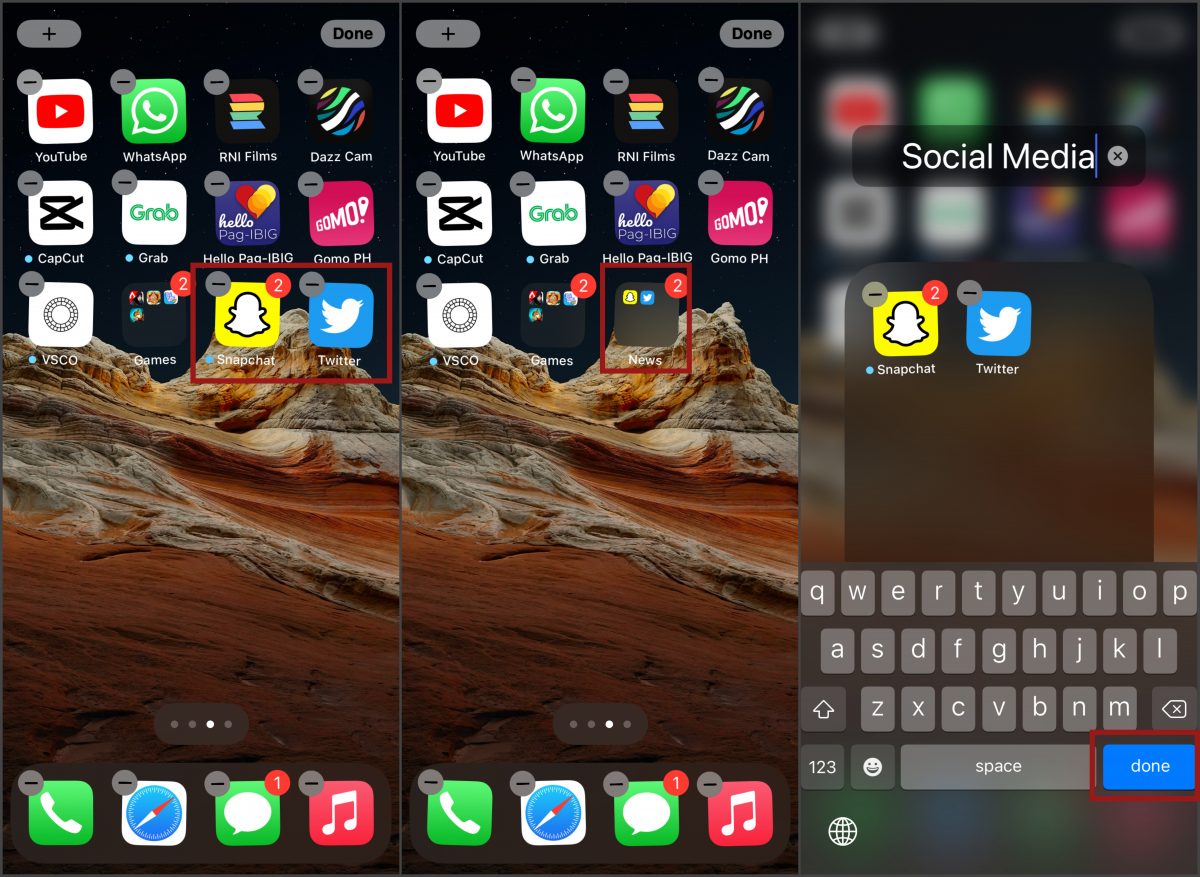
- From your home screen, long-press on an empty area until the app icons start to wiggle.
- Choose an app and drag it on top of another (make sure the apps are of the same category).
- On your screen, you’ll see the apps are now grouped in one folder. Tap on the folder.
- You can rename the folder as you see fit, as well.
- Once you’re done renaming, simply tap Done.
- To save these changes, simply tap on an empty area on your screen.

From here, you can group your apps accordingly — social media, banking, photo & video, etc.
How to Reorder Shortcuts on iPhone or iPad?
Shortcuts, when created the right way, can help you automate simple tasks. And if you are one of those who use Shortcuts regularly, you might find your Shortcuts clattered much like your files earlier. Here’s a simple guide on how to make folders on your iPhone for your Shortcuts:
- Open the Shortcuts app on your iPhone/iPad.
- Tap on the My Shortcuts tab.
- Here, you’ll see all the Shortcuts you have created and are currently all over the place.
- Start organizing these Shortcuts by long-pressing a Shortcut and then tapping on Move.
- From here, select a folder where the Shortcut can be sorted or create a new folder. Once you are done creating the folder, tap Add.
- Back to the My Shortcut tab, you’ll see your shortcut now sorted under the folder you selected/created.
Download Shortcuts App from Apple App Store
Final Thoughts
Organizing doesn’t have to be elaborate. For as long as you can easily access your files and files or apps aren’t scattered all over your iPhone, then you should be good. Furthermore, knowing how to make folders on your iPhone should help you achieve this in no time. We hope this article helps you in organizing your files and apps. Share this with your friends who might need this for their own reference.
