
Have you ever found yourself squinting at your iPhone screen, struggling to read small text or view tiny details? Thankfully, Apple has thoughtfully included a magnifier feature on iPhones to make it easier for users to zoom in on objects and text. The magnifier tool can be a lifesaver in situations where you need to read small print, examine intricate details, or even capture a close-up shot. In this article, we will explore how to access and use the magnifier feature on your iPhone, allowing you to enhance your viewing experience and make the most of your device. Whether you’re using your phone for work, leisure, or everyday tasks, the magnifier function will undoubtedly become a valuable tool in your arsenal.
Inside This Article
- Overview
- Finding the Magnifier on iPhone
- Using the Magnifier Feature on iPhone
- Customizing the Magnifier Settings on iPhone
- Conclusion
- FAQs
Overview
The Magnifier feature on the iPhone is a powerful tool that allows you to use your device’s camera to zoom in on objects and improve visibility. Whether you’re reading small text, examining fine details, or even just trying to see something from a distance, Magnifier can come in handy in a variety of situations.
With Magnifier, your iPhone becomes a portable magnifying glass, making it easier to see and read things that may normally be challenging. From deciphering tiny text on a prescription bottle to examining intricate artwork, Magnifier can provide the extra visual aid you need.
Not only is Magnifier useful for everyday tasks, but it can also be a game-changer for people with visual impairments or low vision. The customizable settings and accessibility options allow users to tailor the magnification, contrast, and brightness to their specific needs.
By using Magnifier on your iPhone, you can transform your device into a versatile tool for enhanced vision and accessibility.
Finding the Magnifier on iPhone
Are you looking for the Magnifier feature on your iPhone? This powerful tool can be incredibly useful, especially for those who may have difficulty reading small text or viewing objects up close. In this article, we will explore how to access the Magnifier feature on your iPhone and make the most of its capabilities.
Accessing Magnifier using Control Center
One of the easiest ways to access the Magnifier feature on your iPhone is through the Control Center. To do this, simply swipe down from the top-right corner of your screen (on iPhone X or later) or swipe up from the bottom of your screen (on iPhone 8 or earlier) to open the Control Center. Look for the magnifying glass icon, which is the symbol for the Magnifier feature, and tap on it to activate.
Once you have activated the Magnifier, your iPhone camera will open with a live viewfinder. You can tap and hold on the screen to lock the focus, adjust the zoom level using the slider at the bottom, and even toggle on features like brightness and contrast enhancements to improve visibility.
Enabling Magnifier through Accessibility settings
If you prefer to access the Magnifier feature through the Accessibility settings, you can enable it by following these steps:
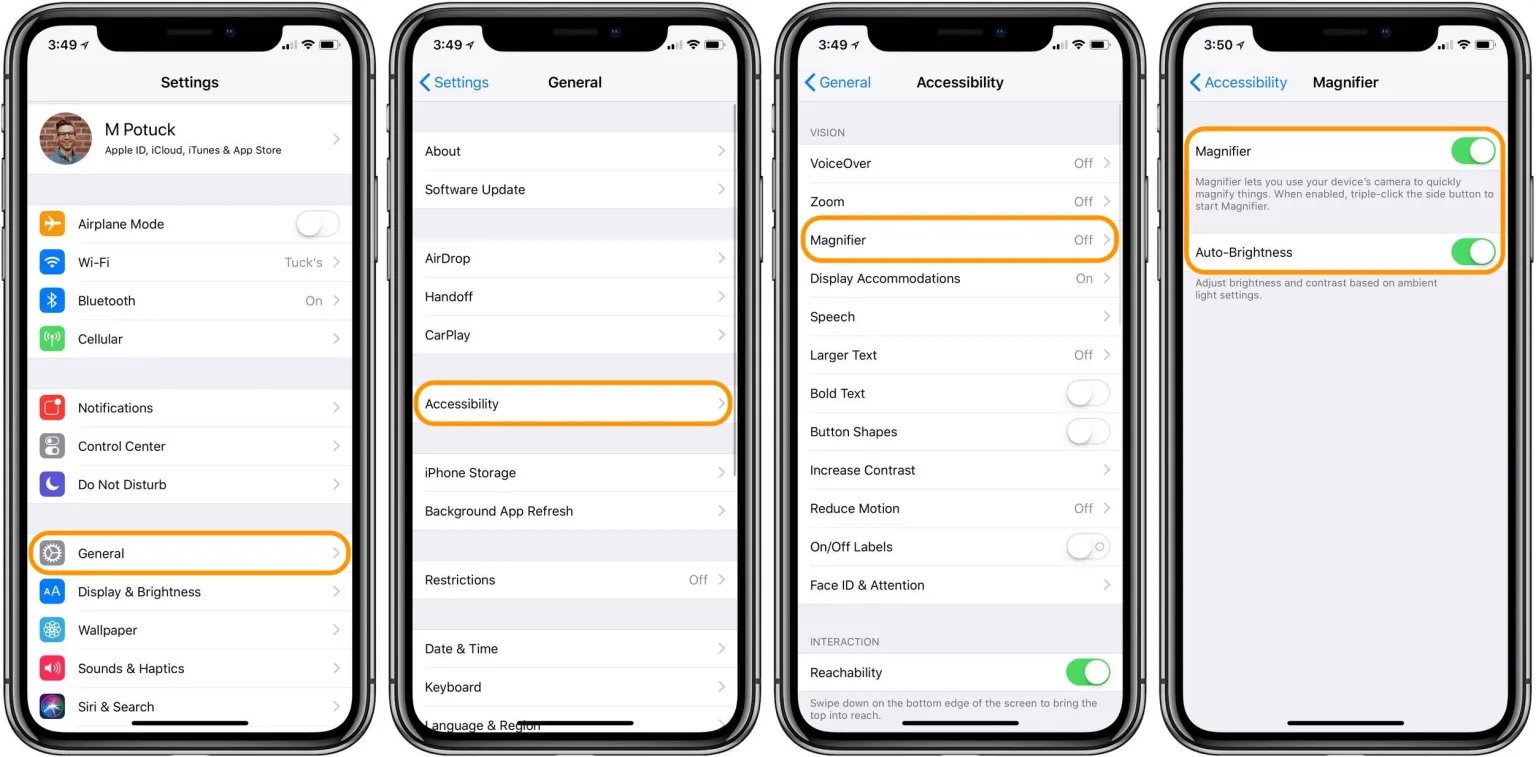
- Open the “Settings” app on your iPhone.
- Scroll down and tap on “Accessibility.”
- Tap on “Magnifier.”
- Toggle on the “Magnifier” option.
Once enabled, you can activate the Magnifier by triple-pressing the side button (on iPhone X or later) or the home button (on iPhone 8 or earlier). This triple-press shortcut can be customized in the Accessibility settings, allowing you to set it as per your preference.
Customizing Magnifier settings on iPhone
Your iPhone allows you to customize the settings of the Magnifier feature to suit your needs. To access these customization options, follow these steps:
- Open the “Settings” app on your iPhone.
- Scroll down and tap on “Accessibility.”
- Tap on “Magnifier.”
Here, you can adjust settings such as the zoom level, brightness, and contrast enhancements, as well as enable features like auto-brightness and the ability to use the LED flash as a flashlight. Take some time to explore these settings and find the configuration that works best for you.
Having the Magnifier feature on your iPhone can be a game-changer when it comes to reading small text or viewing objects up close. Whether you prefer to access it through the Control Center or the Accessibility settings, make sure to take advantage of the customization options available to enhance your Magnifier experience.
Using the Magnifier Feature on iPhone
The Magnifier feature on iPhone is a powerful tool that allows you to easily zoom in on objects or text for greater clarity. With just a few taps, you can turn your iPhone into a portable magnifying glass, making it perfect for reading small text, examining details, or even identifying objects that may be difficult to see with the naked eye.
To access the Magnifier feature on iPhone, there are two primary methods you can use: through the Control Center or by enabling it in the Accessibility settings.
1. Accessing Magnifier using Control Center:
The Control Center is a convenient shortcut that provides quick access to various features on your iPhone, including the Magnifier. Here’s how to access Magnifier using Control Center:
- Swipe up from the bottom of the screen (or swipe down from the top-right corner on iPhone X or newer models) to open the Control Center.
- Look for the Magnifier icon, which looks like a small magnifying glass, and tap on it.
- The Magnifier will open, utilizing your iPhone’s camera to provide a live view of your surroundings.
- You can use the slider at the bottom of the screen to adjust the zoom level, and swipe left or right to change the brightness and contrast.
- To freeze the image, tap the white circular button at the bottom-center of the screen.
2. Enabling Magnifier through Accessibility settings:
If you prefer to have the Magnifier feature readily available without accessing the Control Center, you can enable it through the Accessibility settings. Follow these steps to enable Magnifier through Accessibility:
- Go to the “Settings” app on your iPhone.
- Scroll down and tap on “Accessibility”.
- Under the “Vision” section, select “Magnifier”.
- Toggle the switch to enable Magnifier.
- Once enabled, you can triple-press the Home button (or the side button on iPhone X or newer models) to activate the Magnifier feature.
3. Customizing Magnifier settings on iPhone:
The Magnifier feature on iPhone offers a range of customizable settings to enhance your user experience. To access and customize these settings, follow these steps:
- Go to the “Settings” app on your iPhone.
- Scroll down and tap on “Accessibility”.
- Under the “Vision” section, select “Magnifier”.
- In the Magnifier settings, you can adjust options such as the brightness, contrast, and zoom level.
- You can also turn on the “Smart Invert” feature, which can provide increased contrast for better readability in certain situations.
With the Magnifier feature on iPhone, you have a powerful tool right at your fingertips. Whether you need to read small print, examine intricate details, or simply enhance your vision, the iPhone’s magnifier can make it easier for you to see and understand the world around you.
Customizing the Magnifier Settings on iPhone
The Magnifier feature on iPhone is a handy tool that allows users to use their device’s camera as a magnifying glass. It comes in handy when you need to read small text, examine tiny details, or simply zoom in on something for a closer look.
While the Magnifier feature is useful on its own, you can also customize its settings to suit your preferences and specific needs. Here are a few ways you can customize the Magnifier settings on your iPhone:
- Adjusting the Magnification Level: By default, the Magnifier is set to 2x magnification. However, you can adjust this level to your liking. Simply open the Magnifier from the Control Center or by enabling it through the Accessibility settings. Once it’s open, use the slider at the bottom of the screen to increase or decrease the magnification level.
- Enabling Auto-Brightness: When using the Magnifier, it’s important to have enough light for clear visibility. To ensure this, you can enable the Auto-Brightness feature. This will automatically adjust the brightness of the Magnifier’s viewfinder based on the ambient lighting conditions.
- Using Different Filters: The Magnifier also allows you to apply filters to enhance visibility. By default, it uses the Normal filter, but you can switch between filters such as Grayscale, Yellow/Blue, Red/Green, and Green/Red. These filters can be helpful for individuals with visual impairments or specific color preferences.
- Locking the Focus and Exposure: If you’re using the Magnifier to examine something in detail, you can lock the focus and exposure to keep them constant. Simply tap and hold on the screen until the yellow focus lock indicator appears. This ensures that the focus and exposure levels remain unchanged, even if you move the device or the lighting conditions change.
- Using the Torch for Better Lighting: In low-light situations, you can activate the torch feature to provide additional lighting for the Magnifier. Simply tap the flashlight icon in the bottom left corner of the Magnifier screen to turn on the torch. This can greatly improve visibility, especially when examining small text or objects in dark environments.
By customizing the Magnifier settings on your iPhone, you can optimize its functionality to suit your specific needs. Whether it’s adjusting the magnification level, using different filters, or locking the focus and exposure, these customization options allow for a more personalized and effective magnifying experience.
Conclusion
In conclusion, the magnifier feature on the iPhone is a valuable tool that can enhance your viewing experience and make small text or objects easier to see. Whether you need to read a small print document, examine fine details in an image, or simply zoom in on something for better visibility, the magnifier on your iPhone can come in handy. It is conveniently located within the Accessibility settings and can be easily accessed with just a few taps. Remember to adjust the magnification level to suit your needs and take advantage of the other useful features such as the flashlight option and color filters. With the iPhone’s magnifier, you can now have a portable visual aid wherever you go.
FAQs
1. Where is the magnifier on iPhone?
The magnifier feature on iPhone can be accessed by following these steps:
- Go to the Settings app on your iPhone.
- Scroll down and tap on “Accessibility”.
- Inside the Accessibility settings, select “Magnifier”.
- Toggle the switch beside “Magnifier” to enable or disable the feature.
- Once enabled, you can quickly access the magnifier by triple-clicking the Side or Home button, depending on your iPhone model.
2. Can you adjust the magnification level in iPhone’s magnifier?
Yes, you can adjust the magnification level in iPhone’s magnifier feature. To do this:
- Open the magnifier by triple-clicking the Side or Home button.
- Once the magnifier is open, swipe up or down on the screen to increase or decrease the magnification level.
- You can also pinch in or out with two fingers on the screen to achieve the desired magnification.
3. Are there any additional settings or options available in iPhone’s magnifier?
Yes, there are additional settings and options available in iPhone’s magnifier. These include:
- Freeze Frame: Tap the small circular button at the bottom center of the magnifier screen to freeze the image. This allows you to better examine the magnified content without holding your finger on the screen.
- Adjust Brightness: Swipe left or right on the screen to adjust the brightness of the magnified view.
- Toggle Flashlight: Tap the flashlight button at the bottom left of the magnifier screen to turn on the iPhone’s flashlight, providing better illumination in low-light conditions.
- Filter Colors: Tap the filters button at the bottom right of the magnifier screen to apply different color filters that can enhance visibility for individuals with visual impairments.
4. Can the magnifier be used without enabling the feature in the Accessibility settings?
Yes, there is a shortcut to access the magnifier even without enabling the feature in the Accessibility settings. You can do this by:
- Swipe down from the top-right corner of your iPhone’s screen to open Control Center.
- Tap on the magnifying glass icon to open the magnifier.
5. Is the magnifier feature available on all iPhone models?
Yes, the magnifier feature is available on all iPhone models that support iOS 10 or later. This includes iPhone 5s and newer models.