
Touch control is among the biggest advancements in mobile electronics. It helped everyone do away with pressing physical buttons to navigate the interface of present-day gadgets. Despite touch control being a game-changer in device usage, the said feature for gadget displays can have problems on any smartphone – be it the popular iPhone. Those issues can affect equally important functions, such as Touch ID not working, which you might be using as a primary method to access your gadget. That is why you should learn to troubleshoot an iPhone touch screen that is not working. The more your know-how is about the fixes, the faster you can get your device’s display functionality back.
We are here to help you with that. In this guide, you will not only learn how to solve the problem; you’ll also understand why your iPhone’s display or parts of it are no longer responsive.
Fix iPhone Touch Screen That’s Not Working

Without further ado, we will be going straight to the main topic. What fixes should you try for the touch screen sensitivity or response issue based on the culprit? Read on for quick and insightful tutorials.
1. Wipe Out Dirt or Smudges on iPhone Touch Screen
Let us face it. No matter where a gadget is stored or how it is held, it can still get dusty and full of smudges. An iPhone touch screen not working due to too much dirt is not far from possible. The display might no longer detect any form of touch or even your registered fingerprints.
The solution is something anybody can think of fast. Wipe away dust and smudges on your iPhone. It should work if the underlying problem is only dirt and not something serious.
2. Take Off iPhone Touch Screen Protector
Installed a new screen protector and your iPhone touch screen is suddenly not working? Your protective accessory might be too thick, making it hard for the display to respond to touch. Simply remove or replace the tempered glass with a thinner one, or try a liquid screen protector instead.
3. Remove or Update App in Use When Touch Screen Froze
An iPhone touch screen not working may be a temporary problem. If you noticed that the display is disabled only when a specific app is open, that program is likely the culprit. The app might be buggy or worse, has viruses that are difficult to catch – you would not be able to tell easily if your phone is hacked.
For an app that is not necessary to keep, the best course of action you should take is to delete it. Uninstalling an app can be done fast.
Here is a quick guide:
1. Long-press the app icon until the mini menu shows up.
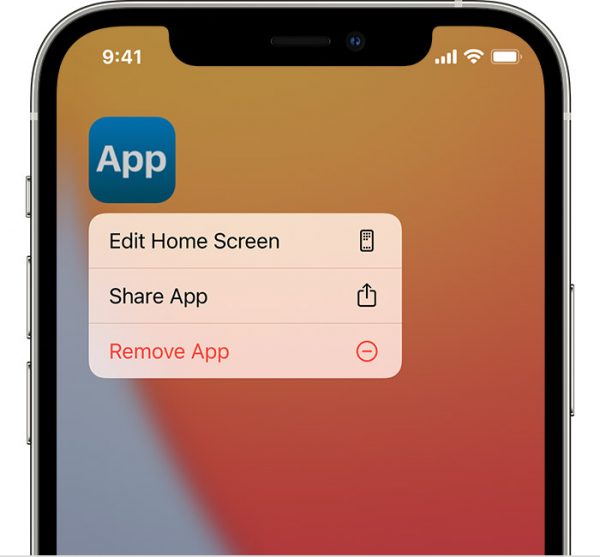
2. Hit the Remove App option.
3. Verify the deletion via the confirmation prompt.
If you think that the app is safe to use, you can just get the new version of it that might have been patched or fixed. That is possible if an update is out already.
Refer to these beginner-friendly instructions:
1. On the App Store, visit your account page.
2. Navigate down the menu to see apps that need updating.
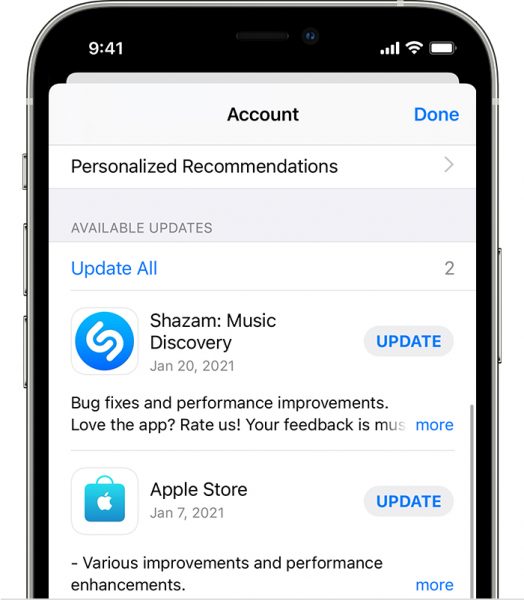
3. Select the specific app you want from the list.
4. Free Up Space on iPhone
Sometimes, an iPhone touch screen cannot keep up with your swiping and tapping speed. If the lags are frequent, then your display is on the brink of being useless. Lagging can be the aftermath of overloaded device storage, so free that space up for your iPhone touch controls to function smoothly again.
Monitor your iPhone’s storage through this simple guide:
1. Tap the app for your device’s settings interface.
2. Pick General from the options.
3. Select Storage from the menu.
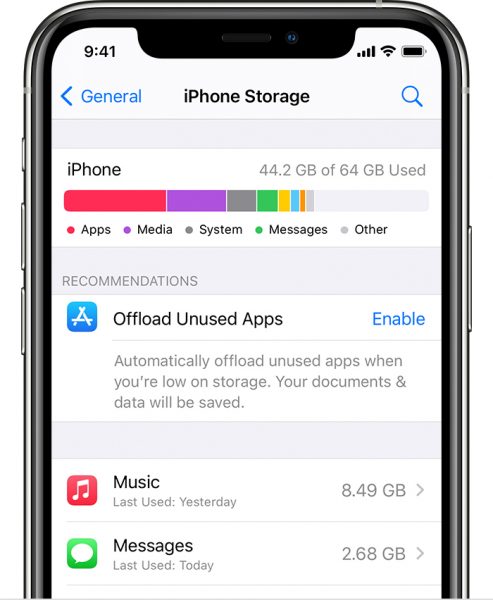
4. Go for the Offload Unused Apps option or pick specific apps to delete.
5. Toggle iPhone 3D or Haptic Touch Feedback Settings
Haptic Touch in the latest iPhones lets you bring out specific menus when you touch any part of your gadget’s display. It is the successor to Apple’s 3D Touch that lets you do the same thing. In 3D Touch, though, the pop-up interface will depend on how light or hard you press on the screen.
If it is the 3D or Haptic Touch of your iPhone touch screen that is not working, reconfigure it. That could restore the display’s functionality.
Here is how to toggle 3D or Haptic Touch configurations on an iPhone:
1. Find and tap the Accessibility option from your iPhone’s Settings app.
2. Choose 3D or Haptic Touch from the menu.
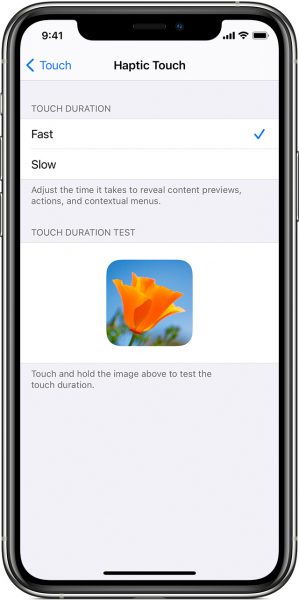
3. On the 3D or Haptic Touch interface, make the touch duration fast or slow.
6. Switch to a Newer OS
You might prefer to stick to a slightly outdated version of iOS because of its functionality, but the time will come when it will be almost useless due to bugs or lags. Switch to the latest iOS as soon as possible, so your old software would not affect your touch screen.
Check for and install a new iOS via the steps below:
1. Use the Settings app on your iPhone.
2. Navigate to and click General.
3. Pick Software Update from the next batch of options.
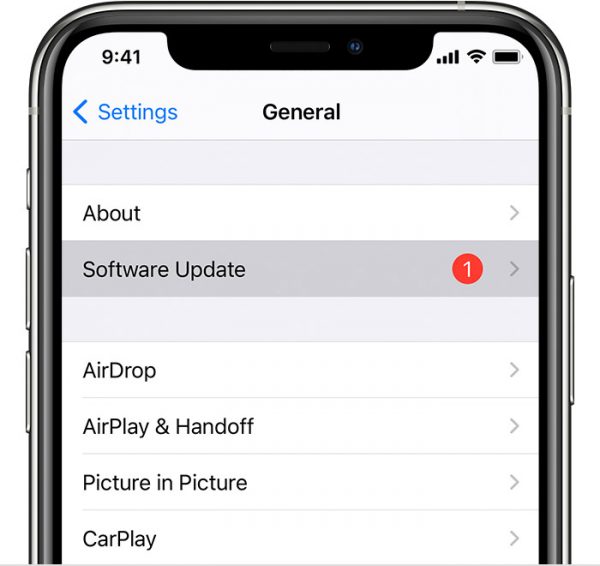
4. Hit Download and Install if there is an available update shown.
If your iPhone touch screen is completely unusable, this solution will not apply to you. Proceed to the next fixes.
7. Hard Restart iPhone
Unknown underlying problem? No problem. You still have the physical side buttons on your iPhone if your touch screen is completely frozen. Those few buttons are still good to have because they allow you to force your iPhone to restart without a press or tap on the screen.
For models newer than the iPhone 7:
1. Long-press your device’s two Volume buttons.
2. Hold the side button until the device’s screen boots up again.
For iPhone 7 and older series:
1. Constantly press the Sleep/Wake button together with the Volume Down or Home button.
2. Let go of all buttons once the screen lights up and shows the device’s logo.
8. Let iPhone Go Into Recovery Mode
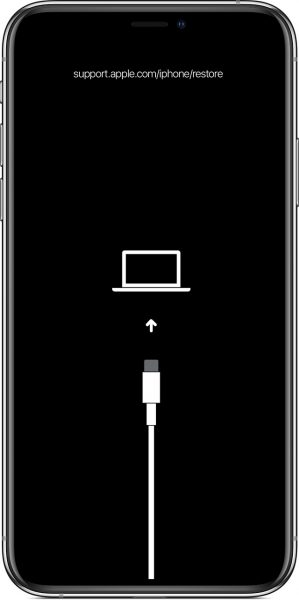
If your iPhone touch screen is not working and you cannot find a clue as to why it is happening up to this point, you may opt to use Recovery mode. We must warn you, though. The process is quite technical and needs caution.
Recovery Mode makes use of Finder or iTunes on a computer to replace faulty software at the expense of your device data, settings, and credentials. We recommend reading our definitive iPhone Recovery mode guide should you deem the said method necessary.
9. Make iPhone Enter DFU Mode

Device Firmware Update (DFU) mode is another fallback when the majority of the fixes fail, including the Recovery mode. If you are wondering why a technical solution such as the Recovery mode can fail, the simple answer is that no troubleshooting technique is perfect. Although rare, you might find your device stuck on Recovery mode, so it is good to have DFU mode as a backup solution.
DFU mode, as you might have guessed, works on firmware and not software. But what is firmware? In layman’s terms, firmware handles the processes of the gadget’s hardware – touch screen included.
Given that, DFU mode is a direct solution for an iPhone touch screen that is not working. But keep in mind that it is not an Apple-endorsed troubleshooting method even if it is a go-to solution for troubleshooting experts. It is also not suitable for anyone who is not tech-savvy. Putting an iPhone in DFU mode is quite complicated to pull off due to the button timings required. You also lose device data as a consequence of trying it. Nonetheless, we have a comprehensive but easy-to-understand DFU mode guide in case you are interested.
10. Restore Factory Defaults on iPhone
Reverting your iPhone to its original factory state needs sacrifice, just like in Recovery and DFU modes. You will have to let go of all configurations and content you have set up or saved on your device. On the bright side, the solution would not cost you that much if you have a recent iCloud backup of your iPhone data. Moreover, it has a high probability of solving the issue no matter what the culprit is.
Now, we know a question that might be bugging you. An iPhone factory reset is usually done via the settings menu, so how can it happen if tapping or swiping does not work on the iPhone’s touch screen? iTunes or Finder on a PC makes the method possible. You will need any of the two, along with your iPhone. We will walk you through the process here.
Try these easy steps:
1. Access iTunes or Finder on your PC.
2. Use a Lightning-to-USB cable to link your iPhone to your PC.
3. Follow the on-screen prompt for device connectivity.
4. On the iTunes or Finder interface, look for and click your iPhone’s name.
5. On the iPhone details pane, hit the Restore from Backup or Restore iPhone button.
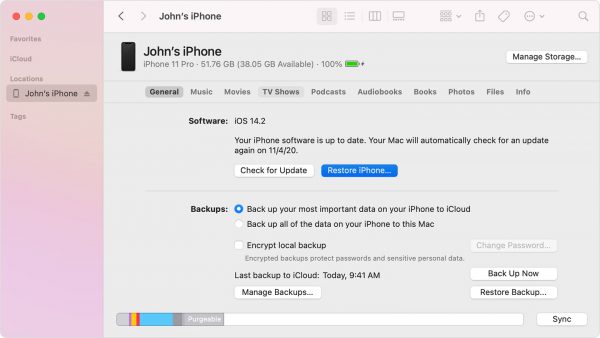
6. Verify the action from the pop-up window if any.
7. Let your iPhone boot up on its own for the factory reset to finish.
11. Have the iPhone Touch Screen Replaced
There are two common reasons why you will have to settle with getting your iPhone touch screen swapped with a new one. It is either you accidentally broke the display or got the device waterlogged.
There is no need to worry about replacement because you have two ways to do so. Those are the DIY method and the Apple repair service. If you are tech-savvy, the former can be more efficient or faster than the latter. Sometimes, it may even cost you less than having someone do the troubleshooting and part replacement. You can purchase a new touch screen and the necessary mobile phone repair tool kit online or at your nearest gadget store. Change the iPhone display on your own afterward.
For the average Joe, it is ideal to have the iPhone taken to a service center for display repair instead of tinkering with the delicate components under the touch screen. That is even if the replacement process might take a while due to customer requests lined up or sourcing brand new parts. Know that the iPhone will be in good hands because you will be handing it over to the experts. Moreover, you will not be voiding any existing warranty privileges.
To get started with the latter solution, reach Apple through the official Apple Support website. From there, you will be able to call the customer support hotlines or download their app to chat with a service representative.
Don’t Forget Proper Care for Your iPhone
The display is one of the most fragile yet important hardware of your iPhone. When your touch screen is not working or responding, it is like saying goodbye to all functions of your gadget. Fortunately, you are now equipped with the necessary troubleshooting knowledge through our guide. We have a reminder, though. Even if you already know what to do when the touch screen acts up, do not forget about the safekeeping practices. For example, clean the display once in a while even if dirt was not the cause of the problem. Also, keep the gadget stable on your desk or secure on your belt or hand to avoid falls. Those together with our recommended fixes will help you prolong the service life of your iPhone and its parts.
Is the problem with your gadget the “black screen of death”? If yes, check out our beginner-friendly guide on how to fix an iPhone’s black screen, too.