
A mobile phone that stops working is alarming because it is so essential for communication, entertainment, information, business, or personal applications. Fortunately, there are a handful of first-aid solutions for a gadget that is malfunctioning. However, what if those do not work? For mobile phones running iOS, this is where the iPhone Recovery Mode comes in handy.
What Is iPhone Recovery Mode?
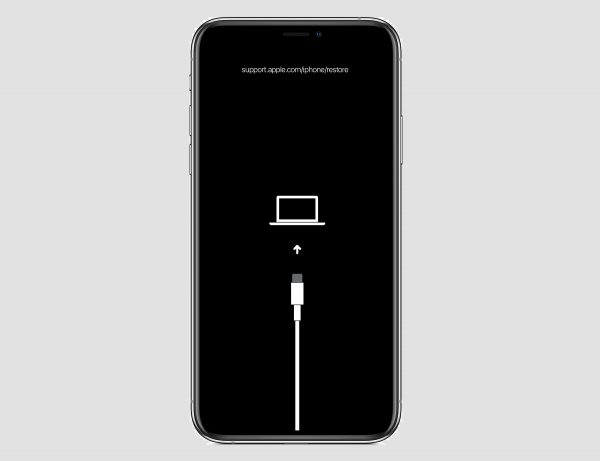
The iPhone Recovery Mode is a fix that focuses on the mobile device’s software. To elaborate, it helps an iPhone obtain a clean version of iOS so it can resume functioning. For example, your gadget is running a buggy iOS 13. Recovery Mode can get your iPhone a working iOS 14 or backup iOS 12 or older software.
Why Use iPhone Recovery Mode?
The iPhone Recovery Mode has many advantages. Firstly, it is a proven working solution to various issues you might encounter on your mobile phone. For instance, an iPhone freezes in the middle of a software update, cannot update at all, isn’t loading beyond the Apple logo screen, or cannot be recognized by a computer; the iPhone Recovery Mode can fix it.
Secondly, it is useful for restoring an OS to its working state even if there is no iPhone issue or anytime you want it. For example, you decide to refresh the device after jailbreaking or because you need iPhone access but forgot your passcode.
Lastly, it is convenient to use. You can put your iPhone into Recovery Mode as long as you have Finder or iTunes, a computer, and a USB to Lightning cable. All of these are what iPhone users typically have so you most likely do not need to look for anything. In case you are not familiar with Finder and iTunes, the former is the default file manager on your Mac. The latter is a media and device management app you can download from the App Store or Microsoft Store. Note that you will be using Finder if you have macOS Catalina while iTunes for macOS Mojave and older versions.
Drawbacks of iPhone Recovery Mode
The iPhone Recovery Mode is a solution with some risks or tradeoffs because it has to delete data, passcodes, and settings in the process. Specifically, you will lose all non-iTunes content, making the mode similar to when you factory reset an iPhone.
Additionally, iPhone Recovery Mode is not so helpful if the software version or data you have as backup is too old. An old iOS version may often work, but it having outdated features will not bring your phone back to its optimal working state.
Also, an iPhone can be stuck on Recovery Mode. This case of solution-turned-problem does not happen frequently but is something you still have to be prepared to fix. You’ll know what to do about this scenario as you read on.
What to Do Before Using Recovery Mode?
There are a few things to do before putting your iPhone in Recovery Mode so you can avoid losing your iPhone’s important information and configurations. Furthermore, these ensure the recovery process will go without or with fewer problems.
1. Try Less Risky Solutions
One is to try non-drastic solutions first because something as simple as waiting for a bit or force restarting your iPhone might already work. As a result, you do not need to use Recovery Mode. Moreover, you can avoid losing your important data, passcodes, and settings.
2. Back-Up iPhone
Another task for you is to back-up your iPhone. This is easy to do because there are many ways to save data and device credentials. For instance, you can use iCloud, an external hard drive, and apps like OneDrive. The first is a service from Apple itself so it is the most recommended method by the experts.
3. Update iTunes
One more thing to do is to update to the latest version of iTunes. This way, the mobile device management app will have all the necessary settings for recovery. Also, it patches all or most bugs, so your iPhone will be entering Recovery Mode hassle-free.
Also Read: How to iCloud Backup Your Apple Devices?
How to Put iPhone in Recovery Mode?
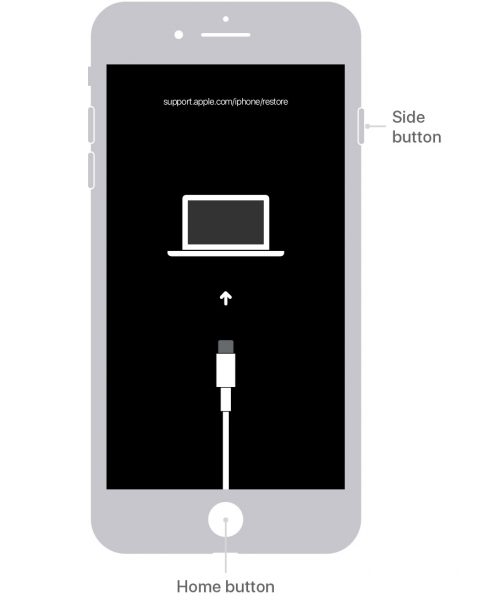
There are no universal activation guidelines for iPhone Recovery Mode because it varies across device generations. To explain, some iPhones do not have the essential button shortcuts for Recovery Mode, specifically the iPhone X and later generations that are lacking the circular home button. This guide covers everything you need to know, so you’ll learn how to use the feature from the latest down to the oldest iPhone series.
For iPhone 8 and newer series
1. If Finder or iTunes is running on your computer, exit from it first and relaunch it after a few minutes.
2. Connect your iPhone to your computer via a USB to Lightning Cable.
3. Hold and release your iPhone’s Volume Up rocker.
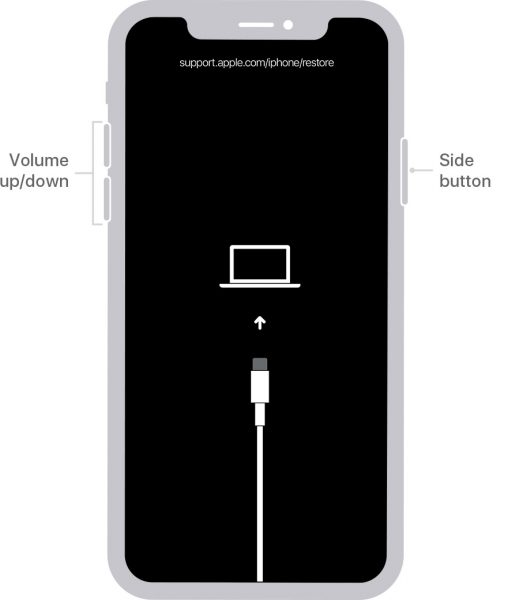
4. Do the same for the Volume Down rocker afterward.
5. Hold the side button for the Recovery Mode screen to show up.
6. Click on Update on the pop-up notification to get the latest OS for your device.
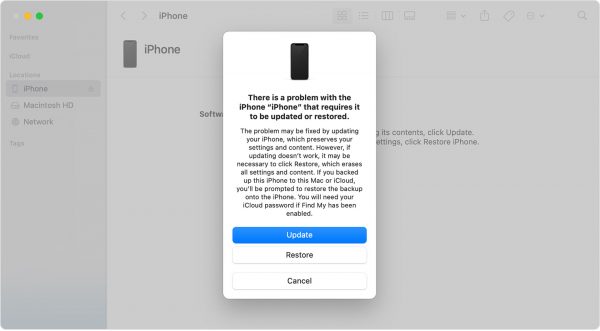
8. If not working, repeat steps 1 to 6, then choose to Restore instead from the pop-up options.
For iPhone 7 series
1. Close Finder or iTunes on your computer if it is open.
2. Launch or relaunch Finder or iTunes.
3. Link your iPhone and computer through a cable connection.
4. Press and hold the power and volume down rocker of the iPhone simultaneously.
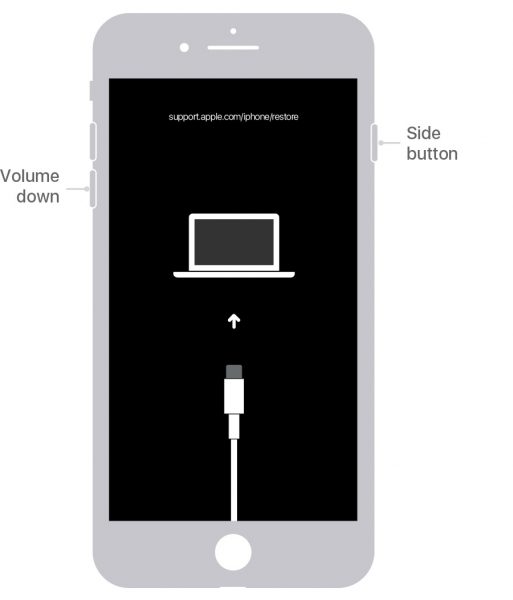
5. Wait for the Recovery Mode interface to be displayed.
6. Release the top or side, and Volume Down buttons afterward.
7. Select Update from the pop-up notification choices.
8. If not working, let the iPhone enter Recovery Mode again but click Restore from the pop-up options.
For iPhone 6 and older series
1. Exit Finder or iTunes if it is running on your computer.
2. Open or reopen Finder or iTunes.
3. Connect your iPhone to your computer.
4. Hold the Home button and while also pressing the top or side button.
6. Wait for the iPhone to launch the Recovery Mode screen.
7. Release the buttons once Recovery Mode is on.
8. Pick Update or Restore from the pop-up notification.
9. If your first choice does not work, repeat everything, then try the other option on the pop-up window.
How to Get iPhone Out of Recovery Mode?
Your iPhone will be out of Recovery Mode automatically if it was restored without issues. Otherwise, you can do it manually if you want to exit from its screen anytime. Unlike the activation process, the steps here are nearly universal across iPhone models.
Here are the instructions to get your iPhone out of Recovery Mode:
1. Exit Finder or iTunes on your computer.
2. Disconnect the cable that links your iPhone and computer properly.
3. Long press on the Sleep or side button of your iPhone.
4. Release the button once the iPhone shows its Apple logo.
5. If it does not work, repeat Step 3 but also hold the Volume Down button.
6. Wait for the iPhone to finish rebooting.
What to Do if Recovery Mode Fails?
No solution is perfect. The iPhone Recovery Mode is not always effective for your mobile phone problems just like any other method is. Also, your iPhone might suddenly get stuck on Recovery Mode as previously mentioned, so you should know what else you can do as a backup plan. The good thing is there are a few more fixes to try.
1. Force Restart or Factory Reset iPhone
When you find iPhone Recovery Mode ineffective, force the mobile device to restart first. To explain, a force restart is like a soft pat versus a hard smack on the device to make it function normally again. This is because the method is safe and does not result in any loss of data or credentials.
Here are what you should do to force restart an iPhone:
1. Hold and release the Volume Up, Down, and side buttons.
2. Wait for the device to display the Apple logo.
3. Release the buttons afterward.
4. Wait for the iPhone to reboot.
You can also follow these steps if the abovementioned process is not applicable:
1. Hold the iPhone’s Sleep and Home buttons.
2. Release the buttons after the Apple logo appears onscreen.
3. Wait for rebooting to finish.
Do a factory or hard reset afterward if force restarting the iPhone did not help. Remember that you might also lose current settings, data, and credentials with this method. You’re good to go if you have backed up important information beforehand, which you already probably did before using iPhone Recovery Mode.
Follow these universal instructions for factory resetting an iPhone:
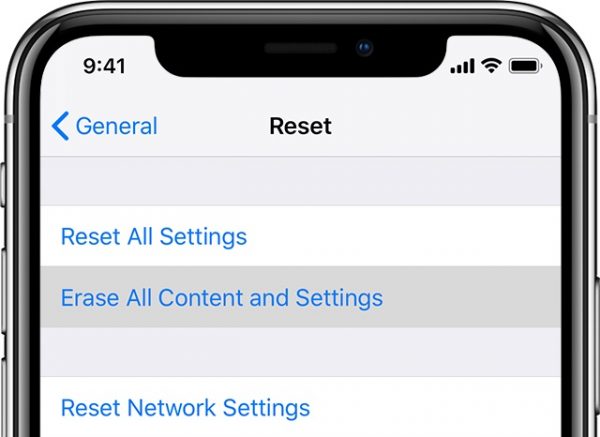
1. Click on the Settings icon of your iPhone.
2. Tap General from the menu options.
3. Select Reset afterward.
4. Click Erase All Content and Settings.
5. Wait for the iPhone to reboot.
Also Read: iPhone Factory Reset: How to Do it Without a Password?
2. Switch to DFU Mode
DFU, in case you are not familiar with the acronym, stands for Device Firmware Update. To elaborate, it is a mode that is available on all iOS devices and the recommended fix when an iPhone gets stuck on Recovery Mode. In fact, it can also be used for a variety of purposes like restoring an iPhone, downgrading iOS, setting up firmware for jailbreaking or unlocking, and more. Be wary, though, because this method will cause you to lose data. These being said, you’ll notice that DFU Mode is quite similar to iPhone Recovery Mode.

The two modes differ, because DFU Mode makes the screen turn blank, does not load OS, and is more of a go-to solution for the experts or tech-savvy. In fact, DFU Mode is quite complicated to pull off because of the many buttons you must hold simultaneously for a specific duration. For instance, just exceeding a few seconds on the button presses may hinder your iPhone from entering DFU Mode. Consequently, you might find yourself repeating the process multiple times.
With this guide, though, it might be a bit easier for you. Note that the methods vary depending on the iPhone series.
For iPhone 8 and newer series
1. Link your iPhone and computer via a cable.
2. Run the iTunes app on your PC.
3. Click the Volume Up and Down buttons on your iPhone.
4. Long press the side or power button until the black screen.
5. Continue holding the Side or Power button and press the Volume Down button.
6. Wait for five seconds before releasing the buttons and make sure to do it without making the Apple logo appear.
7. Wait for the iTunes alert that says it has detected your iPhone in Recovery Mode, then agree to restore your iPhone.
For iPhone 7 series
1. Link your iPhone and computer.
2. Open iTunes on your connected PC.
3. Long press on the side and Volume Down buttons.
4. Release only the side button within eight seconds.
5. There should be no Apple logo on the blank screen, just wait for iTunes to detect and alert about the device.
For iPhone 6 and older series
1. Connect your iPhone to your PC.
2. Click on iTunes to open it on your PC.
3. Long press on the Home and Lock buttons.
4. Stop holding the Lock button after eight seconds.
5. On the blank screen, wait for iTunes to alert you that your iPhone is now in Recovery Mode.
3. Use iTunes
If iTunes lets your iPhone enter iPhone Recovery Mode, you can also force exit it when you got stuck. To elaborate, the app can detect in an instant and let you know that your iPhone cannot move on from Recovery Mode. Furthermore, it restores and factory resets your mobile device if you cannot do it on the gadget itself.
Here are instructions for when you are using iTunes to fix the problem:
1. Launch iTunes from your computer’s home screen.
2. Wait for the detection alert.
3. Click Ok on the prompt that says you need to restore your iPhone afterward.
4. Alternatively, you can go to the Summary option on the sidebar of the iTunes interface.

5. Click on the Restore iPhone button if you had to do step 4.
4. Contact Apple Support
When neither iPhone Recovery nor DFU Modes work on your end or you are finding both hard to do, you can opt to contact the experts instead. For example, personnel from Apple Support or the nearest service center around.
The pros can help you diagnose problems no matter how worse it is, provide you with more Do-It-Yourself solutions, or directly fix your iPhone. Make sure to reach out via the help websites or apps first, so you do not need to travel just for a consultation. Customer support nowadays is active 24/7 online.
Takeaways
Among the drastic and last-resort solutions when your iPhone seems dead or freezes during a software update, the Recovery Mode is a spot-on method to fix your mobile device. Moreover, it is safe as long as you take the necessary precautions, including backing up all your data and updating the applications you need.