
Are you tired of scrolling through your long list of contacts on your iPhone every time you want to send a group message or email? Well, there’s an easy solution – creating a contact group! With this feature, you can easily manage and communicate with a specific set of contacts, saving you time and effort.
But how do you create a contact group on your iPhone? Don’t worry, we’ve got you covered. In this article, we’ll walk you through the simple steps to create a contact group on your iPhone. Whether you want to organize your work contacts, friends, family, or any other group, this guide will make the process a breeze. So, grab your iPhone and let’s get started!
Inside This Article
- How to Create a Contact Group on iPhone
- FAQs
- Open the Contacts App
- Select the Contacts you Want to Add to the Group
- Create a New Group
- Add Contacts to the New Group
- Conclusion
- FAQs
How to Create a Contact Group on iPhone
Are you looking to categorize your contacts and streamline your communication on your iPhone? Creating a contact group is a great way to do that. With just a few simple steps, you can easily organize your contacts into specific groups for work, friends, family, or any other category that suits your needs. Let’s dive into the process of creating a contact group on your iPhone.
1. Open the Contacts App:
To begin, locate and open the Contacts app on your iPhone. It is represented by a gray icon with a silhouette of a person.
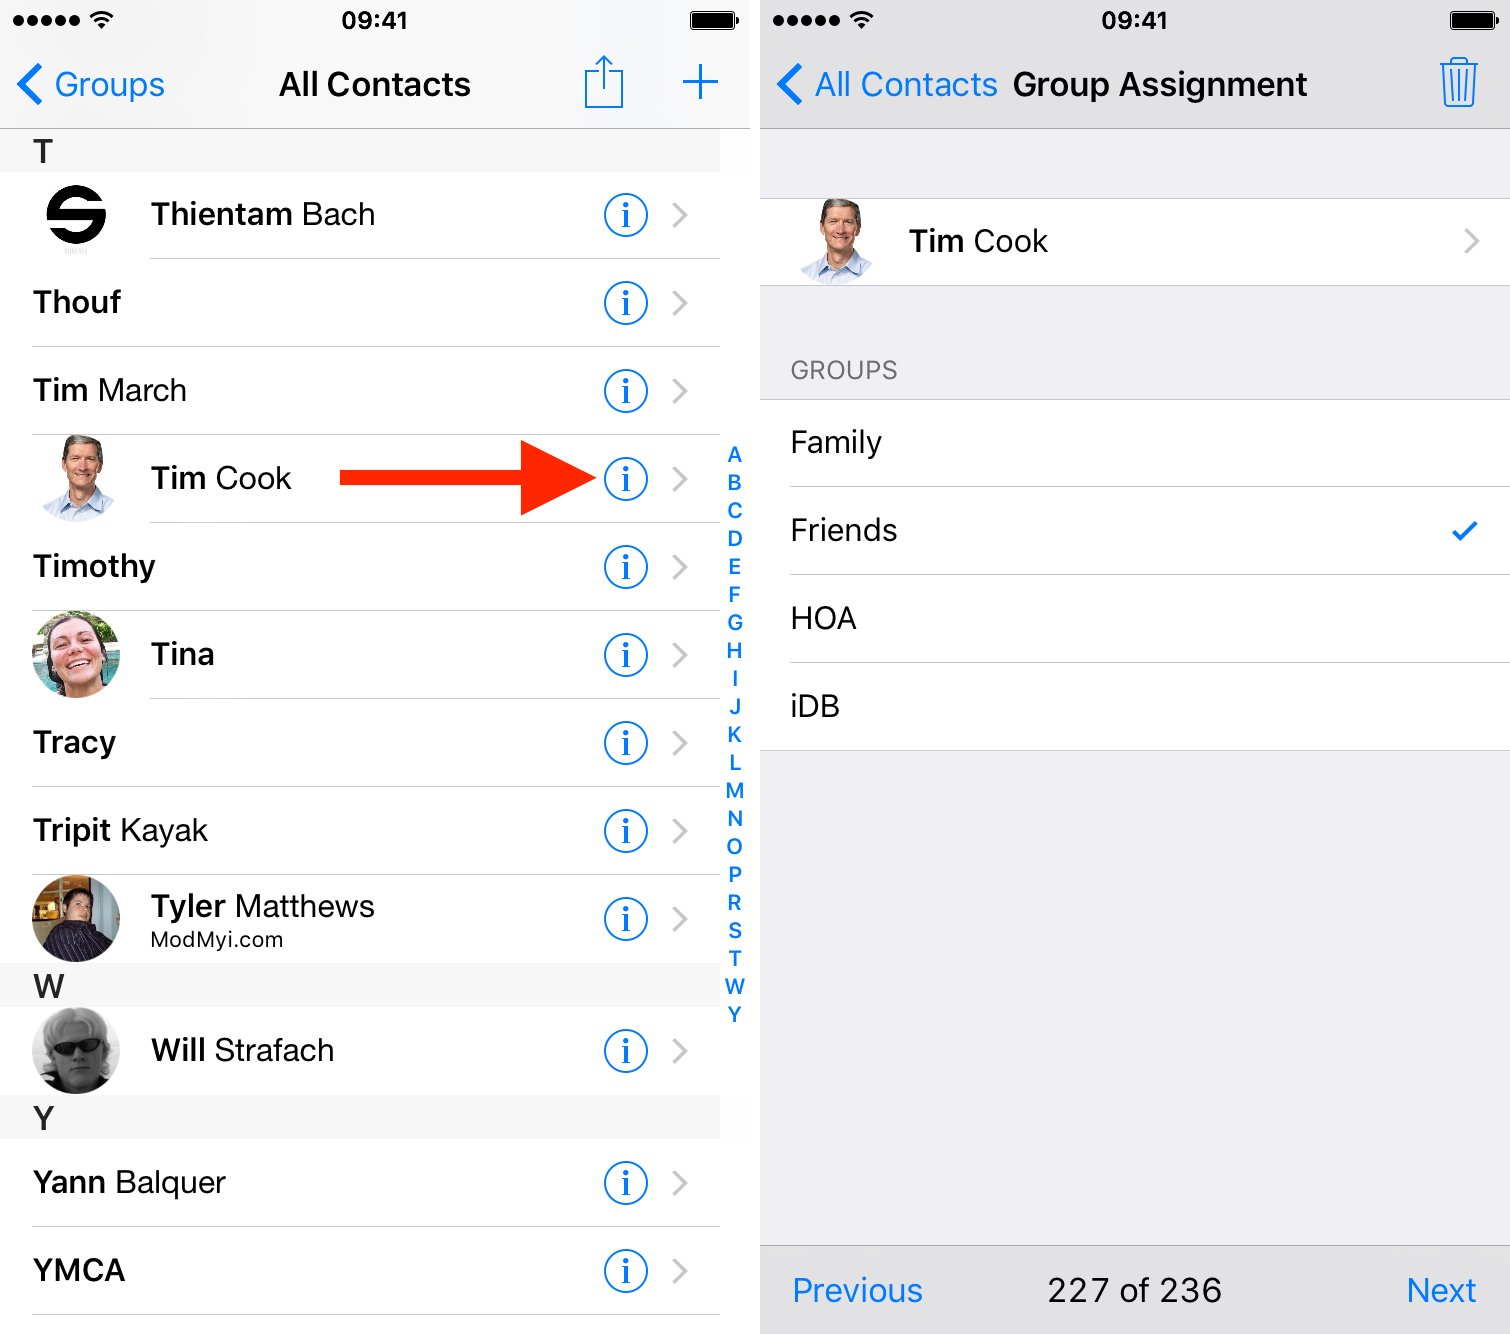
2. Select the Contacts you Want to Add to the Group:
Once you’ve opened the Contacts app, browse through your contacts list and select the ones you want to add to the group. You can do this by tapping on each contact one by one, or you can select multiple contacts at once by using the checkmark icon next to each contact.
3. Create a New Group:
After selecting the contacts, tap on the “Groups” option located in the upper left corner of the screen. This will display a list of existing groups and the option to create a new one. Tap on “New Group” to proceed.
4. Add Contacts to the New Group:
Now, you can assign the selected contacts to the newly created group. Tap on each contact you wish to add, or use the checkmark icon to select multiple contacts at once. Once you have selected all the desired contacts, tap on “Done” in the upper right corner of the screen.
Congratulations! You have successfully created a contact group on your iPhone. You can access and manage this group anytime by going back to the “Groups” option in the Contacts app. Keep in mind that the process may vary slightly depending on your iPhone model and iOS version, but the general steps remain the same.
Creating contact groups not only helps in efficient communication but also allows you to easily manage and organize your contacts. Whether you want to send a group message or quickly find specific contacts, having well-organized groups can undoubtedly save you time and effort.
If you have any more questions or need further assistance, feel free to check our FAQs section below.
FAQs
Q: Can I add contacts to multiple groups on my iPhone?
A: No, the Contacts app on iPhone allows each contact to be in only one group at a time. However, you can create multiple groups and assign different contacts to each group.
Q: Can I delete a contact group on my iPhone?
A: Yes, you can delete a contact group on your iPhone. Simply open the Contacts app and go to the “Groups” option. Swipe left on the group you want to delete and tap on the “Delete” button that appears.
Q: Can I rename a contact group on my iPhone?
A: Yes, you can rename a contact group on your iPhone. Open the Contacts app, go to the “Groups” option, and tap on the “Edit” button in the upper right corner. Tap on the group you want to rename, and then edit the group name. Finally, tap on “Done” to save the changes.
Q: Will creating a contact group on my iPhone affect my contacts on other devices?
A: If you have set up synchronization for your contacts across devices using iCloud, creating a contact group on your iPhone will also reflect on other devices linked to the same iCloud account.
Q: Can I send group emails or messages using the contacts in a contact group?
A: Yes, once you have created a contact group on your iPhone, you can easily send group emails or messages. Simply open the Mail or Messages app and enter the name of the contact group in the recipient field. This will automatically send your message or email to all the contacts in that group.
Creating a contact group on your iPhone is a simple process that can help you stay organized and communicate efficiently. By grouping your contacts, you can quickly access and connect with specific individuals or send messages to multiple people at once. Give it a try and experience the convenience it brings to your everyday communication!
Open the Contacts App
Creating a contact group on your iPhone is a convenient way to organize your contacts and streamline communication. To get started, you’ll first need to open the Contacts app on your iPhone. This app comes pre-installed on all iOS devices and can be found on your home screen.
Simply tap on the Contacts app icon, which typically features a silhouette of someone’s head and shoulders. Once you’ve opened the app, you’ll be able to access your entire contact list and the various options for managing your contacts.
The Contacts app on your iPhone is a powerful tool that allows you not only to create contact groups but also to edit existing contacts, add new contacts, and sync your contacts with other devices. It’s a centralized hub for all your contact-related activities, making it easy to stay organized and connected.
Now that you’ve successfully opened the Contacts app, let’s move on to the next step in creating your contact group.
Select the Contacts you Want to Add to the Group
Once you have opened the Contacts app on your iPhone, it’s time to select the contacts you want to add to the group. This step allows you to choose specific individuals from your contacts list and include them in the newly created group.
To begin, scroll through your contacts and tap on the first contact you want to add to the group. You will notice that as you tap on a contact, a checkmark appears next to their name, indicating that they have been selected. Continue scrolling and tapping on additional contacts until you have selected all the individuals you wish to include.
If you have a long list of contacts and want to speed up the selection process, you can use the search bar at the top of the Contacts app. Simply type in the name of the contact you are looking for, and the app will display the matching results. Tap on the contact to select them and repeat the process for other contacts you want to add.
It’s important to note that you can select contacts from different sections of your contacts list, including favorites, recent contacts, or specific contact groups. This flexibility allows you to create a group with a diverse set of individuals to suit your needs.
Once you have finished selecting the contacts, you are ready to move on to the next step: creating a new group for them.
Create a New Group
Once you have selected the contacts you want to add to a group, the next step is to create a new group. Follow these steps to create a new group on your iPhone:
- Open the Contacts app on your iPhone.
- Tap on the “Groups” option located at the top left corner of the screen.
- Scroll down and tap on the “Add New Group” option.
- A dialog box will appear prompting you to enter a name for the new group. Type in the desired name for your group.
- Tap on the “Done” button to create the new group.
Once you have created the new group, you can proceed to add contacts to it. This will allow you to easily manage and organize your contacts into different groups based on your preferences.
Creating a new group on your iPhone provides a convenient way to organize your contacts. Whether you want to categorize your work contacts, friends, or family members, having separate groups makes it easier to locate and communicate with specific individuals.
For example, you can create a group for your colleagues and another one for your close friends. This way, you can quickly access the contacts you need in specific situations without having to scroll through your entire contact list.
Furthermore, creating contact groups can streamline your communication process. Instead of manually selecting individual contacts each time you want to send a message or make a call, you can simply select the entire group and send a message to all the members simultaneously.
With just a few simple steps, you can create a new contact group on your iPhone and enjoy the benefits of a more organized and efficient communication experience.
Add Contacts to the New Group
Now that you have created a new group on your iPhone, it’s time to add contacts to it. Here’s how you can do it:
1. Open the Contacts app on your iPhone.
2. Navigate to the newly created group by tapping on the “Groups” tab at the top left corner of the screen and selecting the group name.
3. Tap on the “Add Contact” button, usually represented by a “+” symbol, located at the top right corner of the screen.
4. You can now either browse through your contact list and select multiple contacts by tapping on their name, or use the search bar at the top of the screen to find specific contacts.
5. Once you’ve selected the contacts you want to add to the group, click on the “Done” button at the top right corner of the screen.
6. Your selected contacts will now be added to the newly created group, and you can access them by navigating to the group in the Contacts app.
It’s important to note that adding contacts to a group on iPhone does not remove them from your general contacts list. They will still remain there, but will also be accessible through the specific group you created.
Adding contacts to a group can be a helpful way to organize your contacts and make it easier to send group messages or emails. Whether you’re planning an event, managing a team, or simply grouping friends and family members, creating contact groups on your iPhone can simplify communication and save you time in the long run.
Conclusion
Creating a contact group on your iPhone can make managing your contacts and communication much easier. By following the simple steps outlined in this article, you can save time and effort when sending messages or making calls to a specific group of people.
Whether you need to create a contact group for work, family, or social purposes, the built-in features of the iPhone make it a breeze to organize and stay connected. With just a few taps and some strategic contact selection, you can streamline your communication and keep everyone in the loop.
Remember, not only can you create contact groups directly on your iPhone, but you can also sync them with other devices and platforms for seamless contact management. So, unleash the full potential of your iPhone and take control of your contact organization today!
FAQs
1. Can I create a contact group on my iPhone?
Yes, you can easily create a contact group on your iPhone. This feature allows you to organize your contacts into specific groups for easier communication and management.
2. How do I create a contact group on my iPhone?
To create a contact group on your iPhone, follow these steps:
- Open the “Contacts” app on your iPhone.
- Tap on the “Groups” option at the top left corner of the screen.
- Under the “All Contacts” section, tap on “Create New Group”.
- Give your new group a name and tap on “Done”.
- You can now add contacts to the newly created group by selecting them from your contact list and tapping on “Done” when finished.
3. Can I add contacts to an existing contact group on my iPhone?
Yes, you can add contacts to an existing contact group on your iPhone. Simply follow these steps:
- Open the “Contacts” app on your iPhone.
- Tap on the “Groups” option at the top left corner of the screen.
- Select the desired contact group.
- Tap on the “Add Contact” button.
- Select the contacts you want to add to the group and tap on “Done”.
4. How do I remove contacts from a contact group on my iPhone?
To remove contacts from a contact group on your iPhone, here’s what you need to do:
- Open the “Contacts” app on your iPhone.
- Tap on the “Groups” option at the top left corner of the screen.
- Select the contact group from which you want to remove contacts.
- Tap on the contact you wish to remove.
- Scroll down and tap on “Remove from Group”.
5. Can I send messages or emails to a contact group on my iPhone?
Yes, you can send messages or emails to a contact group on your iPhone. Follow these steps:
- Open the “Contacts” app on your iPhone.
- Tap on the “Groups” option at the top left corner of the screen.
- Select the contact group you want to send the message or email to.
- Tap on the “Share” icon at the bottom center of the screen.
- Choose the desired method of communication, such as Messages or Mail, and compose your message or email as usual.