
Group texting has become a popular and convenient way to stay connected with multiple contacts at once. Whether you need to coordinate plans with friends, update your family on important news, or collaborate with colleagues, creating a group text on your Android phone can save you time and effort. With the right steps, you can easily gather a group of recipients and start sharing messages, photos, and videos in no time. In this article, we will guide you through the process of creating a group text on your Android phone, covering the necessary steps to set up and manage your group efficiently. So, without further ado, let’s dive into the world of group texting on Android!
Inside This Article
- Step 1: Open the Messaging App
- Step 2: Start a New Message
- Step 3: Select Contacts to Add to the Group Text
- Step 4: Compose and Send Your Group Text
- Conclusion
- FAQs
Step 1: Open the Messaging App
Creating a group text on your Android phone is a simple process that allows you to send messages to multiple contacts simultaneously. To get started, you’ll first need to open the messaging app on your device.
The messaging app can typically be found on your home screen or in your app drawer. Look for an icon that resembles a speech bubble or has the word “Messages” or “Messaging” written on it. Tap on the icon to open the app.
Once you have the messaging app open, you will see your list of conversations or contacts. This is where you can view and send individual messages. To create a group text, you’ll need to navigate to the settings or options within the app.
Each messaging app may have a slightly different layout, but most will have a menu button or icon which you can tap to access additional options. Look for an icon with three horizontal lines or three dots, often located in the top right or left corner of the screen.
After tapping on the menu button, a drop-down or pop-up menu will appear. Scroll through the options until you find the “Create New Group” or “Create Group” option. Tap on this option to proceed to the next step.
Step 2: Start a New Message
Once you have created a group with all the desired contacts, you can proceed to start a new message and begin the group text conversation. Follow these simple steps to get started:
1. Open your messaging app on your Android phone. This can vary depending on the brand of your device, but the messaging app is commonly represented by an icon that resembles a speech bubble or a message box.
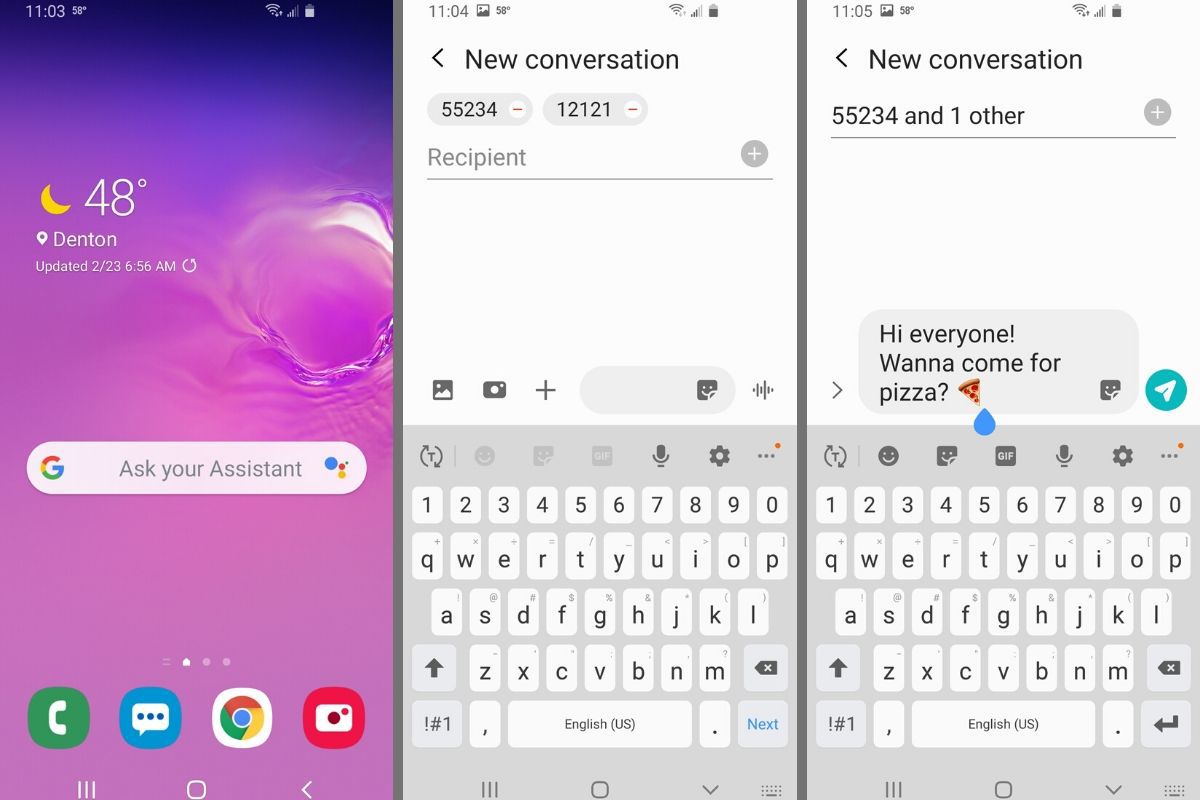
2. Tap on the icon to open the messaging app and access your conversations. Look for the icon or button that allows you to start a new message. It is typically represented by a plus sign (+) or an icon resembling a pencil and paper.
3. Once you’ve located the option to start a new message, tap on it to proceed.
4. In the recipient section, start typing the name of the group you created earlier. As you type, your phone will display suggestions based on the contacts in your group. Select the group name from the suggestions.
5. Alternatively, if your messaging app has a “Groups” or “Contacts” tab, you can navigate to the respective section and search for the group name there. Once you find the group, tap on it to select it as the recipient.
6. With the group selected as the recipient, you can now proceed to compose your message. Type your message in the text box provided, just as you would with a regular single recipient message.
7. If desired, you can attach files such as photos, videos, or documents to your message. Look for the attachment icon (usually represented by a paperclip or file icon) within your messaging app and follow the prompts to add the desired files.
8. When you are ready to send the message, simply tap the send button. The send button is typically represented by an arrow icon or a paper plane symbol.
And there you have it! You have successfully started a new message for your group text on your Android phone. Now you can communicate and stay connected with all the members of your group in a single conversation.
Step 3: Select Contacts to Add to the Group Text
Once you have created a new group, the next step is to select the contacts that you want to add to the group text. This is an important step as it determines who will receive the messages when you send them out. Here’s how you can easily select the contacts:
1. Open the messaging app on your Android phone and navigate to the group text section.
2. Tap on the “Add Contacts” or “Select Contacts” option, depending on the messaging app you are using.
3. You will be presented with a list of your contacts. Scroll through the list and tap on the contacts that you want to add to the group. You can select multiple contacts by tapping on each one individually.
4. Some messaging apps may also allow you to search for contacts by name. Simply type in the name of the contact in the search bar and select them from the list that appears.
5. After selecting the contacts, tap on the “Done” or “Next” button to confirm your selection and proceed to the next step.
It’s important to note that all the contacts you select will be added to the group text, and they will receive the messages that you send to the group. Make sure to double-check your selection before moving forward to ensure that you have included all the desired contacts.
Step 4: Compose and Send Your Group Text
Now that you have created your group and added contacts to it, it’s time to compose and send your group text. This is where you can easily send a message to all the members of the group at once, saving you time and effort.
To compose your group text message, follow these simple steps:
- Open your messaging app on your Android phone. This could be the default messaging app or a third-party app like WhatsApp or Facebook Messenger.
- Tap on the “Compose” or “New Message” button, usually represented by a “+” or an icon with a pen and paper.
- In the recipient field, start typing the name of your group. As you type, the names of the groups you have created should appear as suggestions. Select your group from the suggestions.
- Once you have selected your group, you can start composing your message in the message field. Type your message just like you would in a regular text message.
- If you want to personalize the message for each recipient, you can use placeholders like “{firstname}” or “{lastname}“. These placeholders will be replaced with the respective contact’s first or last name in the actual message that is sent to them.
- When you are done composing your message, review it for any errors or typos.
- Finally, tap on the “Send” button to send your group text message to all the members of the group.
Once you have sent the message, it will be delivered to all the members of your group. They will receive the message just like they would receive a regular text message.
It’s important to note that some messaging apps have additional features and options for group texts, such as the ability to attach photos, videos, or documents. Make sure to explore these options if you want to enhance your group text messages.
Now that you know how to compose and send a group text, you can easily communicate with all the members of your group in one go. It’s a convenient and efficient way to stay connected and share information with multiple people at once.
Conclusion
Creating a group text on your Android phone is a convenient way to stay connected with multiple contacts at once. Whether you need to coordinate plans with a group of friends or communicate important information to your team at work, group texting allows you to do so efficiently.
By following the simple steps outlined in this article, you can easily create a group text on your Android phone. Remember to choose a reliable messaging app that supports group messaging, add the desired contacts to the group, and start composing your message. With just a few taps, you’ll be able to send messages to everyone in the group simultaneously.
Group texting not only saves time, but it also fosters better communication and collaboration. So, whether you’re organizing an event, coordinating a project, or simply keeping in touch with friends and family, the ability to create a group text on your Android phone is a valuable feature that you should take advantage of.
FAQs
Q: Can I create a group text on my Android phone?
Yes, you can easily create group texts on your Android phone. It allows you to send a single message to multiple recipients simultaneously, making communication with groups more efficient and convenient.
Q: How do I create a group text on my Android phone?
To create a group text on your Android phone, follow these steps:
- Open your messaging app.
- Tap on the “Compose” or “New Message” button.
- Start typing the name or phone number of the first person you want to add to the group.
- As you type, a list of matching contacts will appear. Tap on the desired contact to add them to the group.
- Repeat steps 3 and 4 to add more contacts to the group.
- Once you have added all the desired contacts, compose your message and tap send.
Q: Is there a limit to the number of people I can add to a group text on Android?
The limit for the number of people you can add to a group text on Android varies depending on the messaging app you are using. However, most messaging apps allow you to add a significant number of recipients to a group text, typically ranging from 10 to 100 people.
Q: Can I name the group text on my Android phone?
Yes, many messaging apps for Android allow you to name or label the group text for easy identification. This can be especially helpful if you frequently communicate with multiple groups of people. To name a group text, open the conversation, tap on the options menu (usually represented by three dots), and look for the option to edit or name the group.
Q: Can I remove or add people to a group text after it has been created on Android?
Yes, you can add or remove people from a group text on Android even after it has been created. To add or remove someone, open the group conversation, tap on the options menu, and look for the options to add or remove participants. Note that the specific steps may vary depending on the messaging app you are using.