
Cell phones have evolved tremendously over the years, integrating new technologies and innovative features to enhance the user experience. One such advancement is the introduction of 3D Touch, a feature that allows users to interact with their phones using different levels of pressure. With 3D Touch, users can access various shortcuts and actions, making it easier and faster to navigate through applications and perform tasks. However, not all phones come equipped with this feature, leaving some users unable to take advantage of its benefits. Fortunately, there is a workaround – by adding 3D Touch actions to AssistiveTouch, users can replicate the functionality of 3D Touch on any phone. In this article, we will explore how to add 3D Touch actions to AssistiveTouch and unlock a new level of productivity and convenience on your mobile device.
Inside This Article
- Prerequisites
- Creating 3D Touch Actions
- Attaching 3D Touch Actions to AssistiveTouch
- Conclusion
- FAQs
Prerequisites
To add 3D Touch actions to AssistiveTouch, there are a few prerequisites that you need to meet:
1. iOS Device: Ensure that you have an iOS device that supports 3D Touch functionality. This includes devices like iPhone 6s, iPhone 6s Plus, iPhone 7, iPhone 7 Plus, iPhone 8, iPhone 8 Plus, iPhone X, and newer models.
2. iOS Version: Make sure that your iOS device is running on iOS 9 or later. The 3D Touch feature and AssistiveTouch customization options are introduced in iOS 9, so having a compatible iOS version is essential.
3. Enable AssistiveTouch: Before adding 3D Touch actions, you need to enable AssistiveTouch on your iOS device. AssistiveTouch is an accessibility feature that allows you to perform gestures and actions using a virtual button on the screen. To enable AssistiveTouch, go to Settings > Accessibility > Touch > AssistiveTouch, and toggle the switch to turn it on.
4. Familiarity with Shortcuts: While it’s not mandatory, having a basic understanding of how to create and customize shortcuts on iOS can be helpful. Shortcuts allow you to perform actions quickly and efficiently, and being able to leverage this functionality will enhance your experience with 3D Touch actions on AssistiveTouch.
Once you have these prerequisites in place, you’re ready to dive into creating and attaching 3D Touch actions to AssistiveTouch, which we’ll explore in the following sections.
Creating 3D Touch Actions
3D Touch is a unique feature available on certain iPhone and iPad models, which allows users to perform different actions by applying different levels of pressure on the screen. This feature can greatly enhance the user experience by providing quick shortcuts and additional functionality.
To create 3D Touch actions, you’ll need to have a basic understanding of the iOS development process and access to Xcode. Here are the steps to get started:
- Open Xcode: Launch Xcode on your Mac, and create a new project or open an existing one.
- Add 3D Touch capabilities: Go to your project settings, navigate to the “Capabilities” tab, and enable “3D Touch”. This will add the necessary entitlements and settings to your project.
- Create 3D Touch shortcuts: In your project’s main storyboard or interface builder, select the view controller you want to add 3D Touch actions to. On the Attributes Inspector, scroll down to the “Shortcut Items” section and click the “+” button to add a new shortcut item.
- Configure the shortcut: Customize the properties of the shortcut item, including the title, subtitle, and icon. You can also assign a unique identifier to the shortcut for later reference in your code.
- Implement the shortcut handling: In your view controller’s source code, override the `func application(_ application: UIApplication, performActionFor shortcutItem: UIApplicationShortcutItem, completionHandler: @escaping (Bool) -> Void)` method to handle the action associated with the shortcut. Use the `shortcutItem` parameter to identify which shortcut was triggered.
- Test your 3D Touch actions: Build and run your app on a device that supports 3D Touch. Press firmly on the app’s icon to see the 3D Touch menu with your added shortcut actions.
By following these steps, you can easily create and implement 3D Touch actions in your iOS app, providing users with a convenient and intuitive way to access specific features or perform common tasks with just a touch.
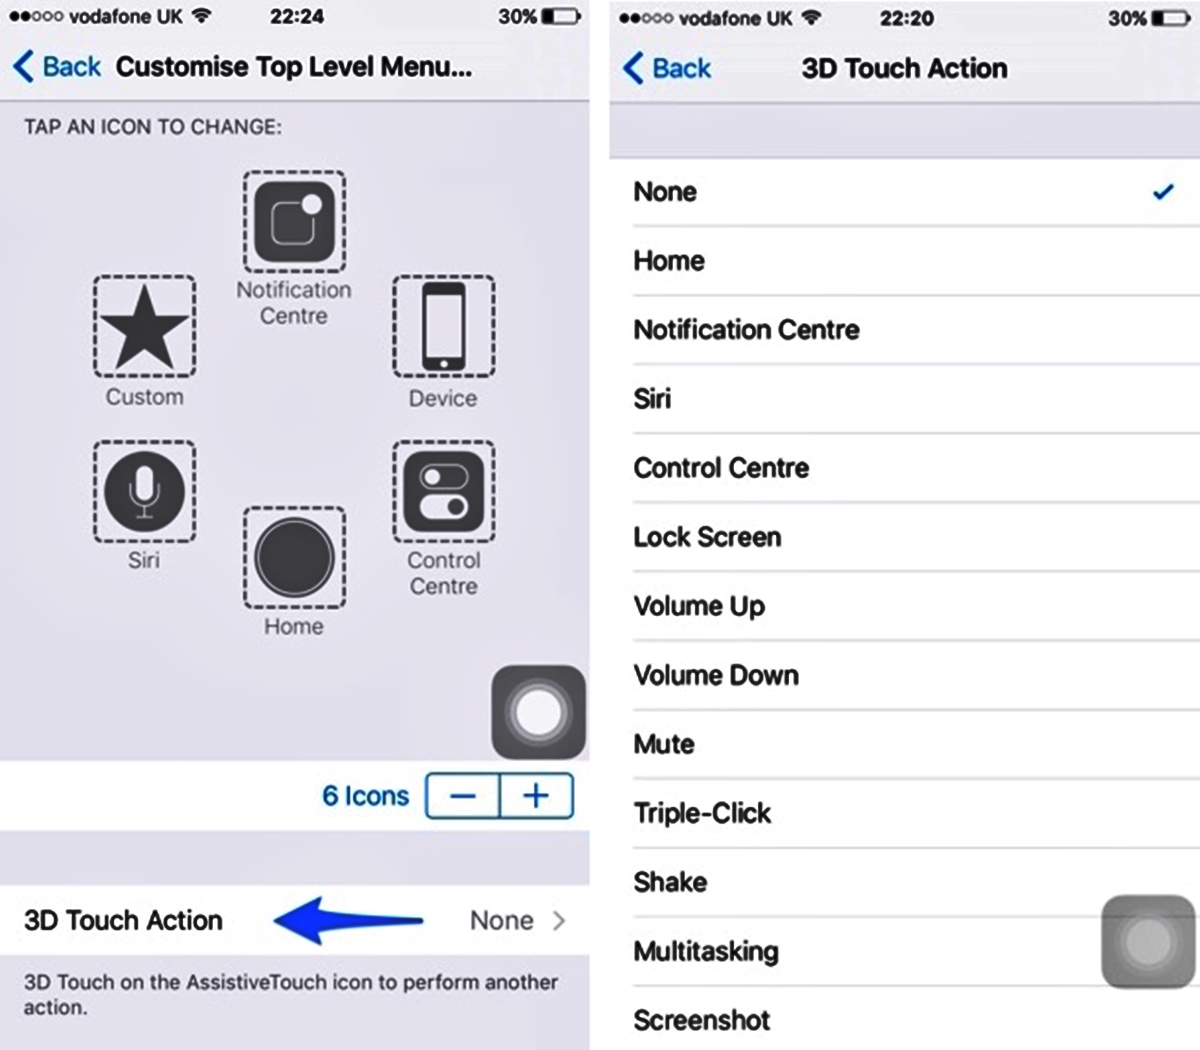
Attaching 3D Touch Actions to AssistiveTouch
Now that we have created our 3D Touch actions, the next step is to attach them to the AssistiveTouch feature. This will allow users to access these actions directly from the AssistiveTouch menu on their mobile devices.
To attach the 3D Touch actions to AssistiveTouch, follow these simple steps:
- Open the Settings app on your mobile device.
- Scroll down and tap on “Accessibility”.
- Tap on “Touch”.
- Under the “Interaction” section, tap on “AssistiveTouch”.
- Toggle on the “AssistiveTouch” switch if it is not already enabled.
- Tap on “Customize Top Level Menu”.
- Tap on the “+” button to add a new custom action.
- Scroll down and select the 3D Touch action you want to add from the list of available actions.
- Tap on “Done” to save the changes.
- Drag and drop the newly added 3D Touch action to the desired position on the AssistiveTouch menu.
- Exit the Settings app and return to your home screen.
That’s it! You have successfully attached the 3D Touch actions to the AssistiveTouch feature on your mobile device. Now, you can easily access these actions by tapping on the AssistiveTouch icon and selecting the desired 3D Touch action from the menu.
Attaching 3D Touch actions to AssistiveTouch provides users with a convenient and efficient way to perform specific actions on their mobile devices. Whether it’s accessing shortcuts, launching apps, or performing system commands, AssistiveTouch with 3D Touch actions offers users a whole new level of accessibility and ease of use.
So, go ahead and customize your AssistiveTouch menu with your favorite 3D Touch actions and enhance your mobile experience like never before!
In conclusion, adding 3D Touch actions to AssistiveTouch can greatly enhance the functionality and convenience of your mobile phone. By utilizing this feature, you can enjoy quick access to commonly used actions and applications, making your device even more user-friendly and efficient. Whether you have a newer iPhone model with built-in 3D Touch capabilities or an older device that supports AssistiveTouch, this versatile combination can help streamline your mobile experience.
FAQs
1. What is 3D Touch?
3D Touch is a technology developed by Apple that allows users to interact with their iPhones or iPads by applying pressure to the screen. It enables a new level of interactivity and functionality, providing quick access to app shortcuts and additional actions.
2. What is AssistiveTouch?
AssistiveTouch is an accessibility feature available on iPhone and iPad devices. It provides a virtual on-screen menu that enables users to perform common actions, such as accessing the home screen, adjusting volume, taking screenshots, and more, without physically pressing buttons.
3. Can 3D Touch actions be added to AssistiveTouch?
Yes, it is possible to add 3D Touch actions to AssistiveTouch. By pairing the two functionalities together, users can enjoy the convenience of accessing 3D Touch actions even if their device doesn’t support 3D Touch natively.
4. How can I add 3D Touch actions to AssistiveTouch?
To add 3D Touch actions to AssistiveTouch, follow these steps:
- Open the “Settings” app on your iPhone or iPad.
- Navigate to “Accessibility.”
- Tap on “AssistiveTouch.”
- Under the “Custom Actions” section, select an available option.
- Tap on “Customize Top Level Menu” to set a specific action for the 3D Touch gesture.
- Choose the desired action from the 3D Touch options.
- Save the changes and exit the settings.
5. What are some practical use cases for adding 3D Touch actions to AssistiveTouch?
Adding 3D Touch actions to AssistiveTouch can enhance accessibility and productivity on your iPhone or iPad. Here are a few practical use cases:
- Creating a shortcut to quickly access frequently used apps or features.
- Assigning a gesture to perform actions like taking a screenshot, toggling Wi-Fi, adjusting brightness, or launching a specific app.
- Enabling quick navigation within apps, such as jumping to specific sections or performing specific actions within an email or document.
- Providing additional control options for gaming or multimedia applications.