
In the era of digital advancements, managing and accessing medical records has become easier than ever. With the advent of smartphones, individuals now have the ability to store and organize their medical information with just a few taps on their screens. One such platform is the Health app on iPhone, which enables users to maintain all their medical records in one convenient location.
In this article, we will guide you through the process of adding medical records to the Health app on your iPhone. Whether it’s your lab test results, medications, or doctor’s notes, we will explore the step-by-step instructions to ensure that your health information is accessible whenever you need it. By leveraging the power of technology, you can take control of your healthcare management and have vital information at your fingertips.
Inside This Article
- How to Add Medical Records to Health App on iPhone (2023)
- Setup Health App
- Access Health Records
- Add Medical Records
- Manage Medical Records
- Conclusion
- FAQs
How to Add Medical Records to Health App on iPhone (2023)
Keeping track of your medical records is crucial for managing your health. With the advancements in technology, you can now easily store all your medical information on your iPhone using the Health app. Whether it’s your lab results, medication history, or allergy records, having access to this information at your fingertips can be life-saving in emergency situations. In this guide, we will walk you through the steps on how to add medical records to the Health App on your iPhone.
Step 1: Setup Health App
The first step is to make sure you have the Health app installed on your iPhone. The Health app comes pre-installed on all iPhones running iOS 10 or later versions. If you can’t find the Health app on your device, you can download it for free from the App Store. Once installed, open the app and proceed to the next step.
Step 2: Access Health Records
To add medical records to the Health app, you need to have access to your health records from your healthcare provider. Many hospitals and clinics now offer the ability to view and download your medical records through their patient portals or health record systems. Contact your healthcare provider and ask how you can access your medical records digitally.
Step 3: Add Medical Records
Once you have access to your medical records, follow these steps to add them to the Health app:
- Open the Health app on your iPhone.
- Tap on the “Health Records” tab at the bottom of the screen.
- Tap on “Add Account” to link your healthcare provider’s system to the Health app.
- Follow the prompts to enter your credentials and authorize access to your medical records.
- Once your account is linked, the Health app will display the available medical records from your healthcare provider.
- Tap on the record you want to add, review the details, and tap “Add to Health” to import it into the app.
Step 4: Manage Medical Records
After adding your medical records to the Health app, you can easily manage and organize them. You can view your records by tapping on the “Health Records” tab. From there, you can search for specific records, sort them by date, or even add notes to keep track of important information.
Setup Health App
The Health app on your iPhone is a powerful tool that allows you to manage and access your medical records conveniently. Before you can begin adding your medical records to the app, you need to set it up properly. Here’s how you can do it:
1. Update to the latest version of iOS: Ensure that your iPhone is running the latest version of iOS. This will ensure compatibility with the Health app and any new features it may offer.
2. Open the Health app: Locate the Health app on your iPhone’s home screen and tap on it to open it. The app icon features a white square with a red heart in the center.
3. Set up your Medical ID: The Medical ID is a crucial feature of the Health app that allows you to store and share important medical information, such as allergies, emergency contacts, and blood type. To set up your Medical ID, tap on the “Medical ID” tab at the bottom right of the screen and follow the prompts to enter the necessary information.
4. Connect with your healthcare provider: Depending on your healthcare provider, you may have the option to connect the Health app directly to their system. This will allow you to securely import your medical records and receive updates automatically. To do this, tap on the “Health Records” tab at the bottom of the screen and follow the instructions provided by your healthcare provider.
5. Customize your Health app: The Health app provides various features and categories to track your health and fitness data. Take some time to explore and customize the app based on your preferences and needs. You can add or remove categories, enable or disable data sources, and adjust privacy settings according to your comfort level.
Once you have set up the Health app, you are ready to start adding your medical records and managing them conveniently on your iPhone.
Access Health Records
The Health app on iPhone is a powerful tool for managing your personal health information. It allows you to access and view your medical records conveniently in one place. Here’s how you can easily access your health records within the Health app:
1. Open the Health app on your iPhone.
2. Tap on the “Health Data” tab located at the bottom of the screen.
3. Scroll down and you will find the “Health Records” section. Tap on it.
4. If you have already granted the Health app access to your medical records, they will be displayed here. If not, you will need to connect with a supported healthcare provider who can provide you with access to your electronic health records (EHR).
5. To connect with a healthcare provider, tap on “Add Account” and select your provider from the list of supported institutions.
6. Follow the prompts to log in to your healthcare provider’s patient portal and grant permission to access your medical records. This step may vary depending on your provider’s portal and authentication process.
7. Once you have successfully connected your healthcare provider’s patient portal to the Health app, your medical records will be retrieved and displayed within the “Health Records” section.
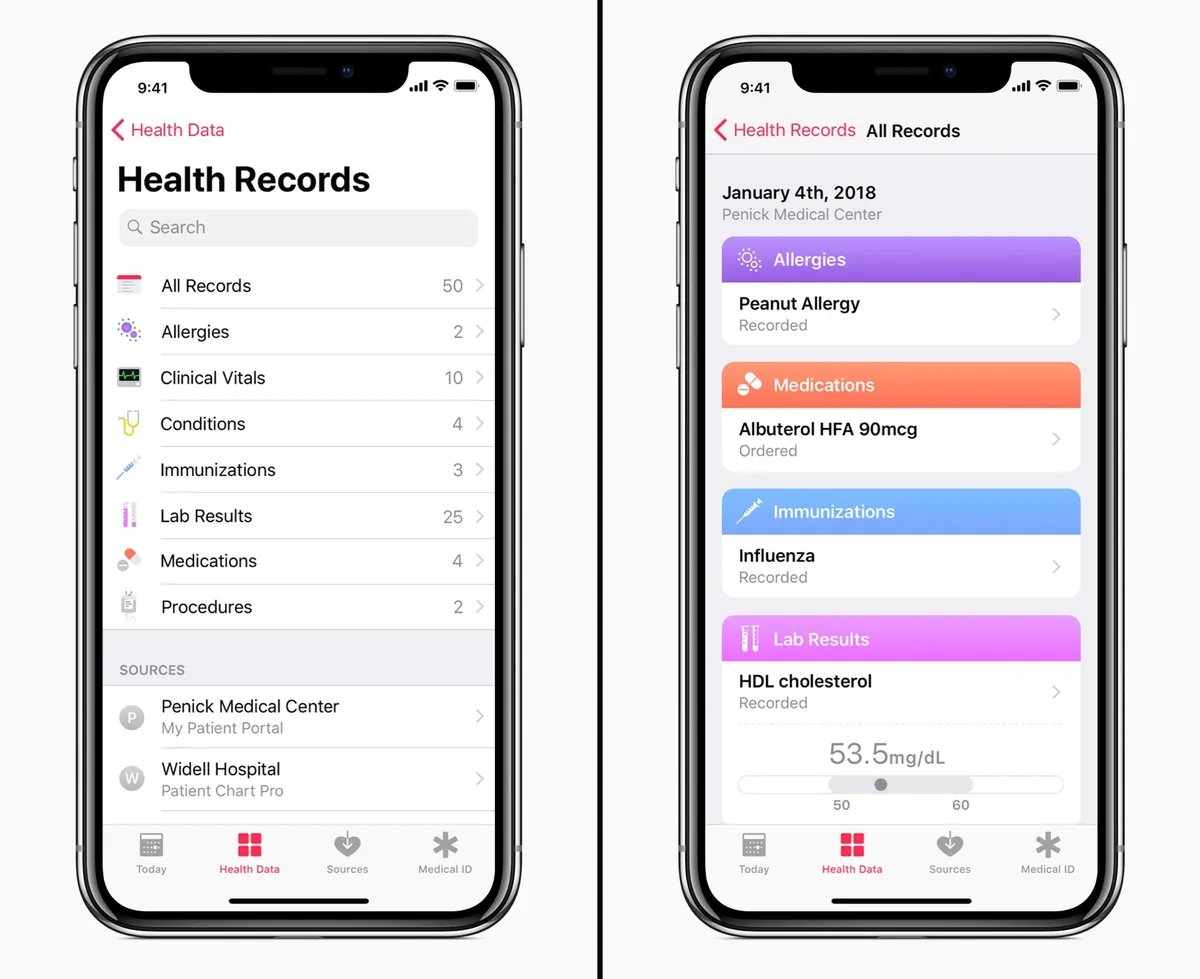
8. To view a specific medical record, simply tap on it. You can browse through different categories such as allergies, conditions, lab results, medications, and more.
9. Within each category, you can access detailed information about your medical records, including dates, descriptions, and any associated documents or images.
10. If you have multiple healthcare providers connected to the Health app, you can switch between them by tapping on the provider’s name at the top of the “Health Records” section.
11. To search for specific information within your medical records, tap on the search bar at the top of the screen and enter relevant keywords. The Health app will filter the results accordingly.
12. Lastly, to ensure the privacy and security of your medical records, consider enabling features such as Face ID or Touch ID for accessing the Health app.
By following these steps, you can easily access and view your medical records within the Health app on your iPhone. This convenient feature allows you to stay informed about your health and have your important medical information readily available whenever you need it.
Add Medical Records
The Health app on your iPhone allows you to securely store and manage your medical records, ensuring easy access to important information in case of emergencies or when visiting healthcare professionals. Adding your medical records to the Health app is a simple process that can be done in just a few steps.
To get started, open the Health app on your iPhone. If you don’t have it installed, you can download it for free from the App Store.
Once you have the Health app open, navigate to the “Medical ID” tab at the bottom right corner of the screen. This feature allows you to input and manage your medical information, including your medical records.
To add a medical record, tap on the “Medical Records” section within the Medical ID tab. Here, you’ll find an option to “+ Add Medical Record” – tap on it.
Next, you’ll be prompted to choose the source of your medical record. This can vary depending on the healthcare provider or institution that maintains your records. Some common sources include hospitals, clinics, and healthcare organizations. Select the appropriate source from the list.
After selecting the source, you may need to authenticate your identity to securely connect the Health app with the provider’s system. This could involve entering a username and password or verifying your identity through biometric authentication methods such as Touch ID or Face ID.
Once the authentication process is complete, you can select the specific medical record you want to add from the available options. This could include lab results, medication history, immunization records, and more.
Review the information to ensure its accuracy, and then confirm the addition of the medical record to your Health app. The record will be securely stored, and you can access it anytime from the “Medical Records” section within the Health app.
If you have multiple medical records from different sources, you can repeat the steps above to add each record individually. Having all your medical information in one place can provide healthcare professionals with a comprehensive view of your health history, leading to more accurate diagnoses and treatment plans.
Remember, the Health app prioritizes your privacy and security. Your medical records are encrypted and can only be accessed with your consent. Additionally, you have full control over which records are visible and editable by healthcare professionals during emergencies.
By taking advantage of the Health app’s ability to store and manage your medical records, you can have peace of mind knowing that your important health information is easily accessible whenever you need it.
Manage Medical Records
Once you have successfully added your medical records to the Health app on your iPhone, you may need to manage and organize them. The Health app provides various options to help you keep your medical records in order and easily accessible when needed.
Here are some useful tips on how to effectively manage your medical records on the Health app:
- Viewing Records: To access your medical records, open the Health app on your iPhone and navigate to the “Health Data” tab. From there, you can select the “Health Records” option to view all your medical records in one place. The records are organized by category, such as allergies, conditions, immunizations, and more, making it easy to locate the information you need.
- Sorting and Searching: The Health app allows you to sort your medical records based on different criteria, such as date, title, or provider. This can be helpful if you have a long list of records and want to find a specific one quickly. In addition, you can use the search bar to search for specific keywords or terms within your medical records.
- Deleting Records: If you no longer need certain medical records or want to remove outdated information, you can delete them from the Health app. Simply swipe left on the record you wish to delete, and a “Delete” option will appear. Tap on it to remove the record from your Health app.
- Updating Records: In case there are any changes in your medical information, such as a new medication or updated allergy details, you can easily update the records in the Health app. Locate the specific record you want to update, tap on it, and select the “Edit” option. Make the necessary changes and save them to ensure your records are up to date.
- Exporting Records: The Health app also allows you to export your medical records if needed. This can be useful when sharing your medical information with healthcare providers or when switching to a new app or device. To export your records, go to the “Health Records” section, select the record you want to export, and tap on the “Export” option. You can choose to export the record as a PDF or in another compatible format.
By utilizing these features and tips, you can efficiently manage your medical records on the Health app, ensuring easy access to important health information whenever you need it. Keeping your records organized and up to date is key to making the most of the Health app on your iPhone.
Conclusion
In conclusion, adding medical records to the Health app on your iPhone is a simple yet powerful way to keep track of your health information in one centralized location. Whether it’s your medications, allergies, or lab results, having this information readily accessible can be lifesaving in emergency situations. The Health app offers a secure and convenient platform to store and access your medical records, giving you peace of mind and empowering you to take control of your own healthcare.
By following the step-by-step guide outlined in this article, you can easily add your medical records to the Health app and ensure that your vital health information is always at your fingertips. So, take advantage of this powerful feature and make the most out of your iPhone’s capabilities to monitor and manage your health effortlessly. Stay informed, stay in control, and prioritize your well-being with the help of the Health app on your iPhone.
FAQs
Q: How do I add medical records to the Health app on my iPhone?
To add medical records to the Health app on your iPhone, follow these steps:
1. Open the Health app on your iPhone
2. Tap on the “Health Data” tab at the bottom of the screen
3. Scroll down and select “Medical Records”
4. Tap on the “+” sign in the top right corner of the screen
5. You will be prompted to choose a medical institution. Select the appropriate institution from the list or search for it.
6. Authenticate your identity using your Health app password or Touch ID/Face ID.
7. Once authenticated, you can choose which medical records you want to import, such as allergies, conditions, medications, and lab results.
8. Confirm your selection and the medical records will be imported and displayed in the Health app.
Q: Can I access my medical records on the Health app from different devices?
Yes, you can access your medical records on the Health app from different devices as long as you are signed in with the same Apple ID. The Health app syncs your data across all your devices, ensuring that you can view and manage your medical records seamlessly.
Q: Are my medical records secure in the Health app?
Apple takes privacy and security seriously and has implemented robust measures to protect your medical records in the Health app. All data in the Health app is encrypted and stored securely on your device. Additionally, you have control over which medical records to import and can revoke access to specific records if needed.
Q: Can I share my medical records from the Health app with healthcare providers?
Yes, you can easily share your medical records from the Health app with healthcare providers. Simply select the medical record you want to share, tap on the “Share” button, and choose the desired method of sharing, such as email or AirDrop. This allows you to provide vital information to your healthcare team for better coordination of care.
Q: Can I add medical records from multiple sources to the Health app?
Yes, you can add medical records from multiple sources to the Health app. Apart from importing medical records from participating medical institutions, you can also manually add information, such as allergies, conditions, medications, and lab results. This flexibility allows you to have a comprehensive view of your medical history in one convenient place.