
Emergencies can happen at any time and it’s crucial to have quick access to essential medical information. With the advances in technology, iPhone users can now rely on the Medical ID feature to provide crucial information in case of an emergency. The Medical ID is a digital representation of important medical details such as allergies, medications, emergency contacts, and blood type. This feature, easily accessible from the lock screen, ensures that first responders and medical professionals can quickly gain access to vital information that could potentially save a life. In this article, we will dive into the functionalities of the Medical ID feature on iPhone, explore how to set it up, and discuss its importance in emergency situations. Whether it’s a sudden medical incident or a dangerous situation, having a Medical ID on your iPhone can be a lifesaver.
Inside This Article
- A brief overview of the Medical ID feature on iPhone
- How to set up and customize your Medical ID
- How to access and use the Medical ID in case of an emergency
- Conclusion
- FAQs
A brief overview of the Medical ID feature on iPhone
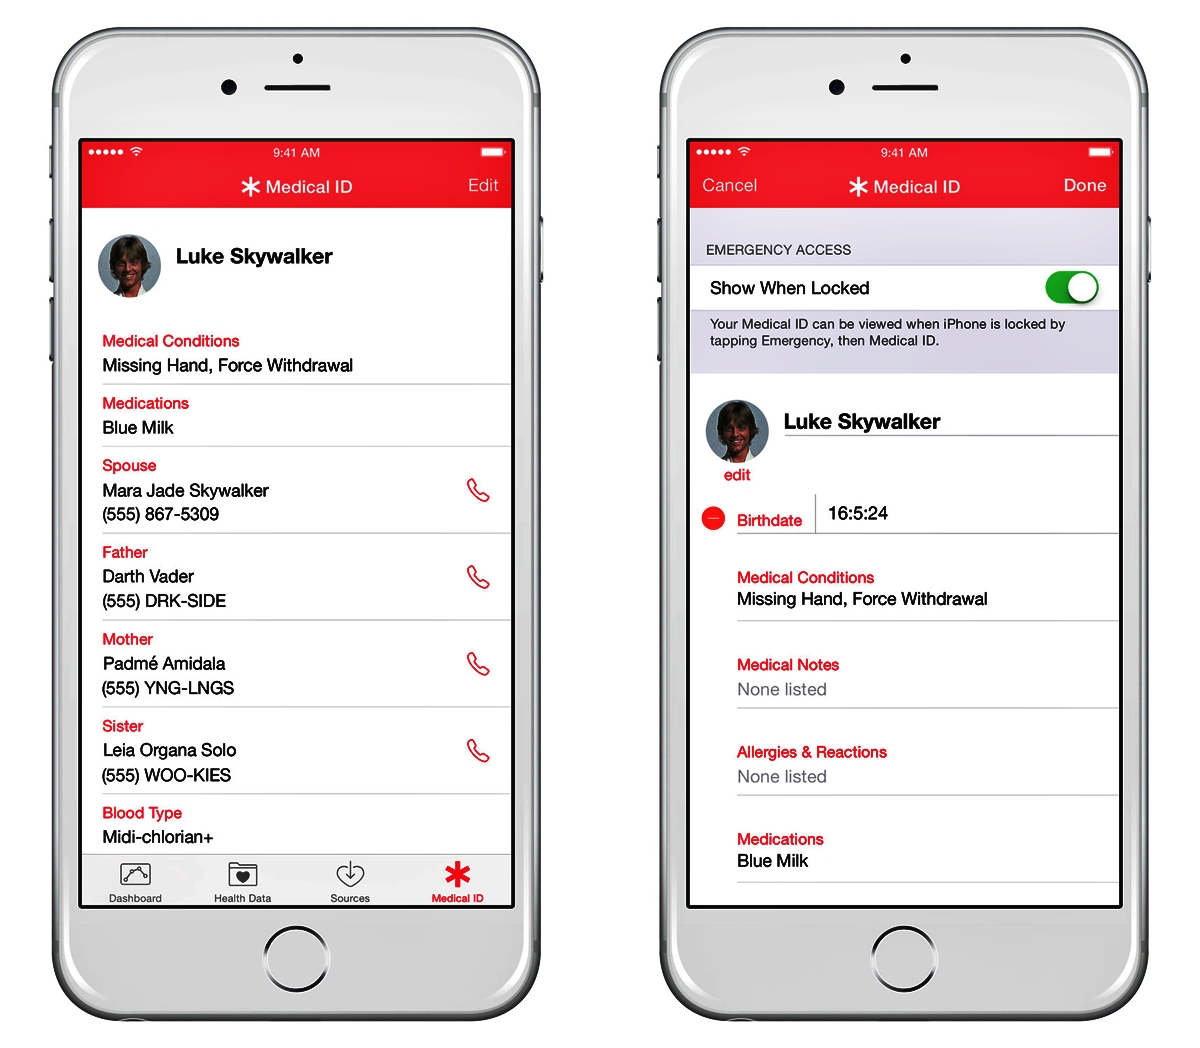
One of the many remarkable features that iPhones offer is the Medical ID feature. This feature allows users to store essential medical information that can be accessed quickly in case of an emergency. The Medical ID acts as a digital medical alert bracelet, providing critical information to first responders or healthcare professionals when time is of the essence.
With the Medical ID feature, iPhone users can input important details such as their name, age, blood type, allergies, chronic conditions, and emergency contacts. This information is easily accessible even when the phone is locked, making it a valuable tool for emergency situations. By having this information readily available, medical professionals can provide timely and appropriate care.
Setting up your Medical ID on an iPhone is a straightforward process. Simply open the Health app, navigate to the “Medical ID” tab, and fill in the necessary information. It’s important to keep your Medical ID updated and accurate, as any changes to your health status or emergency contacts should be reflected in the Medical ID.
In addition to personal details, the Medical ID feature also allows users to include information regarding any medical conditions, medications, or implanted devices they may have. This comprehensive approach ensures that first responders have a complete picture of your health when providing medical assistance.
When an emergency arises, accessing the Medical ID is quick and simple. Even when the iPhone is locked, the Medical ID can be accessed through the Emergency SOS feature. By swiping right on the lock screen and selecting “Emergency”, the Medical ID option will be prominently displayed, providing instant access to the vital information stored within.
The Medical ID feature is not only beneficial for individuals with pre-existing medical conditions but also for anyone who wants to be prepared for unexpected emergencies. Accidents can happen to anyone, and having this information readily available can make a significant difference in getting the appropriate care quickly.
Overall, the Medical ID feature on iPhone is an invaluable tool for ensuring that critical medical information is accessible when it matters most. By being proactive and setting up your Medical ID, you can have peace of mind knowing that your health details are just a few taps away in case of an emergency.
How to set up and customize your Medical ID
Setting up and customizing your Medical ID on your iPhone is a simple process that allows you to provide vital medical information to first responders or emergency contacts in case of an emergency. Follow these steps to get your Medical ID up and running:
- Open the Health app: Locate and open the Health app on your iPhone. It should be pre-installed on your device.
- Go to the Medical ID tab: Once you’re inside the Health app, navigate to the “Medical ID” tab, which can be found at the bottom right corner of the screen.
- Set up your Medical ID: Tap on the “Edit” button at the top right corner of the screen to start creating your Medical ID profile.
- Add your personal information: Fill in essential details such as your name, date of birth, medical conditions, allergies, and any medications you take regularly. It is important to be thorough and accurate with this information to enable first responders to provide appropriate care.
- Include emergency contacts: Tap on the “add emergency contact” button to include the name and phone number of your emergency contacts. These contacts will be able to access your Medical ID even if your phone is locked.
- Customize your Medical ID: Customize your Medical ID by adding additional information such as blood type, organ donor status, weight, and height. This can be helpful for medical professionals in emergency situations.
- Add notes: If you have any additional information or instructions you would like to include in your Medical ID, you can add them in the “Notes” section. This could be anything from specific treatment preferences to known sensitivities.
- Enable “Show When Locked”: To ensure that your Medical ID is accessible even when your phone is locked, make sure to toggle on the “Show When Locked” option.
- Save your changes: Once you have filled in all the necessary information and made the desired customizations, tap on the “Done” button at the top right corner of the screen to save your changes.
By following these simple steps, you can set up and customize your Medical ID, ensuring that vital medical information is readily available in case of an emergency. Remember to keep your Medical ID up to date, reviewing and updating it regularly as needed.
How to access and use the Medical ID in case of an emergency
In times of emergency, accessing vital medical information quickly can be a matter of life and death. Fortunately, the Medical ID feature on iPhone allows you to store important medical information that can be easily accessed by healthcare professionals or bystanders in case of an emergency.
To access the Medical ID on iPhone, follow these simple steps:
- On the lock screen: In an emergency situation, swipe right on the lock screen to access the passcode screen.
- Tapping on “Emergency”: On the passcode screen, tap on the “Emergency” button located at the bottom left corner of the screen.
- Selecting “Medical ID”: Look for the “Medical ID” button at the bottom left corner. Tap on it to view the Medical ID.
Once you have accessed the Medical ID, you will be presented with vital information about the individual’s medical condition. This information is highly valuable in emergency situations when time is of the essence.
If you are assisting someone in need, here’s how you can utilize the Medical ID:
- Viewing medical information: Read through the individual’s medical conditions, allergies, medications, and emergency contacts listed in the Medical ID to gain a better understanding of their medical history.
- Contacting emergency contacts: If immediate medical assistance is required, you can call the listed emergency contacts directly from the Medical ID screen.
- Providing information to healthcare professionals: In case the individual is unconscious or unable to communicate their medical history, provide the Medical ID information to healthcare professionals or first responders to assist them in making informed decisions.
Remember, it is crucial to keep the Medical ID information up to date with the most accurate and relevant details. Regularly review and update the information in the Health app on your iPhone to ensure that it reflects the latest medical conditions, allergies, medications, and emergency contacts.
Conclusion
The Medical ID feature on the iPhone is a powerful tool that can provide crucial information and assistance in emergency situations. By setting up your Medical ID and ensuring that it is accessible from the lock screen, you can provide first responders and medical professionals with vital details about your health conditions, medications, and emergency contacts.
Through the easy-to-use Health app, you can customize your Medical ID to include information like blood type, allergies, and existing medical conditions. This can be especially beneficial for individuals with chronic illnesses, allergies, or other special medical needs.
In times of crisis, every second counts, and having a Medical ID on your iPhone can potentially help save lives. Take the time to set up your Medical ID today, and have peace of mind knowing that your vital information is readily available when it’s needed most.
FAQs
Q: What is a Medical ID on iPhone?
A: A Medical ID on iPhone is a feature that allows you to input and store important personal and medical information on your device. It can be accessed even when your phone is locked, making it helpful in emergency situations.
Q: How do I set up a Medical ID on my iPhone?
A: To set up a Medical ID on your iPhone, open the Health app and tap on the “Medical ID” tab at the bottom right corner. From there, tap “Create Medical ID” and input all the necessary details such as your name, emergency contacts, medical conditions, allergies, and medications.
Q: Can anyone access my Medical ID on iPhone?
A: While your Medical ID can be accessed from the lock screen, it is protected by your passcode or Touch ID/Face ID, ensuring that only authorized individuals can view your information during emergencies.
Q: Can I add my Medical ID to my Apple Watch as well?
A: Yes, you can add your Medical ID to your Apple Watch, and it will sync with the information you have entered on your iPhone’s Health app. This way, your important medical information will be readily accessible from both your iPhone and Apple Watch.
Q: How can a Medical ID on iPhone help in an emergency?
A: A Medical ID on iPhone can provide crucial information to medical professionals in emergency situations. They can quickly access details like your blood type, allergies, pre-existing medical conditions, and emergency contacts, enabling them to make informed decisions about your care.