
Having the ability to quickly access emergency contacts is crucial in times of need. With the rise of smartphones, it has become easier than ever to have emergency contact information at our fingertips. This is especially true for iPhone users, as the device offers a convenient way to edit and update emergency contacts. Whether you need to add a new contact, remove an outdated one, or simply update the existing information, knowing how to edit emergency contacts on iPhone can provide you with peace of mind and ensure that you are prepared for any unforeseen circumstances. In this article, we will guide you through the process of editing emergency contacts on your iPhone, ensuring that your emergency contact list is up-to-date and easily accessible whenever you may need it.
Inside This Article
Steps to Edit Emergency Contacts on iPhone
Having accurate and up-to-date emergency contact information on your iPhone can be crucial in times of need. Whether you want to add or modify emergency contacts or simply delete outdated ones, the process is straightforward. Follow these easy steps to edit emergency contacts on your iPhone:
- Open the “Health” app on your iPhone. This app comes pre-installed and is represented by a white icon with a red heart.
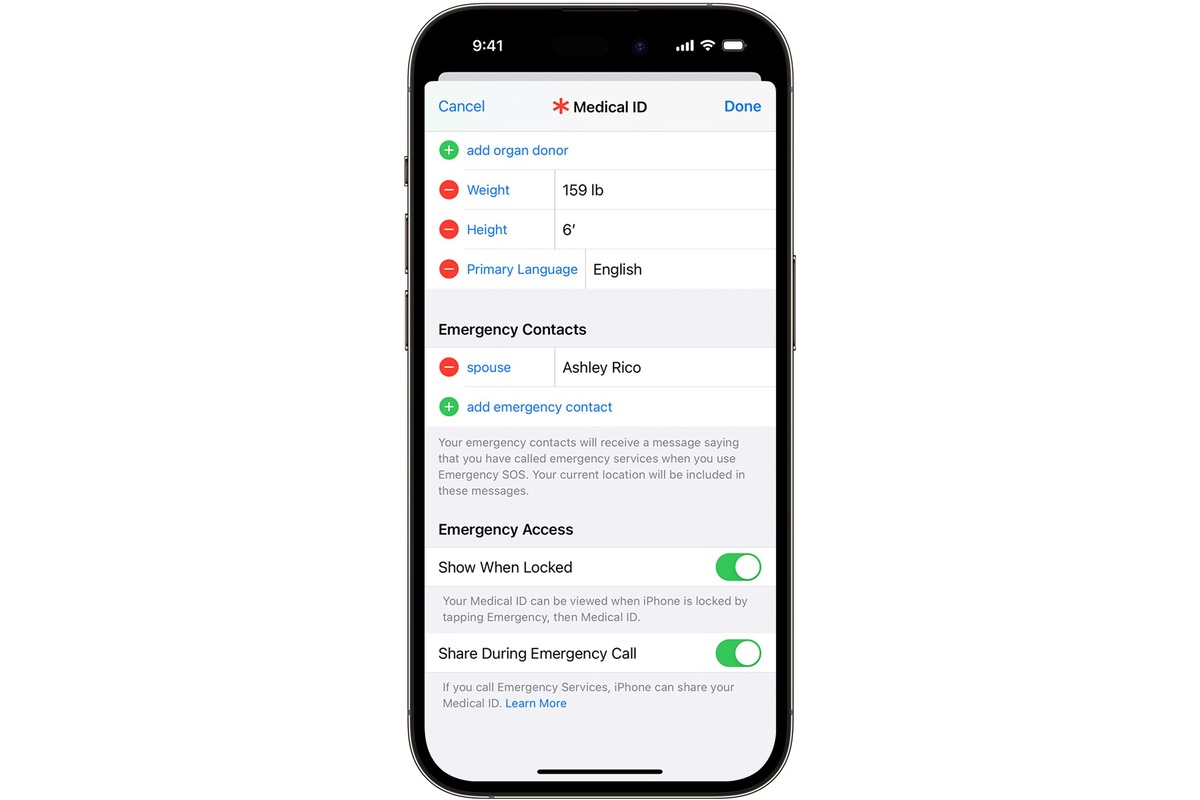
- Tap on the “Medical ID” tab at the bottom-right corner of the screen. This will take you to a page where you can view and edit your medical information.
- On the Medical ID page, tap on the “Edit” button located in the top-right corner of the screen.
- Scroll down until you see the “Emergency Contacts” section. Tap on the green “+” button to add a new emergency contact.
- Select a contact from your iPhone’s contacts list or manually enter the contact’s information, including their name, relationship, and phone number. You can add multiple emergency contacts by repeating this step.
- If you want to edit an existing emergency contact, tap on their name in the “Emergency Contacts” section. You can modify their details or remove them entirely by tapping on the red “Delete” button.
- Once you have added or made the necessary changes to your emergency contacts, tap on the “Done” button in the top-right corner of the screen to save your updates.
That’s it! You have successfully edited your emergency contacts on your iPhone. It’s a good practice to regularly review and update your emergency contacts to ensure the information is accurate and relevant.
Additional Tips and Information
Now that you know how to edit emergency contacts on your iPhone, here are some additional tips and information to further enhance your experience:
- Keep your emergency contact list updated: It is essential to regularly review and update your emergency contact list. People’s phone numbers and relationships can change over time, so make sure to keep your contacts up to date.
- Consider adding medical information: In addition to emergency contacts, you can also add important medical information to your iPhone. This can include details about allergies, medications, blood type, and other relevant health conditions. Having this information readily available can be crucial in emergency situations.
- Enable Emergency SOS: Take advantage of the Emergency SOS feature on your iPhone. This feature allows you to quickly contact emergency services and share your location with them. To enable Emergency SOS, go to your iPhone’s Settings, select Emergency SOS, and toggle on the “Call with Side Button” and “Auto Call” options.
- Use “Medical ID” on the lock screen: Another valuable feature on your iPhone is the Medical ID, which can be accessed from the lock screen. Medical ID displays important medical information and emergency contacts, even when the phone is locked. Set up your Medical ID by opening the Health app, tapping on the Medical ID tab, and entering your details.
- Test your emergency contacts: After adding or updating emergency contacts, it’s important to test if they are accessible during an emergency situation. Try using the Emergency SOS feature or asking a friend to call one of your emergency contacts to ensure everything is working correctly.
- Share your emergency contacts with loved ones: It’s a good idea to share your emergency contact information with your close friends, family members, or significant others. This way, they can assist in contacting the right people in case of an emergency where you might not be able to access your phone.
- Consider using a Medical ID bracelet: While your iPhone is a convenient tool for storing emergency contact information, it’s also essential to have a backup plan. Consider wearing a Medical ID bracelet or pendant that contains critical information such as your name, emergency contacts, and any significant medical conditions. This can be especially helpful if you are unable to access your phone or if someone else needs to contact your emergency contacts on your behalf.
By following these additional tips and information, you can ensure that your emergency contact list is up to date and readily accessible, providing you and your loved ones with peace of mind in emergency situations.
Conclusion
In conclusion, being able to edit your emergency contacts on your iPhone is a crucial feature that can ensure your safety in times of need. By following the simple steps outlined in this article, you can effortlessly add, remove, or update your emergency contacts on your iPhone. Whether it’s a family member, friend, or medical professional, having accurate and easily accessible emergency contacts can provide peace of mind and expedite the necessary assistance during critical situations.
Remember, emergencies can happen at any time, so it’s essential to keep your emergency contacts updated and readily available on your iPhone. Take a few minutes today to review and make any necessary changes to your emergency contacts list. Your well-being may depend on it!
FAQs
Q1: How do I edit emergency contacts on my iPhone?
Editing emergency contacts on your iPhone is a simple process. Here’s how:
- Open the Health app on your iPhone.
- Go to the Medical ID tab at the bottom right corner of the screen.
- Tap on “Edit” at the top right corner.
- Scroll down to the “Emergency Contacts” section.
- Tap on the green plus icon to add a new emergency contact or tap on an existing contact to edit their details.
- Enter the contact’s name, relationship, phone number, and any other relevant information.
- Once you have entered the details, tap “Done” to save the changes.
Q2: Can I add multiple emergency contacts on my iPhone?
Yes, you can add multiple emergency contacts on your iPhone. The Medical ID section allows you to add several contacts, such as family members, friends, or caregivers, ensuring that there are multiple options in case of an emergency. Simply follow the steps mentioned in the previous answer to add multiple emergency contacts.
Q3: Can I edit emergency contacts without using the Health app?
No, editing emergency contacts on the iPhone is specific to the Health app. The Health app provides a centralized platform for managing your medical information, including emergency contacts. Therefore, to edit emergency contacts, you need to use the Health app on your iPhone.
Q4: What if my iPhone is locked? Can emergency contacts still be accessed?
Yes, even if your iPhone is locked, emergency contacts can still be accessed. On the lock screen, there is an “Emergency” option located in the bottom left corner. Tap on this option, and then tap on “Medical ID” to view the emergency contact information stored in the Health app. This ensures that vital information is easily accessible to first responders and medical professionals in case of an emergency.
Q5: Are emergency contacts synced across all my Apple devices?
Yes, emergency contacts added on your iPhone through the Health app are synced across all your Apple devices. This means that if you have an iPad or an Apple Watch, the emergency contact information will be accessible on those devices as well. It provides a seamless experience and ensures that your emergency contacts are readily available, regardless of which Apple device you are using.